
Troubleshooting 4 and 5-Way Wiring Installations
Where to Begin

What Tools Do I Need?

Common Wiring Issues
Harness wires are not connected to vehicle correctly/securely. (Plug-In Only) A set of connectors is not seated together properly or is not making a good connection. (Plug-In Only) A required fuse or relay is blown or missing. (Hard Wire Only) Vehicle has separate turn signal and brake lights, brake wire is not connected. Insufficient ground or short to ground on trailer or vehicle side.
Method 1 Method 2 Method 3 Method 4
(Powered Converter Only) 12V power wire is not connected to vehicle battery. (Plug-In Only) Harness is made for models with a factory tow package, vehicle does not have tow package installed. (Plug-In Only) A required fuse or relay is blown or missing. Harness does not have a connection to ground. Harness has been overloaded.
Connect 12V power wire directly to vehicle battery. Use correct plug-in harness for vehicles without a factory tow package, if available. Method 1 Method 2 Method 3 Method 5
Ground location for harness or trailer connector is weak or ground connection has loosened over time. Harness has been overloaded due to excessive draw from lights or a short in the trailer wiring.
Method 1 Method 3 Method 4 Method 5
(Hard Wire Only) Vehicle has combined brake and turn signals, brake light wire on harness is not grounded. Insufficient ground or short to ground on trailer or vehicle side.
Method 1 Method 2 Method 3 Method 4
Insufficient ground or short to ground on trailer or vehicle side. Harness is overloaded when tail lights are engaged because the trailer has too many running lights.
Method 1 Method 3 Method 4 Method 5
(Hard Wire Only) Incorrect connection to vehicle wire. Insufficient ground or short to ground on trailer or vehicle side. Harness has been overloaded. (Powered Converter Only) Trailer has LED lights which can be powered by the low-level residual voltage present at the 4-Way plug.
Method 1 Method 2 Method 3 Method 4 Method 5 LED lights may remain on dimly whenever trailer is connected to vehicle. Disconnect trailer when parked for extended periods.
Insufficient ground or short to ground on trailer. Harness is being overloaded when trailer is plugged into vehicle.
Method 3 Method 4 Method 5
Fifth wire from harness is not attached to reverse light circuit on towing vehicle. Insufficient ground or short to ground on trailer.
Attach fifth harness wire to vehicle reverse light circuit. Method 2 Method 3 Method 4
Basic Testing Procedures
Method 1: Testing for Function
Use a 12V probe-style circuit tester to check for function at the 4-Way plug. Click here to see our circuit testers. (Figure 1). Have a helper sit in the front of the vehicle to engage the functions while you test. (Powered Converter Only) Before testing the harness for function, remove the fuse on the power wire for 30 minutes, then reinstall it. This fuse should be located close to the vehicle battery, contained in a fuse holder. If the powered converter box has engaged its circuit protection feature, this will reset the box unless it was overloaded to the point where the internal connections were damaged. Do not plug a trailer into the 4-Way plug until function has been verified with a circuit tester.
If any function does not have a correct power reading at the 4-Way plug, test the wiring going into the converter box from the vehicle side. If functions are correct at the 4-Way plug, proceed to testing on the trailer.

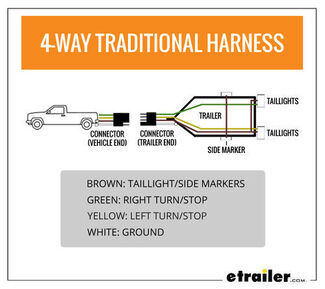
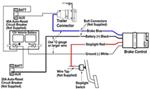
Test to ensure that the signals are going into the converter box from the vehicle side (Figure 2). 2-Wire vehicle: Green (passenger side) and yellow (driver's side) wires should carry turn signal and brake light functions. 3-Wire vehicle: Red wire should carry brake light function, turn signals should be on green and yellow wires.
If any function does not have a correct power reading, look for: Plug-in harness: Connectors that are not securely seated together or were not plugged in flush. Loose wires behind connectors. Missing tow package/trailer wiring fuse(s) or relay(s).
Hardwired harness: Loose ground connection or weak ground connection. Wires not connected to the correct wires on the vehicle.

Method 2: Verifying Correct Wire Connections
Make sure that each wire is connected in the correct location (Figure 3). Standard wire colors are listed, but check connections by function if colors vary. Brake wire must be grounded with white wire if vehicle has combined turn signals and brake lights (Powered Converter Only) 12V Power wire should be connected directly to the vehicle's positive battery terminal with the included fuse installed in line. This wire is required for the harness to function. (5-Way Only) If trailer requires a connection for back-up lights or a reverse lockout feature, ensure that the fifth harness wire (typically blue) is connected directly to the vehicle's reverse light circuit.

Trailer Wiring Color Code
(Powered Converter Only) Make sure the 12V power wire is connected to the vehicle battery and that the inline fuse is not blown. If the harness is intended for vehicles with a factory tow package, verify that vehicle is equipped with tow package and that all required fuses/relays are installed. Contact dealer with VIN to verify vehicle equipment.
Confirm that the part number on the harness is correct for the year, make, and model of the vehicle. Consult our T-One Fit Guide for more information.
Ensure that harness connectors are installed on the correct sides of the vehicle. Green wiring goes to the passenger side. Yellow wiring goes to the driver's side.
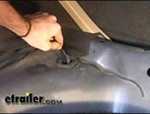
Make sure connectors are seated together properly (Figure 4). Disconnect the harness from the vehicle and reconnect it, ensuring connectors click together.
Inspect vehicle and harness connectors for: Bent or loose pins. Loose or damaged wires. Broken locking tabs.

Method 3: Checking Ground Connections
Check the ground area for any paint, corrosion, or buildup. If any is present, thoroughly clean the area until bare metal is visible.
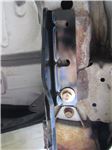
If using a factory ground screw, verify that no other ring terminals are stacked below the ground for the wiring harness. If present, move ground for harness to a new location or move it to the bottom of the stack (Figure 5).
If ground area is already clean, disconnect the ground wire and attach it to a long piece of wire. Run this wire to the vehicle's negative battery terminal for testing purposes. If this solves the issue, the ground wire can be permanently run to the negative battery terminal or moved to a new location with a verified connection to ground.

Make sure that the ground wire (usually white) on the trailer connector is securely attached to the trailer frame. If the trailer tongue folds, place the ground connection on the main body of the trailer frame, behind the tongue hinge.
Check the ground area for any paint, corrosion, or buildup. If any is present, thoroughly clean the area until bare metal is visible.
Move the ground wire to the trailer frame if it is attached to an aluminum section of the trailer body. Each component should have its own ground for the best performance (Figure 6). This reduces the risk of a ground issue on one component impacting the whole wiring system.

Method 4: Finding Other Possible Issues
Inspect the wiring for any damaged areas where copper is visible or any spots where the jacketing on the wire is broken. Repair or replace any damaged wire sections (Figure 7). Pay close attention to areas where wire might run near moving parts. Inspect and replace any butt connectors, splice connectors or direct splices that may have worked loose or are not making a secure connection.
Check the trailer and vehicle plugs for corrosion. Corrosion will usually be green or white in color. If present, replace the plug or clean it thoroughly with battery terminal cleaner and a wire brush.
If the trailer lights ground through the mounting hardware, make sure that the light mounting area is clean and paint-free, and that the surface is not made of aluminum. If the mounting surface is made of aluminum, connect a wire to the light stud and ground it to the trailer frame.
Verify that the bulb in each light is functioning correctly. If damaged, replace the bulb or light assembly as needed.

Method 5: Checking for an Overload Situation
Check harness instructions for maximum amperage rating. Determine amperage draw of trailer lights and confirm that lights do not draw more power than the harness can handle. View the table below for amperage draws for some of the most commonly used trailer lights. (Powered Converter Only) If the trailer lights are overloading the harness, it is possible that the unit can be reset if the overload is not extensive. Remove the fuse from the power line and leave it out for 30 minutes before reinstalling it. Then, use a circuit tester to check for function at the 4-Way plug. Do not plug in the trailer before testing the vehicle's 4-Way plug.
If all functions are present after resetting the unit, this indicates that the trailer may have a short that is causing an overdraw on the system, or that the trailer lights draw more amperage than the harness is rated to handle. Try removing bulbs from additional clearance lights and connecting the trailer to the vehicle. If the harness continues to work correctly with the bulbs removed, this points to an overdraw from the amount of lights on the trailer. Remove some clearance lights if possible or replace lights with the LED versions which draw much less power.
Amperage Draws for Common Trailer Lights
Incandescent Light
Tail Light Circuit
Stop/Turn Circuit
LED Light
Tail Light Circuit
Stop/Turn Circuit


For more information, see:
Lest
12/30/2023
Yes, I am still using the second converter through which the fuse blew the second time. I have a new converter ordered, but it has not arrived yet. Sorry, I did not make this clear. Of course I want to get the lights running, but I also want to understand what is going wrong. So, I am looking forward to your explanation. Thanks very much for your prompt reply.

Lest
12/29/2023
I have a 2016 Jeep Compass and recently purchased the small CE Smith Multi-sport trailer for my kayaks. Installation went smoothly. After several outings, however, I noticed that the trailer lights were out and found a blown fuse. Through the internet, I learned that the wiring to the trailer lights must be disconnected from the vehicle side prior to launching the kayaks. I replaced both the 10 amp fuse and the powered converter unit (CURT #56344). Before launching on the next outing, however, I disconnected the trailer lights. I thought everything was fine, but again I found a blown fuse. Back at home, I replaced the fuse (another powered converter unit is on order) and tested the vehicle side with a 4 flat tester. Both left turn (yellow wire) and right turn (green wire) lights lit up without stepping on the brake. Can you explain what my trouble might be? The trailer side tests out fine, independently using a small external battery source. (I am thinking that the powered converter unit might be insufficiently grounded using the self-setting machine screw provided by the manufacturer to ground the unit to the Jeep chassis. As one of you has suggested, I am planning to run a separate ground wire from the vehicle battery back to the powered converter unit next time, but do not know if this might be the underlying problem). Thank you for your advice! This is really a big frustration when the fuses keep blowing, not understanding what’s going on! Looking forward to you insight! Thank you again!

Rod M.
11/1/2023
I would like to know if you can help with the following. I installed a plug and play wiring harness to my 2021 Chevy Equinox LT, FWD. when I hook my trailer to car all trailer lights work except left signal light. I have tried the trailer with several other vehicles and all trailer lights work perfectly. I have the Equinox with several other trailers and the left turn signal does not work on any of them. Changed plug and play harness with same results as previous. GM stating after charging me plenty for dognostics that it it a bad trailer light assemblt for the left signal. Can you help.
Vaughn
10/26/2023
Had to replace trailer side 4-way flat by splicing the wire now I have no running lights….all lights respond to the trailer light test and to the key fob


Explore Expert Info
![Our Expert]()
on Wiring

on Wiring


Departments
Towing
- Trailer Hitch
- Fifth Wheel
- Gooseneck
- Towing a Vehicle
- Front Hitch
- RV Hitch
- ATV Hitch
- HD Truck Hitch
- Vehicle Wiring
- Brake Controller
- Ball Mounts
- Weight Distribution
Sports and Recreation
Trailer Parts
- Utility Trailer
- Boat Trailer
- Landscape Trailer
- Enclosed Trailer
- 5th/Camper Trailer
- Car Hauler
- Horse Trailer

Lest
12/31/2023
Ahhhh!!!! I checked the CE Smith installation manual and found the second connector that you are describing hidden in the trailer tongue. I had forgotten entirely about this 4 pole connector, which looks identical to the one at the trailer hitch. It is for sure getting wet when the kayaks are launched. Then the hidden connector is wetted again when we pull the kayaks out of the water and onto the trailer at the end of the day. Then this second connector will be likely wetted once again, because we always wash down the insides of the trailer tongue with fresh water to get rid of salt at the wash down ramp. I'm thinking that I will pull all the wires out of the trailer, so that they never get wet. It means that I will have to manually attach and detach the lights to the kayak frames each time we go out, but we always did this with boats in the old days. Trailer lights never entered the water! Thanks very, very much for your help! Happy New Year!!!!! You guys are terrific!!!!!