bing tracking image
  1. Trailer Brake Controller
  2. Jeep
  3. Wrangler
  4. 2025
  5. Redarc
FITS 2025 Jeep Wrangler
Redarc Tow-Pro Elite Brake Controller w/ Custom Harness - Dash Knob - Off-Road Mode - Up to 3 Axles
Redarc

Redarc Tow-Pro Elite Brake Controller w/ Custom Harness - Dash Knob - Off-Road Mode - Up to 3 Axles

Part Number: RED54PR
In Stock
$325.00
Trailer Brake Controller
Confirmed to Fit
2025 Jeep Wrangler

with factory Tow Package

Will this fit?

To see if this custom-fit item will work for you please tell us what vehicle you'll use it with.

zoom in icon
slider vertical icon
zoom out icon
Comment field cannot be left empty.
Name field cannot be left empty.

Thank you! Your comment has been submitted successfully. You should be able to view your question/comment here within a few days.

Error submitting comment. Please try again momentarily.

Product Images

In Use/Installed

The best technical support and full trailer brake controller installation instructions. Great price Wrangler trailer brake controller and expert service. Jeep Wrangler, 2025 trailer brake controller by Redarc are available from etrailer.com. For expert service call 1-800-940-8924 to order your Redarc Tow-Pro Elite Brake Controller w/ Custom Harness - Dash Knob - Off-Road Mode - Up to 3 Axles part number RED54PR, or order online at etrailer.com.
  • All Info
  • Reviews (1665)
  • Q & A (0)
  • Videos (7)
  • Photos

Redarc Trailer Brake Controller - RED54PR

  • Electric
  • Electric over Hydraulic
  • Proportional Controller
  • Up to 3 Axles
  • Redarc
  • Behind-Dash
  • Plug-In
  • Dash-Mounted Knob
  • Single Trailer Only
  • Indicator Lights

This is one of our favorite brake controllers, with flawless braking and a tiny dash knob that looks like it came straight from the factory. Its unique off-roading mode helps you handle rough conditions, so get out there and get towing.


Features:

  • Proportional - Smooth, safe, and good for your brakes long-term
  • Off-road mode - A unique feature that gives you direct control of your trailer's brakes
  • Sleek (tiny!) knob blends into your dash - The main unit mounts out of sight behind the dashboard
  • Simple controls - Use the knob to adjust the settings, activate manual override, and troubleshoot
  • Safe - Meets or exceeds both UNECE R21 and FMVSS 201 regulations for sustainability and safety
  • Plug-and-play - Vehicle-specific harness included
  • Made in Australia - If it can take the Outback, it can take anything, mate


Specs:

  • Application: trailers with 1 to 3 axles (6 brake assemblies)
    • Compatible with electric or electric-over-hydraulic trailer brakes
    • Works with 12-volt and 24-volt vehicle electrical systems
  • Main unit dimensions: 4" long x 3-3/8" wide x 1-1/8" tall
  • Control knob dimensions: 1-7/8" long x 9/16" wide x 3/4" tall
    • Length without knob: 1-1/4"
  • Output voltage range: 9V - 32V
  • Output current rating: 25 amps continuous
  • Maximum charging voltage: 12V DC
  • 2-Year warranty


Off-Road Mode

Redarc Tow Pro Elite User Controlled LED Signal

The off-road mode is a unique feature of the Redarc Tow-Pro Elite. In this mode, the brake controller will apply your trailer's brakes with a preset amount of power, independent of what your tow vehicle is doing. This is ideal for off-roading or challenging conditions. Set the power low if you're towing through sand or mud so that the trailer doesn't stop with too much force and act as an anchor. If navigating a steep descent, set the power to a higher level to ensure that the trailer doesn't push against the tow vehicle.


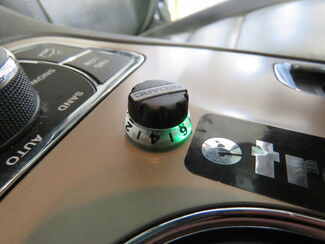
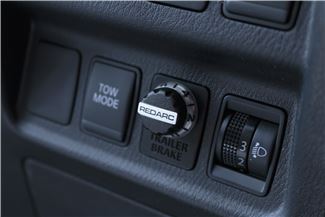
To activate the off-road mode, rotate the knob counterclockwise and apply your vehicle's brakes. Push down on the knob twice (2 times within 1 second) and release the brakes. The knob will turn green to let you know that the mode has been activated.


Redarc Tow Pro Elite review - is redarc elite worth the money

How to Use Redarc Tow-Pro Elite

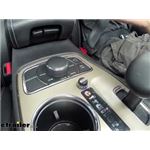
Use the knob to set the braking output -- the maximum amount of power that will be applied to your trailer's brakes. To get more power output, rotate the knob clockwise toward 10. To decrease the power output, rotate it counterclockwise toward 0.


Redarc Tow Pro Elite Braking Output Red Light

When you apply the tow vehicle's brakes, the knob will change from blue to red to signal that the trailer brakes are being activated. The higher the braking power output, the deeper the red that you will see.


Manual Override

To engage manual override, simply press the control knob. This will activate the trailer's brakes and brake lights independent of your tow vehicle, great for stopping sway or controlling your trailer's momentum in an emergency.


How to Calibrate Redarc Tow-Pro Elite

When you are calibrating the brake controller for the first time, the LED lights will signal your progress.


Redarc Tow Pro Elite Brake Controller Calibration

You'll start by braking 20 times or so to let the unit learn its orientation and the direction of travel. You don't need to have a trailer connected for it to calibrate; the only difference is that the knob won't illuminate at all. If your trailer is connected, the LED light will flash green/blue as it calibrates. When the display turns solid blue, initial calibration is complete.


Once done, the unit will remain calibrated. If recalibration is required, it will happen automatically and without LED indication.


How to Install Redarc Tow-Pro Elite

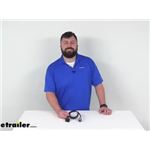
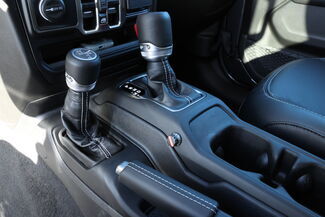
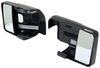
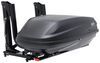
The Tow-Pro Elite has almost no mounting restrictions. It comes in 2 pieces: the main unit and the control knob. The main unit can be mounted out of sight and out of the way. You don't have to worry about dinging your knee on a bulky brake controller or interfering with your vehicle's airbags.


Redarc Tow Pro Elite Dash Mounted Remote Knob

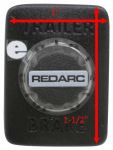
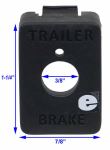
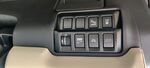
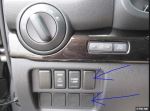
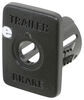
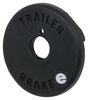
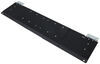
The control knob can be installed in any convenient spot that's easy for you to see and access. This can be a blank switch panel, an open spot on your center console, or wherever there's space on your dashboard. A universal mounting panel is included to ensure a clean, from-the-factory look. Custom-fit panels are available for certain vehicles as well. Before you do any drilling, be sure there's enough clearance behind the dash for the entire knob to install!


where to install REDARC Tow Pro Elite on 2023 Jeep Wrangler 4xe

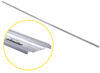
Once you've decided where you want to put the control knob, you'll need to find a good place to install the main unit. Your only restriction is the 3' cable connecting the main unit and the control knob. Securely mount the box using screws, double-sided tape, or zip-ties (not included). A mounting kit (RE67FR - sold separately) is also available for the Tow-Pro Elite. Do not attach the module to wiring or cables that can shift as you drive!


Redarc Tow Pro Elite Adapter, Wiring Harness

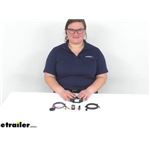
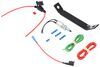
Then plug the custom-fit harness right into your vehicle and the brake controller and you're done!


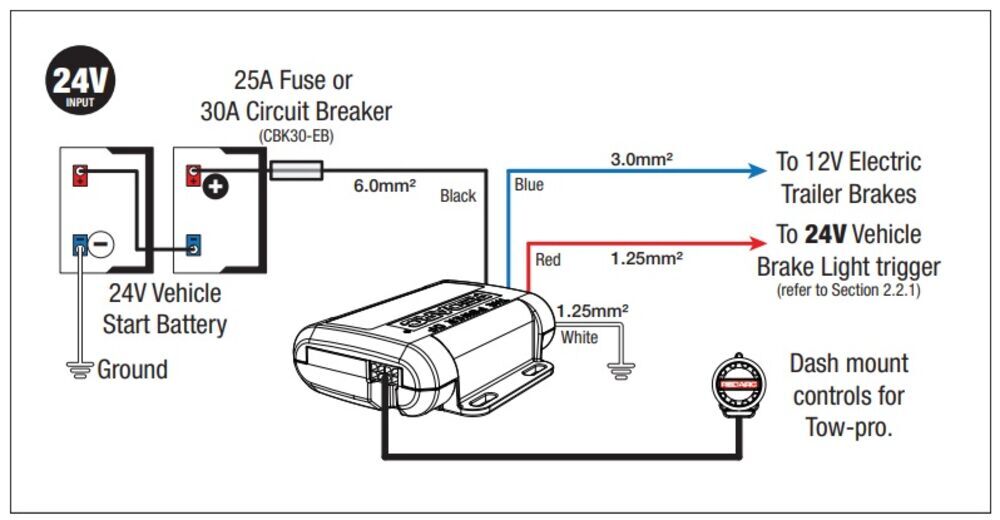
If you don't already have a 7-way plug at the back of your vehicle, take a look at our exclusive 7- and 4-way brake-control installation kit (ETBC7 - sold separately). A 30-amp circuit breaker kit (331-CBK30-EB - sold separately) may also be required for installation.


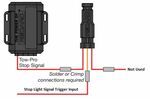
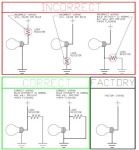
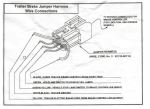
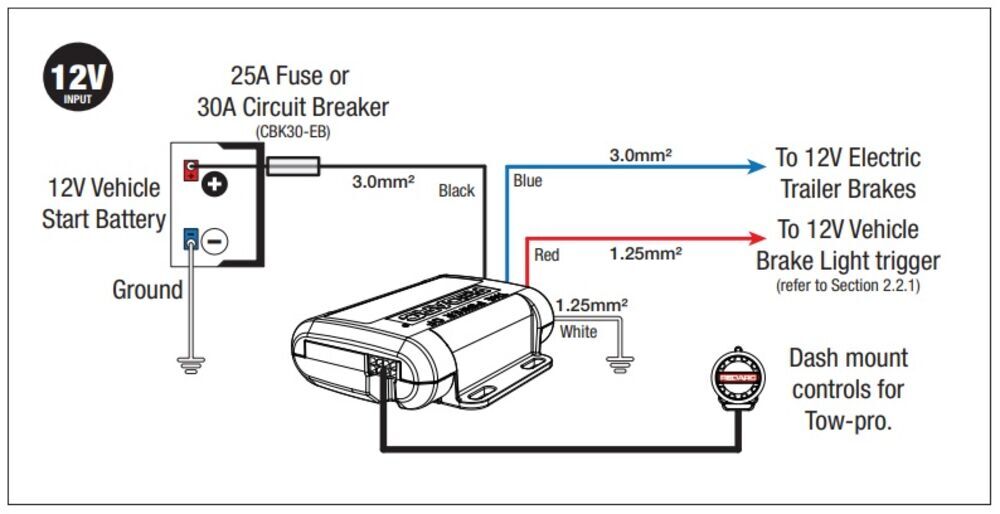
For assistance in properly wiring the Tow-Pro Elite, please refer to the diagrams below:


Redarc Tow Pro Elite Wiring Diagram

Redarc Tow Pro Elite Wiring Diagram

What is Proportional Braking?

What is proportional Braking

Proportional braking means that your trailer brakes mimic your tow vehicle's brakes. If you slam on the brakes in your vehicle, your trailer brakes will activate with the same intensity; if you brake lightly, your trailer brakes lightly too. The trailer's braking is in proportion to your vehicle's braking. This saves wear and tear on the tires and the brakes on both your vehicle and trailer.


The Tow-Pro Elite uses an internal 3-axis accelerometer to sense how your vehicle is braking so it can send the right amount of braking power to your trailer. It measures the inertia of your tow vehicle and activates the trailer's brakes to slow at the same rate. The result is uniform braking across your towing setup. No push-pull action - just smooth, proportional braking every time.


EBRH-ACCV3 Redarc Tow-Pro Elite Trailer Brake Controller - Dash Mounted Knob - Hidden - Proportional Brake Controller

Replaces Redarc 331-EBRH-ACCV2

TPH-022 Redarc Wiring Harness for Tow Pro Electric Brake Controllers - Plug and Play

Installation Details RED54PR Installation instructionsAlternate Instructions RED54PR Installation instructions

California residents: click here


Video of Redarc Tow-Pro Elite Brake Controller w/ Custom Harness - Dash Knob - Off-Road Mode - Up to 3 Axles

Videos are provided as a guide only. Refer to manufacturer installation instructions and specs for complete information.


Video Transcript for Redarc Tow-Pro Elite Trailer Brake Controller Installation - 2019 Jeep Wrangler

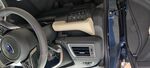
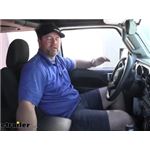
Hey guys, Shane here with etrailer.com. Today, I have a 2019 Jeep Wrangler and I want to walk through how to install REDARC's Tow-Pro Elite brake controller. And when we think of a brake controller, we think of a brake controller that looks like this. In the new Jeeps, it is very hard to mount this. These have to be mounted a certain way. You mount it in the locations where it has to be mounted, or where it needs to be mounted.

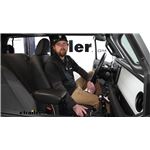
It really gets in the way of your legs if you have the seat all the way up to the dash or even for somebody who is taller because the Jeep seats don't go back as far as they used to, either. So the Tow-Pro Elite fixes that. We'll take a look down here, this is what our brake controller is going to look like. It's gonna take up a lot less cabin space and it doesn't have to mounted any certain way. It can, really, be mounted anywhere, as long as this and the back part of it will fit in this spot.

The REDARC is going to be just like every other brake controller. It's gonna have proportional mode. But it's gonna go one step further: It's gonna have a user mode. Proportional mode's gonna be for highway use, normal, every day use. When you apply the brakes in the vehicle, it's gonna match that pressure on the trailer.

User mode: User mode is gonna be designed for more off-road use. If we're applying the brakes, lightly, in the vehicle, it's automatically gonna send whatever pressure or whatever number we have it set at in the gain button, back to the trailer. So it's not matching what we're puttin' in the vehicle, it's automatically sending the amount of pressure we have set, on the dial, to the trailer so that we're not relying on the vehicle to stop the trailer while we're going down that hill, on that loose gravel. If you see that blue light, that means you're in proportional mode. The numbers on the dial, you would set, depending on your load or depending on the load on your trailer that you're hauling.

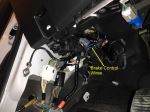
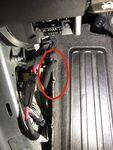
What I want to show you is the blue light, in proportional mode. When we apply the brake in the vehicle, that blue light is gonna go from blue and, gradually, go up to a solid red. Number 10 is gonna be full power for braking on your trailer. And our manual override, you see how it went from blue, to purple, to red So now, user mode: As I mentioned, for off-road use. So put it in user mode, take your foot off your brake, put your foot on your brake. You're gonna push the nob, two times, within one second. It's gonna change that light to green. Now, what you're gonna notice that's different about user mode, is, if we have this set at any number, instead of being that gradual increase or gradual color change, it's gonna go from green, automatically, to red. So it's sending that amount of brake pressure, directly to the brakes on the trailer. It's not gradually building the brake pressure like it is in proportional mode. Same thing with manual override, directly to that color. Now, I kinda brought up manual override. Manual override is used when you just push the button, where, on a normal brake controller, you'd have to slide a lever over. All you do is push. You can see, it changes the color of the LED light to whatever number you have it set at. What the manual override does, is, let's say you're pulling a trailer, going down the highway, it starts to sway a little bit. You can touch the brake controller or the manual override, without applying the brakes on the vehicle. 'Cause if your vehicle or your trailer starts to sway and you apply the brakes in the vehicle, you're just gonna cause your trailer to sway more. What we want to do, is we want to get braking to the trailer but not from the vehicle. That's where your manual override comes in. You simply touch it and it's gonna send the brake pressure to the trailer, without applying the brakes in the vehicle. As far as the installation process, pretty simple and straight-forward. You mount your control knob somewhere on your dash. You're gonna have an operating unit that can be mounted in any orientation, up, underneath your dash. You're just gonna make sure it's mounted to a solid surface, not to any factory wiring, so that it can learn the direction of travel that the vehicle is going. Now that we've taken a look at some of the features, let's walk through how to get it installed. The starter installation, we need to determine where we're gonna mount our knob. This being a manual, right in here is probably a good place to put it. We're gonna go ahead and pull this off to make sure we have enough room and then we can start gettin' it installed. Now, what we're gonna do, is we're just gonna grab it and we're gonna pull up. Like that. Then we can just set it to the side. We're not gonna be able to take it all the way off 'cause of the boot, here, but we'll just slide it over, to the side, make sure we have enough room. You're gonna have a plug, here, and this is for your lighted cup holders. All you're gonna do, is you're gonna push down, right here, on this back side and you'll pull it right out of that connector. Push that to the side and, where this comes down, is right in this area. So, what we're gonna do, is we're gonna go and get our hole, here, 'cause we have enough room. We're gonna set it in place and see if it hits this. If it does, we might have to notch this out, just a little bit. Other than that, I think we can get our wiring ran, right back here and it should come out, right on the back side of the dash, over here. Let's start with our hole we need to drill for our control knob. So, with your brake controller, you're gonna have a little piece that looks like this. This is, actually, a ring that's gonna go on the outside. That's where we get our hole drilled. What I'm gonna do, is I'm gonna use this as my template. So I'm gonna take some painter's tape and tape this in the spot that I'm gonna put it and then I'm gonna drill out the center of each one of those holes. What I don't want to do, is don't damage that ring because it is gonna go on. So we want one that's gonna fit. We can always open the holes up a little bigger, later on. Now this one just fits inside this hole. What I'm gonna do, is I'm gonna start this so I can make my center mark. And I'll switch my drill bit, go back to the small one. And then we'll remove that piece and drill it out to the correct size. If you reach underneath, take these clips, and just push them together, you can pop them right out of the center, here, and pull this whole piece out. I'm finding that this rubber top is causing me an issue with getting the top two pieces to fit, flush on the brake controller switch itself. So that's why I'm pullin' it out. I'm gonna set it up on a table and kind of work with it and see what it's gonna take to get that to fit in there. So, what I did, is I took a step bit and I opened up this bottom hole, just a little bit more and then took a utility knife and kind of opened that top one up. You notice these little wings on here, what I did is I cut them down, about halfway, because the thickness of this panel and this rubber piece, I couldn't get it to go through, far enough to get this nut to grab onto it. If you cut those down, about halfway, and you can just take the utility knife, and they're real simple, you just push it until it gets into this edge and then cut down on it, it'll knock that little piece off. You're gonna take the LED light, it's gonna go up, towards the small hole, like that. I'm gonna take this piece and it's gonna fit, right over top of that light. You're gonna take this nut. We're gonna take a 12-millimeter wrench. We're not gonna tighten, tighten this down, we're just kind of snuggin' it up. The reason we want to do that, take this knob, turn it all the way to the left, take the zero, line it up with the light, then put it in place. And, what you want, is you want to be able to push it. So, if you get this on and you can't push it, turn that nut another time, put it on there, and you want to make sure you can do that. That's gonna be your override button. I'll set this back in place. And it looks like it is gonna hit it. We're not gonna be able to push this, all the way back down, in there. So, what we're gonna do, is we're just gonna notch this out, right here, on top. And I'm just using a rotary tool with a cutting blade. Now that we've got it notched out, go ahead and test fit, see if we have to make any other adjustments. It fits right in there. This is gonna be our plug that's gonna go into the back of our control knob and into the back of our control unit, which we're gonna be mounting under the dash, here in a few minutes. One end's gonna have a right-angle, one end's gonna be straight. What I'm going to use, is I'm going to use a right-angle on the knob, the straight end on the control unit. I had to get this down, underneath, and over to this side of the dash. So what I'm gonna do is, I'm using an airline tube and, right down here, right down here, it's open. You can take this and it comes out, right there. Now, instead of trying to get this up, through here, I'm gonna take this end and I'm gonna tape it on, there, and pull it through and over here. You can see, I've got my wire through. What you might have to do, is pop your carpet off on this corner. The whole underside of your dash is open. You have your box that runs up to all your vents and everything. If it feels like it's gettin' stuck, just reach under with your pull wire, pull it towards the back or towards the face of your dash, and it kind of comes up like this and you'll have plenty of room to pull this through. And we'll take the tape off of this side. We're gonna take this wire. Right along this edge, it's all open. Take it, we're gonna take it back, just like this. Just make sure you give it a second look, down in here, make sure it's not gonna hit any moving components. Is that clear, away from everything Now we can plug this into the back of our controller and get this mounted in place. Now we've got our plug on, we got our center piece put back, down in place. We can go ahead and snap our boot back into place and we can move on to mounting the control unit. Now, to mount this, we can mount this in any orientation. It can be upside-down, it can be turned, it can be sideways, however you want, which makes it nice 'cause we can put it up, underneath the dash. The only thing we don't want to do, is we don't want to zip-tie it to some factory wiring. We're gonna pull this panel off. We're just gonna grab the top corners and just work our way, down. Once we get that off, there's a bracket, here and then, right behind it, there's another bracket and it's just an aluminum bracket. What I'm gonna do, is on the back one, or the most forward one, I'm gonna take this couple self-tapping screws, I'm gonna mount it, right to that bracket. It stays hidden, up behind the dash, out of the way of the driver's feet and it's secured. Like that. Take this end. I'm gonna run it up, over top of that and it's gonna plug in, right in the back side here, right on the side, there. Now what we do, is we need to pop out this panel and this one. This one, we just pop it off, like that. We can pull this little rubber plug, out here and set it aside. We're gonna have a nut, right here. Use a 10-millimeter socket if you can't get it off with your fingers. Pull that off. You need to disconnect your wiring for your door. What you're gonna do, is you're gonna push up on that red tab, right down here, in the center, you're gonna push down and it's gonna release this white lever. Rotate that up, slide your plug out, slide that loop off of that hanger, and we're gonna pull this panel off. You just pull out. I won't be able to, can be held in a couple of places. You may have to pop the wiring off of the sidewall to get that out. Pull this panel out and set it aside. Our customer previously had a brake controller in here and they wanted to upgrade it 'cause they didn't like it, which is great 'cause the wiring's already ran. It's gonna be four wires on the back of the plug that goes into the main unit. You're gonna have a red one, it's gonna be marked, it's gonna say, "brake light." Blue one is for your brake output. White is gonna be your ground. Black is gonna be powered by the battery. Your red, it goes to your brake light, will go to your brake light switch, which, in this case, for this vehicle, we cannot tap into the factory brake light wire, so it would require or it does require a stop light switch. And, all that does, is mounts on the brake pedal arm and it has a plunger on it and, every time the brake pedal is pushed, that plunger comes out and that's what activates the brakes on your trailer. The brake output is gonna connect to the brake output wire, going to your seven-pole plug on the back of the vehicle. In our case, here, because it didn't have a tow package, it required an ETBC7. So, if your vehicle doesn't have a factory tow package, you're gonna need the ETBC7, in order to get a brake controller to work on a trailer. If you do have a factory tow package, your plug's gonna be right up in this corner, against your sidewall. The nice thing is, here, is that these wires, that we're on the previous brake controller, are already ran for us. And this red one goes up to my stop light switch or my brake light signal, which is gonna be the red wire on our plug. The black wire is running up to the positive side of the battery. The blue wire is our brake output, which is this white wire, here. You can see, it's got the blue wire on it. This is running back to our seven-pole plug, which is giving our brakes the signal on our trailer. And then, finally, we have our ground, which is gonna be this white wire, here. Our ground wire has to be grounded at the battery. To get all these wires outside of the vehicle, including the one coming from your brake light switch, it's going to the positive side of the battery because it has to be powered, also. Right underneath of this seat, your driver's seat, if you pull up your carpet, there, there's a little plug. Put a couple holes in it and you can take all these wires and feed them in. You can file the frame rail, either back to seven-pole plug or up, into your engine compartment and across, over to your battery. That's where your plug or your wires are gonna come out. Again, run them, follow the frame rail up, run right up the firewall, over the the negative and positive side of the battery. Your other wire, you run it out, you run it back to your seven-pole plug that's mounted on the back of the vehicle. So we'll plug our next plug into the side of our main unit, there, and take our wires. Let me get those routed so they're out of the way. And this is where I don't want to confuse you: White to white. We have two white wires. One of them was cut off with the blue wires so that's why we know that we're using this one. Blue to blue light. The power wire coming from or going to my battery from the old brake controller, I did disconnect it from the positive side of the battery. So you're gonna make sure you do that before you connect these 'cause it is fused. If you're doing this with the ETBC7, it is gonna have to be fused to the battery. So just make sure that you follow those instructions on, when you're running that power wire, up there and gettin' the fuse put on. The ETBC7 is gonna come with what you need. Do black to black. Then our red wire goes to the red wire coming from our switch. Now, before we put all our panels back in place, I'm gonna go ahead and hook the power back up to the battery, make sure we're getting power to our controller. Now what we're gonna do, is we're gonna push that and, hopefully, we see our LED light. There it is. So you can see how our light is changing blue to green. That means we need to calibrate it. We got our trailer hooked up, we're gonna go ahead and run through that again. Hit our brakes about 20 times, allow it to calibrate, and, once it goes to a solid color, it's been calibrated. When it goes from blinking green to blue or blue to green and it goes to solid blue, that means it's been calibrated and you're ready to go. That's gonna do it for look at an installation on the REDARC Tow-Pro Elite brake controller on a 2019 Jeep Wrangler..

Customer Satisfaction Score:

Ratings & Reviews

4.8

1665 reviews
5 Stars
(1463)
4 Stars
(142)
3 Stars
(26)
2 Stars
(11)
1 Star
(23)
This is one of our favorite brake controllers, with flawless braking and a tiny dash knob that looks like it came straight from the factory. Its unique off-roading mode helps you handle rough conditions, so get out there and get towing.

by:


by:


by:


by:


by:


by:


by:


by:


by:


by:


by:


by:


by:


by:


by:


by:


by:


by:


by:


by:


by:


by:


by:


by:


by:


25
1682
Show More Reviews

See what our Experts say about this Redarc Trailer Brake Controller

  • Is The Redarc Encapsulated Power Diode # RED34FR Needed On a 2016 Toyota Highlander W/ Redarc Elite?
    The Redarc Encapsulated Power Diode # RED34FR is only needed on vehicles with certain advanced safety systems like the Adaptive Cruise Control, Assisted Emergency Braking and Autonomous Emergency Braking. If your 2016 Toyota Highlander has these features the Diode will need to be installed into the harness for the Redarc Tow-Pro Elite Trailer Brake Controller # RED44FR. I have included an image with the wiring that will need to be connected.
    view full answer...
    Image 1 for
  • Correct Trailer Hitch Receiver for 2022 Ram ProMaster 3500 With Long Wheelbase
    Since your 2022 Ram ProMaster 3500 has the extended 159" wheelbase you'll need to go with the Draw-Tite Max-Frame Trailer Hitch Receiver # 76050 instead of the Hitch # 75882 you're looking at. Over the years we've found that the 75882 has issues with a driver side bolt cutout and the spare tire release on the extended wheelbase ProMasters which is why that exclusion exists. The 76050 that does fit has a completely different mounting bracket design so the installation isn't a problem....
    view full answer...
  • Switch Panel for a Redarc Control Knob on a 2022 Subaru Ascent
    Thanks for the pictures! I have exactly what you are looking for. We have a couple of mounting options for the control knob that can go inside inserts in your Subaru's dash. This will give you a clean factory look install. The Universal Mounting Panel for Redarc Tow-Pro Trailer Brake Controller Control Knob item # 331-TPSI-001 which measures 1-1/4 by 1 inch. There is also the option of using the Mounting Panel for Redarc Tow-Pro Trailer Brake Controller Control Knob item # 331-TPSI-002...
    view full answer...
    Image 1 for Image 2 for Image 3 for Image 4 for
  • Brake Controller Recommendation for a 2023 Mazda CX-50 with OEM 7-Way Harness
    - SEE SOLUTION UPDATE WITH PART # C32FV IN COMMENT SECTION BELOW - I have a brake controller recommendation but at this time it doesn't look like we (or our manufacturers) have any information or at least an adapter harness to fit with the wiring you have under the dashboard on your 2023 Mazda CX-50. I recommend checking out the Redarc Tow-Pro Elite # RED44FR for your application because the only part of the controller that will be visible is the small control knob - this not only gives...
    view full answer...
  • Recommended 7-Way Connector for a 2025 Toyota Grand Highlander
    Hey Kyle, congrats on the new SUV! I am a big fan of the Redarc brake controllers for the exact same reason. The Universal Installation Kit for Trailer Brake Controller item # ETBC7 plugs directly into your 4-way connector and requires you to run a brake controller, power, ground, and accessory wire. It's got all the fuses and wiring you need to complete the installation. For this set up you would need the Redarc Tow-Pro Elite Brake Controller item # RED44FR. The Tekonsha OEM Replacement...
    view full answer...
  • Converting an M105A Military Trailer Air Over Hydraulic to Electric Over Hydraulic Drum Brakes
    I have the perfect solution for you! The first thing you need to do is swap out your actuator and for that I recommend using the USA made HydraStar Electric Over Hydraulic Actuator for Drum Brakes # HBA-12 because this company makes very reliable equipment and they receive great reviews from our customers. From my information military trailers like your M105A use larger 1/4" brake lines so you should also need the Fitting # HS43-9035 to make this actuator compatible with your trailer brake...
    view full answer...
  • Recommended Brake Controller and Wiring for 2018 Chevy 4500 Cutaway Motorhome
    For your 2018 Chevy 4500 Cutaway Chassis, the brake controller wiring you will need is the hardwiring kit # 5506 to connect to your 7-way. If you don't already have the 7-way then use # ETBC7 for your brake controller and trailer wiring. For your brake controller, I recommend using the Redarc Tow-Pro Elite Trailer Brake Controller # RED44FR. This will give you a really clean look for your motorhome and it won't take up usable space.
    view full answer...
  • How To Tow A Trailer That Has Brakes With A 2022 Subaru Outback Wilderness
    I can certainly help you out with using your 2022 Subaru Outback Wilderness to tow a trailer. You will want to use a trailer hitch receiver like Curt Trailer Hitch Receiver 2" # C67JR which offers a simple no-drill installation. A ball-mount will also be needed so that your trailer can connect to the receiver and for this you can use etrailer Ball Mount Kit for 2" Hitches - 7,500 lbs # 989900. Then for the trailer wiring you will want to first install a 4 way setup like Curt T-Connector...
    view full answer...
  • Can the LED on the Redarc Tow-Pro Elite Be Turned Off
    The Redarc Tow-Pro Elite Trailer Brake Controller part # RED44FR will go into a sleep mode when there is no trailer connected to the tow vehicle. This sleep mode is displayed by a breathing blue light on the push control. The breathing blue light is simply a gradual fade from bright, to dim, and then off. The sleep mode allows you to retain all of your saved settings. Unfortunately, there is no way to get ride of the breathing blue light unless you unplugged the controller which would...
    view full answer...
  • Recommended Brake Controller for 2018 Nissan Titan With Factory 7-Way
    For your 2018 Nissan Titan I very strongly recommend going with the Redarc Tow-Pro Elite item # RED44FR over the Curt Spectrum item # C51170, which does use Wiring Adapter item # C51382 to connect to your 2018 Nissan Titan. The Redarc Tow-Pro item # RED44FR, which you can install in your '18 Titan with Wiring Adapter item # 3050-S, is by far the superior option because it is not only extremely effective and responsive but its manual control knob makes it simple to use; the Tow-Pro can...
    view full answer...
    Image 1 for
  • Load Resistors for 2018 Toyota Tundra and 2010 Airstream with LED Lights to Remove Error
    The load resistors # DI34ZR put out 6 ohms resistance each and you most definitely can install them yourself. I've attached a photo of the correct installation method to assist. They will get warm to the touch but you can absolutely install them on the inside of your RV where the wires come in from the tow vehicle. I wouldn't put anything right up against the fins as that would further reduce cooling and increase heat, but you won't have any issue in the location stated. The 7-Way...
    view full answer...
    Image 1 for
  • Location of Brake Controller Connector in 2019 Subaru Ascent
    To install the Redarc Tow-Pro Elite brake controller, part # RED44FR, in your 2019 Subaru Ascent you need to find the white connector with the standard red, white, blue, black wires coming out of it behind a kick panel to the left of the driver. The picture I attached shows the location. Use part # 3062-P to plug into that white connector to install and use the Redarc controller.
    view full answer...
    Image 1 for
  • Towing Setup with Brake Controller, Mirrors and Weight Distribution for 2015 Nissan Frontier
    Hey Brad! Appreciate you reaching out. Looks like you’ve got an awesome setup with the Frontier and that trailer low miles too, that’s sweet! I’d recommend the Redarc Tow-Pro Elite part # RED44FR for your brake controller — it’s super clean because it's just a little knob on your dash and works awesome for normal towing or even rougher roads. You’ll also need the plug-in adapter part # 3050-P to make it plug straight into your truck’s tow package without splicing anything. For weight...
    view full answer...
  • Troubleshooting No Power To Trailer Brakes with Redarc Tow-Pro Brake Controller
    The best way to test your Redarc Tow-Pro Elite # RED44FR or Liberty # RED52VR brake controller is by cutting the blue wire coming out of it about 6" away from the controller and using a circuit tester to make sure power is coming out of the controller and going towards your trailer brakes. Try using your manual override by pushing the button to send power on that blue wire and you can verify this function. If you do get power coming out of the controller then you have an issue with the...
    view full answer...
  • Brake Controller Installation in 2019 Ford Ranger
    We have not yet (as of April 2019) had a chance to install any wired trailer brake controllers on a 2019 Ford Ranger so for guidance I checked with my most trusted brake controller expert at Tekonsha. Based on what I could learn about the truck if the Ranger has a factory-installed 7-way it should have a standard brake controller connection port above and to the left of your left knee when seated; this will be near the kick panel. You will want to look for a connector that matches the...
    view full answer...
    Image 1 for Image 2 for
  • Wiring Location For Trailer Brake Controller On a 2021 Buick Enclave With Factory Trailer Package
    Your 2021 Buick Enclave has a wiring pigtail and not a connector for wiring a Redarc Tow-Pro Elite Trailer Brake Controller # RED44FR. The 4 wires are located below the OBD2 port behind the side kick plate(see Image). This is where you will be able to attach the included pigtail using the Heat Shrink Butt Connectors # DW05744-5 and # DW05745-5. You will only need 2 of each connectors for the 4 wires that connect to the brake controller pigtail.
    view full answer...
    Image 1 for
  • Installing Redarc Tow-Pro Elite in 2018 Toyota 4Runner Using Tekonsha Wiring Harness
    For the Redarc Tow-Pro Elite Trailer Brake Controller # RED44FR is an easy installation with the Tekonsha Wiring Harness # 3041-P. You will just use the white connector of the harness along with the wire length and cut off the other end of the connector in order to use butt connectors provided with the Redarc system and it's harness. It is simply color matching and securing the ground to a metal screw utilizing the eyelet. You can see this installation in the attached video and you will...
    view full answer...
    Image 1 for
  • Parts Needed to Add Trailer Hitch, Wiring Harness and Brake Controller to 2011 BMW X5
    To tow with your 2011 BMW X5 you are correct that you will need a trailer hitch receiver, a 4-way flat, 7-way and brake controller. Let's start with the trailer hitch and for that the best option for your 2011 X5 is the Draw-Tite Trailer Hitch Receiver # 75600. Next you will need a 4-way wiring harness, the Curt Powered Tail Light Converter with 4-Pole Flat Trailer Connector # C59236. You will also need the Universal Installation Kit for Trailer Brake Controller # ETBC7, which will give...
    view full answer...
    Image 1 for
  • Troubleshooting Redarc Tow Pro Elite That No Lights Come On
    Since the Redarc Tow-Pro Elite Trailer Brake Controller - 1 to 3 Axles - Proportional # RED44FR you have does not have any lights you are correct that it is not recognizing that a trailer is connected. What you will need to do is inspect the 7-way connector on your tow vehicle and trailer looking for any corrosion or debris in the connectors that can cause a connection issue. If the connectors look good double check the wiring on the vehicle and trailer side to verify that no wires have...
    view full answer...
  • Brake Controller Recommendation for 2015 GMC Sierra 3500 to Bypass Integrated Brake Controller
    We can help bypass the OEM controller of your 2015 GMC Sierra 3500 but to answer your first question you do not need to take truck to dealer to have any check engine lights addressed. I would recommend the Prodigy P3 part # 90195 for you because this is widely considered to be the best brake controller that stops trailers in the smoothest and safest way but more specifically for you I recommend it because it has ability to save trailer settings so you can easily switch between two trailers...
    view full answer...
  • Install Harness Recommendation for Redarc Tow Pro in 2006 Dodge Ram 2500
    The correct install harness needed to install the Redarc Tow Pro part # RED44FR you mentioned in your 2006 Dodge Ram 2500 is the part # 3020-S which plugs in under your dash and wires by color to the brake controller wiring.
    view full answer...
  • Blue Light On Redarc Tow-Pro Elite Trailer Brake Controller Stays On with Vehicle Off
    The controller will actually wake up from sleep mode when the door is opened so that's likely why you still see the blue light on even with the vehicle off and trailer unconnected. This is common for all brake controllers including the Redarc Tow-Pro Elite Trailer Brake Controller part # RED44FR. If you peek through the window, you should see the light on the controller go off after about 15 minutes of inactivity.
    view full answer...
  • REDARC TowPro Elite Electric Trailer Brake Controller Install in 2018 Honda Pilot
    All you need to install the Tow Pro Elite Brake Controller part # RED44FR in your 2018 Honda Pilot is the install harness part # 3070-S which matches color for color to the Tow Pro and then plugs into a port under the dash of your Pilot. The TireMinder TPMS part # TM89FR is a really great option. It comes with 4 sensors for your tandem axle trailer and checks the pressure every 6 seconds so you always know what the pressure is. This comes with a display you'd have inside your Pilot, but...
    view full answer...
    Image 1 for
  • Brake Controller Wiring Location on a 2019 Ford Ranger
    Hey M, thanks for reaching out! Since you aren't seeing wires like what we show in the Redarc Tow-Pro Elite Brake Controller # RED44FR install video on a 2019 Ford Ranger, are you seeing a plug anywhere? The wiring is tucked up pretty far into the side panel so you might have to do a bit of digging around in order to find it. Worst case is you take your Ranger to a Ford dealer or shop to find the wiring, but I'm pretty confident if you move some wiring around you'll be able to find it. Feel...
    view full answer...
  • Wire Harness Required to Install Redarc Tow-Pro Elite Brake Controller On a 2020 Jeep Gladiator
    For your 2020 Jeep Gladiator with the factory tow package you will only need the Plug-and-Play Wiring Harness # RED93RR to attach the Redarc Tow-Pro Elite Trailer Brake Controller # RED44FR. This harness will have 2 connectors, one for the Jeep side and one for the Redarc. The Redarc Tow-Pro Elite Brake Controller for Tekonsha Harness # RED63RR that you found does require the Tekonsha Custom Wiring Adapter # 3073-P so you will have 2 different adapters to connect the controller making...
    view full answer...
  • Correct Harness for Redarc Trailer Brake Controllers on 2023 Jeep Wrangler
    We do offer the correct harness that will allow you to install the Redarc Tow-Pro Liberty part # RED24FR or Redarc Tow-Pro Elite part # RED44FR on your 2023 Jeep Wrangler, it's the Plug-and-Play Wiring Harness for Redarc Tow-Pro Elite or Liberty Trailer Brake Controllers part # RED93RR which is the same TPH-022.
    view full answer...
  • Parts Needed For Towing a Travel Trailer With a 2021 Jeep Gladiator Sport With Max Tow Package
    According to the owners manual for your 2021 Jeep Gladiator Sport with the Max Tow Package and Gas engine you can tow a trailer up to 7,650lbs with a tongue weight up to 765lbs. Personally I wouldn't want to tow anything over 6,000lbs depending on where you plan to tow your trailer as even though your Jeep can pull more it will likely struggle on steep hills and in high elevations where the power is reduced due to oxygen levels. I recommend the Redarc Tow-Pro Liberty Brake Controller...
    view full answer...
  • Will Redarc Tow-Pro Elite Handle Triple Axle Trailer/Custom Wiring Harness for 2020 Jeep Gladiator
    Hi Ray; sorry for the delay on this. Our fitguide has changed how it shows brake controllers and that has definitely caused some confusion. It looks like you already sorted it out but just to confirm, the # RED93RR you ordered is the correct wiring harness for your 2020 Jeep Gladiator. Also, I'm not sure where you saw 2 axles but the Redarc Tow-Pro Elite # RED44FR can definitely handle up to 3 axles (6 brake assemblies). I went ahead and attached an installation video below for your reference.
    view full answer...
  • Recommended Trailer Brake Controller For a 2019 Jeep Wrangler Sahara With Factory Tow Package
    I recommend installing the Redarc Tow-Pro Liberty Brake Controller # RED24FR on your 2019 Jeep Wrangler. This will connect to your factory wiring of the tow package with the Plug-and-Play Wiring Harness # RED93RR. The Universal Mounting Panel # 331-TPSI-001 will give you a clean appearance and factory look unlike other controllers which have a large control box mounted to the dash. The Redarc hides the control box behind the dash with only a small control knob on the dash.
    view full answer...
  • Recommended Trailer Brake Controller and Wiring For a 2022 Jeep Gladiator
    For your 2022 Jeep Gladiator I recommend the Redarc Tow-Pro Liberty Brake Controller # RED24FR. This is a proportional brake controller that takes up very little room on your dash as the main unit is installed behind the dash. You will only have the control knob on your dash for easy adjustability. If your Gladiator came with the factory tow package you will only need the Plug-and-Play Wiring Harness for Redarc Tow-Pro Elite or Liberty Trailer Brake Controllers # RED93RR to connect your...
    view full answer...
  • Recommended Trailer Brake Controller For a 2022 Jeep Wrangler 4xe With Factory Tow Package
    Yes, you can use the Redarc Tow-Pro Elite Trailer Brake Controller # RED44FR with the Plug-and-Play Wiring Harness # RED93RR on your 2022 Jeep Wrangler Rubicon 4xe with the factory tow package. This controller includes a Universal Mount # 331-TPSI-001 that will give you a factory appearance and it does not take up a lot of room like other controllers that mount on the lower dash. The Tow-Pro Elite allows you to switch to a user controlled mode that will allow you better control if you...
    view full answer...
  • Redarc Tow-Pro Elite Trailer Brake Controller and Wiring Harness For a 2019 Jeep Wrangler Unlimited
    To connect your Redarc Tow-Pro Elite Trailer Brake Controller # RED44FR on your 2019 Jeep Wrangler Unlimited with the factory tow package you only need the Plug-and-Play Wiring Harness # RED93RR. We have never had dash error lights with these installed in our facility or reviews stating the error.
    view full answer...
  • Plug & Play Wiring Harness For Redarc Tow-Pro Elite Brake Controller On 2021 Jeep Wrangler Unlimited
    The Plug-and-Play Wiring Harness # RED93RR will allow you to connect the Redarc Tow-Pro Elite Trailer Brake Controller # RED44FR to your 2021 Jeep Wrangler Unlimited with the factory 7-way. If your Jeep does not have the factory tow package with 7-way, you will need to hardwire in the controller. You will need a 4-Way # 118786 if you do not already have one. This will connect to the Universal Installation Kit for Trailer Brake Controller # ETBC7. And finally a Roadmaster Universal Stop...
    view full answer...

Do you have a question about this Trailer Brake Controller?


Info for this part was:

Employee Lindsey S
Edited by:
Lindsey S
Employee Wilson B
Updated by:
Wilson B
Employee Amanda K
Written by:
Amanda K

At etrailer.com we provide the best information available about the products we sell. We take the quality of our information seriously so that you can get the right part the first time. Let us know if anything is missing or if you have any questions.


Product Experts Available Now!
Call 1-800-940-8924
<