
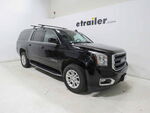
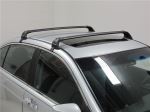
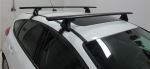
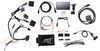
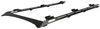
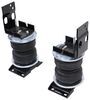
Yakima BaseLine Roof Rack for Naked Roofs - JetStream Crossbars - Aluminum - Silver - Qty 2


To see if this custom-fit item will work for you please tell us what vehicle you'll use it with.


This stylish, aerodynamic Yakima roof rack gives you the space to carry gear on your vehicle. Rubber strips in the top channels push down to load carriers or accessories - no need to trim. Installs on your vehicle's naked roof.
Features:
Specs:
 Alternate Instructions
California residents: click here
Videos are provided as a guide only. Refer to manufacturer installation instructions and specs for complete information.
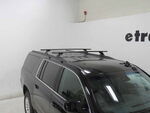
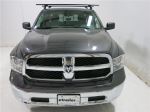
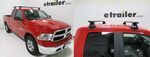
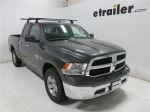
I'm Matt with etrailer. If you have a 2024 Ram 1500 and you want to carry those longer items and you don't want to really use a ladder rack to do that because that's gonna take up some room on your bed, then, the Yakima roof rack is gonna be a great option for you. So let's check it out. Another situation where you might not want to use a ladder rack is if you have a tonneau cover back here and either that's gonna impede you from using it or it's gonna be too much of a hassle to try to get them to work together is gonna be another reason why you might wanna get a roof rack so you can carry those extra long items that can't fit in your bed. But we can take a closer look at this rack today. So it's gonna be made of three parts.
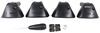
Up top, we're gonna have our 60-inch JetStream crossbars. Beneath that, we're gonna have our BaseLine towers. And under that, beneath that we're gonna have our fit kit. So taking a closer look at that crossbar, we're gonna have this Aero shape to it. That Aero shape's gonna allow it to be more aerodynamic to help reduce that wind noise.
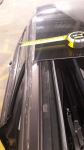
Something else that's gonna help with that is gonna be this weather strip that's built into the crossbar. And what's really nice about that is not only does it reduce wind noise, it also keeps debris from getting in here. And what's nice about this one in particular is it's built in so you don't have to cut it down the size to get the work with your accessories. And a reason why you might want to use a T-channel on these bars is if maybe your clamp-on accessories aren't working with these crossbar, or since we don't have a whole lot of overhang right here, you wanna push something all the way to the edge just so it's a lot easier to access since our roof rack is pretty high up today. That's gonna be another reason to use this T-channel.
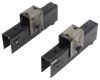
We're also gonna have another T-channel underneath. This T-channel though is used for the towers. And if you take this end cap off, you can kinda check out what's happening underneath here. So there's a lot of stuff happening. We've got all our hardware, and this is what gives us this really unique fit today.
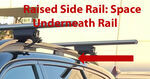
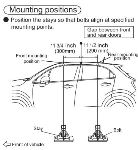
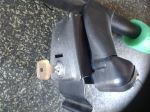
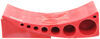
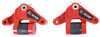
What that's why I like these towers is they're really adaptable. They can really contour to our roof. Now, today, our roof doesn't really change that much. It's mostly flat. But in some situations where you do have a lot more extreme like curvatures to your roof, that's where these are really gonna stand out. And if I put this end cap back on, you'll notice we're gonna have this little circle right here, that's just a placeholder. If you wanna get this changed out later on, you can actually put a metal lock core there. That's just going be extra security so no one can come by and take your stuff and you can get this keyed alike with any of the other Yakima accessories. And then beneath that, we're gonna have our fit kit. And our fit kit is what's attaching this to our roof today. And I'm liking the fit pretty okay. It's grabbing onto our gutter, giving us a really secure fit. Something I'm not a huge fan of though is how it sits around this point here. A lot of times, these will have just custom-fit cutouts that will grab onto edges like this. We're really not getting anything like that. It's pretty much sitting flat here, but even when I come by here and really try to pull on this, this doesn't feel like it's going anywhere though. Now, we can get a few measurements just to see how it's gonna live up here. So the first one I'm gonna get is gonna be the distance underneath our crossbars. That's gonna be about three inches. So that's something to really think about when you have more bulky clamps underneath here. You should have enough room for it to sit, but operating 'em might be a little bit tricky. That's just gonna depend on what accessories you have here. Then the next one I'm gonna get is gonna be the overall height it adds, which is gonna be slightly over four inches, which is pretty good, sort of low profile. What I'd recommend though is just taking a total height of your vehicle crossbar. And if you have anything on top of that, include that too so you know what areas you can make it under. The spot to really think about would be a garage. And we are gonna have a fair bit of overhang. So if you have any smaller clamp-on accessories, they should fit around that. So something to think about would be some smaller ski carriers, their straps might fit around here. Now, we don't have a whole lot sticking out, so if you have those more bulky clamp-on accessories or a kayak, that probably isn't gonna fit here. That's where that T-channel is really gonna take play. Now, the next thing I'm gonna get is gonna be our crossbar spread. And this is important because we have a fixed mounting system today, so this won't be able to be adjusted, and that's gonna be at 32 inches. So it's important that you check that your accessories are gonna work with that. 'Cause if they can't make that distance, you won't be able to change this. You are gonna be able to put a decent amount of equipment up here and what your limiting factor is, at least weight-wise, is probably gonna be your roof. So what I would recommend doing is just checking your owner's manual and then just checking what this kit is rated for and going from the lowest rated component. Now, in my opinion, I think this is a great fit for what we have today. Yakima makes a great product, and I really like that you can get it keyed alike with your other accessories. Now, I'd actually recommend the Thule roof rack over this one. And the reason is is because with the Yakima roof rack really shines is when you have a lot of change to your roof. And here, our roof really isn't tapering that much and it's still pretty dang level on top. So that's where I think the Thule really shines above this one because it looks a little bit nicer, in my opinion, and it's gonna be an easier installation. But if this is a little bit of a concern for you 'cause it is at maybe a slight bend, then, I think this is gonna be a great option for you. Now, if you are curious to see what this installation process looks like, just stay tuned, we'll walk you through it. To start off the installation, I like to lay everything out. You probably already noticed I installed my front crossbar. Now, there will be or probably be a few differences in the measurements, but I'll talk about that later on. Right now, let's focus what I have in front of me. So in front of me, I'm gonna have this crossbar, I'm gonna have the tower and its end cap that goes behind it. Then, we're gonna have our fit kit, which is gonna have a clamp, and it's gonna have these bases too. You also have a Allen key that has this built-in torque device on it. And what I recommend grabbing is gonna be a measuring tape just so you can make sure everything's even. Where I like to start is putting all my towers to my crossbar. So I'm actually gonna prep the tower first. And the first thing I'm gonna notice is this block in here is in there pretty tight. There's not enough of a gap for me to put that on my crossbar. So what I'm gonna have to do for that is loosen up a bolt. It's gonna be right underneath this tab right here. The only way to access that tab though or that bolt is to pull this section here back until it clicks, and that will reveal that bolt that's hiding out in there. I'm just gonna take my Allen key, loosen that up a bit. Just a few turns, check this block now. That's gonna give me plenty of space to work with now. Once I've done that, I'm gonna come over to the crossbar, I'm gonna remove this end cap. The way we're gonna remove this end cap is just by prying up on this tab a bit and pulling out. And we've had these ones in the shop for a little bit, so that might get a little bit stuck on there, but yours should be a little bit easier. And since we have two of these, I can actually put 'em both on from the same side. So this one, I'm gonna make sure all the hardware is facing out or towards the center of our crossbar. And really, the way this goes on, I'll give you a better look at it, wanna have that block that slides into that channel, just like that. Again, I'm gonna push this all the way to the other side so it sits there. And the other tower is gonna go on in the exact same way. Only this time, it's gonna face the opposite direction. So this hardware faces out this way. And then just make sure you put your end caps back on. Now, we wanna go into our M1 measurement or an M3 measurement, and that's gonna just depend on which crossbar you're working on. On your front crossbar gonna be the M1, on your rear crossbar is gonna be the M3 measurement, and you can find that in your instructions. And what that's really gonna look like, that's just gonna be the distance from one tower, the front of it, to the other tower. Now, an easy way to get that measurement is to really take that number in half and then go from the center. You're gonna find that there's an arrow that marks here marking the center of this crossbar. And that's also gonna important to make sure that's facing away from you because that's really gonna change how we set our pitch and toe, and I'll talk a little bit more about that later on. But like I said, we're just gonna half the number that's in our instructions going from the center. And then if we need to make any adjustments, I'm either just gonna pull on this tower, we'll push this away. And something else is gonna be a little bit easier for you, you're probably gonna have a ruler on your crossbar. Now, we've had ours in the shop for a long time, so ours is kind of faded, so it's really hard to see. That's why I like to use a tape measure. But you can just use this ruler instead and just match it up with the distance that's in your instructions. Now, we can adjust with pitch and toe, and that's also gonna be in your instructions. And what's nice about this is this is gonna be on B and 2. And the nice thing about B and 2, that's in the center, and it's really easy to adjust, but I'll still show you how to do that. But first, I'm gonna put on these bases, and that's just gonna make getting your toe a lot easier. So the way this goes on, you're gonna have this channel right here, and that's gonna grab onto this metal bar on our tower. So I'm just gonna line it up, apply some pressure, push it on until it clicks. (toe snapping) There we go. Make sure you didn't move this too much, just double-check your measurement. And then I also like to shift it some to make sure it's not gonna fall off. Now that we've checked that, I'll have to go right into my pitch. So our pitch adjustment bolt is gonna be right here. You're gonna have three lines, it's gonna be marked with A, B, and C. So you can see right, right here in that center line. Now, if yours is on a different setting, then how you actually adjust that is either by pulling or pushing this to be lined up with a different line. But I wanna make sure mine stays on B, the center line, then use my included tool and tighten that down completely until this device clicks, like that. And then I'm gonna go to my toe, which is gonna go by 1, 2, 3 settings. And right now, it's on the 3 setting, so I'm gonna have to adjust that. So the first step to doing that is loosening up this bolt. With that loosened up, I then can come over to this base. I just really just have to turn or twist this until that lines up with that center line. Just a little bit more, just to show you how much how it looks and make sure I go back to that center line on 2, and then come back with my Allen key and tie it in down the rest of the way. And then you'll repeat this process on the other side. (screw clicks) Now, we're at the stage where we can put this on top of our roof. And when we do that, we wanna make sure it's in the right orientation. So we want this thicker side facing in front of us and this thinner side facing behind us. And when you doing this for the first time, you can just kind of roughly place it up there. And then afterwards, we can get our measurements. I'm just gonna just roughly place it here, and then I'm gonna get in the bed and make sure everything's looking pretty good before I really finalize this. You're probably starting with the front crossbar, so I'm gonna get that distance first. So we're gonna reference our M2 measurement. You can find that in your instructions. And that's gonna be the distance from the top of your windshield, right here, to the front of this crossbar. After when you get this measurement, then, you're gonna check in on both sides and then fully install this. Then to get the distance from the front crossbar to the rear crossbar where you're gonna find the center of where that is sitting to the center of the rear one. If we need to make any adjustments, it's pretty easy. All we have to do is push or pull that back, and we will be referencing our M4 measurement for this. The last thing I'm gonna do before I fully tighten this down to my roof is make sure that these pads are sitting in the right location. Now, these don't have any divots on the bottom of them, so what I'm trying to do is make sure this is centered on this rubber pad on top of our roof, and I wanna make sure it's even on the other side. All you have to do to adjust that is either push or pull it in. And if you haven't done so already, you can push in this tab here at the top, we won't need that anymore. And now, I'm gonna open up this access door right here. You're gonna find that we have two bolts, one's kind of all flipped around, so I'll have to fix that. All you have to do is just turn a bit over over, making sure that hooked edge is on the bottom, like that. And then when grab our clamps, this is what your clamp should look like when it goes into it. It's gonna be this big opening. And that bottom of that drive bolt is gonna grab onto it, just like that. Now, if you notice this, this does not look like it's gonna be able to grab around our gutter. So what I'm going to do is make some adjustments. And the first adjustment I'm gonna do is adjust my drive bolt, and that's gonna push it out some. So you'll see, this will expand past that gutter sets. There we go. We have enough so we can make that clearance. Now, if you run into the situation where this is pushed too far down and you can't get it to grab onto that lip, what you'll have to do is come over here to the swing bolt, loosen that up a bit, and that'll be pushed up. Right now, we're in a good situation, so I have to actually like to start with the swing bolt and push that downwards, and you can see it's moving now. You just kind of pushing down until you get a little bit of pressure and it's may be flush against that truck. Then, we come down to that drive bolt and tighten this sum until it's flushed against that gutter. Neither one of these I'm tightening down completely because if I tighten down too much, it's really gonna affect my fit today, and it won't make sure everything's even. So I might just adjust that a little bit more until I get a fit that I like. And with this loosely in place, I'm gonna repeat this on the other side, just going back and forth until this is completely tightened down. And the way you're gonna notice this is tightened down completely is when you hear this click, like that, and then you'll come over to your drive bolt, do the same thing. (bolt clicking) That'll start to click, letting you know it's tightened to all the way down. We're just gonna push this access door and then give it a good shake test. And if it doesn't feel like it's moving, then you should be good to go. And the last step really is just gonna be putting on our end caps. Where that goes on, you're gonna have two hooks on the backside of this end cap that grab onto these spots right here. I like to put mine on at an angle and then apply pressure till it clicks in the place. And that will pretty much do it for our look at the installation and some of the features of the Yakima roof rack on top of our 2024 Ram 1500. I'm Matt, thanks for watching.


Do you have a question about this Roof Rack?
Info for this part was:
At etrailer we provide the best information available about the products we sell. We take the quality of our information seriously so that you can get the right part the first time. Let us know if anything is missing or if you have any questions.


Thank you! Your comment has been submitted successfully. You should be able to view your question/comment here within a few days.
Error submitting comment. Please try again momentarily.