
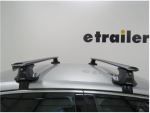
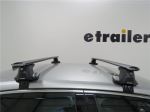
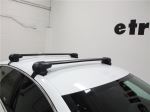
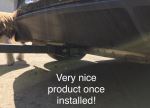
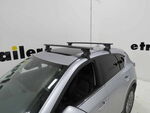
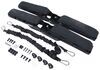
Inno Aero Roof Rack for Naked Roofs - Aluminum - Black - Qty 2


To see if this custom-fit item will work for you please tell us what vehicle you'll use it with.
This sleek, aerodynamic roof rack provides space to carry gear on your vehicle. Crossbars with push-down rubber strips in top channels work with channel-mount and clamp-on accessories. Installs on your vehicle's naked roof.
Features:
Specs:
 Alternate Instructions
Videos are provided as a guide only. Refer to manufacturer installation instructions and specs for complete information.
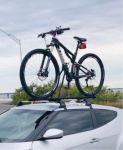
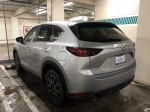
This is Curt with etrailer. And today, we're gonna be taking a look at the Inno Aero roof rack and we're gonna see how it fits and how it installs on our 2025 Mazda CX-5. While the CX-5 does have a decent amount of cargo space, if you're loaded up with passengers and everything they're bringing with them, that space is gonna vanish really, really quickly. In those instances, a roof rack is gonna be an excellent way to carry those extra items, as well as any items that you don't want riding in the vehicle with you or items that simply won't fit. So, for instance, some of the rooftop accessories you could use would be rooftop cargo boxes and baskets, kayak carriers, bike carriers, ski and snowboard carriers. Even something like an awning can all go on the roof rack here of your CX-5.
But in the case of the roof rack, it's gonna keep everything up and outta the way. Your other alternative might be using a trailer or going through the hitch or some kind of hitch carrier, but that only extends the footprint of the vehicle. It can make it a little bit more difficult to maneuver and difficult to park. Keeping everything on the roof and outta the way tends to be a much more popular way to go. And when it comes to the Inno Aero roof rack, we're gonna have a lot of great features to take a look at.
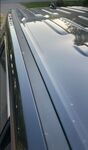
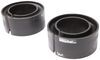
It uses an aero-style bar, which is gonna be this kind of more ovular, elliptical shape of bar. Now, these are much more aerodynamic than your traditional square or round bar, so it's gonna be a much more comfortable and quiet ride as you go down the road. It's gonna be able to accept your clamp-mounted accessories and your T-track-mounted accessories. You can access your T-track right here through the end cap. If you remove that, you could push down on the weather strip and slide your accessory over into place wherever you want it.
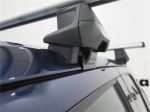
It's also an overhanging roof rack. And then what that means, is that it just gives us more bar space for those clamp-mounted accessories. As long as you're under weight capacity, you can actually clamp to the outside of your tower and therefore giving you more bar space, and allowing you to possibly use two accessories up top side by side. Now, I had already mentioned weight capacity. This roof rack does have a 165-pound weight capacity.
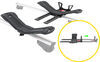
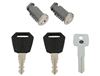
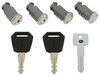
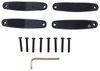
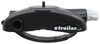
However, you always want to double check your owner's manual for the vehicle's rooftop capacity. If it's lower than 165 pounds, you're gonna have to stick with that lower amount. Well, let's take a few measurements and see just how it fits on the roof of the CX-5. We're gonna be walking you through the installation momentarily. And when we do, we'll explain the fact that there are really fixed areas for where Inno wants these placed. In order for your foot pads and your clamps to fit correctly, you're gonna have to adhere to those locations. So, we do have them installed in the correct spot. And if you do that, you're gonna get a crossbar spread of just a hair under 27 inches. Now, the reason the crossbar spread is such an important measurement, is that every rooftop accessory has a minimum and a maximum crossbar spread in order for you to use it. And at 27 inches, that puts you in a place where most, if not all rooftops accessories are gonna be able to be used up here. The other measurement we're gonna take is the height that it's gonna add to the CX-5. And that height is gonna come in right at around four inches. Now, if you know the height of your accessory and the height of your vehicle and you add four inches to it, you'll get the overall height and you'll understand what kind of clearance you have up here. So, if you go over anything, like go through anything low hanging, like for instance a parking garage or something, you'll be able to determine immediately if the car will fit with the accessories on top. The other measurement that we wanna take is going to be the clearance underneath the bar. Underneath the bar, we're gonna have just under three inches of space to work with. That's plenty of room to use your clamp-mounted accessories. And not only that, that's enough to clear the shark-fin antenna that we have back here. So, I know that anything that I load up on top of these bars should be able to clear that without any issue. Now, I had mentioned earlier that we're gonna be walking you through the installation. stick around, we're gonna show you that right now. We begin our installation, just an important thing to know. When it comes to Inno crossbars, you're gonna get two different sizes, you're gonna have a longer one and a shorter one. The shorter one needs to go in the rear position, the longer one in the front position. And that's because the roof that we have on the CX-5 is going to taper as it gets to the back of the vehicle, it's gonna get narrower. So as we go to the back, we want to use the shorter bar, to the front, we're gonna use the longer bar. But with that being said, we've already got our rear bar on, so we've got the longer bar on the table here. We're just gonna go ahead and turn that over on its backside and here is what we'll find. So, the first thing I'm gonna do, is remove my end cap, just like so. What I'll do then, is this here, I'm gonna slide this all the way out until it exposes this cavity right here. Which I'm gonna use this piece, which is gonna come in your foot kit or your tower kit, and it's gonna have a little notch here, and there's a notch in there to fit into it. And what this will do, is just come up from underneath here and we're gonna snap it into place. And once it's in place like this, we'll have this big square cavity to the outside, bolt hole to the inside, we're just gonna slide that back in. And once we get here, we're gonna depress this tab and we'll be able to open the whole cavity up and make it accessible. Now, go ahead and grab one of your towers, and we're gonna turn that over just like this. Then I'm gonna grab this rubber footpad that we have right here. Now, on the back, you'll see indentations for where the tops of these screws are gonna go. So, it's really easy to get it aligned. But what you want to do, is pay very close attention to your instructions. There's a number stamped on the rubber pads, and there's a different number for our front bar and for our rear bar. So, being our front bar, that's gonna be footpad 425. We're gonna be putting that into place right where it looks like it'll go. So, we're gonna make sure that we depress this down and get it flushed all the way around just make sure it goes all the way in. And once I just kind of check all the seams, make sure that's on there all the way, we're in good shape. Now, what I'll do, is I'll turn it over just like this. Now, this bolt needs to be going toward the outside of the bar. So, as you can see from the top right here, these three spots on the top of my tower are gonna fit perfectly into these three cavities right here. So, this large kind of T-slot-looking part is gonna drop in here, the bolt is gonna drop in here. So, we're just gonna go ahead and turn it over and get that all aligned and into place just like that. Once we have that in there and in place, we're gonna slide it over just like this, and that tab will pop back out and it'll lock it in place. At this point, I'm also going to replace my end cap. The very center of the underside of your crossbar is gonna have a sticker on it, that's just marking the exact center of your bar. If you pay attention to your instructions, you're going to see that for both the front and the rear bar, it's going to give you a measurement for how far apart our feet or our towers are supposed to be. So, you'll be measuring from this point here to the hash that's right here on either side of this bolt on the underside of our tower. They're gonna provide you with a paper measuring tape, so you can go ahead and get that measured out. Our front bar needs to be measuring at 21 and a half inches. And once that we have that in place, you're gonna have this longer Allen wrench with it through that bolt right there. We're gonna go ahead and tighten it down, and that is going to secure our bar onto the tower and keep that in place. Now, there's actually one more thing to do before we get this up on our roof. I almost forgot about it myself. But you're gonna get these kind of rectangular-foam blocks. And where those are gonna go, is basically in here to cover up this air cavity. When you have air cavities like this in your roof rack, as you're going down the highway, especially at higher speeds, the air is gonna go right across this cavity and it's gonna create a lot of noise. And this is gonna be right outside of your window, so it would make it very, very uncomfortable to drive with the windows down, believe me. So, in order to eliminate that, we can remove our end cap, slip this in there essentially to cover up that whole cavity. Now, I take a scissor, a knife and just cut it off at the end before replacing my end cap. But we're not doing a permanent install today, so I'm not gonna go through that step, but that is something I would highly recommend you do. It's just gonna give you a much more comfortable ride as you use your roof rack. In your instructions, you're going to see that Inno tells you exactly where on your roof that they want your bar placed. So, that is gonna be measured from the door seam. So, for our front bar, the measurement that they want see from this door seam to the center of this bolt is seven and three quarter inches. On our back bar, the measurement they give us from here to the center of the bolt is gonna be 18 and a half inches. So, we're gonna go ahead and use our measuring tape, and we are gonna double check this to be seven and three quarter inches. Lines right up with it. But we're also gonna go over to the passenger side and take that same measurement. I really need to make sure that my towers are directly across from one another, that's gonna guarantee that our bars are gonna be perfectly parallel and we'll be able to carry our cargo safely. Once you have it in place where it needs to be, the next thing we want to do is this bolt and washer and bushing that we have right here, we're just gonna want to get that out. So, I'm gonna unscrew that, and I am gonna keep this aside. Now, I'm gonna grab my clamp. Now, the front and the rear clamps are both different. So, like with our foot pads, we wanna pay attention to the instructions and make sure we're putting the right part in the right place. The clamps for the front are gonna be stamped with a 134. It'll be right in this area here, it's very, very dim and hard to see probably on camera, but this is 134 going on our front bar. And what we'll do, is we're going to place this on. This cavity right under here should be fitting right over this piece, just like so. I'm gonna hold it up, flush under here, before grabbing my bolt and re-threading it. Now, I'm not gonna thread it on too tightly yet. I'm just going to get this into position to where this hook is snug and not dangling around, but I don't want to tighten it up too much yet. Reason being, is I wanna make sure both sides, driver and passenger, are snug. If I overtighten this side without tightening down or snugging up the passenger side at all, it'll likely knock that tower out of place. I'll have to undo everything and remeasure to make sure I've got my placement right. And if I just get it into a position where it's not gonna go anywhere and not gonna move and the clamp isn't gonna dangle down at all, I'll be in a really good place to do that and go from there. Now, once I get it up to where it's kinda hard to thread my hand, you are gonna get a tool from Inno. You just take it apart, it's a T handle like this, and I'm gonna use that to get the last few turns and make sure that this is right where I want it. Okay, so now it's in a good spot. Still a little movable, but it's not really going anywhere. Before I start tightening down from this angle, I just wanted to point something out. This channel up here on the roof of our CX-5 gets really, really aggressive at about this point coming to the windshield. So, do expect to have some gap here underneath your rubber foot pad. It's gonna be actually pretty natural to have some gapping there, so don't be alarmed that you have a bad fit if you see that. But with that being said, I've got both my driver and my passenger side snug down. What I'm gonna do at this point, is go ahead and grab my Inno tool and I'm gonna actually start doing some real tightening. Now, again, I don't want to overtighten one side and risk moving the other side out of place, even though they're both pretty snug at this point. So, what I'm gonna do, is I'm gonna do this incrementally. I'm gonna maybe do, you know, three or four turns on this side, and then move over to the passenger side and do the same thing. And I'm just gonna work my way back and forth until I get it tightened down all the way. This tool is a torquing tool, so it's gonna let us know exactly when we have it tightened down to spec. When we hear that loud click, that means it's completely tightened down. Once you get that click out of your tool, I like to play it safe, just go ahead and grab it, give it a bit of a shake test. If the vehicle's rocking back and forth but our bar isn't and our towers aren't, then I know we've got a good secure hold. At this point, the only thing we have left to do, is to put on our tower cover. Now, before I do, one of the cool things that I really like about Inno that I want to go over, is that you do get metal lock cores with keys right outta the box. A lot of other roof-rack kits that you get from other manufacturers, they'll come with a plastic lock core that you can undo with a, you know, flathead screwdriver if you want to. You have to purchase your metal lock cores and keys separately. Not so with Inno, they're going to be available right outta the box. So, in order to put your cover on, we're gonna have these two hooks right here. They're gonna go over these two posts that we find down at the bottom of our tower. And it's just gonna go up and click into place. We can go ahead and lock it up and our crossbars are gonna be secure to the vehicle. So, that was a look at the Inno Aero roof rack on our 2025 Mazda CX-5. And if after watching this video you've still got some questions about it, go ahead and leave those in the comments below. We would love to answer those for you and share them with other neighbors just like you so they can make the best decision for themselves. Once again, this is Curt with etrailer, thanks for stopping by.


Do you have a question about this Roof Rack?
Info for this part was:
At etrailer we provide the best information available about the products we sell. We take the quality of our information seriously so that you can get the right part the first time. Let us know if anything is missing or if you have any questions.


Thank you! Your comment has been submitted successfully. You should be able to view your question/comment here within a few days.
Error submitting comment. Please try again momentarily.