

 Arrives before Christmas
 To see if this custom-fit item will work for you please tell us what vehicle you'll use it with.
Thank you! Your comment has been submitted successfully. You should be able to view your question/comment here within a few days.
Error submitting comment. Please try again momentarily.
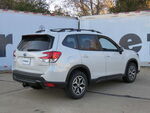
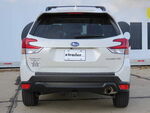
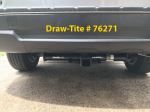
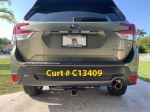
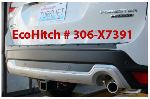
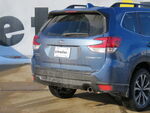
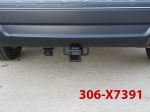
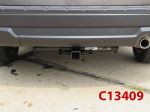
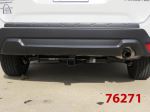
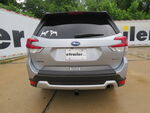
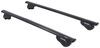
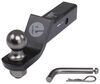
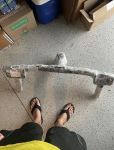
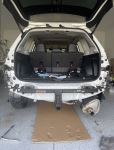
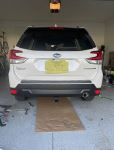
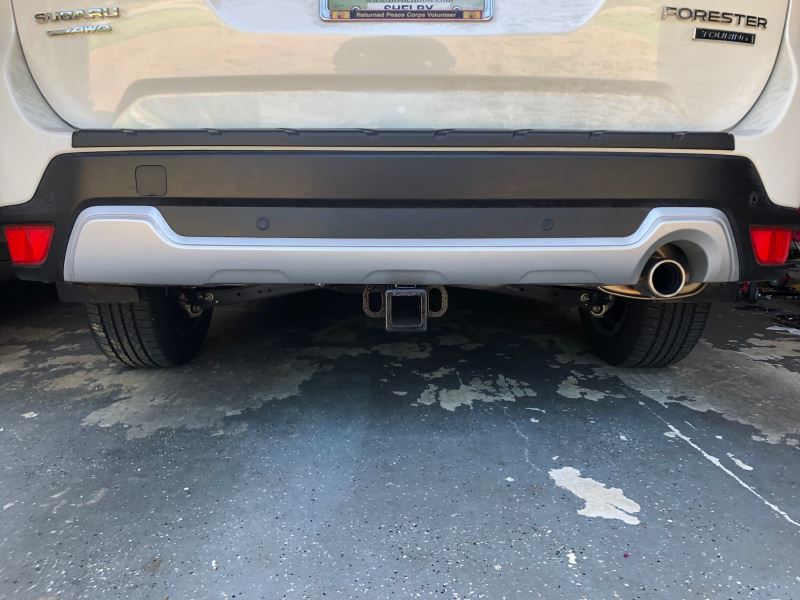
If you're looking to tow without compromising your vehicle's appearance, the EcoHitch Hidden Trailer Hitch Receiver is perfect for you. Its concealed cross tube hides behind the rear bumper, leaving only the 2" receiver visible. This design allows your vehicle to keep its sleek, factory-fresh look while giving you the towing capability you need.
Concerned about the environment? The EcoHitch is crafted from a durable, lightweight alloy made of aerospace-grade aluminum, steel, and stainless steel—all recycled materials. By opting for this hitch, you're reducing your carbon footprint and choosing a product that helps limit harmful gas emissions during its production process.
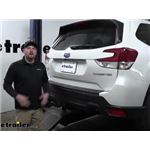
Wish installation was easier? Say goodbye to complicated setups; EcoHitch offers a simple, bolt-on installation that requires no drilling or welding. You'll have it ready in no time, following straightforward instructions, so you can hit the road with your trailer or bike rack quickly and stress-free.
Worried about safety and reliability? The EcoHitch meets stringent SAE J684 towing safety regulations, ensuring that every hitch is tested for strength and durability. This means you can tow confidently, knowing that your hitch is up to the highest standards.
Need a robust hitch for your active lifestyle? With a Class III rating, the EcoHitch supports up to 3,500 pounds of gross trailer weight and 525 pounds of tongue weight. Whether you're pulling a trailer or carrying a bike or cargo rack, this hitch has you covered.
California residents: click here

Really great. I appreciated the video and followed it step by step.
It took me about 7 hours - I am a beginner with mechanical work and had to make a plan where I didn't have the most appropriate tool (hacksaw in place of tin snips and dremel, flat screwdriver in place of push pin remover, cardboard box in place of supporting strap, no torque wrench, no lifts etc.)
I did have some difficulty with tightening one of the 19mm nuts under the rails - it just turned the bolt and it's pretty difficult to prevent the bolt from spinning because it's inside the car's frame. I got it pretty tight but not torqued. Not sure why one side worked but not the other
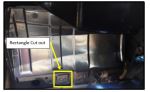
Solid hitch. Once I prepared the 2025 Forester with hands free gate opener the rest of the work went nicely. That motion detector device needs to be modified by cutting it in a particular way in order forit to fit and still work. The 2025 forester has different rear wheel cladding best removed starting from the back door towards the rear. Your staff and the ecohitch folks were helpful. If you're using Subaru trailer harness make sure to pass the exterior wire assembly through the small access point along the back inner wall. Subaru needs photos in their instructions!

Brooke M.
4/27/2025
Thank you for detailing what all happened when you did this install. With such a new car like the '25 Forrester, it's super nice to know! We appreciate you, Carl!
Love the look of this hidden hitch. The install took me 4 hours on a 2019 Subaru Forester. My car was older and I had a bunch of rust. So definitely needed the wd40 and silicon lube. The etrailer video was so helpful as was a YouTube video by Lucrativesoldier.
Tools you’ll need:
Torque wrench with 50lb and 75lb torque strength
Ratchet wrench with 10mm and 17mm sockets
6-10in socket extension
Silicon spray
Penetrating oil like WD 40
Ratchet strap
Car lifts (not required but made this so much easier to get under car)
Multitool or tin snips
Fascia removal tools (not required but so helpful)
Screw drivers
Removing the heat shield sucked for me because a bolt was rusted. Other reviews recommended removing the muffler, but that requires replacing a muffler ring so I just dropped the muffler. It took time with the silicon but once you work it on and use a bit of force they come off.
Cutting the bumper was a bit challenging. Measure twice cut once.

Gwendolyn Y.
9/18/2025
Thanks for taking the time to share your experience installing the hitch with us, Mike! The list of tools will definitely be helpful for others who like to read through reviews. Also... the reminder to always measure twice before cutting.
Hitch seems solid, but the powder coating is thin. It was shipped unprotected in a large cardboard etrailer.com box and the powder coating was rubbed away to the metal in some spots. They offered a swap and to pay return shipping, but I would have to pay for return packaging. Offered to paint it myself for a discount, they agreed, I sent a cost estimate, annnnnd they ghosted me.
Great product. Shipped and arrived timely. About a 4 hour install minus the time it takes to find tools you need if you aren’t organized and ready for it.

Nick S.
10/13/2025
We love hearing that! I am glad it got to you in good time and you were able to get it installed yourself. Looks great on the vehicle too. What are you planning to use the hitch for?
Dear ETrailer Folks,
Purchased this hitch December last year as a Christmas present. Finally got the opportunity to install it on my daughters 2021 Forester yesterday. Had watched the video a several times . The install went very well and the outcome was perfect. Your install guide and your support video is top notch. Keep up the good quality work. Thank You, Charlie Harrisburg Pa.

Heather A.
4/23/2025
And they say dads can’t pick good Christmas gifts… but a hitch with free installation? Great choice! There are so many ways to use it—bike racks, cargo carriers, towing—you name it. What’s she planning to use it for? Also, thanks so much for the kind words! I’ll make sure to pass them along to the video team.
The short and sweet of it is the product feels very well made, the installation went smoothly, and everything you need—parts-wise—is included in the kit (even the little fishing wire for the bolt.) One thing I'd highly recommend is watching the videos. They are very well made and helped a ton!
From start to finish it took me about 3 hours with normal hand tools. As long as you have a metric deep socket set and a torque wrench you should be able to get everything off and re-installed.
The only other tool that might be helpful is a Dremel or some tin snips for cutting the heat shield and bumper. When cutting the bumper I found it helpful to create a positive template out of cardboard first, place that on the bumper, and trace around it with a sharpie.
I'd say the only "negative" in this whole experience was the way it was packaged. It doesn't affect the product itself, which is why I'm still giving it 5 Stars, but it felt a little chintzy. They did their best to wrap it up, but some areas of the plastic/bubble wrap did wear away to the metal. Again, no fault of the product or how it performs, but it definitely could have been packaged with a little more care.
All in all I highly recommend this hitch receiver if you like a clean, hidden look.

Very solid, and I love how concealed it is. Installation was more difficult than other receivers I've installed in the past, but totally worth it!
It has been a solid receiver it does shows some rust around the welds I don’t know why but will see in the long run,the manufacturer doesn’t include important info as the receiver has degrees to compensate for off roading so when you mount your bike don’t expect to be completely straight flat.
It tends to lean towards the back glass and if you add a swing arm it’ll be more noticeable(Yakima hold up evo and the Yakima swing arm) due to the fact that Yakima also tend to compensate and prevent dragging whatever you attached to it. I don’t know what it was but the Yakima hold up whenever I’ve installed on my Tacoma it hold quiet and solid but on the eco hitch tends to be a tad loose and tend to rock up and down even do the knob is tighten as it was on my Tacoma.
I’ve ended up changing my rack with different brand and that seems to fix the tilting issue but otherwise I’m good with the hitch.
Should I be concerned with that rusty spot?
Heather A.
10/15/2020
Thank you for your review. In order to prevent the rust from spreading I do recommend to lightly sand it with a fine grit sand paper and spray the spot with a rustoleum type of paint. This will cover the spot and prevent any further rusting.
Only reasons for the four star rating is the hitch arrived slightly scuffed/scratched on a couple corner from shipping, this is not a big deal to me as the majority of the hitch is well hidden, used some good paint to touch up the scratches to prevent rust and corrosion, also two of the lock washers deformed and broke while tightening the fasteners to spec, again not a big deal to me as I had some on hand to replace them.

Richard

11/23/2024
Works great for our cargo carrier, appearance and finish has held up well.
This was a relatively easy install. The installation video is outstanding and makes it easy to follow along. My neighbor has a special tool to help remove the rubber exhaust hangers that makes the job easier. One small problem was trying to torque the downward facing 1/2” nuts to 75 ft-lbs; the bolts kept turning. I used an electric impact wrench to get it tight. I also used a high temperature clear spray paint to coat the bolts to reduce corrosion.

Mark
6/5/2022
I love how it works and looks on the car. Installation was pretty simple.
Hitch seems heavy duty and well-made. Packaging was terrible but the hitch seemed unharmed. Most of the supplied hardware seemed fine, but I had one washer that yielded so much that the specified torque in the instructions could not be achieved. Had to get a new washer from the hardware store. Looks great now that it's installed but the soft washer made me a little nervous.
One note on the installation: I didn't have any luck tightening the larger bolts that went through the frame underneath the car with hand tools. The bolt just spun. Maybe there's a trick to it, but I had to use an impact wrench. My impact wrench required a u-joint to access the bolt under the muffler due to the limited space.
Video was a GREAT HELP! II was a bit anxious, but then had no problems at all other than a frustrating time disconnecting one of the two tailight wiring harnesses. Glad I spent the extra $$ for the hidden hitch. Looks just like factory installed. Been carrying two bikes (one is a 60 lb e-beast!) all summer, including a 4,000 mile trip out to Denver and back from Vermont. Highly, highly recommended!
I love the look of this hitch. The crossbar isn’t visible when mounted to car. I was able to install it myself without any major hiccups. It took me roughly 4-5 hours total to complete. I started at night and finished up in morning. Most of this time was spent going slow making sure I didn’t cause any damage to the car. There are a couple of good YouTube videos showing how to install this hitch on the 2019 Forester. I would definitely recommend watching the videos before attempting this on your own unless you have good experience these kind of projects. The instructions were decent but the videos made some of the steps more clear. I plan to use this with a Thule bike rack. So far so good!
This is my 3rd hitch for a Subaru. My 2nd for a Subaru Forester in particular. My previous hitches were your standard round tube hitches that sit underneath the car. Once your install is completed, you're going to have a factory looking hitch that sits noticeably higher than a round tube hitch. This extra ground clearance will come in handy when your Forester is loaded down. All I can say is, this EcoHitch ROCKS!! It's beautiful and was easy to install, well I guess that's relative.
Yesterday with bikes on the back, it didn't bottom out on a driveway spot my Curt hitch on my 2018 Forester used to bottom out on. That little extra ground clearance does come in handy.
A few quick notes about my particular install that may help someone. If you follow these simple recommendations, I think your install will be a lot easier.
- Watch the "Torklift Ecohitch Install 2019 Subaru Forester Sport" install video on YouTube by a user named Lucrativesoldier
- Spend $8 and get a plastic fastener remover
- Use ramps if you have them. It makes it so easy to get underneath the car. Of course, use car stands for additional safety.
- Remove the muffler. It's not on the instructions but it's only 2 - 14mm nuts and bolts and gives you a LOT more room to work with. Oh and trim the heat shield before putting it back on. It's the last thing noted on the instructions which make easy to miss.
- My install took a little over 3 hours at a very moderate pace and even taking a brief break.
P.S. I'm using my hitch for a Thule XT 2 Pro bike rack. I was a bit concerned that the receiver tube wasn't long enough but it's 4" and no issues with the Thule rack.
Installed on 2023 Forester in about 3 hours (2 people). Followed the included paper instructions as well as the 2022 Forester install video - the most difficult step was removing the muffler from the rubber mounts - silicone spray a must.
Super solid - Looks Great!
This hitch is perfect fit for my 2019 Forester Sport. The only part that made me nervous was cutting my existing bumper fascia. Just make sure you measure twice before making your cuts and you’ll be fine. The included instructions with this hitch are EXCELLENT and include PHOTOS. My only modification to the included instructions would be to disconnected the muffler from the exhaust line in order to remove it from the hangers. Saved me a lot of hassle. Loving the look of the final install. The end result, if done correctly, is a hitch that looks like it came installed from the factory.
Super heavy duty hitch! Part of it was sticking out of the box upon arrival, but you could probably drop it off of a building, and it wouldn't bend! It was a fairly easy install too.....I was pleased about that. This hitch may be better than the factory one....just guessing though. Great Purchase!!
Excellent quality and fitment. I am very pleased and would recommend to all forester owners.
Rating would have been excellent but 4 bolts to mount hitch in bumper area were missing from hardware pack. Luckily [hardware store] had what I needed. But still unnecessary time and expense required. Used 2020 Forester video to install hitch on 2019 Forester Premium. Packaging leaves a lot to be desired but no issues other than the bolts. Definitely recommend it.
Tolerances are off, receiver is oversized and there is alot of motion/noise. Only uses one bolt per side for installation when there is more that could have been used like the OEM.
I’ve purchase multiple trailer hitch receivers from etrailer over the years and each time they exceed my expectations !
Pros mounted it for me as it was a little beyond what I was comfortable with, Came out looking great! Folks at etrailer helped me order all the right stuff. This is mounted on a 2019 Forester.
It fits really well and looks good on the van we use it to haul our bikes and small trailer
Well-made and fit great.

Do you have a question about this Trailer Hitch?
Info for this part was:
At etrailer.com we provide the best information available about the products we sell. We take the quality of our information seriously so that you can get the right part the first time. Let us know if anything is missing or if you have any questions.


Mike L.
10/8/2025
I'd recommend you borrow a torque wrench from your local auto parts store (O'Reilleys rents torque wrenches) to make sure your hitch is secure..... Congratulations on your successful install, good job!!!