bing tracking image
  1. Trailer Brake Controller
  2. Tekonsha
  3. Electric
  4. Electric over Hydraulic
  5. Proportional Controller
  6. Up to 4 Axles
THIS ITEM IS NOT A FIT FOR
2013 Dodge Durango
Tekonsha

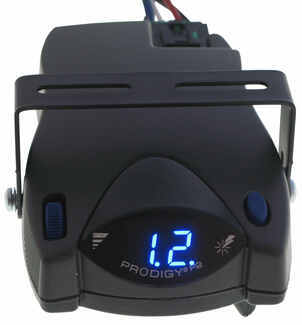
Tekonsha Prodigy P2 Trailer Brake Controller w/ Custom Harness - 1 to 4 Axles - Proportional

Part Number: TK55BR
In Stock
ChristmasTree SantaHat Arrives before Christmas SantaHat ChristmasTree
$219.73
Trailer Brake Controller
Not Confirmed to Fit

2013 Dodge Durango

Will this fit?

To see if this custom-fit item will work for you please tell us what vehicle you'll use it with.

zoom in icon
slider vertical icon
zoom out icon
Comment field cannot be left empty.
Name field cannot be left empty.

Thank you! Your comment has been submitted successfully. You should be able to view your question/comment here within a few days.

Error submitting comment. Please try again momentarily.

Product Images

In Use/Installed

This proportional brake controller keeps it simple with intuitive controls that are easy to use. Includes a large, digital LED display, 3 boost levels, battery protection, and continuous diagnostics. Great Prices for the best trailer brake controller from Tekonsha. Tekonsha Prodigy P2 Trailer Brake Controller w/ Custom Harness - 1 to 4 Axles - Proportional part number TK55BR can be ordered online at etrailer.com or call 1-800-940-8924 for expert service.
  • All Info
  • Reviews (2750)
  • Q & A (0)
  • Videos (5)
  • Photos

Tekonsha Trailer Brake Controller - TK55BR

  • Electric
  • Electric over Hydraulic
  • Proportional Controller
  • Up to 4 Axles
  • Tekonsha
  • Under-Dash
  • Plug-In
  • Under-Dash Box
  • Single Trailer Only
  • LED Display

This proportional brake controller keeps it simple with intuitive controls that are easy to use. Includes a large, digital LED display, 3 boost levels, battery protection, and continuous diagnostics.


Features:

  • Brake controller activates trailer brakes in proportion to your vehicle's braking action
    • Automatically adjusts trailer's braking based on deceleration of tow vehicle
  • Simple controls make it easy to operate the controller
    • Gain setting lets you adjust the amount of power sent to the trailer's brakes
    • 3 Boost levels let you adjust initial braking power and aggressiveness
    • Built-in, rotary-style manual override lever is within easy reach for controlling trailer sway or stopping in emergencies
  • Auto-dimming, blue LED display is easy to read
    • Automatically adjusts screen brightness based on the current lighting conditions
  • Built-in safeguards protect your vehicle, trailer, and the controller
    • Runs continuous diagnostic checks to alert you to any potential problems
    • Minimizes drain on car battery by drawing only 3.6 milliamps when not in use
    • Prevents trailer brakes from overheating by reducing power output to them during prolonged stops
    • Defends brake controller and trailer breakaway systems against shorts
  • Automatic leveling lets you mount at any angle up and down for an easy installation
    • Controller must be parallel with direction of travel and horizontally level
    • Mounting bracket and hardware included
    • No need to wire into your vehicle - custom-fit harness lets you plug in and go
  • Quick-disconnect feature lets you easily remove and store the controller when you don't need it
    • Replacement wiring harness (sold separately) and replacement bracket (7686 - sold separately) required to swap controller between vehicles


Specs:

  • Application: trailers with up to 4 axles (8 brake assemblies)
    • Compatible with electric or electric-over-hydraulic trailer brakes
  • Dimensions: 5-1/8" long x 3-1/8" wide x 2" tall
  • Mounting: 360 degrees vertically
  • Warranty:
    • Limited lifetime on brake controller
    • Limited 1-year on wiring harness


Gain Power Adjustment

Tekonsha Prodigy P2 gain

You can adjust the gain (also known as output) with the thumbwheel on the front of the controller. Gain lets you set the maximum amount of power that will be applied to your trailer's brakes. A heavier trailer will need more power to achieve smooth, safe braking, while a lighter trailer will need less. Typically, the gain is only readjusted when you experience changing road conditions or if the weight of your trailer changes.


Power Boost for Heavy-Duty Towing

The boost setting controls the aggressiveness of your trailer's braking, meaning how quickly the brakes reach the maximum braking level. You can adjust this when you're towing heavy loads and you need more umph to bring your trailer to a stop. Your tow vehicle doesn't need that much power to brake in time, but your heavy trailer does.


Depending on the level of boost, your trailer brakes can start at either 13 percent or 25 percent of the set gain. What this means is that, instead of starting at 0, the brakes will start at 25 percent and get to100 percent sooner. This keeps the trailer from pushing your tow vehicle forward.


If your trailer weighs less than your tow vehicle, no boost is needed. But, if you want your trailer to lead the braking, you can select level B1.


Boost Levels:

Approximate Gross Trailer Weight Boost Level Increase in Initial Power Output
Less than tow vehicle GVW B1 13%
Equal to tow vehicle GVW B1 or B2 13% or 25%
Up to 25% more than tow vehicle GVW B2 or B3* 25%
Up to 40% more than tow vehicle GVW B3* 25%

*Both B2 and B3 offer a 25-percent boost in initial power. But the braking curve for B3 is more aggressive than that of B2. This means that, even though you will start out with the same intensity when using these boost levels, you will get an overall more aggressive braking experience with the higher level. So if you use B3, you will reach maximum braking sooner than if you use B2.


Safety Features

The Prodigy P2 offers key safety features to prevent damage to various components of your towing setup. Integrated reverse battery protection shields the brake controller and your trailer's breakaway system from shorts. When the P2 is not in use, it will be in power-saving mode. In this setting, it draws only 3.6 milliamps, minimizing drain on your vehicle's battery.


The P2 also comes equipped with a hold feature to prevent wear on your brakes. When you're waiting at a red light, you don't need your trailer brakes on at full power. The longer you sit there, the more they will overheat. But with the P2, any time your tow vehicle and trailer are at a standstill with the brakes applied for more than 5 seconds, the hold feature will kick on and reduce power to just 25 percent. This will keep your trailer in place while saving your brakes.


The P2 keeps the manual override within easy reach, great for stopping sway or controlling your trailer's momentum in emergencies. To engage the manual override, just twist the rotary-style lever from right to left. This will activate the trailer's brakes and brake lights without you having to apply the brakes on your tow vehicle, perfect for limiting trailer movement while you're cruising.


The Prodigy P2 also offers diagnostics such as:

  • Open ground
  • Overload
  • Output short
  • Power loss
  • No trailer connection

Automatic Leveling and Simple Installation

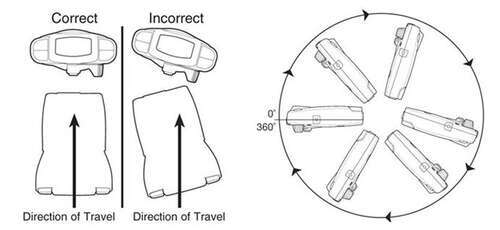
The self-leveling feature of the P2 ensures that the brake controller continues to function even as you drive up steep hills or through the mountains. Simply mount it in your cab at any vertical angle, and the controller will level itself automatically thanks to its 360-degree rotational range. This makes the installation that much easier. But keep in mind that the P2 must be horizontally level and parallel with the direction of travel to work correctly.


Prodigy P2 correct mounting

Installation is a snap. After mounting the P2 unit in your cab using the included bracket, just plug the custom harness directly into your vehicle. The other end plugs into the brake controller. To remove the P2 for storage when you're not using it, just unplug the unit and slide it out of the bracket. With a replacement wiring harness (sold separately) and replacement bracket (P7685 - sold separately), you can even transfer the Prodigy P2 to another vehicle.


Note: If you don't already have a 7-way plug at the back of your vehicle, take a look at our exclusive 7- and 4-way brake controller installation kit (ETBC7 - sold separately).


Proportional Braking

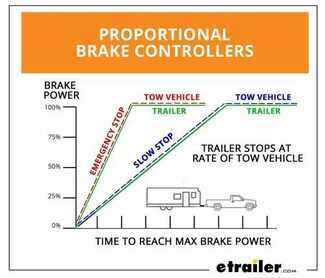
What is proportional braking

The Tekonsha Prodigy P2 brake controller comes equipped with proportional braking to give you the best towing experience. Proportional braking means that your trailer brakes mimic your tow vehicle's brakes. If you slam on the brakes in your vehicle, your trailer brakes will activate with the same intensity; if you brake lightly, your trailer brakes lightly too. The trailer's braking is in proportion to your vehicle's braking. This saves wear and tear on the tires and the brakes on both your vehicle and trailer.


The Prodigy P2 uses an internal inertia sensor to detect how your vehicle is braking so it can send the right amount of braking power to your trailer. It measures the inertia of your tow vehicle and activates the trailer's brakes to slow at the same rate. The result is uniform braking across your towing setup. No push-pull action - just smooth, proportional braking every time.


90885 Tekonsha Prodigy P-2 Proportional Brake Controller - 1 to 4 Axles

Replaces Tekonsha 90185

303700 Tekonsha Plug-In Wiring Adapter for Electric Brake Controllers - BMW

Replaces Tekonsha 3037-P

Installation Details TK55BR Installation instructionsAlternate Instructions TK55BR Installation instructions


California residents: click here


Video of Tekonsha Prodigy P2 Trailer Brake Controller w/ Custom Harness - 1 to 4 Axles - Proportional

Videos are provided as a guide only. Refer to manufacturer installation instructions and specs for complete information.


Video Transcript for Setting up the Tekonsha Prodigy P2 Trailer Brake Controller on a 2013 Dodge Durango

Today in our 2013 Dodge Durango, we're going take a look at and show you how to install the Tekonsha Prodigy P2 trailer brake controller. This is a proportional controller designed for use with one up to four axles. Part number on is 90885. We're also going to be using the Tekonsha plug-in wiring adapter, part number 3045-P. Now here you'll see the C on our screen. That's going to indicate that we've got a connection made to our trailer in the back.

We're going to have programmable boost levels. We'll have zero, one, two, and three. That's going determine how aggressively and how quickly our brakes are applied to our trailer. This is also going to be in addition to the already proportional system. The proportional aspect of the controller's a really nice feature. This is going to use a sensor inside of the controller to determine how quickly we're stopping.

If it's very fast and very immediate, it's going to ramp right up to maximum power very quickly. If it's one of the more stop and go or a more drawn out or a slower stop, something that we're just kind of creep into a stop, it's going to ramp up very slowly, going right up to our maximum power. Pull the lever over it, we'll be able to dial our maximum output to the rear of our trailer down, and also up. Now it's only going to go up .. It'll go right up to our 11 now.

As you can see, it'll go right up to max power using the rotary style lever here. This is your manual operation lever. You see, if we peg it over, it gets up there pretty quick. If we gradually bring it over, it's going to ramp it up slower. That's the same way the proportional system's going to work for us. Now setting our gain's important.

This really helps us to determine how much maximum braking force is going to go to the rear. As our trailer gets heavier, our gain should also increase. As it gets lighter, you just simply rotate our knob, and bring that right down. Now our P2 can be mounted in any orientation we like. We can have this all the way up vertical, up and down, as long as we stay on the vertical plane, it's going to offer 360 degrees of rotation. It offers us a continuous diagnostic check for proper connection and also a shorted magnet condition and a few other things. We've got reverse battery protection for both the vehicle and the break-away system. This can also be set up for electric over hydraulic brakes. The system also works proportionally in reverse, so it's great for backing into those tough, tight stops. As you can see, boost mode is going to be indicated by a small LED right here. Once we go down to no boost, that light's going to disappear. The boost modes are important. We've got zero, or boost off, then we've got one, two, and three. Now we'll set those based on the proportion of our trailer weight to our vehicle. If we've got a really heavy trailer, say something that weighs up to 40% more than our vehicle, we're going to want to be up in that high setting. That way, we'll get a nice quick, aggressive braking being sent to the rear. If the trailer weighs less than the vehicle that we're pulling it with, maybe we don't use any boost. Maybe we just go to the first level. Really nice to be able to adjust that to the weight of the trailer. Here you can see we've got a C. This is going to indicate that we've got a trailer connected situation. As soon as we we're to remove the plug from the rear of the vehicle, it's going to switch right over to NC. This is going to help us . and you can see it's flashing here. This is going to help us know if we happen to lose our connection as we are heading down the road with our trailer, which could really create a problem for us when we went to stop. Now installation is going to begin by removing this. It's kind of like a decorative or a cosmetic cover that's underneath the dash here. There's a couple of push pin fasteners that we'll take out. Then over here. All right. Then that should just come down out of the way for us. That'll allow us to access right up under the dash. Set that aside. If we want to, we can certainly re-install this. If not, we don't have to. Now here's our parking brake lever. It comes up to a little white panel here. Right above that, we're going to see our gray connector. That's what we'll plug into our pig tail. To release it, there's a little catch here on the bottom. We'll pull down on that and then just give it a push rearward and get it slid off. Once you have got that tab released, we'll just kind of push it forward slightly. There you see it's going to come right off there and be accessible. You can see that little tab. It's going to be located right there. You just want to pull down on that tab and then that'll allow you to slide it forward and out. Now we can take the end of the pig tail. It'll only slide in one way. Slide that in. You want to hear it click. Then we'll push and pull just to make sure that it's nice and secure. Now we're going to determine where to mount or bracket. We've got two choices. We've got the slide-in type here. The kit's also going to come with the type where we just put a small screw in the side. Now it's up to you. This one would be mounted kind of up here in this area, wherever you decided, or we can mount it kind of up in here. Same thing with the bracket. It can be mounted like this. It can go on the underside here, just like that, which I think that's where we're going to put ours, be somewhere in there just like that. We'll use the provided self-tapping screws. Put them right up in place there. As you can see, that gives us a nice secure mounting location without having to put any holes here in the front side of our dash, but of course if you decide that's where you want it, feel free. Drill a couple holes there and thread it right in. Now we can grab the brake controller itself. Also our pig tail. We'll slide it right under the back side. Make sure it clips. Give it a few good pulls. Then we can start positioning our controller where we want it. I like to keep them up as high as I can, be out of the way as much as possible. It looks like in this application, we'll be using the bottom holes. We're also going to have a couple of screws right here that we'll use for this bracket. We'll just tighten down our screws. That'll hold it in place. As you can see, that's tucked away nicely, right up against the bottom of our dashboard there. Now we'll just tuck our wire. There's a nice little cubby hole over here on the side where we can tuck most of our excess in. Then we'll use a zip tie, and we'll bring this right up here to the top. Now we don't want to go around the movable portion of it, but we've got a great opportunity to go right around our steering shaft up here. There's a fixed portion, or a portion that won't move when you turn the wheel. It's nice and high, so it's really going to draw our wire up there and get it out of the way for us. Of course trim off the excess on that. Tuck this on the way over here. It'll be great. Everything's up out of the way. We won't have to worry about any interference, and our controller is here, easily accessible, easy to operate. As you can see, the NC there. That's going to indicate no connection or no trailer connected. With everything working as it should, that's going to complete today's installation of the Tekonsha Prodigy P2 trailer brake controller, part number 90885. Also using the Tekonsha plug-in wiring adapter, part number 3045-P. All on our 2013 Dodge Durango. .

Ratings & Reviews

4.9

2749 reviews
This proportional brake controller keeps it simple with intuitive controls that are easy to use. Includes a large, digital LED display, 3 boost levels, battery protection, and continuous diagnostics.

by:


by:


by:


by:


by:


by:


by:


by:


by:


by:


by:


by:


by:


by:


by:


by:


by:


by:


by:


by:


by:


by:


by:


by:


by:


25
2754
Show More Reviews

See what our Experts say about this Tekonsha Trailer Brake Controller

  • What is the Difference Between the Tekonsha Prodigy P2 and the P3 Brake Controllers
    Actually, the P3 now has the upgraded axis accelerometer like the P2. The Tekonsha P3 Trailer Brake Controller # 90195, will work with both electric over hydraulic brakes on the trailer as well as electric brakes. It has a menu option on the display that allows the user to switch between the two systems. I have included a link to the installation details for the P3. The P2, # 90885, will also work with both electric brakes and electric over hydraulic brake systems but the mode is selected...
    view full answer...
  • Electric Over Hydraulic Brakes Don't Work w/Brake Pedal on Newer GM Trucks w/OEM Brake Controller
    Like you said, many factory integrated brake controllers will not work well with electric over hydraulic trailer braking systems. Some of the newer versions of these controllers now have an electric over hydraulic mode. Check to see if any of your trucks have this mode and, if they do, if the braking starts working with the pedal. Otherwise there are a couple of solutions to solve this issue. First, there may be an adapter that will allow the factory controllers to work but it depends...
    view full answer...
  • Can Brakes be Added to 3,500 Pound Dexter Trailer Axle
    Yes, brakes can be added to your trailer and I've linked an article to help with the parts you'll need. The first thing you'll need is the brake mounting flanges welded to the axle, like you mentioned. The correct flange is # 4-35 however these need to be welded by a qualified welder because the mounting flange must be welded square and concentric. This is generally done using a jig at a trailer shop. I've linked our selection of hub and drum assemblies for 3,500 pound axles. You'll...
    view full answer...
    Image 1 for
  • Are Electric Trailer Brakes Okay to Use on a Boat Trailer
    Hydraulic brakes are better suited for boat trailers for the simple fact that wires and water do not like to cooperate with each other, but the etrailer.com Self Adjusting Electric Trailer Brakes, # AKEBRK-35L-SA, can be used on a boat trailer assuming there is a 4-bolt brake mounting flange welded to the axle. The compatible right hand brake assembly is part # AKEBRK-35R-SA. If you choose to install electric brakes on your boat trailer, there are a few things that you should keep in mind....
    view full answer...
  • Brake Controller Installation In 2020 Chrysler Pacifica
    Great question Mark! There is a brake controller plug and play wiring adapter for the 2020 Chrysler Pacifica to plug into the tow package with part # TK93VR. Tekonsha is currently the only manufacturer that has one available that we are aware of. This will plug into the built-in port under the dash of the Pacifica for an easy installation. For the brake controller I recommend the Tekonsha Prodigy P2 Trailer Brake Controller part # 90885. The P2 is one of our most popular brake controller...
    view full answer...
    Image 1 for
  • Parts Needed to Install Brake Controller in 2014 Honda Pilot
    Hey Mike, the 7-way kit part # 118265 does fit your 2014 Honda Pilot to provide it with a functional 7-way but it does not come with the brake controller install port you'd need for a brake controller. So you can hardwire in a brake controller or have a Honda dealer install one for you so that you could use a # 3070-P to install a brake controller like the P2 part # 90885. If you'd prefer to hardwire let me know and I'll walk you through that process as well.
    view full answer...
  • Should Blue Wire From Brake Controller Have Constant Power
    The blue wire coming from the back of your Tekonsha Voyager Brake Controller # 39510 is for brake output to the 7-Way connector. This wire should only have power with the brake pedal depressed or the manual override activated on the brake controller. If you are getting constant power on this blue wire this may be an indication that the controller is bad but there is an easy way to test this. You will want to first sever the blue wire several inches from the back of the controller. Then...
    view full answer...
  • Testing for Proper Voltage on the Brake Output Circuit
    There are many things that can affect the voltage on the brake output wire from your brake controller to your trailer brakes such as the power setting on your brake controller, how you are testing the wire and if you are testing it with the brakes or manual override activated. Using a multimeter to test the voltage on the brake output wire at your trailer connector will not always give the proper reading because it does not provide a load on the circuit like brake magnets from a trailer...
    view full answer...
  • Brake Controller Recommendation for a Truck with Air Brakes and a Trailer with Electric Brakes
    The trailer brakes work on a separate circuit than the lights. You have a couple of options to control the electric brakes on the trailer. One option is to use an air over electric brake control, # HA100400C. This unit connects to the air brakes on the truck and when the brakes are applied it sends an electric signal back to the trailer brakes. The other option, and what I would do, is to use an electric brake controller like # 90885. For either of these controllers, the red wire attaches...
    view full answer...
  • Fuse Box Instructions for Installing a Brake Controller on a 2003 Chevy Silverado
    Whether your 2003 Chevrolet Silverado came with a factory 7-Way or not, the wiring for both the brake controller and the 12V power pin on a 7-Way is already run. If you check out the video I attached of the Prodigy P2 # 90885 being installed on a similar 2003 Silverado you can see what needs to be done with the wiring under the fuse box at the 3:20 mark. You will just need to connect the Blue wires together and you will be good to go since you already took care of the Red wires. The P2...
    view full answer...
    Image 1 for
  • Brake Controller Has Constant 12V Power But Trailer Brakes Do Not Engage
    First I suggest you double check your wiring from the controller. Typical brake controller wiring is: Red wire goes to the brake switch cold terminal, which gets power only when the pedal is pressed; Blue wire connects to the trailer brake circuit; White wire is ground; Black wire connects to the 12V power source. Please note that we do offer vehicle-specific wiring harnesses that plug into the OEM socket under your dash and provide bare wires on the other end to wire directly to your controller....
    view full answer...
  • Brake Controller Wiring for Ford E-450 Motorhome
    If your vehicle has a factory brake controller plug, you can simply use the Tekonsha Plug-In Wiring Adapter for Electric Brake Controllers – Ford, Item # 3034-P, which will connect to the vehicle plug and the brake controller. On the new E-450 vehicles, the plug is located behind the storage compartment above the radio. Once you remove the storage compartment, you can plug in the adapter and run the cord behind your dash to the brake controller. I've attached several images showing where...
    view full answer...
    Image 1 for Image 2 for Image 3 for
  • Recommended Brake Controller And Plug-In Harness For 2021 Suburban Z71 With Tow Package
    For your 2021 Chevy Suburban, I recommend going with the Tekonsha Prodigy P2 Trailer Brake Controller - 1 to 4 Axles - Proportional # 90885. This is an easy to use controller that works very well with trailers that have electric brakes like yours. I use this exact one on my vehicle and I love it. You will also need Tekonsha Plug-In Adapter # 3016 which allows you to connect the brake controller to your factory tow package plug. I attached some demonstration videos to help.
    view full answer...
  • What Trailer Wiring is Needed for 2024 Subaru Outback Wagon
    Hey Ryan, so I looked up the Aliner LXE and it doesn't look like a trailer that would have brakes so most likely all you need is a 4-way confirmed as a fit for your 2024 Subaru Outback XT like the Tekonsha part # 118467 which installs pretty easily. 4-way trailer wiring basically controls all of the taillight functions on a trailer but nothing else If instead the trailer DOES have brakes you would need to convert the 4-way to a 7-way with the part # ETBC7 so that you can install a brake...
    view full answer...
  • Towing a Trailer with Electric Brakes with a Semi Tractor with Air Brakes
    To tow your trailer that uses an RV style 7-way blade style connector with your semi that has a 7-pin connector, you need to construct an adapter that will also combine the brake signal into the right and left directional signal pins. This can be done by using a female 7-pin socket # PK11720 to accept the plug from the semi, a tail light converter # 119178 and a female 7-way RV blade-style socket # PK12-707E. The converter would be wired in between both sockets to combine the brake light...
    view full answer...
    Image 1 for
  • Troubleshooting Tekonsha Prodigy P2 Brake Controller that Doesnt Recognize Trailer
    It's possible the brake controller is bad, but you definitely want to check some other things before you purchase a replacement. The first thing to do is inspect both the truck's and the trailer's connectors to make sure the pins are clean and free of debris. On the trailer connector at the rear of your 2004 Chevrolet Silverado test the pin at the 5 O'clock position with a circuit test like # PTW2993. You'll need someone to engage the manual lever on your P2 for this. If this checks...
    view full answer...
  • Tekonsha Prodigy P2 Trailer Brake Controller Showing OL, PL and SH Error Codes
    First, lets start by resetting the Prodigy P2. With the trailer disconnected from the vehicle, disconnect the brake controller by unplugging the harness from the rear of the unit, and plug it back in. The display will show NC for 15 seconds, and then show two dots. The OL error code indicates that the Prodigy is drawing too much current. This is usually caused by a short on the brake output wire on the trailer or low resistance to ground on the brake wire. Look for any pinch points, or...
    view full answer...
  • Is There a Brake Controller Wiring Adapter for a 2022 Volkswagen Atlas
    Thank you so much for the photos and all of the info! Currently none of our manufacturers have an adapter that they have tested and approved to work with that connector you found on your 2022 Volkswagen Atlas, so you'll have to cut off that connector on your vehicle and use the included pigtail to spliced in the Prodigy P2 # 90885 in your vehicle. You will need to connect the following wires from the pigtail to the corresponding functions on your Atlas: Blue - 7-Way Output to Trailer Black...
    view full answer...
    Image 1 for Image 2 for Image 3 for Image 4 for Image 5 for
  • How Does a Brake Controller Know when a Trailer is Connected
    When a trailer with electric brakes is connected to a vehicle that has a brake controller that brake controller is sensing the draw of the brake magnets by sending back a small amount of voltage on the blue wire. The brake controller also get's signals from the tow vehicle to let it know when you are stepping on the brake pedal. On most vehicles this connection is made either at the brake switch above the brake pedal or through some kind of tow package wiring. I have included a link...
    view full answer...
  • How do I Tell if the Brake Controller is Bad
    You are correct, you should only be getting output when the brake is applied, or the override switch is activated. It sounds like the controller might be bad, but to make sure, you should probably bench test it before tossing it. Use a circuit tester, and check the red wire that exits the rear of the controller. This wire should only go hot when the brake pedal is pressed. If this checks out ok, then the controller is bad and must be replaced. We have a video that shows how to bench...
    view full answer...
  • How Does Brake Controller Install in 2017 GMC Canyon
    For installing a brake controller in your 2017 GMC Canyon there is no plug present under the dash, but the needed wires are already run. You will connect the brake controller wiring with the vehicle wiring already present under the dash. It's up above the brake pedal. If you check out the attached video link you can see the Prodigy P2 part # 90885 installed in a similar GMC Canyon and you can see exactly where the wiring is and the entire install process.
    view full answer...
  • Installing a Brake Controller on a 2000 Chevy Silverado
    There are some connections under the hood that will need to be made to complete the installation of the Tekonsha P2 Brake Controller # 90885 with Wiring Harness, # 3025-P. Once you have plugged in the # 3025-P harness into the port to the left of the brake pedal, you can make the connections under the hood. Locate the power distribution box. There will be a bracket on the driver side near the windshield that will need to be removed. Remove the bracket and power distribution box cover....
    view full answer...
  • Brake Controller Installed in 2021 Chevy Silverado Z71 Trail Boss Not Powering Up
    Assuming that you've found the correct connector for the # 3064-P brake control harness which is located under the dash to the left of the steering column, I'd wager than you have a fuse missing in the power distribution box in the engine compartment on the passenger side. Check fuse location # 84, and make sure that there's a fuse installed there. If the fuse is missing or blown, you can obtain a replacement from your local auto parts store.
    view full answer...
    Image 1 for
  • Brake Controller and Install Wiring Needed for 2014 Jeep Wrangler Unlimited
    Since you have a 7-Way you will only need a few more components to complete a brake controller install on your vehicle. First let's start with a brake controller. I would recommend the Prodigy P2 Brake Controller part # 90885. This is our best selling brake controller because of how well it works and how easy it is to set up. Next, for a wiring kit to install the brake controller to the 7-way you would want the Wiring Kit for 2 and 4 Brake Electric Brake Controllers # 5506. This will...
    view full answer...
  • Will The Curt Echo Manual Override Button C83HR Work Without The App?
    Hey John, good question. The app must be running in order for the separate manual override button part # C83HR to work. If your phone is not connected to the controller with the app running, the button will not do anything. I know the connectivity issues can be frustrating, but it might not necessarily be something you are doing wrong so much as the controller just being unreliable. This is by far the most common complaint we get about the Curt Echo # C51180 wireless controller. Most...
    view full answer...
  • Does 2026 BMW X5 With Factory Tow Package Have Brake Controller Port
    Hi Benjamin; the 2026 BMW X5 with the factory tow package will have a port for your brake controller. Assuming you're using the same P3 # 90195 you need the Tekonsha Plug-In Wiring Adapter for Electric Brake Controllers - BMW # TK29FR.
    view full answer...
  • Can Redarc Tow-Pro Elite Controller be Installed with 14V Present on a 2021 BMW X5?
    Hey Wayne, thanks for all of your research and the information you provided! Yes, the Redarc Tow-Pro Elite Brake Controller # RED44FR will work perfectly fine with the 14V you're measuring on your 2021 BMW X5. In fact, the 14V you're seeing is normal to see that close to the battery, even on non-hybrid vehicles. I wasn't able to pull up both of the parts you referenced from ESC but you've done so much research already that I'm trusting you found the correct parts for your vehicle. We...
    view full answer...
  • Recommended Plug and Play Brake Controller Adapter for a 2024 BMW X5
    Yes, we do! To install the Prodigy P3 Brake Controller item # 90195 in your 2024 BMW X5 you will need the Tekonsha Plug-In Wiring Adapter for Electric Brake Controllers - BMW item # TK29FR.
    view full answer...
  • Will Tekonsha Prodigy P3 Brake Controller Work on 2022 BMW X5
    Yes the Tekonsha Prodigy P3 Brake Controller # 90195 is compatible with your 2022 BMW X5. If you have the factory tow package you can plug it in with Tekonsha Plug-In Wiring Adapter for Electric Brake Controllers - BMW # TK29FR.
    view full answer...
  • Is There a Brake Controller Harness That Plugs In Under the Dash on a 2019 BMW X5
    It's possible that there is a brake controller port under the dash on certain 2019 BMW X5's, but none of the aftermarket manufacturers we carry support this plug. The only option we offer for installing an electric trailer brake controller like the Tekonsha BRAKE-EVN Trailer Brake Controller part # TK63VR without splicing is with the Tekonsha Plug-In Wiring Adapter for Electric Brake Controllers part # TK29FR. This harness plugs in at the rear. I checked with Tekonsha and the Tekonsha Plug-In...
    view full answer...
  • Recommended Parts to Add Brake Controller to 2017 BMW X5 with Aftermarket 4-Way Connector
    The Tekonsha Plug-In Wiring Adapter # TK29FR is what you'd use if your 2017 BMW X5 has the factory 7-Way connector at the back. Since you're using the Vehicle Wiring Harness # 119250KIT that tees in behind the tail lights on your vehicle you need to use the Universal Wiring Kit # ETBC7 instead. This kit comes with all of the wiring and connections you need for a fully-functioning 7-way as well as what you need to get a brake controller up and running. Please note that it might be difficult...
    view full answer...
  • Can Prodigy P3 Brake Controller Install in 2011 BMW X5
    To install the Prodigy P3 part # 90195 in your 2011 BMW X5 all you need is the install harness part # TK29FR that you referenced. If instead you were referencing the Primus part # TK90160 that is also compatible.
    view full answer...
  • Furrion Cameras Not Working Properly From Running Light Circuit
    It sounds like the running light pin is not providing enough power for the three cameras. You might need to introduce the 7-Way Vehicle Power Adapter w/ Power Switch for Furrion RV Observation Camera, part # FR87PR, into your electrical system. It is designed to connect the trailer wiring from your tow vehicle's 7-way trailer connector. It will provide your cameras extra power. This should eliminate the intermittent power issues you are having with your camera. I have included product...
    view full answer...

Do you have a question about this Trailer Brake Controller?


Info for this part was:

Employee Lindsey S
Edited by:
Lindsey S
Employee Wilson B
Updated by:
Wilson B
Employee Amanda K
Written by:
Amanda K

At etrailer.com we provide the best information available about the products we sell. We take the quality of our information seriously so that you can get the right part the first time. Let us know if anything is missing or if you have any questions.
<