

 Arrives before Christmas
 To see if this custom-fit item will work for you please tell us what vehicle you'll use it with.


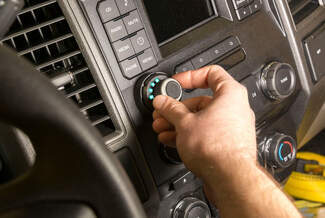
You can stick the control knob to the dashboard, plug in the module, and your brake controller installation is done with no drilling and no hardwiring. The knob is large and easy to use, while the main unit is out of sight behind the dash.
Features:
Specs:
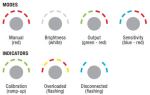
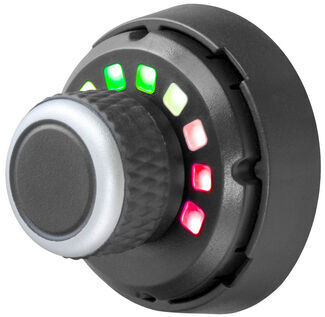
The Spectrum puts control of your trailer's brakes at your fingertips and, with bright LED indicators, you know what your brake controller is doing at a glance.
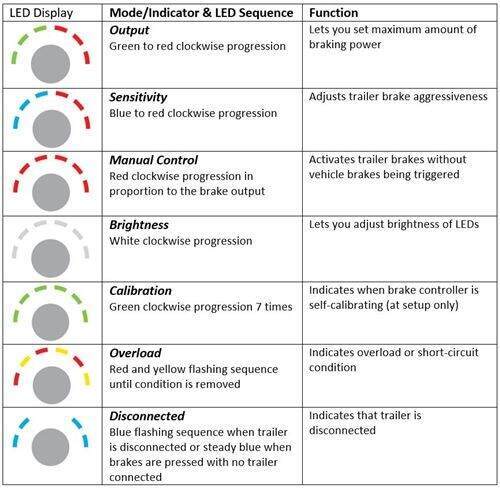
You can adjust all of your settings using the control knob. To switch between modes, press the control button in the center of the knob. Each mode has its own distinct LED display with several different colors and patterns to eliminate any guesswork as you cycle through.
Output: Braking output is the maximum amount of power that will be applied to your trailer's brakes. How much braking output you need is determined by the weight of your trailer; a heavier trailer will need more power to bring it to a stop. You want to go as high as you can without the trailer brakes locking up.
Sensitivity: This controls the aggressiveness of your trailer's braking, meaning how quickly the brakes reach the set output level. This is a great adjustment to make when you're towing a heavy load and the trailer will need more umph to bring it to a stop so it doesn't push your vehicle forward. If your vehicle takes too long to come to a stop, increase the setting. If it stops too abruptly, lower the setting. You may also need to adjust the sensitivity based on your own preferences, or when the trailer load or road conditions change.
Manual Override: The manual override activates just the brakes of your trailer, great for stopping sway or controlling its momentum in an emergency. To engage the manual override, press and hold the button on the control knob.
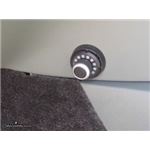
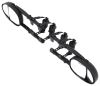
The Curt Spectrum comes in 2 pieces: the main unit and the control knob. Because the only part that you need to be able to access is the control knob, the main unit can be mounted out of sight and out of the way. You don't have to worry about banging your knee on a bulky brake controller or interfering with your vehicle's lower airbags.
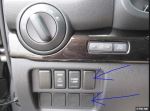
The dash-mounted control knob can be installed in any convenient spot that's easy for you to see and reach. This can be a blank switch panel, an open spot on your center console, or wherever there's space on your dashboard. The knob sits flush against the dash, so you don't have to worry about finding enough clearance behind the dash. You can use either the included screw to mount the knob, or the adhesive pad for a drill-free installation.
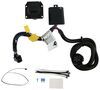
Once you've decided where you want to put the control knob, you'll need to find a good place to install the main unit. Your only restriction is the 4' plug-in cable that has to be able to reach between the main unit and the control knob. Thanks to the 3-axis accelerometer, the main unit can be positioned at any angle or position. No matter how you install it, the unit will sense the direction of travel and its orientation.
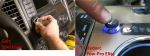
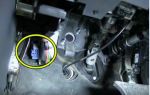
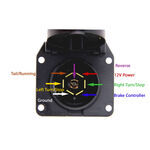
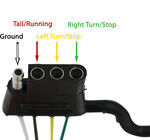
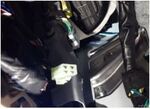
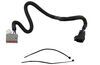
The included custom-fit adapter plugs into the port on your vehicle's built-in brake control wiring harness, which you'll find underneath the dash, to the left of the steering column, taped to another harness near the emergency brake pedal. Once you're plugged into the factory port, just plug the other end of the adapter into the main unit. No hardwiring needed!
Note: If you don't already have a 7-way plug at the back of your vehicle, take a look at our exclusive 7- and 4-way brake controller installation kit (ETBC7 - sold separately).
Proportional braking means that your trailer brakes mimic your tow vehicle's brakes. If you slam on the brakes in your vehicle, your trailer brakes will activate with the same intensity; if you brake lightly, your trailer brakes lightly too. The trailer's braking is in proportion to your vehicle's braking. This saves wear and tear on the tires and the brakes on both your vehicle and trailer.
The Spectrum uses an internal 3-axis accelerometer to sense how your vehicle is braking so it can send the right amount of braking power to your trailer. It measures the inertia of your tow vehicle and activates the trailer's brakes to ensure that your trailer slows at the same rate. The result is uniform braking across your towing setup. No push-pull action - just smooth, proportional braking every time.
 Alternate Instructions
California residents: click here
Videos are provided as a guide only. Refer to manufacturer installation instructions and specs for complete information.
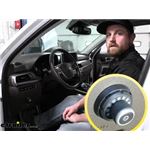
Hey everybody, Ryan here at etrailer. Today on our 2021 Kia Telluride, we're gonna be showing you how to install the CURT Spectrum Trailer Brake Controller. And we're gonna be doing that in conjunction with the CURT adapter plug. But before we get to that, why don't we just check this out and make sure it's gonna be the right setup for you. When it comes to the Telluride, we see a lot of them come in to the shop here at etrailer and people are doing a lot of different things with them. And with these being pretty capable SUVs, people are pulling some bigger trailers around them and ones that have brakes.
And if your trailer has brakes, they're gonna need a way to apply them. And that's where a trailer brake controller like this one here is gonna come into play. What happens whenever you have it all hooked up and you hit the brakes inside of your Kia, that's going to apply the trailer brakes and slow everything down as a whole unit, as opposed to just relying on your vehicle to stop itself as well as the trailer. And this one's a little bit different than what I call the traditional style brake controllers. So a lot of other ones are pretty big and take up a lot of space.
A lot of times you'll see some wires coming off the back that run down the dash and nothing wrong with them. They work, but I feel like this one has a little bit more of a clean look to it. Honestly, the knob almost matches the factory knobs and it doesn't really look out of place or take up a whole lot of room inside of your vehicle. This is going to be a proportional type brake controller which is what I usually recommend in most instances, and this is one of them. And so what that means is however hard you apply the brake in your Kia, the trailer brakes are gonna match it in a sense.
So it just makes for a smoother stop. So let's say if you're just rolling up to a stop sign and halfway on the brake trailer, brakes can do the same thing. On the other hand, let's say, if you slam on the brake, you make an emergency stop. The trailer's gonna do the same thing. So it just makes for a better driving experience, at least in my opinion.
This is gonna have several different things you can change too. So if you push down on the knob, you can cycle through. So one of them will be green, green to red, and this adjusts the output. So essentially how aggressive the brakes are gonna be on the trailer. And so you can fine tune that. Probably start halfway, something like that. And then depending on how heavy your load is or whatever, you can always just change that. If you push it again, it'll turn blue and purple to red and that adjusts sensitivity. So essentially how strong the brakes are gonna come on. And again, probably somewhere halfway is what I'd start with and you can fine tune it depending on your particular driving style. And then the other one, it's just a light blue or white that just adjusts the brightness of it 'cause this thing puts some light out. So at nighttime, if it bothers you, you can always crank it down and that's that's about it. So, I mean, it's really straightforward. It does have a manual override. So what happens, let's say if your trailer starts to sway and get away from you a little bit, you don't wanna hit the brake inside of the car and that can potentially make it worse. So if you start to notice that happen, you can hold this button down. And when you hold that down, it's going to justify the trailer brakes and slow that down and get it back under control and tracking behind your Kia again. But other than that, if you're looking for a trailer brake controller for your Kia, honestly this is one I'd definitely consider. I think it's a good fit for it. It looks good. It doesn't look out of place, really user friendly, doesn't interfere with anything else, or anything along those lines. So not a bad brake controller for the Kia, at least in my opinion. As far as getting this installed, really not bad at all since we have the connector plug under there. Essentially everything is just plug and play and really isn't confusing or anything along those lines. So this is definitely something that you could do at home. Speaking of that though, why don't we go ahead and hook this up together now. So to begin our installation, first things first, you wanna make sure you have a 7-way trailer connector plug installed here at the back. This one is a CURT plug-and-play type one that we carry here. That's what I'm using. This is gonna work with all the different types of brake controllers. So I just wanted to mention that first. But with that said, now we can take our adapter plug and find the connector that should be located underneath the driver's side dashboard. To find the factory connector plug so we can plug our adapter into it. If you look under the driver's side dash right here in this area, up just a little ways, it's not really buried or anything, that connector plug should be located right there. This is that connector plug looks like. And so we'll just take the matching end from our wiring adapter here. Literally just plug that right in. The other end of our connector plug, that's going to plug into our brake controller body here, which is this piece. So these two ends are just gonna plug right on in and I'm just gonna let this sit here for now. We can focus on mounting up our button and running the little bit of extra wiring that we need. That way we can plug it into here and then be able to mount all the stuff up. So here's our switch or our button that we need to mount up. My thought is I'm gonna do it right here to the fuse panel. That way it's easy to work with 'cause you can pop this off. Not really in the way of anything, easy to get to. And then for whatever reason, if you ever do wanna take this out of your vehicle since we do have to drill a hole, you'll just find a new little panel there. It's not really a big deal. So I'm gonna pull this off and we can just go over to the work bench and where it's a little bit easier to work and see. I put some tape here on our fuse cover, this little panel. And then this is a piece of we're gonna be using, we're gonna have to drill two holes in it. Want the bigger hole to be on the bottom. And so I just line this up where I want it, marked with my pen, and then we can come back and draw us out to the appropriate sizes. Once our holes drilled, go ahead and just push this thing right on into place and make sure it's how we want it. Then we can grab this black rubber piece. There's a little nut in there. We can push that in through that bottom hole and then take the included screw, put that in and thread this down. And when we tighten this, it's going to smash the back of it and draw it up. And that's going to hold our bracket tight against our panel there. So with that done, you can take our wiring now from our knob and feed this through. And I wanna mention there's other ways you can mount this too. You can use the sticky tape and stuff, but my thought is since you have to drill one hole anyway, why not make the other hole then actually use a nut and a bolt. It's gonna work better, at least in my opinion, but we'll push this through. You might have to actually get rid of our sticker here and push this through. And then our connector is just going to snap into place. I went ahead and started to hook up our plastic connector end to the wires. And I did all of them, but one 'cause it's gonna be all set up the same, how they work, but you wanna make sure and pay close attention to the instructions because you just can't plug any color wire into any slot. There's a specific order that you need to follow. And it's probably pretty much impossible to pick up on the camera 'cause I can hardly see it. But there is small numbers on the ends there to reference to you on what number terminal it is. So with that said, the way these work is they should slide in easy. There shouldn't be much resistance. And when you get towards the very end, you should feel it almost click into place and lock in. If you're having to try to jam it in there, take it and spin it around and try it the other way 'cause it should go on smooth. So if I flip it around, that's how they look. Once they're all plugged in and once they are, you just close up then in piece there. Now back inside our vehicle, we can just take our connector end, run that through our opening there, just pop our fuse panel back in place. And then this is going to plug into the other end of our brake controller body here, which just plugs right in. And now I'm going to find a spot to mount this up out of the way and I'll show you how it looks once I'm done. So underneath the dash here, we have a really solid piece of factory wiring that's very secure and that's what I zip tied our brake controller box to just buttoned everything up to clean up the install look. So I went ahead and plugged our tester in and we can do a quick check to make sure our brake controller is working. I'm just gonna push down on it to engage the manual override button and you can see we have power being sent back to brake current. So I think it's safe to say that everything is working properly. You can always use your trailer to do this too, but keep in mind, if your trailer has any issues with it, that could affect the performance of the brake control. And that'll finish up our look at and our installation of the CURT Spectrum Trailer Brake Controller on our 2021 Kia Telluride..


A wonderful customer experience. Worked with professionals who guided me in selecting the correct product. Thank You!
Excellent service


Do you have a question about this Trailer Brake Controller?
Info for this part was:
At etrailer.com we provide the best information available about the products we sell. We take the quality of our information seriously so that you can get the right part the first time. Let us know if anything is missing or if you have any questions.


Thank you! Your comment has been submitted successfully. You should be able to view your question/comment here within a few days.
Error submitting comment. Please try again momentarily.