

 Arrives before Christmas
 To see if this custom-fit item will work for you please tell us what vehicle you'll use it with.


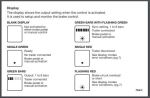
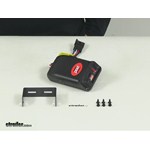
This time-delayed brake controller is designed to mount at any angle, even upside down. The controls are all up front for easy access, including a slide-bar manual override and a thumbwheel for braking output. LED indicator shows your braking status.
Features:
Specs:
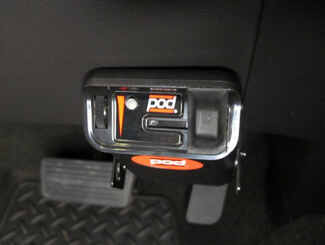
The Tekonsha POD is designed to mount in any direction, and it's especially suited for mounting on near-vertical dashes. All the controls are on the front of the module, so you can still access them with the controller tucked away in a convenient place.
Braking output is the maximum amount of power that will be applied to your trailer's brakes. How much braking output you need is determined by the weight of your trailer; a heavier trailer will need more power to bring it to a stop. You want to set the braking output as high as you can without locking up the brakes. Once you've set up the brake controller the first time, you shouldn't need to adjust the settings until the trailer load changes, you switch trailers, or road conditions change. Use the thumbwheel on the side to change the braking output level. The output setting will appear as a number on the digital display, with a higher number indicating higher braking power.
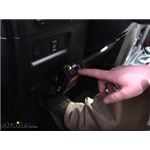
The Tekonsha POD keeps the manual override within easy reach on the front of the module, great for stopping sway or controlling your trailer's momentum in emergencies. Push the slide-bar lever to activate the trailer's brakes and brake lights without you having to apply the brakes on your tow vehicle, perfect for limiting trailer movement while you're cruising.
Because inertia plays no role in the functioning of this controller, you do not have to mount the unit at any particular angle. Your mounting options are limitless, with the controller designed with all of the controls on the front of the module so you can access them even if it's mounted upside down.
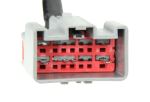
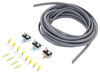
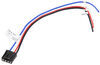
The included pigtail harness splices into your vehicle's wiring beneath your dash to provide an easy-to-access plug for the POD. This way installation of the controller isn't permanent. You can unplug and remove it at any time and securely stow it away.
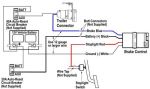
Note: If you don't already have a 7-way plug at the back of your vehicle, take a look at our exclusive 7- and 4-way brake controller installation kit (ETBC7 - sold separately).
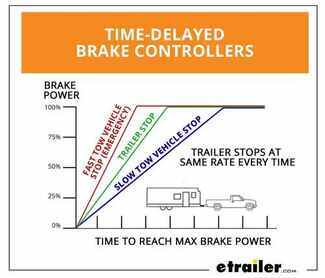
The Tekonsha POD comes equipped with time-delayed braking. Every time you apply the brakes in your vehicle, a signal is sent - via the brake switch - to the POD. The controller then sends power out to your trailer brakes to activate them with an intensity set by you, at a rate determined by you. The amount of braking power (output) can be adjusted to suit your preference, the road conditions, the type of trailer, and the weight of your load. To determine which levels are best for your application, test your towing setup and choose what feels right.

California residents: click here
Videos are provided as a guide only. Refer to manufacturer installation instructions and specs for complete information.
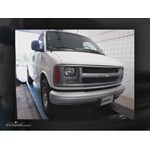
All right, today on this 2001 Chevrolet Express Van were going to install part #: 39523, this is the Tekonsha Power Track brake controller. Now to install this were also going to use part #: ETBC7, the brake controller install kit. Were going to start with that part first. Were going to start off of our wiring harness and start from the rear of the vehicle and work our way up. All right, next well go ahead and take our 7 pole bracket and were going to attach it directly to the bumper. All right, now well go ahead and take our seven to four pole adaptor, well attach it to the bracket, then well take the four pole and connect it to the preexisting four poles on the van.
Well use some dielectric grease to seal the connection up, connect the two four poles together and make a permanent connection out of it. All right, then well continue on with our gray wire and well run that to the front of the vehicle. Now, when we do well make sure stay away from anything moving like the suspension components or anything hot like the exhaust. Now well also take the white wire thats with the gray cable with the ring terminal and well attach that to the frame. Now to attach our ground were going to use a number 14 self-tapping screw.
Now, to run a wire up to the front were actually going to run all the way through the frame. Now, were using a piece of airline tubing to help run the wire through. This also can be a piece of stiff wire or something you can work with. Okay, well pull all the way up to the frame and then well run up through the engine compartment. Again, we want to make sure we stay away from anything moving or that gets hot like the exhaust.
Well run it up along the firewall and pull it out the top and then well use a zip tie to help secure the wire and take up the tension. Next well go ahead and install our circuit breakers. Were going to mount them to the inside of the fender well next to the battery. Now well take our duplex cable and well peel away the gray sheath. Our black wire will go on across the front of the vehicle to the 40 amp circuit breaker for a hot lead.
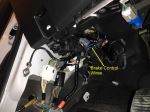
Then our wire well pull back and leave it out of the way for now. After we have our initial hook up to the circuit breaker well go ahead and take our white wire and then well pull it from the inside out. Now, on this vehicle theres a grommet thats missing in the firewall, so were going to use that hole to run our wires through. If there was a grommet there we would make a hole in the grommet and then run our wires through it. Now, since that weve ran out of cable on our install due to the way how we ran the wire from to rear and the lengths were going to add another piece of cable to it. Well use a ten foot length of wire, were using part #: 10-2-1. Well take this new length of wire and well run it from our 20 amp circuit breaker to the inside of the cabin to where were going to install our brake controller. Now, our black wire will be connected to the 20 amp circuit breaker and our white wire in this bundle will be attached to the factory ground. Okay, now that weve run our wires inside well go ahead and cut them to the length that we need. Then we can go ahead installing the wire harness for the brake controller. Now the wire harness were going to use is universal brake controller plug part #: 20127. Now, we hook up our wires, were going to start with our single white wire. Well connect that to the blue wire on our brake controller harness, then next well go to the gray cable with the black and white wires, well connect those color for color from the brake controller harness and our red wire well run up to the coal side of the brake switch. All right, at this point we can go ahead and start installing the brake controller. Well take our bracket and mount it to the bottom of the dash. Then well go ahead and take the brake controller and well get ready to install it to the bracket. Well go ahead and take one of the attachment screws and make some threads before we attach the brake controller to the bracket. Okay, well go ahead and attach it to the bracket. Well connect our wire plugs together and well zip tie the wires out of the way and well go back underneath the hood and make our final connection. Now, well run two wires to our power supply, one for the brake controller and one for the 40 amp circuit breaker for the 12 volt power supply out back. Normally you want to make your connections straight to the battery. However, due to the lack of room inside the engine compartment, with the battery, we cant really use battery extenders or post extenders. Okay, with our power hooked up well go ahead and attach the trailer to the vehicle and test the brake controller. Now, you can see we have a little green light on the LED. If we move the manual override over you can see how it turns to the green, to orange, to red and it also, since its a time delay brake controller, itll do the same thing when we hit the brake pedal. Okay, and with that, thatll finish it for our install of part #: 39523 from Tekonsha on our 2001 Chevrolet Express Van.


quick delivery
Simple install and fit like a glove! Great product and great company to work with!
Had all wires just plug in. No splicing. Great. Thanks

Do you have a question about this Trailer Brake Controller?
Info for this part was:
At etrailer.com we provide the best information available about the products we sell. We take the quality of our information seriously so that you can get the right part the first time. Let us know if anything is missing or if you have any questions.


Thank you! Your comment has been submitted successfully. You should be able to view your question/comment here within a few days.
Error submitting comment. Please try again momentarily.