


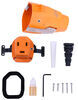
Get your ride SmartPlug ready. Replaces the fiddly twist lock inlet with a more secure and safe connection. Plug in with ease and have one less thing to worry about. Installs into the same footprint as a standard inlet with no modification needed.
Features:
Specs:
SmartPlug vs. Twist Lock
RV and boat owners have long relied on Twist Lock style connections for powering their rides. For years, it has been the best option for connecting to shore power. It's been reliable, but most know it's not without disadvantages:
SmartPlug's connector addresses each of these concerns and does all of the heavy lifting.
Locking arms grab the inlet, a clamp inside the plug body holds the cord, the inlet cap snaps to the top while in use, and the integrated seals weatherproof the connection. This helps prevent the wiggly, dirty connections that increase electrical resistance, which creates potentially dangerous heat.
Since it uses a square plug face, SmartPlug is able to use flat pins which create far more surface contact, further reducing the risk of high heat and electrical arcing. The square shape and flat pins also make it easy to plug in - no more twisting or guessing if the pins are lined up correctly.
California residents: click here
Videos are provided as a guide only. Refer to manufacturer installation instructions and specs for complete information.
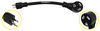
Hi there, I'm Michael with etrailer.com. Today we're gonna take a quick look at the SmartPlug 30 amp replacement power inlet. This inlet is gonna replace a 30 amp or 125 volt AC inlet on your RV or boat. And this will allow you to plug it in to shore power with a 30 amp SmartPlug power cord that is sold separately, but I do have an example here so you can see how this is gonna work. So these power cords do have a cap that you'll remove and that's gonna help protect them when they're being stored. But if you haven't already upgraded to the SmartPlug, one of the main benefits of this system is that it is going to be a straight plugin.
So unlike your twisting systems that are pretty common on your RVs, this is gonna be very simple to get plugged in even in the dark. You're not gonna have to be able to figure out where your L pin is and get it lined up properly. So you can only plug it in the one way and then it's gonna give you a nice secure attachment there. The straight-in connection is going to also create more connection. So it's about 20 times more contact than your curved system design.
So it's going to reduce the heat caused by electrical resistance with your traditional twist style connections. They don't really have a whole lot of contact, so there's a lot of heat that can build up with those and that can cause issues obviously. So this is going to be a much more secure option for you. That sleeved design is gonna help keep the weight and tension off the electrical pins. So this is going to be a very sturdy option for you.
It does also have triple weatherproof seals that prevent any water, corrosion, and overheating, that sort of thing. So you can see we've got that inner ring there that's going to fit inside here. And then we've got this inner portion so it is gonna be very secure and weatherproof. So again, we have the cap here that's going to help prevent that cord from coming out. So even if you we're to trip over the cord, you're not gonna pull it out.
It's gonna be very securely connected there. The cap also forms a weatherproof seal on the inlet. So when it's not in use, it's going to make sure that your connections stay nice and dry. No worries there. This is made here in the USA of high quality materials that are gonna hold up to your extreme climates, as well as being out on the water if you're installing this on a boat. So it will be very durable for you. The plastics are a UV and heat resistant VALOX 553U resin and our electrical pins are nickel-plated brass and we do have tinned wires that are gonna be resistant to corrosion. So very, very simple to get installed. It does fit right in place of your traditional twist type inlet. So all the holes are gonna line up. So basically just take your old one off and you'll be able to put this one in. You won't have to drill a new holes or anything like that. They do include instructions to show you how to get everything wired. You can see we got that gasket there to make sure we've got a nice tight seal on the backside. So overall, just a major improvement in how you're connecting to your shore power, giving you a much more solid connection, that you're not gonna have to worry about coming loose or getting damaged and also giving you more contact so that there's less resistance, less heat. That completes our look for today. Again, I'm Michael with etrailer.com. Thanks for watching.

Do you have a question about this RV Power Inlet?
Info for this part was:
At etrailer we provide the best information available about the products we sell. We take the quality of our information seriously so that you can get the right part the first time. Let us know if anything is missing or if you have any questions.


Thank you! Your comment has been submitted successfully. You should be able to view your question/comment here within a few days.
Error submitting comment. Please try again momentarily.