
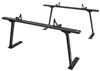
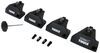
Thule SquareBar Evo Roof Rack for Naked Roofs - Steel - Black - Qty 2


To see if this custom-fit item will work for you please tell us what vehicle you'll use it with.


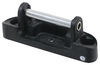
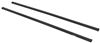
This strong Thule roof rack lets you carry gear on your vehicle. Galvanized steel crossbars accommodate clamp-on accessories. Polymer coating provides extra grip for your cargo. Installs on your vehicle's naked roof.
Features:
Specs:
 Alternate Instructions
California residents: click here
Videos are provided as a guide only. Refer to manufacturer installation instructions and specs for complete information.
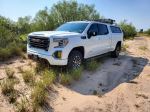
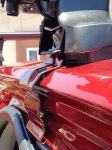
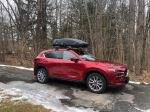
This is Curt with etrailer, and today we're gonna be taking a look at the Thule Square Bar Evo Roof Rack. We're gonna see how it fits and how it installs on our 2023 GMC Sierra 2500. With all the cargo space you get in a truck, you might be wondering why a roof rack on a pickup truck like this Well, there's a few reasons that people do it, and it's actually a really popular thing to do. One of the reasons would be if you have a ladder rack, or in our case today, a camper shell that has a roof rack on it, you may want that extra load support going over your cabs for some of those longer items that you might be carrying. With the absence of that, however, another reason why a lot of people get roof racks on their pickup trucks is because there are items that they just don't want getting mixed up with whatever they have back here. If you've got a lot of lumber, tools, things like that, things that could get a bit messy, you might have some bigger items that you just don't want to throw back there.
Or there are items that are longer than the truck bed, like say for instance, kayaks or canoe or something like that, and having the extra space for the length up on the roof is just a better option. So the Evo Square Bar is obviously a square-shaped bar. Now more popular than that has been the aero-style bars like we have on the camper shell. They've got a little bit more of an aerodynamic shape. They tend to be less noisy.
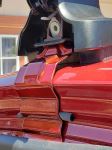
But the thing about a square bar like this is that they do tend to have a higher weight capacity. So these have a weight capacity of 220 pounds. Now that's the capacity of the bar and the towers. You do always wanna double check your vehicle manual just to make sure of what your rooftop capacity is. Whatever number is lower, that's the weight that you're gonna have to stick to.
You've got a little bit of overhang over here so that you could mount those clamp-mounted accessories a little more to the side in case you've got two items up here that you want to carry side by side. It won't work with T slot accessories. There is no T slot at the top to attach those. So we're really just gonna be looking at clamp-mounted accessories. Now one of the things that you always wanna double check for as far as, you know, your crossbar setup is, what is your spread Just about every rooftop accessories has a minimum and a maximum spread.
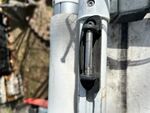
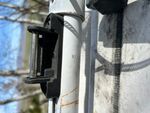
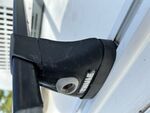
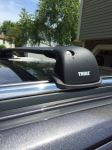
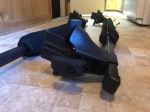
And in our case today, we've got a crossbar spread of 27 and a half inches. And that, for me, is actually a really good place to be. Pretty much everything falls in that 25 to 35 inch category. So a 29 and a half inch spread is gonna be able to carry a lot of different rooftop items. The other thing that I always like to take a look at is just how high above the roof this is coming. And the top of our bars are gonna be three and three quarter inches. So if you're concerned with your vehicle height, like getting underneath something like a low clearance garage or something like that, just make sure you add that to the vehicle height. Make sure you can get under there safely without damaging your bars. We're also gonna take a look at how much space we have underneath. And with two and three quarters inch clearance, that's more than enough clearance, in my mind, to be able to get any of those clamp-mounted accessories underneath here. Now installation of these, because there's no set roof rack up here, Thule is pretty specific about where the bars get placed. You won't really be able to change that crossbar spread at all. But stick around and we're gonna show you exactly how we got these on the roof of our Sierra today. To start our installation, we are gonna be working with our rear bar, our second bar. We already have our front bar installed. And the reason we installed that already is because placement of the second bar is based on placement of the first bar. Now as far as the towers going onto the bar and our clamps going onto the towers, the is all the same on both bars. The big difference though is that there is a number stamped on the inside of your clamp. So just pay very close attention to your instructions. It will tell you which clamp goes on the front and which clamp goes on the back. The rubber pads at the bottom are the same for both passenger and driver's side and for front and back bar. Now on the other side of your bar, you're going to find a slot and you're gonna find a numbered scale by the slot. Now what you're gonna end up doing is looking at your instructions and finding the measurement that you need to place your tower at. Now, before we place our tower onto the bar, we're gonna go ahead and assemble it with our clamp and footpad. And the first thing we'll need to do is remove our cover. (tower cover pops) That'll pop off just like that. We'll set that aside. And underneath here we're gonna find this empty spot. And that is where we're going to place our pad. Now this will go right around, and you do just want to make absolutely sure that it gets seated completely. Just go all the way around the edges and make sure it's on there completely tight. And once that's completely seated, we're gonna go ahead and grab our clamp. This one is stamped with the 454, which are the clamps that we need for our rear bar. And we'll see these two little hooks right here. With this hole toward the outside, we wanna make sure that our clamp is going on like this, with those hooks facing inward. So we're gonna just pop those into the slot and it'll click into place just like that. So at this point we'll take our tower, and if we depress down on it like this, it's going to loosen up this clamp on the top. That's what we're gonna be putting into this slot right here. So I'll loosen it up, and we'll slide it over into place. And what we're gonna line it up to is the 59.5 mark, which is right here. We want the inside of our tower to line up with that. That is our Y measurement, which in the instructions, it tells us how far apart our towers need to be on that second bar. In your instructions for the front bar, it's gonna be an X measurement. Now, before we get this up on our roof, it's a good idea to loosen these clamps up and give us some slack so we can make sure that we get them seated properly. Go ahead and grab the tool that's included in your kit from Thule. And right through here we're gonna find a bolt head. We're just gonna loosen that up all the way. I just wanna give us as much slack as possible just to make sure that we get this around the lip of our roof so we can anchor it properly. Next, just go ahead and open the driver and the passenger side of your second row. And if you got a friend to help guide it across, that's fine. If not, just reach around the other side over the top, get that clamp over there. We're gonna do the same right here on this side. Now those feet, those rubber pads, are gonna slip right into this groove, and you'll notice that it's contoured really kind of perfectly to the shape of the roof. But we're not really supposed to place this just anywhere. Our placement of this bar is based on our placement of our front bar. Front bar placement is 13 and a quarter inches according to the instructions. And that's from the edge of our roof right here. So from here to here, we got 13 and a quarter inches. Our bar placement on the second bar is gonna be based on the front of our front bar to the front of our rear bar. Whenever you're taking those measurements, you wanna make sure that they're equal. You double check 'em both on the driver and the passenger side, because we wanna make sure that our bar is going perpendicular across the vehicle, that it's not twisted sideways or anything like that. So we got the 13 and a quarter up here on the front. From the front of our first bar to the front of our second bar, the measurement is 27 and a half inches. So once you get that lined up, again, on both the driver and the passenger side, you'll get your bar into the right place. Now the clamp has a little bit of a hook end at the bottom to it. We wanna make sure that that's going around the bottom of the frame. And the other thing to take note of is that Thule provides us with these kind of rubber bulb seals. The place that we want to put those is right here, right above where the seal is, and that's just gonna give some extra cushion underneath there. They do have an adhesive backing, but because we're not doing a permanent install today, we're not gonna be these, but that is where it would go, underneath your clamp right there. And once it's seated underneath there, go ahead and take the tool that Thule provided and that same bolt that we used to loosen up before. We're gonna go ahead and we're gonna tighten that down a little bit. Now I don't want to completely tighten this down yet. I just want to take all of the slack out of it so that it's seated nicely. So once you start feeling it get a little snug, go ahead and stop, because again, we just want that little J hook underneath here to make sure it's up and seated up under the frame. And then you can go ahead and put your door seal back up into place. Someone's both the passenger and the driver's side are snug, now we can start tightening it down for real. However, we don't want to tighten it down completely on one side. We're gonna kind of have a balance to this. We're gonna do maybe three or four turns over here. And then do the same on the passenger side and go back and forth until we're completely tightened down. And the way that we know we'll be completely tightened down is this is a torquing tool. So we're gonna get a loud, audible pop when we've got it completely tight. (tower pops) And there's that pop I was talking about. That means it's tightened down completely. Once you hear that sound on the driver's side tower and the passenger side tower, our bar is in place. And our last step in the installation is gonna be to put our tower covers back on. And these go on really easily. There's these two tabs in here. We'll take that and we'll pop it right in, just like that. Now we have this empty cavity here. With our tower kit, we do get four plastic lock cores. Now those are just slotted. They're not keyed or anything. You can use those to lock these down with something like a flathead screwdriver or a coin. But my recommendation would actually be to grab a set of keys and locks for Thule's One-Key system. And these can be keyed alike to other Thule accessories you have. So if you have a roof box or a bike rack or something like that from Thule that already has its own lock and key, you could check the numbers on that and get a lock set that's gonna be keyed alike to those. That way, you don't have several sets of Thule keys. You don't have to wonder what goes with what. So that's really it for the installation. Not too difficult, and you only needed the tools that are provided by Thule itself. But if after watching this video you've still got some questions about it, go ahead and drop those in the comments below. We'd love to answer those for you. It'll help you and other neighbors just like you to make the best decision for yourself. Once again, this is Curt with etrailer. Thanks for stopping by.


Do you have a question about this Roof Rack?
Info for this part was:
At etrailer we provide the best information available about the products we sell. We take the quality of our information seriously so that you can get the right part the first time. Let us know if anything is missing or if you have any questions.


Thank you! Your comment has been submitted successfully. You should be able to view your question/comment here within a few days.
Error submitting comment. Please try again momentarily.