
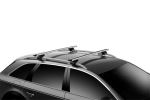
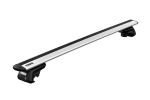
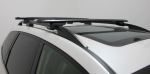
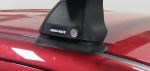
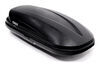
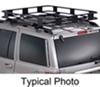
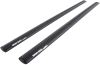
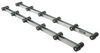
Rhino-Rack Vortex Roof Rack for Flush Rails - Aluminum - Black - Qty 2


To see if this custom-fit item will work for you please tell us what vehicle you'll use it with.


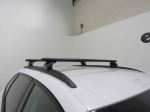
This aerodynamic roof rack lets you carry gear and cargo on your vehicle. Full-length aluminum crossbars provide plenty of space for channel mount and clamp-on accessories. Installs to flush rails on your vehicle's roof.
Features:
Specs:
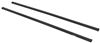
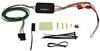
 Alternate Instructions
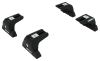
Videos are provided as a guide only. Refer to manufacturer installation instructions and specs for complete information.
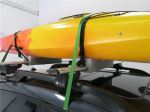
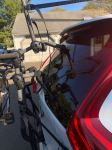
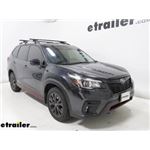
What's up, everybody It's AJ with etrailer.com. Today, we're gonna be checking out the Rhino-Rack Vortex roof rack system. It's gonna be on the raised rails on this 2021 Subaru Forester. So roof rack system is an awesome addition to your Subaru just so you can carry more things up on the roof. So, many different things, like if you wanna throw a bike rack up there, you can. If you don't use your hitch or your hitch is already used by something else, you can throw a cargo box up there, maybe a kayak carrier.
A lot of things for different adventures are unlocked once you put these up on your cross rails. And this system is awesome because it just clamps onto your existing side rails. So there's not a full on installation on this. It's pretty easy to put these on and take 'em off if you don't wanna leave 'em there all the time. Look at the bars themselves.
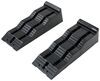
There are gonna be arrow bars. So they are arrow shape design. It's gonna be a black powder coat aluminum on there. So if you leave 'em up on the roof, you're not gonna have any issues with the weather, eroding them, corroding them, or rusting. They're made to stay up here.
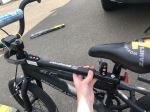
One nice thing about this, that it also has the T-track here in the middle with rubber strips to cover that up and the T-tracks can be nice. So you can use clamp-on accessories that go around like that, or ones that slide here in the track. That way there's nothing gonna be underneath those bars. So you have both options. I like that the rubber strip, you will have to peel that and get that cut to however your accessories are.
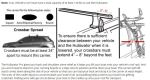
You can see that ours have a couple spots missing in there. That's where we lined up to add a bike rack on top. So it's just gonna be like that unless we got more rubber strip to fill in those gaps. So there might be a little bit of whistling if you don't have that fully filled out. But if you just use clamp-on accessories, that rubber strip can stay in the middle. And it's not gonna be a problem. A security-like feature would be the end caps here. So you have a special key that unlocks them. So right now I can't take that off so that if I had any T-track accessories on there, nobody can take it off and mess with it when I'm not around. So you can just use this key, turn it, then you can remove the cap and then you have access. And that even goes to protect you taking the clamps off of your cross rails. Now, if you're not wanting just a plastic core in there, you can replace it with a lock core and then get that key. So then it's fully locked up. Now I talked about how easy the installation is. You don't really need any tools except for the one that comes with it, check out how I did it. We're gonna do a little bit of assembly here on the table before we put it up on our roof. Gonna come over here to remove one of the end caps with the key. Like that. Pull that outta the way. Then we'll take our foot and slide in. Make sure these portions go in the track here at the bottom. Now we're gonna make sure this is spaced out enough so we can go over the cross rails on your Subaru. And then we're gonna go ahead and put it on the roof. Carefully, climb up there and set it on the cross rails. I'm gonna use the tool that comes with it to tighten it down, once we've measured out where it should be. We measured from center to center for 24 inches and then we measured about four and three quarters of overhang on both sides. And then we can go ahead and tighten it down once we know that's right. And with that done, we're gonna place the end cap here. That'll complete the installation. Now, let's get some measurements. So we're gonna come here to the top of the bar, measure to the top, from the top of the cross rail to the top of the bar, is gonna be about two inches. So it's gonna stick up a little bit from that crossbar. And then if we come to the middle, go from the the roof to the bottom of the bar, that's gonna be right there at three inches. You're gonna have three inches of space. So just keep that in mind with clamp-on accessories, that's how much space you're gonna have for the clearance. One thing we adjusted for your Forester, was we've brought the bar back just a little bit. That way we could still have access to the sun roof. It still works and you can still use it. Now it will be covered up if you get like a cargo carrier, a rooftop box, it's just gonna overhang and you're gonna lose a little bit of that visibility. Something to compare this roof rack to would be an Inno roof rack. It's gonna clamp on the side rails, just like this one. It's very easy to install. Just like this one. The one thing I kind of like above that one is gonna be it's T-track strip, the weather strip on top, you push down on the accessories. So it pushes that down and then you slide it along there. So you don't have to cut anything to length. You don't have to peel it out and cut it like you do on this one. No matter what you're gonna put up on the roof, it's definitely gonna help you out and either making space in the vehicle or just be able to take those extra gear with you wherever you go. Well, I think that does it. Thanks for hanging out. And I hope this helps..


Do you have a question about this Roof Rack?
Info for this part was:
At etrailer we provide the best information available about the products we sell. We take the quality of our information seriously so that you can get the right part the first time. Let us know if anything is missing or if you have any questions.


Thank you! Your comment has been submitted successfully. You should be able to view your question/comment here within a few days.
Error submitting comment. Please try again momentarily.