
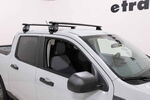
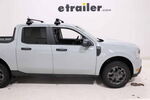
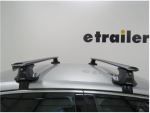
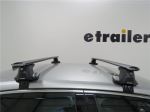
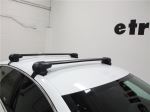
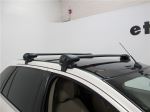
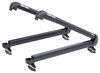
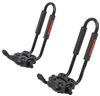
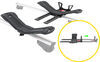
Inno Aero Roof Rack for Naked Roofs - Aluminum - Black - Qty 2


To see if this custom-fit item will work for you please tell us what vehicle you'll use it with.
This sleek, aerodynamic roof rack provides space to carry gear on your vehicle. Crossbars with push-down rubber strips in top channels work with channel-mount and clamp-on accessories. Installs on your vehicle's naked roof.
Features:
Specs:
 Alternate Instructions
Videos are provided as a guide only. Refer to manufacturer installation instructions and specs for complete information.
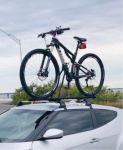
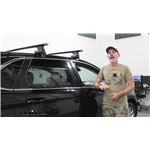
Hello, neighbor. This is Curt with etrailer. Today we're gonna be taking a look at the Inno Aero Roof Rack on our 2024 Ford Edge. Now, if you've decided to go ahead and purchase this roof rack, go ahead and share your experience in the comments below. We'd love to hear your story and share with our other neighbors so they can make the best decision for themselves. So if you've been looking for a roof rack to help with all of that extra luggage or equipment that you're bringing on your trip, maybe it's stuff that you can't fit in the car or just don't want to fit in the car with you, a roof rack is an excellent way to carry those things.
It keeps things up and out of the way, unlike a hitch carrier, which you really have to be mindful of as far as backing in and out of spaces. You do have to mind roof clearance on this, but for most people, getting things up here on the roof and outta the way is the option that they tend to choose. So this roof rack system actually has a 165-pound weight capacity, but I do wanna make sure that you understand that you still wanna double check your owner's manual. Make sure what the vehicle's roof capacity is isn't less than what the crossbars are. If they are, then that is gonna end up being your roof capacity.
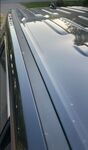
But Inno does a couple of things really, really well. This is an aero bar, which means that it's gonna have kind of an elliptical shape here. It's gonna be more of a blade in the back and more blunt and rounded in the front. What that's gonna really help you out with is reducing road noise as you're driving down the highway. Square bars and round bars do tend to offer a lotta wind resistance and therefore create a lot of noise.
These are gonna be much, much quieter for you. So you can use your clamp-mounted accessories on this, but having aero bars also gives you the ability to use track-mounted accessories, which you can access through the end cap and just pushing down this rubber strip here and sliding your accessories over. Another thing that I really, really like about Inno, other than the fact that they're very easy to install compared to other roof racks, is the fact that Inno creates a lot of value by providing your own metal key cores and keys so that you can lock and secure your roof rack up to your roof. So why don't we go up on the roof and just take a look at exactly how these are fitting on our 2024 Ford Edge. Now, from up here on the roof, we're just gonna take a few measurements and see where we're at.
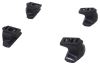
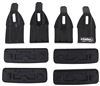
As far as our crossbar spread, being that this is a naked roof, there are very specific points that Inno ask you to place your bars, which we're gonna cover in our installation shortly, but to get the crossbar spread that it's going to provide us, we're looking right at a little under 28 1/2 inches, and for me, that's perfect. Most rooftop accessories ask for a crossbar spread of anywhere between 26 and 32 inches. So usually if you're inside of that range, just about anything that you wanna put up on your crossbars is gonna fit just fine. The other things we want to take a look at is just how much height this is gonna add to your vehicle. So the crossbars come to 4 1/2 inches above your roof here, and from underneath, you're gonna get a clearance of about 3 3/8. Now, that's gonna be plenty enough underneath here to clear this antenna that's back toward the back. So what that tells me is that because we're kind of loading anything up up above these crossbars, even if it's a bigger box that comes back further, we might have to be mindful of lift gate clearance for that, but this antenna, the shark fin antenna that we have in the back, there's not gonna be any interference with that at all. So this is an overhanging roof rack, which means that the crossbars are gonna come out past the towers. Now, while that actually provides us with more room to put accessories up here, even a single clamp outside of this tower, it can be a concern for people as far as getting in and out of the vehicle and hitting their head. Well, while it does come past the door threshold up here at the top, it doesn't down here at the bottom. So anybody getting in and outta the car, as long as their legs are clearing out, they really shouldn't have any issues with hitting their head on this as they're entering and exiting the vehicle. And just a final thought about it is, you know, one of the things that people notice a lot about these crossbars is this chrome trim on the edge here. While it's not for everybody, I think it fits the Edge really, really well. Because of this subtle chrome trim that it puts around our windows, I think it matches up nicely. So now that we've taken a look at what it can do and how it fits on our Ford Edge, let's go ahead and take a look at exactly how we got these up on our roof. Now, as we begin our installation process, we're just gonna kind of lay everything out here for you. So what we've got is our foot pad. We've got an attachment that's gonna go into our crossbar. We've got our tower itself along with the cover, and we've got our hook claw here that's gonna attach to the vehicle. So the first thing that we want to do is prep our bar, and the way that we're going to do that is by removing our end cap first. Once that end cap gets removed, we're gonna go ahead and slide this all the way out till we expose this tray here, and then once we do that, we're gonna take this piece with the metal side facing up and the bolt hole facing inwards on the bar. We're gonna insert that right underneath here, and then we're gonna slide this back all the way till it stops. Once it stops, we're gonna depress this tab right here and we're gonna slide it all the way in until it hits that tab. At this point, we can replace our end cap. And that's how our crossbar is going to get prepped. We're gonna continue on with our tower, and underneath our tower here, we're gonna see kinda this place. There's gonna be a couple of Phillips head screws going in here. We're gonna take our rubber foot pad here. Now, there are gonna be two different numbers in your kit for the foot pad. The numbers 425 are gonna go on your front crossbar, and the number 411 is gonna go on your rear crossbar. That'll be indicated in the instructions for you as well, and in order to put these on, you'll see these impressions here that'll go over those Phillips head screws. So we're just gonna pop it in those two tabs right there, and we're just gonna push it in until it's tight. Okay, so once our pad's on, we're gonna notice that there are these tabs here and this bolt coming outta the top of our tower. They're gonna line up with this hole, this hole, and then the bolt to this hole here. So we're gonna go ahead and turn over our tower and get this into place. Okay, now once this is in place, it's not gonna allow us to slide it out to the edge like we want to. What we'll have to do is lift the, oops, lift this tab back. That's gonna take pressure off of the top of the tower on the bar, and we'll be able to slide this over and into place. Once we have that in place, go ahead and check your instructions. It is gonna give you a measurement from the center marker on the crossbar to this tab here next to this bolt underneath on your towers. Now, for the back set of bars, it gave us a measurement of 22 inches. On the front set, it's giving us a measurement of 22 5/8. So we're gonna go ahead and get that measured out right now. All right, once we have that in place, we're ready to go ahead and put it up on the vehicle. What we wanna make sure of is that the wider part of the crossbar is facing the front of the vehicle and the blade part of the crossbar is facing the rear. So we're gonna go ahead and get this up on our car right now. Now, there is a specific placement for your front bar. Once we get it up here, we're gonna make an adjustment and get it into that spot, but the way that it is measured is gonna be from this door seam right here. Now, the measurement that we're going to be looking for from this door seam is going to be 8 3/4 inches to the center of this bolt. The back crossbars that we already put on, that measurement from here was 19 inches, and we're gonna go ahead and get that 8 3/4 inches measured out and get our bolt lined up. Okay, there it is. Now I'm gonna take the exact same measurement on the other side. This is gonna guarantee that our bars end up parallel and perpendicular to the vehicle itself. So now that we've got everything placed correctly on both sides, we're gonna go ahead and install our claws here so that it'll grab onto the vehicle itself. So I'm gonna remove this bolt. I'm gonna put it in again just like this. I'm gonna make sure that this part is covering up that section of the tower, and I'm just gonna kinda hold it in place and then I'm gonna hand tighten it down until it's just a little bit snug. So we've got everything snug. Everything is staying in place the way that we want it to. The next thing that we're gonna do is we're gonna take our torquing tool here, and we're just gonna go ahead, and what I'd like to do is kinda incrementally tighten down the passenger to the driver's side. So I don't want to tighten down completely over here. It may kinda put the other side out of position. So I'm gonna give it, you know, two or three good turns over here. Repeat the process on the other side so that everything gets tightened down evenly. Now, this is a torquing tool. So once we get it kinda incrementally tightened down, (tool popping) eventually we're gonna hear a pop like that, and what that means is that these are torqued down exactly as Inno expects. It's gonna give us a really good secure hold. Our bar's not sliding. Our towers aren't moving anywhere. Everything is really nice and secure. And the final part of our installation is going to be putting on our tower caps here. So those will hook in down there. Get 'em right up in place. Lock 'em in, and that's that. The installation of the Inno crossbars is actually very, very simple compared to other brands and look really, really nice on your Ford Edge. I'm Curt with etrailer. Thanks for stopping by.
Ratings & Reviews


Info for this part was:
At etrailer we provide the best information available about the products we sell. We take the quality of our information seriously so that you can get the right part the first time.


Thank you! Your comment has been submitted successfully. You should be able to view your question/comment here within a few days.
Error submitting comment. Please try again momentarily.