
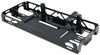
Inno Aero Flush Roof Rack for Raised Rails - Aluminum - Black - Qty 2


To see if this custom-fit item will work for you please tell us what vehicle you'll use it with.
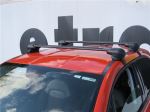
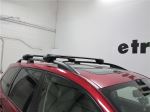
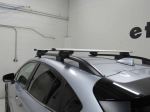
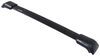
This aerodynamic roof rack mounts flush on your roof for a factory look. Crossbars with push-down rubber strips in top channels work with channel-mount and clamp-on accessories. Installs to raised rails on your vehicle's roof.
Features:
Specs:

Videos are provided as a guide only. Refer to manufacturer installation instructions and specs for complete information.
Hello neighbor, this is Curt with etrailer and today we're gonna be taking a look at the Inno Aero Flush roof rack and we're gonna see how it fits and how it installs on our 2024 Volkswagen Tiguan. Now, when it comes to taking cargo with you on your next adventure and you know, it's items that you can't fit in the vehicle or that you don't want riding with you in the vehicle, a roof rack is an excellent option in order to carry those to your destination. The other option is generally using something out of the hitch, like a hitch cargo carrier or basket or a trailer itself. But having things up on the roof isn't gonna increase the footprint that those options would, so it doesn't give you that extra problem of you know, where to park and things like that. The only thing you have to worry about with rooftop accessories is roof clearance. So make sure you understand when using a roof rack, just how much extra space you're taking up on top of the vehicle.
That way if you come across somewhere with low clearance like a garage or some low hanging branches or something like that, you can be aware of whether or not you're gonna be able to fit under it. This is a flush roof rack, meaning that the crossbars dead end into our towers. They don't overhang it at all. This tends to be a bit of a cleaner, more OEM look for a lot of vehicles. A lot of people like the look of this more than they do an overhang bar.
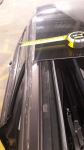
The downside would be is you have less usable bar space on a flush roof rack than you would an overhanging roof rack. It is an aero style crossbar, meaning that it has an ovular shape to it. This is gonna be a lot more aerodynamic, it's gonna have less vibration on the road, so therefore it's gonna be a much quieter ride for you than your traditional round or square shaped bar. There is a T-track at the top that you can use. If you remove your cover, there is a piece of weather stripping in there that's also gonna help keep it quiet for you.
You can just depress that and slide your T-track accessories across. So that's gonna work out really well. It's gonna have a 165 pound weight capacity. However, you always wanna double check your owner's manual of your vehicle to see what the vehicle weight capacity is up on the roof. If it's lower than 165 pounds, that is the weight capacity that you'll have to stay under.
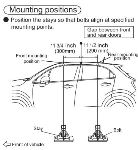
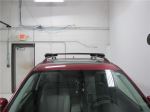
So we're up here on the roof now and we're just gonna kind of check out how this is fitting for us. So the first thing I'm gonna double check is my crossbar spread. That's the distance center to center between my crossbars and that's an important number to know because rooftop accessories all have a minimum and a maximum crossbar spread that they can handle. And usually that number's somewhere between 25 and 35 inches just depending on the rooftop accessory that you're doing. So the center to center crossbar spread that we have today is right at about 30 inches, which is perfect 'cause again, that puts us right in the middle of that optimal window for all those different accessories. We're also gonna be taking a look at how much height this is adding to the vehicle and it's gonna add an extra three and a quarter inches from the center of the vehicle roof to the top of it. So if you take that number, add it to your rooftop accessory and your vehicle height, you ought to get your overall height so you can double check when you're going into those low clearance type of areas. Underneath the bar, we've got about two inches on underneath the bar, which is more than enough room for those clamp mounted accessories to get around and underneath the bar and be tightened up. Now one thing about the Tiguan is that the rails up here that these are resting on have a really aggressive taper. As you start at the front, they're wide and they get a lot more narrow as you go to the back of the vehicle. So because of that, we've actually got more crossbar space on our front bar than our back bar. However, generally speaking, rooftop accessories are gonna require both bars. So what you actually end up having in total bar space to work with, we're just gonna measure our back bar here and what we have in usable bar space is gonna be 38 inches. So even though you've probably got 40, maybe 41 inches up here, you got about 40 and a half actually. I'm not gonna be able to mount something way over here on the front crossbar and expect it to be able to mount back here. So really you just want to, you know, you have about 38 inches of bar space with the T-track. If we're measuring from the inside of the tower to the inside of the tower for our clamp mounted accessories, we're gonna have about 32 and three quarter inches to work with in that instance. But they do look really, really good. Again, having that less bar space is a downside to not being an overhanging bar, but they look really, really nice. And if you don't need more than that amount, then you know, so be it. Again, these look gorgeous up here and they're really, really easy to install. So just stick around and I'll show you exactly how we got these on the roof of our Tiguan. Installation of Inno crossbars is a really a simple task. Just go ahead and take your crossbar and flip it on its back. What you'll find under there are these two tabs, one on either side. This is where we're going to attach our towers. So the first thing you wanna do is just to press this little button here, slide this all the way over, and it's gonna open up this cavity for us. What we're gonna find then is at the top of our tower, we'll have this tab here that's gonna go into this slot and we've got the rest of this that'll go into this cavity right here. Now, unlike overhang bars and things like that where the towers don't necessarily get side specific, on these flush bars they do. On your tower, you're gonna see an imprint of either an R or an LR indicating the right side or the passenger side, L indicating the driver's side. So this is going to be going up on our passenger side over here. The other thing we wanna make sure of is there is a little etching here that shows the outline of the side of the bar where the wider end is supposed to go and where the more narrow end is supposed to go. So with it flipped over, the wider end is back here, the narrow end here. So we're gonna go ahead and turn this over and what I'm gonna do is I'm gonna drop this into this cavity, making sure that the tab goes into that spot in the front right there. And once I get it in there, I just need to slide it over and it's gonna lock in place. Now we're gonna be able to get it up onto our roof. One of the things you wanna pay attention to is the wider portion of the bar needs to be facing the front of the vehicle, the more narrow portion toward the rear of the vehicle. We've already got our rear bar up. It's gonna go on the same way as the front bar that we're putting on now. And what we're gonna do is get this over to the other rail. If we can get it to where we can get this strap underneath the rail, fantastic. If not, we can just set it up there and get it later. But might need to reach a little bit. If you need to get in the door and get up on the door threshold to get over there, by all means do it. Or if you have a friend with you to get over there, by all means, use your friend to help you out too. But this is the way that you want it. You want the top of the tower nestled up here and the strap going underneath the rail. So we've got it here. We've got our strap underneath the rail. What I'm gonna do next is just kind of slide my tower over. I want this to kind of nestle on top of the rail as best I can. Just get as much contact with that rubber padding under there. That's just gonna give it some really good grip. Then I'm gonna lift this tab up in the middle right here and what I'm gonna find is a cradle on the tower that this post at the end of our strap is just gonna nestle right into just like that. Now I'm not gonna tighten anything up yet. I wanna make sure that I get my bars positioned the way that I want to. One of the reasons why I'm positioning my bars this way is I want to be able to get up into the door threshold and be right in the middle of the bars as close as possible. This is gonna give me the best opportunity to reach my cargo and my accessories if I need any adjustments. So what I am aiming for here is to basically kind of get the center of this over this door seam right here. But to ensure that I've got my towers directly across from each other, we're gonna go ahead and get this measured out. I'm gonna measure from the base of my rail right here, the edge of this black trim to the edge of my tower. I'm gonna ensure that that measurement is the same over there. That way I can guarantee that my towers are directly across from each other. And if I do the same thing with the towers on the back getting that measurement, my bars are gonna be perfectly parallel and that is what's gonna enable me to carry my load safely. So I have gone ahead and gotten that measurement done. It's about an inch and a half between this point and the edge of my tower here. I went ahead and made sure that that measurement is equal on the other side. So now I've got my strap in its cradle up here. I'm gonna start turning this clockwise and that's gonna start tightening up this strap underneath. Now what I don't want to do is tighten down my driver's side completely before touching my passenger side. That's a really good way to knock it out of alignment. My suggestion would be, you know, give it three or four turns here on the driver's side and then go ahead and do the same on the passenger side, and I'm just gonna incrementally tighten 'em down back and forth. That's gonna ensure that they stay in place for me. And there isn't anything like you won't hear any kind of click or anything like that when we've got it tightened down all the way. It's really just kind of intended to keep on going until you really can't get it any tighter. One of the things I will say though is that you want to be able to press this tab all the way down by the time you're done with it. So I can probably get it turned a bit more, but I don't think I'm gonna get a complete half rotation to be able to lay this down flat. So I'm just gonna give this a good shake test up here. Yep, my bar isn't moving back and forth. My towers aren't sliding or moving anywhere. This is gonna be plenty tight for us, but if I don't have this in this downward position like this, I'm not gonna be able to put my tower cover on. So since everything is done up here, this is really gonna be the last step of the installation putting this cover on. But before I do, I just wanted to point out one of the great things about Inno is that you are gonna get included metal lock cores and keys that go along with it. A lot of other roof racks out there are gonna give you a plastic lock core that you can open with a coin or with a flathead screwdriver, and you have to purchase lock cores with keys separately, not the case with Inno. It'll have keys and locks for you right out of the box, but I'm just gonna slip this on and over, at this point I just lock it and our installation is complete. So that's a look at the Inno Aero Flush roof rack on our 2024 Volkswagen Tiguan. And if you have any other questions after watching this video, go ahead and leave those in the comments below. We would love to answer those for you. It'll help you and other neighbors just like you make the best decision for yourself. Once again, this is Curt with etrailer. Thanks for stopping by.


Do you have a question about this Roof Rack?
Info for this part was:
At etrailer we provide the best information available about the products we sell. We take the quality of our information seriously so that you can get the right part the first time. Let us know if anything is missing or if you have any questions.


Thank you! Your comment has been submitted successfully. You should be able to view your question/comment here within a few days.
Error submitting comment. Please try again momentarily.