
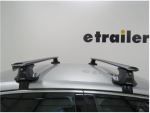
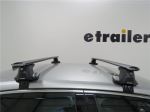
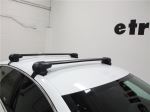
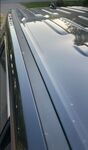
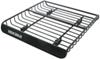
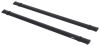
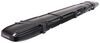
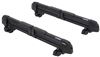
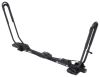
Inno Aero Roof Rack for Naked Roofs - Aluminum - Black - Qty 2


To see if this custom-fit item will work for you please tell us what vehicle you'll use it with.
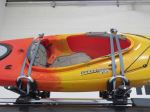
This sleek, aerodynamic roof rack provides space to carry gear on your vehicle. Crossbars with push-down rubber strips in top channels work with channel-mount and clamp-on accessories. Installs on your vehicle's naked roof.
Features:
Specs:
 Alternate Instructions
Videos are provided as a guide only. Refer to manufacturer installation instructions and specs for complete information.
Hi, there, I'm Evangeline right here at etrailer. If you're looking to carry around some cool stuff on top of your 2025 Honda HR-V, like a roof box or maybe some kayaks or even some bikes, well, we're taking a look at one of my favorite roof rack systems for this vehicle. It's gonna be the Inno Roof Rack and this will be a great base for all that great gear for those adventures. It is available right here at etrailer as a full kit. So you have these 51-inch long bars, you have these towers that provide that base, that weight capacity, and you have these hooks and pads that are custom fit for your vehicle. So combining all together, (car door thudding) this is what creates your whole system.
For most situations, this is the one that I usually recommend first, simply because I love Inno as a brand. I've had their roof rack on previous cars and I just love how custom fit and easy they make things. However, depending on your different accessories, you may wanna consider some measurements and knowing some things ahead of time to see if this is compatible with what you are carrying. First off is going to be measurements with where it sits on your roof. Because this is custom design, this is designed for a very specific part of your car, so you have a very specific crossbar spread.
Center to center, (tape measure swishing) from one bar to the other, you have 27 inches. (tape measure snapping) And that crossbar spread is something that you'll look at when you're looking at roof boxes, roof baskets, sometimes skis and snowboards. They require a very specific crossbar spread. Now, that information is available on the accessories on our site if you ever wanna double-check if this will work with maybe the roof box you have in mind. Next up is height.
So there's two measurements here at the top of the roof. The first is, well, how much space do we have for things to clamp around the bars (tape measure swishing) Top of the roof to bottom of the bar is around 3 1/4 inches, maybe 3 1/2, depending where on the roof you measure. (tape measure snapping) That is really good for space. Most items will fit, even some of your U-bolts, wing nuts, old-fashioned style clamps should be good, but it's always worth double-checking beforehand. (tape measure swishing) Next up is the height on top of your roof.
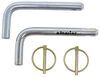
So from the roof to the top of the bar, I have it at around 4 1/4 inches. (tape measure snapping) And that's gonna be where your cargo sits. So picture this, you have some skis you're carrying around, maybe you have some taller bindings. You make sure that those bindings aren't scratching up the top of the roof. If you find you need some extra space, well, a lot of our accessories here at etrailer have options for a little bit of extra height and that should help solve your problems. I've always had a roof rack on my car because I love carrying around kayaks, and having that reliable base is always important. I've always had a smaller car. So something to think about when carrying longer item, like kayaks, is the distance from the crossbars to the top of your hatch door. So here, we have 32 inches, which is a lot of space. (tape measure snapping) This roof rack actually sits a little bit further forward than I was expecting, which is a good thing 'cause then you have all this clearance for larger roof boxes, longer kayaks, canoes, ladders, things like that. Now, if you do happen to carry something that might be a little bit too long or you have clearance issues, then just keep that in mind as you open up your hatch door so you don't run into it. (hatch door thudding) Everything really works together for that full system. Another thing that I like about Inno is it has these lock cores and keys included so you can lock up your system. Your end cap, that's removable if you want to mount things into the channel. So if you wanna fully utilize that 51-inch crossbar space, then go ahead and pull that end cap out, and then you can slide your accessory on through, no cutting of the rubber required. And that's pretty convenient too. Again, I really like that end cap design here. And then, everything tightens down, (end cap snapping) and secures onto your vehicle. So it really is a full and complete system with no extra accessories needed to use the whole thing. The installation process is actually very straightforward. Now, it might seem confusing at first because there's a lot of different parts and pieces, so I'm going to guide you through that process. I already installed the rear crossbar on this vehicle, so we get to install the front crossbar together. So first, we're gonna grab our crossbar. And out of the box, it actually already has the rubber strip attached up top, so no need to install that. We're going to flip the crossbar over, and this is actually probably the most confusing part for most people. It's attaching this metal plate. So underneath your crossbar, you're gonna notice this open tray and this track. We're just gonna slide that tray all the way out to the end of our crossbar, just like that. See how it sticks out like that And then, notice on your plate that there's this little notch in here. That means you go from underneath and then fit this plate up into that tray. And now, we're gonna slide that tray right back in. (tray whooshing) And you're gonna go all the way to the middle, or as close to the middle as you can get, and you're gonna press this button here and continue sliding until the tray is now in this open space, so that you can now attach your tower. So notice on the tower, you're gonna have this bolt and then you're gonna have this tab. All that is gonna line up onto that plate, just like that. (tower clanging) And then, you're going to press this knob here or, I guess, this lever. And this is what we will use to slide the tower out. So you're going to do this on both sides and this will happen four times. To measure out where you put your towers, you're gonna have a center marker on your crossbar and you're gonna have instructions in your fit kit as well. So for what I do is I measure from that center point and then I go out to the line on the tower. So for example, for our front crossbars, that's gonna be 21 inches and 3/8 of an inch. And then, your tape measure will also have the millimeter version if you want that for a little bit more accuracy. Once both towers measure to that distance apart needed, then you're gonna use the Allen key included with your kit to just tighten down on that bolt in between those lines. Then, it's once attach your rubber pads. So for your front towers, they're going to use the pads four to six. So when you put these on the towers, you wanna make sure that the cutout of those rubber pads is facing this way. So the taller portion is towards the inside of the bar. The thinner portion is towards the outside of the bar. You can now lift this onto the roof. So very carefully placing your towers on the roof, that rubber pad will prevent scratching up. Where do you put this Well, there's gonna be a measurement in your instructions that will align from the door seam to the center of the bar. For the front bar, that's going to be 9 3/4 inches. So we wanna make sure that both sides match up with that number. Secure those towers with your hooks. For the front tower, it's gonna be a T115. So these hooks fit onto the tower, and then into your door. And you're gonna have these bolts, as well as this plastic washer and then this metal washer, and that's used to secure it. Now, included with your kit is going to be this Allen key. So the metal part is stored in the knob and you just drop that into place. Now, you're going to use that to tighten down that bolt until your hook is just barely touching the side of your door. (bolts clinking) Now, go to the other side and attach the hook there. It's very important that you evenly tighten down the hooks on both sides because if you pull one side too strong, it will pull the entire system in that direction. By evenly distributing, I tighten this down halfway then tighten that down a couple turns more, and then just going back and forth, you'll then be able to evenly secure the whole roof rack to your roof. As you're tightening down with this tool, (tool clicking) it's actually a torque tool. So once you get to the correct tension, or tightness, this tool will click. And I do recommend having it click at least twice. (tool clicking) That way, you know for sure that you're at the right spot. (tool clicking) So if you are ever wanting to just double-check your towers that they are all tightened down properly, I tend to go through and just tighten them until they all click, just for peace of mind. With everything properly secured, you can now slam the door on your system, (car door slamming) without any worries. And then, final touch-ups, you're gonna put the end caps on. Remember, there's gonna be a left and right end cap, so don't get those confused. (hand tapping) Those fit into place. And then, your tower end caps, put the key in and then pivot those end caps up, turn the key, and now that's secured. (hand tapping) That's gonna be it for the installation of your roof rack. From this point on, something I recommend doing, since you get two keys, I put one on a keychain, the other in the glove box or in the center console. That special tool as well for undoing those hooks, that's something I keep with the key. And that way, if you ever need to remove this roof rack, you can do so, or double-check the tightness on your roof. Now, you can load up your roof rack and hit the road 'cause you just installed the Inno Roof Rack on a 2025 Honda HR-V.
Ratings & Reviews


Info for this part was:
At etrailer we provide the best information available about the products we sell. We take the quality of our information seriously so that you can get the right part the first time.


Thank you! Your comment has been submitted successfully. You should be able to view your question/comment here within a few days.
Error submitting comment. Please try again momentarily.