
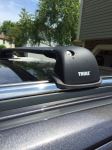
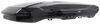
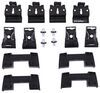
Thule WingBar Evo Roof Rack for Flush Rails - Aluminum - Black - Qty 2


To see if this custom-fit item will work for you please tell us what vehicle you'll use it with.


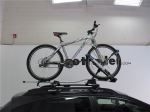
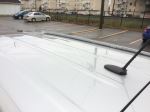
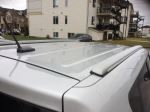
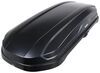
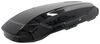
This Thule roof rack lets you carry cargo and gear on your vehicle. Aerodynamic crossbars with split rubber strips in top channels work with channel-mount and clamp-on accessories. Installs to flush rails on your vehicle's roof.
Features:
Specs:
 Alternate Instructions
California residents: click here
Videos are provided as a guide only. Refer to manufacturer installation instructions and specs for complete information.
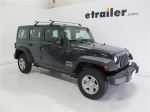
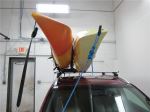
Hi, everyone, it's Evangeline right here at etrailer. Today we have the Thule roof rack with some extra long crossbars, and we're gonna take a look at how it fits and I'll also show you how to get it all installed on the 2024 Jeep Wagoneer L. Now this is a fit kit that can fit your other Wagoneer models. Double-check our website to make sure this will fit yours. But if you're looking for a great way to carry all kinds of fun accessories, whether it's a rooftop tent, some kayaks, some bike racks, this is gonna be a great way to start. I'm actually really excited about this fit kit because this is a combination that I put together for the Wagoneer L.
Your Wagoneer is gonna be a really tall, really large vehicle. Awesome for most situations, except for when you have to lift things up and onto the roof. So this is gonna have the extra long crossbars. We have 60 inch bars here, the WingBar Evos, and we combine that with the flush rail towers and the custom-fit kit for a whole kit that works together for your Wagoneer. This kit is also available in the 53 inch bar version, which is gonna be a bit shorter, if you wanna sleeker look.
But if you ask me, just go ahead and get the 60 inch long bars. That way you have more space for more things, for more adventures. This secures to the flush rails of your Wagoneer, and there's actually two bolts in the back that each bracket bolts onto, which is why it's pretty important to use our fit guide right here at etrailer. You put your year, make, model on top, and then we give you all the different roof racks that are confirmed fits for your vehicle. So make sure you get that correct mounting spot.
Now, real quick before we move on, some people ask me if this follows the Jeep's standards of give you an extra spot for a third bar in the back. Technically, yes. If you want to put three crossbars on your roof, you can. Now Thule doesn't offer the three-fit kit, but we can get you two-fit kits for four bars, and you can figure out something that works that way. If you have any questions on how things fit or how to just really customize your whole system, whether you want the longer bar or the shorter bar, also feel free to give us a call.
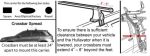
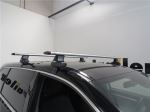
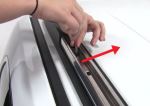
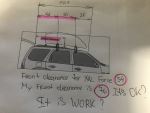
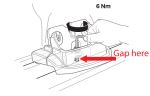
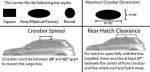
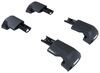
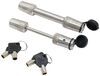
We love helping you out with all kinds of different fun ways to get out on those different journeys. So how much clears are you gonna get with this roof rack on the Wagoneer Well, if we measure from our roof, whether it's by the top or bottom of the ridges, there's gonna be a lot. So I'm measuring around 4 1.4 inches of height, plenty of space for all kinds of clamps. Even if you have those old-fashioned roof boxes with a large U-bolts, this is gonna have space for that. As we're on top where your cargo sits, that's gonna be about 5 1/2 inches. Again, a lot of height. So let's say you have skis or snowboards with extra large bindings, chances are you are gonna have clearance for those bindings, you're not gonna be scratching up the roof, but this measurement might be helpful for you because in case you do need more height, you can go ahead and grab some accessories here at each trailer that give you some extra height, like those special skiing snowboard carriers. As for crossbar spread, that's gonna be measured from the center of one bar to the center of the other. For us, that's gonna be 29 inches. This measurement's pretty important for carrying around roof boxes, roof baskets, sometimes ski and snowboard carriers. 29 inches is pretty average for crossbar spread. Very versatile, will fit most of your accessories, but there's a measurement for you to double-check. Some premium Thule things are that this is gonna be made of some really strong aluminum. If you flip this end cap over, you can just see the thickness of the bar. This is also where you could technically mount T-track-mounted accessories. I have T-track-mounted accessories. I usually take the wind strips out because splitting them apart sometimes catches things, but then you can always push 'em right back in, and this will help reduce wind noise. This end cap just covers everything for a nice and neat look. Thule also has some really strong towers, where these are gonna be the towers that hold up the hold system. You can purchase locks that are sold separately if you want something that uses a metal key. And then they have this really thick rubber base. So the base goes over your flush rail system, but this utilizes two metal clamps to clamp into the flush rails in the back. So everything works together for a really strong and sturdy system. Even when you have your heavier roof tents or kayaks up here, this is definitely a brand that a lot of people rely on because of their durability. Thule is a premium brand with a premium price. While you might be wondering why they tend to have a high price tag for their roof racks, the reasoning for that is because they've done roof racks for a very long time and they've really mastered their art, especially this one for the flush rail system on the Wagoneer. This is gonna be one of the easiest roof rack installs that I've done with that system, even though I'm anchoring to fixed mounting points. And if you're curious about that process, we'll get into the installation in a second. But first, I would really like you to consider which crossbar length you need the most for your adventures. Because if you have longer bars, that's gonna be more bar space, as well as less distance you're gonna have to reach onto your roof to load things on. But then it also takes up more space on your roof and may look a little bulkier. So, if you want a more sleek look, there is some really good WingBar Edge crossbars that look lit really good and are installed on this vehicle if you wanna check that video out. But if you want more space, as well as more crossbar capacity, that's where these 60 inch bars may come in handy. Now I kept talking about that install process. Let's go take a look. To get everything installed, it might seem a little confusing at first 'cause there's a bunch of different parts and different things and bolts, and that's okay. I'm gonna guide you through that process. It's pretty straightforward once you know what you're doing. And remember, this process is gonna be the same, whether you have a Wagoneer, Wagoneer L, and wherever on the roof you wanna install your roof rack. Now the very first thing I like to do is set up the roof on the vehicle, and that's gonna involve installing the brackets onto your flush rails. Up top, you're going to have caps covering your bolt holes. So they're just gonna be plastic caps. You can use a flat head screwdriver or a pry tool to just pry those out. Once those are out, you can then attach your metal bracket. so see how that bracket fits on over your system. There will be a gap up top, but your main focus here is just lining that bracket up with the holes. Secure that bracket with your included security bolts. So these are gonna have just a special end to them, where you need to use the included Allen key to tighten them down. And there's not that much space on the roof for these bolts, so just be careful as you tighten these down to not scratch things up. There are wind strips included with your crossbar, so make sure to install those at some point during your install. These are just gonna be rubber strips that push down two separate pieces, and you're gonna want the arrow facing the wide or tall part of the tower, and then you want the flat piece towards the tapered edge. If there's excess wind strip, you can just go ahead and cut that end off with some scissors. Today we are using our 60 inch bars, but this process will be the exact same if you're doing the 53 inch bars. And we're going to be using the flush rail kit as well as the custom-fit kit. So first go grab in your tower and insert those towers into your crossbar. We're then going to set up the towers with a hook and a rubber pad. Get the clamps that say A, and they're gonna have that fun shape like that. That shape is designed to fit right into your towers. And then you're gonna hold those clamps in place using the rubber pads. So the rubber pads will, see there's tabs on them, fit right into the tower, clipping into those little matches, and hold your first clamp in place. Once you've installed all four towers, secure them in place using your WingBar Evo end caps. (plastic clacking) Those just pop into place. And then now, we're going to grab our C-clamps, our torque tool, as well as our tower caps, and we're gonna take our crossbar to the roof. Remember those brackets you installed earlier Well, your towers are going to sit on top of those brackets. Now some things to note here is make sure that your crossbars are facing the right way. You want the taller portion facing front, the tapered end facing back. Also, since your end caps are on there, those should hold the towers in place and prevent them from sliding off during this process. If you're a little nervous about it, definitely grab a second person to grab the tower on the other hand to make sure nothing falls off. You are then going to want to measure so you can have the same amount of crossbar on each end. I measured mines be about four inches from the tower to right before the end cap, and then you're gonna secure that spot with your hook. So the hook fits into that lip of that first hook. See how that C-hook goes in And then you're going to secure that by using these tower caps. The tower caps thread into that bolt back there. Might be a little tricky lining it up with that bolt, but just keep working away at it until you get that thread started. Now you're then going to use your included Thule tool to continue tightening down that bolt, and this is gonna be a torque wrench set to four newton meters. So go ahead and tighten those bolts down until your tool clicks, and then make sure all four towers click too. Now cap them all off with your tower cover. And these come with plastic locks that can be turned with a flathead screwdriver. If you purchase the metal lock cores, which are sold separately, you can switch that out here right now, and that will make sure all your Thule items are keyed-alike. That's available here on our website if you're interested about that. But with all four towers secured, all our crossbars secured, give it a good old shake to make sure everything is nice and tight. That's gonna be it for your install. You are not ready to load this up with all kinds of fun accessories and hit the road. Hopefully this video just guided you through the process of installing this roof rack, and it is pretty straightforward once you get to it. But today, what you saw was the Thule roof rack system with a longer crossbars, the 60 inch WingBar Evos, the tower kit for flush rails, and the custom-fit kit for your 2024 Jeep Wagoneer L. My name is Evangeline, and I hope you enjoyed this journey.


Do you have a question about this Roof Rack?
Info for this part was:
At etrailer we provide the best information available about the products we sell. We take the quality of our information seriously so that you can get the right part the first time. Let us know if anything is missing or if you have any questions.


Thank you! Your comment has been submitted successfully. You should be able to view your question/comment here within a few days.
Error submitting comment. Please try again momentarily.