
To see if this custom-fit item will work for you please tell us what vehicle you'll use it with.
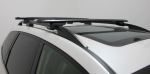
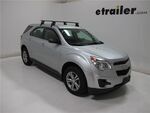
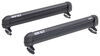
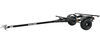
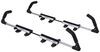
This aerodynamic roof rack lets you carry gear and cargo on your vehicle. Full-length aluminum crossbars provide plenty of space for channel mount and clamp-on accessories. Installs on your vehicle's naked roof.
Features:
Specs:
 Alternate Instructions
California residents: click here
Videos are provided as a guide only. Refer to manufacturer installation instructions and specs for complete information.
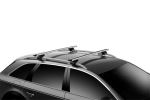
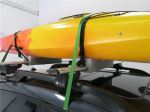
Hi, Matt with etrailer. If you have a 2021 Ford Ranger and you're looking for a way to get a little bit more storage out of your Ranger and you want something that's gonna be relatively easy to install, then the Rhino-Rack roof rack is gonna be a pretty good option for you so let's check it out. What I like about a roof rack is a few things. So what's nice about it is it's gonna allow you to carry those extra long items because while we do have a bed, sometimes that can still be limiting 'cause if you have anything like lumber, ladders or kayaks, putting it back there just isn't gonna be ideal. What's also great about it is instead of relying on a small trailer or a hitch cargo basket, putting it on your roof is also gonna save you more space, keeping everything in just one footprint. It's also important to check you have the right type of roof and the Ford Ranger really only has one type for the most part but sometimes you might run into something else so you need to make sure you have a naked roof option.
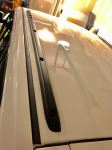
And a naked roof option isn't gonna have any type of rails on it. A flush option will have some type of rail that you can grab on and then a raised roof option, you'll be able to get your hand underneath that rail. I also just recommend plugging in your vehicle's information into our fit guide to make sure you find the right one for you. But let's just focus on the kit that we have today. And it's gonna come in three parts.
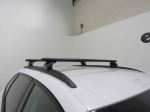
It's gonna have our 49 inch Rhino-Rack Vortex crossbar on top. We're gonna have the tower underneath and then we're gonna have the fit kit that attaches to your roof. But let's focus on the crossbar. The shape of this crossbar is gonna be an aero style and what that means is it's gonna have a taper end to either side that's gonna help it be more aerodynamic and that's gonna help reduce wind noise. Something else that's gonna help reduce wind noise is gonna be this weather strip up top.
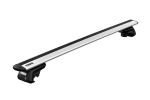
That's also gonna keep out any debris or water from getting into this channel. And the important reason why you want that clear is if you want to use any T channel accessories. T channel accessories are ideal if you run into any situations where you have a clamped on accessory that just won't wrap around a certain section anywhere like where the tower is sitting, you won't be able to get your clamp on accessories there. Now I will say this weather strip is just one that you have to cut down the size to work around your gear. If you're looking for something that's a little bit more premium, I'd recommend checking out the Thule roof frack.
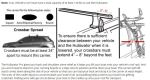
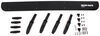
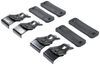
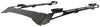
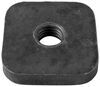
What's nice about that, that weather strip is actually built in so you don't have to worry about cutting anything down to size. We'll also have this end cap. This end cap is gonna have a plastic lock core on the end of it and it's gonna help deter theft. But if you want even more security, you can actually get that replaced with a metal locking core. We're gonna have a T channel underneath too. And what that's gonna be used for is to connect your tower to your crossbar. And if you look inside of here, I already removed our end cap. The nice thing about this is it does have a metal locking core. So you will have the extra security right here. And this is a relatively simple layout. So we're just gonna have this bolt that connects to your tower that's gonna hold this clamp and this clamp is grabbing onto your gutter right here. So it is keeping everything cinched into place. Now I will say this is a fixed mounting location. Now it's not gonna be as fixed as some other options out there where you actually have to drill or really put a bolt through a certain hole in your roof. This, you could move maybe an inch to the back or front if you really needed to. I still don't recommend it, but just know you will have a little bit of play with this when it comes to installing it sometimes. And with that clamp, that's also gonna be part of your fit kit. And your fit kit's gonna come in two pieces. So it'll be that clamp itself and we're gonna have those rubber pad underneath. And right now we're getting a really good fit from this. And what I mean by that is we don't have any gaps. It's relatively flush. So we know we're having a secure fit 'cause it's doing two things for us. One, it's giving us a pretty nice look on top of your roof, you wanna make sure you don't have any gaps. And if you did have some gaps, sometimes that can create additional wind noise or some whistling that can occur. But right now we don't have to worry about that and it's gonna give us more peace of mind since it is flush, ensuring that we do have a good hold on top of our roof. And the way it's gonna sit up here, if we get some measurements, we can get the total height and right now that's gonna be sitting a little bit over five inches. So that's a little bit high compared to some other options out there. What I'd recommend doing is just taking the total height of your vehicle, your crossbars, and anything on top of there is just so you know if you can make it underneath a spot, a spot to really think about would be a garage. And if we get the distance underneath the crossbar, that's gonna be a little bit over three inches. And why that's important is if you have any really bulky clamps, they should work. Now, if you do have a sunroof on your roof then you might need to consider that too 'cause if that opens up and expands up, it could make contact with something. Just make sure you keep an eye on it. And then for the crossbar spread, this is gonna be set to 31 and a half inches. Like I said earlier, this is gonna be at fixed points. Gears might be a little bit off if maybe your installation is just a little bit off. But just make sure it is as flush as possible. And that's important to know because you need to make sure that spread is gonna work with whatever gear you have. Something else to consider is how it's sitting up here. And what I mean by that is the angle of our crossbar, since they are at a slight angle, that's just 'cause the shape of our roof. But the good thing is both bars are parallel so we shouldn't have any fitment issues. The biggest thing is if you have any extra long items, they might be at a slight angle and that's gonna be more of a cosmetic thing than anything. And as for how much room we have for the overhang, this is gonna be a little bit more close to the tower, so it might be more of a clean finish. The big obstacle you might face is if you have any clamp on accessories, a lot won't work with this amount of space. You might be able to get a ski carrier at the very end of here. That's gonna be a big maybe. That's one of the benefits of having this T channel up top. So if you are running into any issues like that and you want your gear be as close as possible to the side so it's just easier to access, then you still have that ability. And this will have a pretty decent weight capacity and what's gonna be the limiting factor is most likely going to be your roof. So what I'd recommend doing is finding that in your owner's manual and then going from the lowest rated component. Now in my opinion, I think this is a solid choice for a roof rack. I don't think it looks bad at all on our roof and I think it's a great value option in the realm of these more custom fit roof racks. Now if you're looking for a slightly better look and a just as easy of a installation, then I'd recommend the Thule roof rack. That one is personally my favorite aesthetic wise on top of your roof, but it's gonna be the most premium one and it's gonna be at a little bit more of a premium price range. So if you're looking to save a little bit and you still want that easy installation, I think this will be perfect for you. Now if you are curious about that installation, just stay tuned, we'll walk you through the process. To begin the installation, I like to lay everything out. So for this way for me, we are gonna have our crossbar, next to that, we're gonna have the towers and their bases. And on our other side we're gonna have our fit kit that's gonna consist of these two pads and these clamps. You'll have this little measurement tab to make sure everything's even on both sides. And we're gonna have this included tool. Not only is it gonna be an Allen key, but we'll have one to take off your end caps. And we're gonna have our included key so we can lock everything up. What I recommend grabbing is just an additional tape measure just so you can make sure everything's even. We already have our front crossbar installed but it's gonna be the same process for either one. Now there will be a few differences when it comes to measurements, but we'll talk about that when we get to it. But right now I will install our bases to our rubber fit kit. The way this is gonna work is we're gonna have a lot of tabs on here and this is kind of just plug and play into each other. Now there's a few things we wanna make sure of before we get this all cinched together. So there's gonna be a couple indicators on this. One of the indicators is gonna be an arrow on that plastic base. And right now I have this facing out. And what I mean by that, we wanna make sure when we install this that this isn't facing towards the center of your vehicle. The second thing we want to check is the rubber base or fit kit itself. On here we're gonna have an arrow. It might be kind of hard to see, but we wanna make sure this is facing forward towards the front of your vehicle. I got my crossbar in front of me now and what I'm gonna do is grab this little blue key and I'm gonna remove my end cap. The best way I like to do this is just simply face it like this, that key's gonna sit in place and I can remove it. I'm gonna grab my key in a second, but what we're gonna be doing at this point is putting our tower on. The way this is gonna work is we got this little metal block here at the top of it and sometimes it's best to loosen this up before you get in place. If you loosen it up a bit, you have this head right here. This will give you a little bit more room to work with. And the way this is gonna seat into place is we're gonna have this T channel right here. That metal block is gonna go into it and we wanna make sure that we're putting this on in the right orientation, making sure that this bolt is facing out. We got both towers in place and the end caps back on. And what I wanna do from here is grab this strip. This strip is gonna have this measuring tape on it. And what I'm gonna do is figure out where this tower needs to sit. You can actually find this measurement in your instructions and the best way to do that is get that measurement, cut it down where you need it to sit and try it out. Now I found that this actually needs to be a little bit more in than what we originally thought, so I'm gonna try it like that. But I'd recommend sticking to your instructions first and then going from there accordingly. Once you get that measurement, we can tighten this down, which you can grab that Allen key and go from here. Now you'll notice I don't have my strip in place. That's because this is just one we keep in the studio. So we're gonna need this for a lot of different lengths but you can install yours. We can start putting it on top of our roof. Before we get it up there, we wanna make sure it's in the right orientation. So like I said earlier, we're gonna have those arrows on those rubber pads and we wanna make sure those are facing forward. Once we've done that, I'm just gonna roughly place this on top of my roof. This doesn't have to be perfect quite yet, 'cause later on I'm gonna use some measurements from my instructions to get the exact location. Your instructions are gonna have two measurements. It's going to have an A and B. Your A measurement is gonna be the distance from the top of your windshield to the front of your front crossbar. You're gonna check on both sides and make sure it's even and square it off. And then you can get the measurement for your rear crossbar, which is gonna be B. It's just gonna go from the center of your front crossbar to the center of the rear one to make sure it's squared off too. The second thing I'd like to check is how this is sitting up here. And what I mean by that is I wanna make sure this base is looking pretty good and it's flush. And right now I'm not a big fan of this, that's because this isn't cinched up against this corner. So it's gonna give me a little bit less peace of mind and that's what I was talking about earlier. Sometimes this can sit a little bit too wide, so we'll have to adjust it later on. We'll just have to bring these towers in maybe by a half inch, a quarter inch. Just kind of take it slow until you get this into the right spot you want it to. Now this is what the fit we want is, just like this. It's more flush against this corner. Once you got that, then we can start installing our clamps. To do that, you're gonna remove this bolt at the very back of it. You can use your tool to do this. It should be loose enough just to do with your hand. Once you get that out, we can just open up our door and install our clamps. Now you're gonna have two sets of these. You just need to make sure you reference a number on the inside of it, that's gonna match the right locations on your roof. Once you've done that, we're gonna reinstall this bolt back into that hole in the backside of it. Now, the best way I find to do this is to use your tool. Just kind of hold it in place like that and it's gonna be a little bit tricky sometimes, but you're just gonna guide that bolt through that hole on your clamp through that nut on the backside or inside your tower. We just wanna get this started and once that's grabbing on, then we can kind of test your fit. Sometimes you might run into this case where this clamp is just sitting on top rather than around your gutter. What I find is the best solution for that is to just pull on here a little bit and try to slide that in and push it back into the right location. And you just repeat that on the other side. And with both clamps installed, we're gonna start tightening this down. Now the trick to this is just to tighten each side a little bit at a time. And the reason being, you wanna make sure you don't tighten this up too much on one side because it's gonna start to pull and that's not gonna give you an even fit. Now, you're eventually gonna reach the point after going back and forth a few times where this is gonna start to kind of bend at the end. And you can tell if this straightens out all the way, then this is fully tightened down. And what we can do from here is kind of give it a good shake test to make sure it's not gonna go anywhere. And if it feels pretty good, then you can put your end caps back on. And with all four of your end caps in place, just make sure you lock 'em up. And then that'll pretty much do it for our look at the installation and some of the features of the Rhino-Rack roof rack on top of our 2021 Ford Ranger. I'm Matt, thanks for watching.

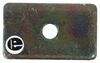
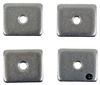
service was great. Only 3 out of 4 pads came obviously manufacture error. But would like to have the 4th pad
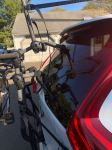
Are you kidding me? First I get the box with missing hardware (pic attached). I call up, tell them I don't even care for a discount, just expedite the right parts. They didnt expedite them as promised, a week later the parts come in and they are WRONG (pic attached)!! So after calling in and spending more of my precious time on the phone again, I looked up the correct part numbers from Rhinos website and provided them to the rep. Again I was assured they would be expedited.... The (2nd) phone call about missing parts was on Mon Feb 21st 2022. They didn't prepare the items for shipping until Fri the 25th. As of today Sun the 27th, USPS is STILL awaiting my items. After being assured they would expedite my stuff, here I am still waiting. Btw, my original order date was Jan 23rd. What a terrible experience, I should have paid the little bit extra and just went through Rhino themselves. Would not advise dealing with this company. Now I'm waiting on my parts to ship again, which means I probably won't see these until March 4th if I'm lucky, which is 1.5 months after my original order date! Hopefully they are the right parts this time.
Just as described. Fast shipping. Very good service.
Super fast shipping!!! Excellent suppor t.
Customer service via phone excellent. Speed of delivery excellent (2days). Packaging minus 5 (yes…four products dumped in an oversized box with such a poor tape job that it was open on one end). I didn’t know if all that I had ordered was actually in the box and either had fallen out or damaged until I took each part out of their individual boxes. I installed the roof rack yesterday. Overall pleased. Not etrailer’s fault but the key bolts on the Rhino-Tak plates that secure the bars to the car (M8 50mm) are much too short. Going to the hardware store today to replace them with 60mm.
Very happy that I went with etrailer, %100 recommend
Worked perfectly with the Rhino Rack DS 126B.
Product was deliveried quickly, and complete. Instructions where helpful and measurements where correct
Good product! Installer said it was a bit confusing to install.
Instructions confusing, easier to figure it out by looking at parts
Great price and fast shipping , I’m definitely shopping here again!!!
Carol, I bought this for my son for a College graduation gift, that he picked out.
He got it pretty quickly in the mail and said it was fairly easy to put together. He's very Happy with the racks.
Its to put his kayak on.
A bit of a challenge to get it installed just right, but once in place it's rock solid. Very pleased with the rack, especially for the price.

Great directions easy to install. Solid rack. No issues after a year of use
The rack works great but the wind noise is so aggravating that the rack now sits in the garage not on my truck.
Good product. Instructions would be challenging for many Thank goodness I’m an engineer.
Good product. thank you Kimberly for your outstanding customer support and service. Will definitely buy from you again.
Great customer service. Product was easy to install. Met all my expectations.
The fit for these on my Porsche Cayenne was spot on, so why only three stars (2.5 would be more accurate in my opinion) Only the front and back of the mount is coated, the edges are exposed and while setting them up I scratched the heck out of my roof. I plan to dip them to prevent this in the future but really this should be addressed by the manufacture.
Great product , Etrailer did a great job for me especially Kevin!
Thanks !
Worked over the front doors of a 2011 gmc crew cab
Metal legs that grab onto paint could use more padding to protect paint. But just my opinion. They did a good job. Drove 85 and they didn’t move.
If you are mechanically inclined. This roof rack system is easy to install. If you are a rookie, let a professional do the install.
Fast shipping, great follow-up, received all the correct parts.
Highly recommended


Do you have a question about this Roof Rack?
Info for this part was:
At etrailer we provide the best information available about the products we sell. We take the quality of our information seriously so that you can get the right part the first time. Let us know if anything is missing or if you have any questions.


Thank you! Your comment has been submitted successfully. You should be able to view your question/comment here within a few days.
Error submitting comment. Please try again momentarily.