

 Arrives before Christmas
 To see if this custom-fit item will work for you please tell us what vehicle you'll use it with.
Thank you! Your comment has been submitted successfully. You should be able to view your question/comment here within a few days.
Error submitting comment. Please try again momentarily.


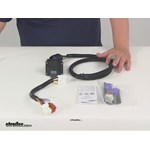
Forget the hassle of complicated wiring and modifications. The T-One Vehicle Wiring Harness with 7-Way Trailer Connector is designed for easy installation with your vehicle's factory wiring. Simply plug it into your Nissan Frontier, Xterra, or Pathfinder and you're ready to go. This custom-fit solution fits snugly, requiring no cutting or splicing, streamlining the installation process so you can hit the road quicker.
This harness is not just a one-trick pony. It seamlessly works with 4-pole, 5-pole, and 6-pole adapters, making it versatile for a variety of trailer types you might own or rent. Whether you're towing a boat, a camper, or a utility trailer, this connector has you covered with ease and adaptability.
Engineered with 16-gauge bonded wire, this harness ensures reliable and durable performance in all weather conditions. It’s built to last, providing consistent power to the lights and brakes on your trailer. The high-quality materials used in this wiring harness mean you can trust it won't let you down during long hauls or repeated towing trips.
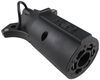
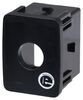
Worried about wear and tear? This 7-way connector comes with a protective cover that shields it from the elements when not in use, prolonging the life of the connector and ensuring it performs under various conditions. This peace of mind allows you to focus on your journey, not on maintenance issues.
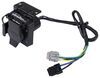
No need to scramble for extra parts. The kit includes required relays to ensure all wiring functions operate correctly once installed. This thoughtful inclusion makes sure your trailer's lights and signals are fully integrated with your vehicle’s system the moment you finalize the setup.
Make the installation as seamless as possible. This wiring harness is specifically designed to follow the lines of your vehicle’s frame, ensuring a perfect fit without any drilling or additional modifications needed. It’s tailored for your specific Nissan model, ensuring minimal hassle and optimal functionality on the road.

California residents: click here
Videos are provided as a guide only. Refer to manufacturer installation instructions and specs for complete information.
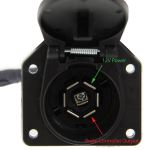
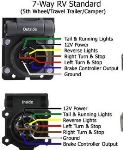
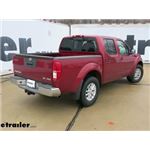
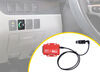
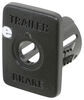
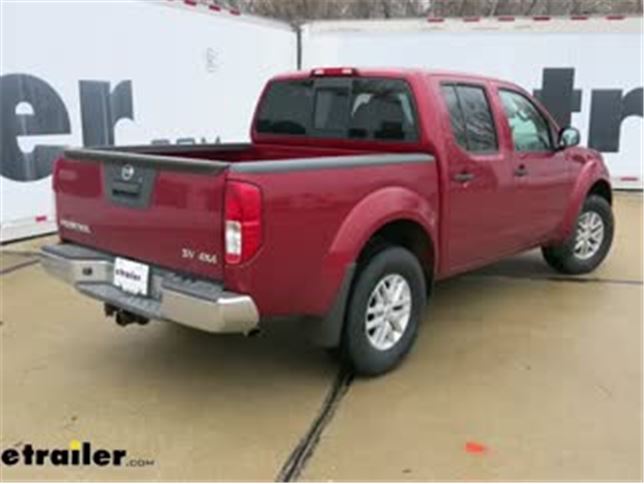
Today on our 2018 Nissan Frontier, we're going to be taking a look at and showing you how to install the Tekonsha T-One vehicle wiring harness with 7-way trailer connector. That's going to be part number 118266. To help us with our installation, we're going to be using the Pollak mounting bracket, part number PK12711U.Here's what our wiring's going to look like once we have it installed. I do want to mention that our kit is not going to come with a mounting bracket, so we will need to pick one of those up so we can secure the connector at the back of the truck. Our wiring's going to give us a 7-way connector, that way we have all the required lights to get down the road safely, like our turn signals, stop lights, tail lights, and our reverse lights.It's also going to give us a 12 volt power source at the back of the 7-way, and the option to use an electronic brake controller if we choose to put one in later.The spring-loaded door along with the rubber gasket on the inside is going to prevent any kind of debris or moisture from getting inside. What I really like about our wiring is the fact that it is going to be a completely plug-and-play installation.
We're not going to have to cut or splice into any wires at all. We're not even going to have to remove our tail lights. We're going to have two connectors underneath the vehicle, and then we'll have a few relays that we'll have to put in place on the inside.So now that we've seen what our wiring looks like and gone over some of the features, let's show you how we got everything hooked up. We went ahead and mounted our 7-way bracket. Now we're going to take our 7-way plug, we'll slide it through, and the holes will line up, and we can take the hardware from the bracket and attach everything up.
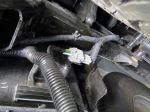
Start by taking one of the screws, we'll go through our connector, all the way through the bracket, and then we'll secure it on the back side using a locking nut. We'll repeat that for all four holes, so we can make sure our 7-way is going to be secure.I'll come back and I'm going to take a flathead screwdriver, and while I'm holding the nut on the back of my finger, I'll just tighten it up to where they're nice and snug.If we move underneath, on the side of the frame rail on the driver's side, we're going to have two plugs. We're going to need to take the caps off of each of them. The easiest way to do it without having to take the plug off of the frame, you just take a pair of needle-nose pliers, and we'll come in and we're going to squeeze on that tab, and then we'll pull down, and we can pull the plug out. We'll do the same thing for the other plug as well.With those caps unplugged, we'll grab our wiring harness.
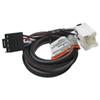
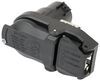
The black plug is going to plug into the black connector on the bottom. Just push it in until it locks into place. And then the gray plug is going to plug into the gray connector. We'll take the other end with our 7-way connector on it and we're going to route it towards the back of our hitch where we have our 7-way plug at.Before I plug my connector in, I'm going to take some dielectric grease and I'm just going to fill up this entire area. Hopefully, that'll prevent any kind of corrosion from building up and moisture getting inside the connector.
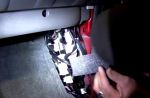
If you need some dielectric grease, you can pick it up here at etrailer.com. We'll just line it up and push it til it locks into place. We can tie up any of the excess wires to the back of the hitch here.Now that we have everything connected back here, we're going to move into the cab on the passenger side. On the passenger side, right by the outer door here, we're going to have this kick panel. If we look at the very back, we'll have this plastic fastener that's holding it in place. You should be able to remove this by hand, just turning it to the left to unscrew it. And then we're going to have to remove this lower panel on the side here. If we start on the lower part at the threshold, we should be able to get our hands underneath it. We'll pop all the clips out, so we can remove this piece. And then we'll grab behind this piece and I'll pull this one out as well.Now, behind all those panels, we're going to have several plugs. We should have one that's going to be open, it's going to have several pins on it, and it should match up to the other side of our harness. We'll take our white connector and plug it in, want to make sure it locks into place.On the other end of our harness, we're going to have a few more plugs, and we're going to be plugging some relays into there. We'll have two white plugs, we're going to have two blue relays. These are going to be exactly the same, so we just want to make sure that we plug them in correctly, but it's not going to matter which one we plug into where. We'll plug them in, make sure they lock into place. And then the brown connector, we're going to take our brown relay and plug it in. Again, it only goes on one way, just want to make sure we get it in and locked into place.Now, to help with keeping down the noise and our relays rattling around when they're back here, they are going to provide us with some of this foam insulation. What we'll do is we'll take off the backing, and we're going to wrap our relays so that even if they do bounce around a little bit and move, hopefully this will cut down some of that noise and we won't have that plastic on plastic contact noise. So we'll do that for each one of our relays. Then you can tuck the relays and the rest of your harness back into this little cubby here, and we can put all our panels back in place.So I went ahead and plugged in my tester to make sure that all the functions are working properly on our wiring. We can see that the tail light function is working, as well as the left turn signal, the right turn signal, our brakes, and even the reverse turn signal. All we have left to do now is hook up to our trailer and hit the road.That'll finish up your look at the Tekonsha T-One vehicle wiring harness with 7-way trailer connector on our 2018 Nissan Frontier.


One couldn't find an easier way to add trailer wiring to a Nissan Frontier, it's just plug'n'play! There is one complaint, though. I finally got electric brakes on my trailer, and almost burned up the brakes on the first outing. It appears that Nissan has the color codes for the electric brakes and the 12V lead reversed. This puts 12V to the brakes all the time. As simple swap of the wires in the harness solved the problem.
Perfect custom wiring kit for my 2012 Xterra which utilizes the existing pre-wired towing connectors next to the left rear wheel and the front passenger kick panel. After seeing some other examples in reviews for installing the 7-way connector ended up with a clean looking install through the rear bumper.
Had to swap blue and black wires...due to being a 2011 Nissan Frontier....known Nissan issue. But overall, the harness works great! Controller too!
After installing the harness I found that the power wire and brake wire were swapped and I had constant power going to the brakes. I was able to correct this by swapping the wires in the terminal block that connects to the 7 way receptacle on the vehicle. The wires were the correct color I just think they were swapped on the vehicle side but it was easier to swap them on the receptacle side.
Easy installation except, like a previous reviewer noted, my Gen 3 (2022) Frontier was sending 14 volts to the brakes and the controller was not seeing the electric brake units. I switched the two wires at the plug and everything is good now!
Okay, so I've finally had a day off to fully install the kit in my 2013 Pro-4X Xterra. If you're looking to do the same and are wondering if it has everything you need, don't worry, it does. I didn't time myself during install but I know it took me less than 20 minutes, you don't even have to remove the spare tire to hook up the wiring in the rear. Literally plug and play. It took me a lot more time to figure out where to install the connector.
Nissan went out of their way to make this an easy install if you don't have a factory towing package, this kit is worth it. Buy it, use it.

Shawn K.

6/11/2018
Great. Havent had any problems and dont expect any. Ive since added a brake controller and airbags. They all work in conjunction perfectly.
This kit worked great. It took about an hour to install on my 2005 Xterra. The process was just like the video on etrailer.com. The only difference was that I mounted the bracket directly to my bumper instead of the hitch.

Keith
7/16/2020
Working great. Im glad I purchased the 7-pin version for this car
Excellent hooks up to factory cut outs

Heather A.
4/30/2025
Hi Charles, glad to hear the install was easy peasy! How's the towing life treating you? Anything we can help with?
Product itself is great. Plug and Play taking off a star because the instructions call for pulling off the frame rail the existing plug which is not necessary and also the way that it's described in the video damages the plastic piece that holds it onto the frame rail it's supposed to slide down not be pulled directly off so now I have a broken plastic bracket and had to zip tie it to the frame. Otherwise easy install
Great product. Plug and play in 2025 Nissan Frontier.
Easy to install and easy to follow inst ructions
This #118266 7-Way connector harness kit contains everything needed to install basic trailer light wiring on ALL 2015 Xterras, regardless of trim level. The vehicles are completely factory prewired for a simple plug-in installation as described below (other recent model years are most likely also prewired, just check out my photos of the three connectors and see if they are on your vehicle. If you do indeed have the three connectors, the wiring harness plugs into the two factory installed connectors located on the frame, to the left of the spare tire area (one contains the wiring for the lights, the 2 conductor connector carries the +12v charge line and the brake control wire). The relay cable & relays are installed behind the plastic panel on the right side of the front passenger footwell. The trickiest part is removing that panel, along with the plastic doorsill trim to the right of the seat without damaging them. Be very careful not to break the plastic tabs and grabbers that hold both panels in place.
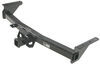
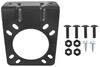
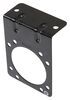
This harness kit does not contain a mounting bracket for the 7-way connector. I recommend the
#TM76474 bracket, necessary to mount the 7-way connector to your bumper.
If you do need to control electric brakes on your trailer(s), consider the additional two items, below. If you choose something other than a Tekonsha controller, you will need the short wiring pigtail that is compatible with that brand, instead of the #3050P.
#90195 Tekonsha Prodigy P3 brake controller. An excellent, top performing unit. Other lower priced Tekonsha controllers may meet your needs.
#3050P Wiring pigtail. Connects Tekonsha brake controllers to the factory installed connector (see photo) under the dash, above the right side of the driver footwell. If you use a different brand of brake controller, pick out the appropriate pigtail to match it.
NOTE: There are apparently two major wiring standards associated with 7-way connections. One of them has the brake control line swapped with the +12v charge line. Make sure to check your trailer plug and wiring before hooking up to your vehicle. You may need to cut and cross the two lines leading to the vehicle’s 7-way connector. If you need to occasionally swap between the two wiring standards, install insulated male & female crimp-style connectors in the lines. Use heat shrinkable tubing over the connections to make them more resistant to the weather. For a more permanent, reliable connection, solder them instead of using the crimp connectors and apply shrink tubing over the joints.
Installation took about 15 minutes, pretty straight foward. feels and look good
Fantastic plug and play installation of your product. Hardest part of the install was wrestling with my panel trim. Thank for your online tutorial and great on time delivery.
Ken
2/3/2020
Everything still working great. Boat was launched 14 times since install.
The hitch is great, but the screws for the electrical connector have rusted.

Tim M.
7/18/2020
It’s still working. The screws are still rusted, though.
Fast shipping and good quality product.
I didnt need the blue relays since my Pathfinder alreay had it. What I did need was the brown relay. Gray plug came with a 6 cable plug where mine in the truck was 8, I used the original plug that came with 4way, the color combination was exactly the same, I was able to replace the plug without cutting the cables. The black plug locked the wheels so I just switch the cables, there is a video here somewhere showing how to do it. Good on price, nissan was selling me the same setup for about 141 without the extra stuff that I bought. Found this webpage a while a go, and I always find what I need at good price. Thanks a lot!!!
Really easy plug and play kit. Removing inner cab plastic pieces is easy(er) if you have a plastic tool like the photo I’ve used these tools a few times for plastic trim removal and its been a good purchase. Anyway easy install as I said but I forgot to include the mounting bracket that attaches to my hitch bar and secures the trailer plug. Thats why you see the harness zip tied until I order that part. Then I’ll be done. Total time on this trailer wiring install on my 2020 frontier pro 4x was about 10 minutes.
Good installation, simple and predictab le
Simply awesome. So happy that this harness system is just plug & play for my 2011 Suzuki Equator!!
Instead of using the optional mounting bracket, I drilled a hole in the bumper for a clean/better than factory look!! Took an extra 5 minutes!!
Product came well packaged and quick delivery - 2 days. I will recommend etrailer to friends and family. I’m most likely not done ordering for myself! Thank you for the helpful videos for installing the items.
Installed as directed and everything worked - almost. called etrailer, spoke to Derek and he advised me that for my 2011 Nissan Frontier some wiring might need to be switched to correct the problem. He sent me and article with pics to fix the issue, in the attached picture the black and blue wires needed to be reversed. Now everything works fine. Thanks for the great customer service.
Super easy to fit on my 2018 Frontier Pro-4x. Passenger panel came off easy, a little jimmying to get the plug covers off, but not too tough. I chose to drill through the bumper to install the plug receptacle, but even that was manageable for a moderate DIYer.
Shipping that etrailer uses SUCKS. Take lessons from Amazon, or 1 of the others. Wiring as described.
2016 Nissan Frontier. Ordered equipment to tow a trailer.
I had trouble with the web-based ordering. Had to break down and call. Call was smooth.
Package shipped next morning and arrived the following evening.
Communication throughout the process was timely. All components where included & as described.
First time I've used eTrailer, but I will use them again.

Do you have a question about this Custom Fit Vehicle Wiring?
Info for this part was:
At etrailer.com we provide the best information available about the products we sell. We take the quality of our information seriously so that you can get the right part the first time. Let us know if anything is missing or if you have any questions.


Chuck
3/14/2025
Been working flawlessly. I added a snow plow to the truck, and its wiring harness plugged right into this one.