
To see if this custom-fit item will work for you please tell us what vehicle you'll use it with.


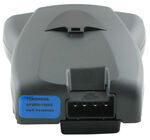
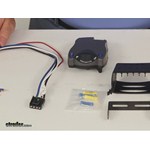
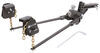
The Tekonsha P2 is a classic brake controller you know you can rely on. It's easy to install, and with the custom harness, it's plug-and-play.
Features:
Specs:
Gain is the maximum amount of power that will be applied to your trailer's brakes. How much braking output you need is determined by the weight of your trailer; a heavier trailer will need more power to bring it to a stop. You want to go as high as you can without the trailer brakes locking up.
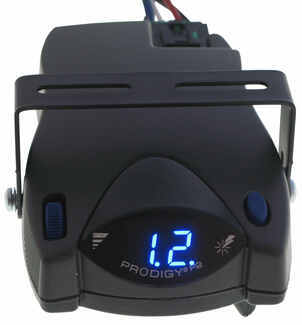
You can adjust the gain by turning the thumbwheel on the front of the controller.
The boost setting controls the aggressiveness of your trailer's braking, meaning how quickly the brakes reach the maximum braking level. If your vehicle takes too long to come to a stop, increase the setting. If it stops too abruptly, decrease the setting.
Depending on the level of boost, your trailer brakes can start at either 13 percent or 25 percent of the set gain. So instead of starting at 0, the brakes will start at 25 percent and get to 100 percent sooner. This keeps the trailer from pushing your tow vehicle forward.
Boost Levels:
| Approximate Gross Trailer Weight | Boost Level | Increase in Initial Power Output |
|---|---|---|
| Less than tow vehicle GVW | B1 | 13% |
| Equal to tow vehicle GVW | B1 or B2 | 13% or 25% |
| Up to 25% more than tow vehicle GVW | B2 or B3* | 25% |
| Up to 40% more than tow vehicle GVW | B3* | 25% |
*Both B2 and B3 offer a 25-percent boost in initial power. But the braking curve for B3 is more aggressive than that of B2. This means that, even though you will start out with the same intensity when using these boost levels, you will get an overall more aggressive braking experience with the higher level. So if you use B3, you will reach maximum braking sooner than if you use B2.
To engage the manual override, twist the rotary-style lever from right to left. This will activate the trailer's brakes and brake lights independently of your vehicle, great for stopping sway or controlling your trailer's momentum in an emergency.
The Prodigy P2 offers key safety features to prevent damage to your towing setup:
- Integrated reverse battery protection shields the brake controller and your trailer's breakaway system from shorts.
- When the P2 is not in use, it draws only 3.6 milliamps to minimize the drain on your vehicle's battery.
- Any time your vehicle and trailer are at a standstill with the brakes applied for more than 5 seconds, the hold feature will kick on and reduce power to just 25 percent. This will keep your trailer in place without your brakes overheating.
The Prodigy P2 also runs continuous diagnostics to check for problems as they come up, including:
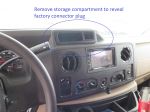
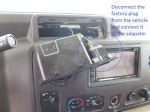
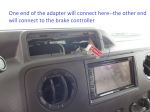
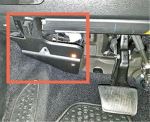
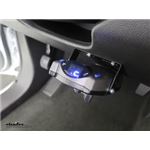
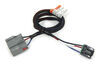
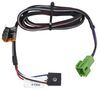
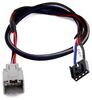
Installing the P2 is incredibly simple. You'll mount the bracket to your dashboard then mount the unit to the bracket. Plug the custom harness into your vehicle and into the unit. Done!
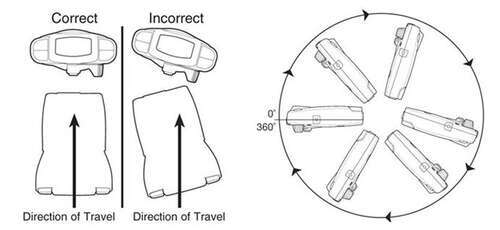
Keep in mind that the P2 must be horizontally level and parallel with the direction of travel to work correctly.
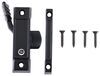
With a replacement wiring harness (sold separately) and replacement bracket (P7685 - sold separately), you can even transfer the Prodigy P2 to another vehicle.
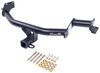
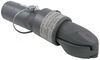
Note: If you don't already have a 7-way plug at the back of your vehicle, take a look at our exclusive 7- and 4-way brake controller installation kit (ETBC7 - sold separately).
Proportional braking means that your trailer brakes mimic your tow vehicle's brakes. If you slam on the brakes, your trailer brakes will activate with the same intensity; if you brake lightly, your trailer brakes lightly too. The trailer's braking is in proportion to your vehicle's braking. This saves wear and tear on the tires and the brakes on both your vehicle and trailer.
The Prodigy P2 uses an internal inertia sensor to detect how your vehicle is braking so it can send the right amount of braking power to your trailer. It measures the inertia of your tow vehicle and activates the trailer's brakes to slow at the same rate. The result is uniform braking across your towing setup. No push-pull action - just smooth, proportional braking every time.
 Alternate Instructions
California residents: click here
Videos are provided as a guide only. Refer to manufacturer installation instructions and specs for complete information.
Speaker 1: Today in this 2015 Ford Transit 250 we'll be having a look at and showing you how to install the Tekonsha Prodigy p2 trailer brake controller, part number 90885 in conjunction with the Etrailer electric trailer brake controller kit, part number ETBC7.This is what our brake controller looks like installed. You can see it sits up nice and tight against our dash using the provided mounting pocket that it comes with. This is a proportional brake controller and what that means is that if you're applying your brakes gently in your vehicle, it'll apply the brakes gently on the trailer to match so you have a smooth and safe stop. If you're applying more pressure and slowing down more aggressively, it'll apply more power to your trailer brakes quicker as well so you can have a smooth, safe stop there as well.This brake controller will allow you to control up to for axles of trailer brakes, so if you're towing a small trailer or a large trailer it doesn't matter. It'll work great for either one. Also, if you're using an electric over-hydrolic setup on say a boat trailer or a fifth-wheel trailer, this one can still control those.The reason you're gonna want a brake controller for your vehicle is if you're planning on towing a trailer that has electric brakes, you need to have a way to operate them and this brake controller will do just that.
What sets this brake controller apart from other ones on the market is that this is a very high quality and good brake controller but it's also super easy to use without a lot of added features that you don't need.On the bottom, we have our manual override. This is a lever which will apply our trailer brakes as we slide it over and the further over you slide it, the more power that's getting applied to your trailer brakes. A manual override is used in situations where your trailer is starting to get a little squirly behind you or starting to jackknife. You don't need to slow down your vehicle; you only need to slow down the trailer. So, by sliding the lever over, it applies only the trailer brakes without you applying the brakes in your vehicle.To the top left of the controller, this is our gain adjustment knob.
We operate our manual override all the over, we can adjust how much power is going to our trailer brakes by going down all the way to zero, which will be no power at all or all the way up to 11, which is max. A good place to set it to start is right around five; somewhere right in the middle. You can adjust as necessary as you need it.This button over to the top right, that is our boost level button. What boost does is it applies your trailer brakes faster and with more intensity as you're applying your brakes. If you're encountering a situation where you're going downhill or you add in more cargo to your trailer and need a little bit of extra assistance, you can just simply press the button to engage the boost without having to adjust your gain knob.
There's three different levels. There's boost one, boost two, boost three and then boost off. Each one of those settings, the higher you go, the faster with more intensity the brakes will be applied.We have a nice, easy to read display on our controller. Blue LED on it. And through there you can see everything that's going on.
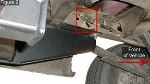
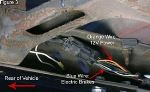
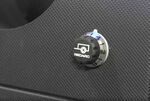
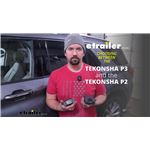
You have the C showing you're connected and there's no faults with the trailer. That's what you're looking for every time you hook up. If you see something flashing, you'll have an error message, which you can refer to the owner's manual and it'll tell you what that problem may be, such as a short or bad ground or something along those lines.When comparing the Prodigy p2 to another style of brake controller, the Redarc Tow-Pro Elite, the Prodigy has to be mounted to your dash and everything's exposed, whereas with the Tow-Pro Elite from Redarc you can hide the brain box of it behind the dash and the only spot you'll have visible on the dash itself is this small knob right here which you can use to adjust or control your manual override by pressing the button. You do have more versatile mounting options with the Redarc. You can mount it anywhere. You don't have to put it on your dash within reach. You can put this in your center console if you wanted or anywhere else that you can easily get to as you're driving. But in comparison to the p2, this will take up less foot room. You don't have to worry about running your knees into it on your dash.When it comes to the display of the Prodigy p2, it is much easier to read than the display on the Redarc Tow-Pro Elite because we actually have something that displays letter codes versus having to memorize flash patterns of different color LEDs on the Redarc.To begin our install, we need to first ensure that we have a functional four-pull flat wiring harness on our vehicle. We already had that pre-installed, so we're good to go there. The next thing we need to concern ourselves with is to find a way to mount our seven-way connector on our vehicle. We used a CURT no-drill mounting bracket to attach that to our hitch using the provided clamp. This is part number C57202.Next thing we did is we cut off the end of our four-pull flat connector and the end of the four-pull flat connector on our seven-way and we matched up the colors. The brown wire on our four-pull flat goes to the brown wire in the seven-way. This is for our tail light and running light circuit. We used heat treat and butt connectors on all of our connections to better protect them from moisture, corrosion; things of that nature. We have these available on our website. We use 14 to 16 gage ones for the blue ones and then 10 to 12 gage ones for the yellow ones.The brown wire to brown wire for our tail light and running light circuit, the green wire is our right turn signal and right brake light, so we just match those up. Yellow wire is for our left turn signal and left brake light, so those match there. The black wire here with the white stripe, that's our ground. We combine that with the white wire from our seven-way there as well. The black wire here, this is for our constant 12-volt power. We connected that to the black wire of our duplex wiring here. The blue wire, that is for our electric trailer brakes, themselves. We connected that to the white wire of our duplex wiring from our ETBC7 kit. This purple wire here, this is for reverse light output. Our customer will not be using that, so we just cut off the end of the butt connector and left a little bit of wire left to work with in case you needed to add that later. With all of our connections made in the back, we can now bundle up our wiring with some electrical tape and zip ties.Here's what it looks like with our wires taped up, so we aren't seeing colored wires underneath the vehicle. We secured it with a couple zip ties. Now, our duplex wire we routed to the front of the vehicle, securing it along the way with zip ties to our frame rail until we got to a wiring harness. We then follow this wiring harness all the way to the front, securing it with zip ties til it gets to our gas tank and then it runs along the side of it behind our gas tank hanger brackets. We secure the wiring harness here to the side of the gas tank and just ran it behind our gas tank hanger brackets, continues following the wire harness, goes above inaudible 00:07:36 neck, secured to this wiring harness and then it goes behind our charcoal canister and then it's on the other side of our frame again.Once it flips around on the other side of our frame, it goes behind our charcoal canister following the wiring harness towards the front of the vehicle and then once we reach the end of it where it turns 90 degrees, it goes into our engine compartment. This is where our duplex wiring comes up. It's just resting right in front of the grommet that goes through our firewall for our main wiring harness for the vehicle. We cut off the rest of the insulation that covers both wires at this point. So, here's where the white wire goes into our grommet through a hole that we cut in it.The black wire from our duplex wiring goes over towards our driver side fender area where we mounted our two circuit breakers from the ETBC7 kit using provided self-tapping screws. The top breaker's our 30-amp breaker and the bottom breaker is our 40-amp breaker. The black wire is going to the silver terminal on the 40-amp breaker. The silver terminal is the auxiliary terminal and that is the terminal that powers our constant 12-volt source on the back of the seven-way. On our 30-amp breaker, this is the breaker that's gonna power our brake controller. On the auxiliary terminal, we connected a wire to that and that goes through the same grommet as our white wire from the duplex wiring.Now we're inside the vehicle underneath our dashboard. This is our brake controller harness. The blue wire from our brake controller harness, this is what connects to the white wire from our duplex wiring that went through the firewall. The black wire here, that's our 12-volt power for our brake controller and that's what connects to the black wire from the auxiliary side of the 30-amp breaker that came through the firewall. This red wire here, this is what attaches to the cold side of our brake light switch in order to get the signal that the brakes are being applied when the pedal is depressed. We'll show you how to test that and where that wire's located.We removed our lower dash panel underneath the steering column simply by pulling it off in order to gain access to our brake light switch. We use a test light to determine which wire is the cold side. We'll try this purple and white wire here. Just back probe it and step on our brake pedal. And as we step on the brake pedal, our test light's illuminated. We're off the brake pedal, it's not. So, the purple and white wire from that connector, that is our cold wire. And we tapped into that into our red wire using one of our quick splice connectors.The white wire from our brake controller harness we connected to an additional white wire that we routed through the firewall and grounded inside of our engine compartment. We'll show you that now. The white wire comes out of the firewall for our ground and then goes over to a factory ground location. We just remove the bolt for the factory ground wire and placed our wire with the ring terminal on it in the same location and reinstalled the bolt. On both of the copper terminals on our 30 and our 40-amp circuit breaker, these are the battery side of our circuit breakers. These need to be connected directly to our battery or a cable that goes to our battery.We connected two segments of wire to both of those terminals and we routed those over to our auxiliary fuse box. The wires go up where our main battery cable goes into it behind this cover. We removed the factory 15 milometer knut, placed the ring terminals over the stud and re-installed the nut. We went ahead and bundled up the wiring underneath the dash with some electrical tape and some zip ties, this way we don't have any colored wire underneath your dash. Now we can reinstall our panel.This is our brake controller mounting bracket. We'll attach this to the lower right hand side of our dash using provided screws. We routed our wiring harness through our brake controller bracket, now we'll take our brake controller and we'll plug it in to the harness. Now we went ahead and pushed it into our mounting bracket until it clicked into place. Now we'll test it out by hooking it up to our trailer and as we hook up our trailer, a C comes on the brake controller screen, thus indicating that we have a proper connection and everything's working properly.That completes our look at and installation of the Tekonsha Prodigy p2 trailer brake controller, part number 90885 in conjunction with the Etrailer electric trailer brake controller installation kit, part number ETBC7 on this 2015 Ford Transit 250.


Do you have a question about this Trailer Brake Controller?
Info for this part was:
At etrailer we provide the best information available about the products we sell. We take the quality of our information seriously so that you can get the right part the first time. Let us know if anything is missing or if you have any questions.


Thank you! Your comment has been submitted successfully. You should be able to view your question/comment here within a few days.
Error submitting comment. Please try again momentarily.