
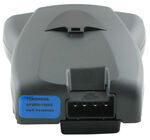
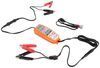
Tekonsha Prodigy P3 Trailer Brake Controller w/ Custom Harness - Up to 4 Axles - Proportional


To see if this custom-fit item will work for you please tell us what vehicle you'll use it with.


The Tekonsha P3 is a brake controller beloved for its reliability and useability. You're able to save your settings and multiple profiles. It's easy to install, and with the custom harness, it's plug-and-play.
Features:
Specs:
Braking output is the maximum amount of power that will be applied to your trailer's brakes. How much braking output you need is determined by the weight of your trailer; a heavier trailer will need more power to bring it to a stop. You want to go as high as you can without the trailer brakes locking up.
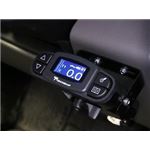
Use the arrow buttons on the front of the module to set the output.
The boost setting controls the aggressiveness of your trailer's braking, meaning how quickly the brakes reach the maximum braking level. If your vehicle takes too long to come to a stop, increase the setting. If it stops too abruptly, decrease the setting.
Depending on the level of boost, your trailer brakes can start at either 13 percent or 25 percent of the set braking output. So instead of starting at 0, the brakes will start at 25 percent and get to 100 percent sooner. This keeps the trailer from pushing your tow vehicle forward.
Boost Levels:
| Approximate Gross Trailer Weight | Boost Level | Increase in Initial Power Output |
|---|---|---|
| Less than tow vehicle GVW | B1 | 13% |
| Equal to tow vehicle GVW | B1 or B2 | 13% or 25% |
| Up to 25% more than tow vehicle GVW | B2 or B3* | 25% |
| Up to 40% more than tow vehicle GVW | B3* | 25% |
*Both B2 and B3 offer a 25-percent boost in initial power. But the braking curve for B3 is more aggressive than that of B2. This means that, even though you will start out with the same intensity when using these boost levels, you will get an overall more aggressive braking experience with the higher level. So if you use B3, you will reach maximum braking sooner than if you use B2.
To engage the manual override, twist the rotary-style lever from right to left. This will activate the trailer's brakes and brake lights independently of your vehicle, great for stopping sway or controlling your trailer's momentum in an emergency.
The P3 is able to store your settings in multiple profiles so that you can have them ready to go for different trailers and drivers. Even the display is super customizable: you can change the screen color, brightness, and language to make it easy to use.
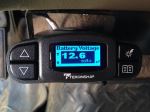
The P3 makes it easy to troubleshoot problems as they come up, with comprehensible and detailed diagnostics displayed on the screen.
Diagnostic troubleshooting messages include:
Diagnostic warning signs include:
The Prodigy P3 offers advanced safety features to prevent damage to various components of your towing setup.
-Integrated reverse battery protection shields the brake controller and your trailer's breakaway system from shorts.
-When the P3 is not in use, it draws only 3.6 milliamps, minimizing drain on your vehicle's battery.
-Any time your vehicle and trailer are at a standstill with the brakes applied for more than 5 seconds, the hold feature will kick on and reduce power to just 25 percent. This will keep your trailer in place without your brakes overheating.
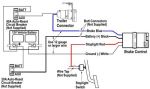
Installing the P3 is incredibly simple. You'll mount the bracket to your dashboard then mount the unit to the bracket. Plug the custom harness into your vehicle and into the unit. Done!
Keep in mind that the P3 must be horizontally level and parallel with the direction of travel to work correctly.
With a replacement wiring harness (sold separately) and replacement bracket (TK5906 - sold separately), you can even transfer the Prodigy P3 to another vehicle.
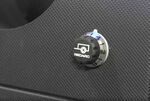
Note: If you don't already have a 7-way plug at the back of your vehicle, take a look at our exclusive 7- and 4-way brake controller installation kit (ETBC7 - sold separately).
Proportional braking means that your trailer brakes mimic your tow vehicle's brakes. If you slam on the brakes, your trailer brakes will activate with the same intensity; if you brake lightly, your trailer brakes lightly too. The trailer's braking is in proportion to your vehicle and trailer.
The Prodigy P3 uses an internal inertia sensor to detect how your vehicle is braking so it can send the right amount of braking power to your trailer. It measures the inertia of your tow vehicle and activates the trailer's brakes to slow at the same rate. The result is uniform braking across your towing setup. No push-pull action - just smooth, proportional braking every time.
 Alternate Instructions
California residents: click here
Videos are provided as a guide only. Refer to manufacturer installation instructions and specs for complete information.
Today on our 2017 Chevrolet Express, we're gonna take a look at, and show you how to install, the Tekonsha Prodigy P3, part number is: 90195. We're also gonna be using part number: ETBC7, which is the Electronic Trailer Brake Installation Kit. Now, the Prodigy P3 is one of the most popular brake controllers on the market. This is a proportional brake controller, which means it senses what is happening with your vehicle, and it matches it. So in just a normal stop situation, you're gonna get normal braking power go to your trailer. But where it really helps out is in those emergency braking situations, when we need the maximum braking power as quickly as possible.
This is gonna make towing much safer for us. It delivers the power we need, when we need it. On the flip side of that, in a lower braking situation, when we don't need as much braking power, it helps to save brakes on our trailer. Now this is gonna be a big advantage to the old time-delayed systems, because they just give you the same braking force every time, regardless of your situation. To fine-tune the brake controller further, we've got boost modes. This is something that we'll change depending on how our trailer is in relation to our truck.
So as our trailer gets heavier and heavier, we'll want to increase boost so we get more initial braking power. The two buttons you see here on the side, that's for your gain adjustment. Now, that registers up to 14, so you can adjust anywhere through there at the inaudible 00:01:24. The lower we have this set, the lighter our trailer should be. As our load starts to get heavier we're gonna move this up further and further, again, allowing us to fine-tune the system to get it exactly where we need it for our braking application.
The manual override lever's here on the bottom. You can see, I'll bring that all the way over and it only goes up to whatever you have your gain set at, so at no time will this allow you to overpower your trailer, but in those emergency sway situations or something like that, when we need to brake the trailer and the trailer only . So you can see, this allows us to apply just the right amount of braking force to make that happen. Also, as we travel down the road it's gonna monitor the connection between our vehicle and our trailer. Here you see, when the plug becomes disconnected or loose, it gives us that warning indicating that we've got an issue that we need to get addressed. As soon as we reconnect that, it goes right back into the normal mode.
And also offers presets that you can use for different driver preferences or different trailers. Now, the plug that comes with the ETBC7, you can see, is gonna offer the 7-pole round and the 4-pole flat trailer. That's gonna eliminate a lot of the needs for adapters. Typically you'll have a 7-pole or a 4-pole that you'll be connecting to. The 7-pole door is spring loaded; we've got a spring right up here. That's gonna help when we plug in our trailer, or in this case, our tester. That catch is gonna come down on that back side and that's gonna hold our plug in place for us. Now, the first steps to your installation are gonna depend on whether your 4-pole trailer connector is mounted outside of the Express, or inside. Ours is inside, so we're gonna show you how to route that outside. If yours is already outside, you can skip to where we start mounting our plug. Now, since our plug is inside, we're gonna be removing this cover here, and we're gonna drill a hole in the access panel located right above it. The false panel is gonna be about finger length, right up, and it's flat. Now, what you'll do is you'll take either a long screwdriver or a pry bar, and then that outside corner, you can actually poke a hole right through that to that cover that's above it. Once we've got that hole poked through we'll run up either a piece of coat hanger, stiff wire, or in our case, airline tubing. We can find that up top. Now we'll reach in the rectangular-shaped opening. It's on the back side. You may have a plastic panel that fully covers that. If that's the case, you'll have to unclip it. It fits into these rectangular-shaped openings with clip fasteners. You just kind of pop it off up through there. We'll reach into that outside edge and we should be able to pull through our wire, or like I said, our airline tubing here. To the end of that, we're gonna tape on our 4-pole flat connector and we'll try to pull that down through. Now we can bring our cover back in place. You'll see it has that soft seal that'll compress around our wiring. And then just push that fastener back in. And if it's tough, just kind of tap on it until it goes in. We'll bring our 4-pole over closer to the middle of our vehicle here. We'll have a spot on our body-mount here where we can just zip tie that wiring up; give us an anchor point for it. Now, we need to install a bracket in order to connect our plug. We're gonna be using part number: 18136, this is the Universal Long Bracket. We'll want to position that within about 6" of the end of our 4-pole plug, and we're gonna use the provided clamp here to get it secured in place. This is just gonna go up and over our hitch. Now we're gonna take the bracket, you just want to kind of slide the wires through this small slot in the bottom. We'll rotate it. Now, this bracket can be installed this way, upside down, or this way, depending on your application. We're gonna be doing it this way. We're gonna use the provided screws they have the long shanks on them and kind of a smaller head and those are gonna go through all four of the holes, and each four of those line up with one of the holes in our bracket. Now, on the back side, we're gonna thread on one of our nuts with the serrated lock washer onto each of those bolts. Now we'll use a flathead screwdriver, just secure all those down. Now we can get that attached to our long bracket. I'm gonna bring one of the screws provided with our long bracket, up and through. And then another lock nut will go on there that has the serrated washer already installed. Do the same thing for the other side, and we'll tighten those down. Now, we've got a couple different wires coming off the back of our plug, and the purple wire, this is meant to run up to the reverse light signal. So if you have a marine-style application with surge brakes, this'll deactivate those surge brakes if it's got the electronic de-activator. Our customer doesn't require that, so that wire we're gonna trim off. We'll leave some there in case they ever want to hook it up. We'll just trim that off, then I'm gonna wrap that up with some black electrical tape and we'll run it up over the hitch. We'll start making a few of our connections. Connecting our 4-pole here; you plug them together. Now we're gonna use the larger self-tapping screw that comes with our kit, and a 3/8" bit driver, and we'll get the hole drilled for our ground wire. And we'll back that out, add on our ring terminal, and I'm gonna turn it kind of up; I want to zip tie it off with our other wiring that we ran across. Get that secured into place. That's gonna leave us with just the black wire and the blue wire remaining. We're gonna be trimming the butt connectors off of here, and we're gonna be replacing these heat-shrink butt connectors. The yellow ones that we'll use along the way are DW05745. Now, to the other side of that we're gonna be connecting black to black, and white to blue, from our duplex wire. We're gonna have to strip that outer coating back just a little bit. Be careful just to go through the wiring and not that outer coating. Now we'll remove the sheathing. We just want to be careful that we don't do any damage to the wiring, we just want to cut through the gray stuff and not the wires. Let's get these stripped back. And again, add the black to the black, crimp it down, and then the white's gonna become the blue, so we'll connect those together. And really, that's only because it's not very common that you see blue and black duplex wire, and this allows us to run the wires up together so we don't have two different wires hanging down. Now, for all of our heat-shrink connectors, we need to use a heat source to warm these up, that allows those to shrink down. You can use a lighter, a mini-torch, you can use a heat gun. And then you can do what you want as far as taping it up to make it look a little bit cleaner. I prefer it, that way if you ever have to work on the wires, they're not all dirty. Now we can zip tie our duplex wire off, and we're gonna start running this up towards the front of our vehicle. Now, I'm gonna let my wire duck into the frame rail here, and we're just gonna go inside the frame all the way up towards the front of the vehicle. It's good to kind of pull it out along the way so you can kind of restart. Now we're gonna wrap this towards that front driver's side corner, under the hood area there. Put plenty of it up there so you can find it. Then I'm gonna anchor it off, pull out any slack you might have, and I'm just gonna anchor it off right here. That'll kind of prevent us ever having any hanging out below our vehicle. Let's go up and pull it on through. Should be located kind of above the wheel well area here, and I want it to come right up in this area, so I'm gonna run it down below those other wires and wire looms that we've got in here. If you can get it up in that corner, that's ideal. Make sure you've pulled out all of your slack, and then a zip tie right down here around that main wire loom will do a great job of holding it in place. Now, just like we did on the back side, it's time for us to remove the insulation, and we're gonna go just about all the way down there to where we zip tied it. If we look on the back of the firewall, you can see a black grommet. We want to pull that out just like that. We'll be replacing it later. We'll let our white wire go through that hole into the passenger compartment of the van. Now you should be able to look directly back from your parking brake and you'll see that wiring come through there, and just pull through the slack. Now, you're gonna have three breakers in the ETBC7 kit, and the size of that breaker, the rating of that breaker, is gonna be printed here on the side. You can see this one says 30A, this one says 40A. That means 40 amps, 30 amps, you also have a 20 amp. Now, your 20 amp is gonna be for your smaller 1-2 axle trailers. Your 30 amp, you're gonna use that for your trailers larger than that. If you've got large brakes on a double axle, or tandem, even quadruple axle trailer, you want to use your 30 amp. The 40 amp breaker, that's gonna be used for our charge wire. Now, we're gonna mount these in position. You can see the tabs on them. You can see, we can go right over here on this edge, and we're gonna kind of daisy chain them together. It looks like right there's gonna be a good spot. Now we'll trim off that wire that we've run up from the rear of the vehicle, just about where that silver stud is on our 40 amp breaker. We'll need to strip the end of that back. We're gonna add on one of our ring terminals. You can see that's got the smaller sized hole on it. Get that crimped down. We'll place that right on top of that silver stud. The silver stud runs to our accessories, the copper stud runs to the battery. We'll use a 3/8" socket, we can get that tightened down. Now we're gonna strip back the length of wire that we just trimmed off. We're also gonna add a small ring terminal to it. Now that one we're gonna connect to the top of our other breaker. With that secured down, we'll run the other end in the same hole we sent our white wire in. Now we'll go inside and we can pull all that slack through. We can see our fuse panel cover here. This is where we're gonna be getting our stop light switch signal from the fuse inside of there. So we've got locks on each side, just need to kind of pop these off. We're gonna take that panel, and then this one's gonna have four; two in the front, two in the back here. Just gonna want to rotate it and bring it up this way. Now we're gonna find the stop light switch. Since we can't get that from underneath the dash, we'll come out here to our fuse panel. And it's labeled as "auxiliary stop lamp"; it's gonna be the third fuse over here. And off the brake, and back on, and back off. You'll see how when the brake is depressed, that light comes on, we get our sensors, we know that's the right one. Now we can use part number F2526 to tap that fuse and give us the line we can run inside. Now we're gonna extend our fuse tap out, using just a regular piece of 16 gauge wire. And because our connection is gonna be on the outside of the vehicle, we're gonna replace the standard butt connector with a heat-shrink. Let's trim that off. We'll follow the exact same process we've done on all of our other connectors here. Just strip both wires back and get them crimped. Now we'll pull that fuse out. Just want to be gentle so you don't crack it. That's gonna go in the lower slot on the fuse tap, then on the top slot, we're gonna place the 10 amp fuse that came with our fuse tap. Now we'll put that back in position. On the back edge of my fuse box I'm gonna notch out just a small area to allow that wire out. We'll run that right up through and we can put our cover back on. It's likely you'll also have to notch your cover just slightly. All right, now we can get this zip tied off, and it's gonna go in the same hole that we pulled that grommet out of, our other two wires have. All right. Now, we've got three of our four wires ran inside the vehicle we're gonna need. The only one we're lacking is gonna be our ground wire. We'll show you how to get that done in a minute. Now, if we look underneath the dashboard here, we see the brake pedal and where it's gonna be moving. We need to avoid that area. So we can bring our wiring right up here, kind of right in this area. We'll be mounting our brake controller right up here, so we'll probably zip tie our wiring off here. Let's start by hooking up our pigtail, and that'll leave us with extra white wire we can use for our ground. I like to stagger the cuts that we make. This is gonna allow us to stagger our butt connectors so we don't have a big pile of them. Now we'll get the end of these stripped back. Now, to our red wire we're gonna add one of the blue butt connectors that came with the brake controller. The white one and the black one are both gonna get a yellow butt connector. Now you'll notice we're not using heat-shrink, it's because we're gonna be inside the vehicle here. We don't really have to worry about the moisture and stuff like that. Now, to the other side of those butt connectors, we're gonna connect the black wire from our pigtail to the black wire that comes from our breaker there under the hood. Our white wire that we brought up all the way from the rear of the vehicle, that gets connected to the blue wire from the pigtail. That sends the braking signal out to the trailer so the brakes engage properly. Then the red wire's gonna connect to the red wire from our fuse tap. Now the extra piece of white wire that we cut off here from the one that ran up from the back of the vehicle, we're gonna get that stripped back, and that's gonna be connected to the white wire from our brake controller. We're putting a little bit thinner wire into a larger butt connector, so I'm gonna double this wire back so it has plenty to hold onto. Now the end of that wire, it's gonna go out the same grommet all the other ones came in. Now we'll get that wire pulled on through so it's about same length as all of our others. Now just for appearances in this application, we're gonna have our brake controller mounted a little bit higher up here on the dash. So we're gonna tape down the harness a little bit, just so it looks more appealing. That way we won't have four different color wires hanging out there. Now we can mount our brake controller up. We've got two brackets to choose from. We've got more of the standard style metal bracket, and then one that allows for a little bit more adjustability forward and back, and a smaller bracket. Now this one also would allow you to remove the brake controller. You'd have to then, kind of tuck your pigtail up out of the way, of course. But you can stick it in the glove box or something like that if you wanted to, and then just the bracket would be hanging there. I prefer, especially in this application, the metal bracket. We're gonna be mounting ours pretty close to the middle here. The customer is also getting a air compressor kit and I'll have to have somewhere to mount that. Now if this weren't going over in this location, I would bring this over a little bit further. Kind of keep it more to the right side of the dashboard. You want to avoid this area just because you're probably gonna bump that with your knee getting in and out. We're gonna bring our bracket up, 1/4" bit driver, and one of the provided self-tapping screws, and we'll just get that mounted in position. Gives us a good solid surface there. All right, now we need to line up the holes in the side of the controller. We're gonna use the small machine screws that already have that lock washer on them. Just decide where you'd want it. Of course, I'm gonna mount it up as high as I can get it there in that top set of holes. Put one of those screws in each side and we'll tighten them up. Now we'll plug the pigtail into the back of our brake controller. Once that's clipped in fully, let's get our wiring tucked up out of the way remember, we're avoiding the brake pedal there and zip tie it off. Now we're gonna cut back our ground wire that we ran from our pigtail. We're gonna get that stripped back and add a ring terminal to it. You can see, right here on the fender, we've got a body stud. We're gonna go right into that so we get a really nice ground, that way there won't be any kind of interminute issues with it. We'll add on one of our 3/8" ring terminals and get that crimped down. Then with the 10mm socket we can pull that bolt out. Place our bolt through our ring terminal, place it back through that ground, and just resecure it. Now I'm gonna make my jumpers from my breaker down to that positive stud. You've got enough scrap left, if you use one black and one white, to run from those breakers down to that, but to keep everything kind of consistent I'm gonna switch that out for about 6' of 12 gauge wire. We sell this on our website, part number is: 12-1-1. Gonna strip both ends of that back, and I'm gonna add on one of the small ring terminals. Then I'm gonna remove the lock nuts off our breaker there. We'll add one of those onto each of our copper studs, and then we can replace the nuts. We've got a wire loom that runs here, and also the cable from the hood. I'm gonna go right underneath that, and I'm gonna duck down to this main cable and follow that right around, and it runs right to that stud. Now I'm gonna zip tie the wires off all the way around that cable, and trim both those back, strip them, and add the larger ring terminals. Now we're gonna remove the nut here. Before we do this though, we're removing the positive battery terminal. This connects directly to it and we don't want to short that out. And our nut here is a 10mm. Once that's off, we'll just lay these ring terminals right down on top, then we can replace our nut and tighten it down. Now we'll take our cover and we're gonna slide that back down on there. Last thing, we're gonna replace our grommet. Just gonna cut a slit in it, then a small opening. And it's a good idea to also use some black silicone sealant on that, just to make sure you don't get any dust or anything like that blowing in the cab. Now we can come inside and our screen should look like this; should say Tekonsha P3 there. That's gonna mean we're getting power to the system. Now we'll hook up our tester in the back and make sure it's sending braking signal out to our trailer. Now what we'll do is just slide our tester in our 7-pole plug there, and the screen on the brake controller should change from what we had before, now with this plugged in, to the actual user screen. Now to test it out, we're simply gonna hit the manual override lever. As we do that we're gonna see that increase in the braking power go back. Now you can see, we'll test out our running lights. We want to do left turn signal, right turn signal, and our brakes. Now, with everything working properly, that's gonna conclude our installation of Tekonsha Prodigy P3 Proportional Trailer Brake Controller, part number: 90195, on our 2017 Chevrolet Express.


Do you have a question about this Trailer Brake Controller?
Info for this part was:
At etrailer we provide the best information available about the products we sell. We take the quality of our information seriously so that you can get the right part the first time. Let us know if anything is missing or if you have any questions.


Thank you! Your comment has been submitted successfully. You should be able to view your question/comment here within a few days.
Error submitting comment. Please try again momentarily.