


Replacing Chewed Up Power Wires On A Lippert PSX2 Stabilizer Motor
Updated 07/13/2026 | Published 01/27/2022
Products Featured in This Question
Question:
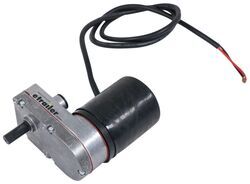
My dog recently chewed through the wires on my Lippert PSX2 Stabilizer motor on my 21 Rockwood 2608bs. I see a couple of phillips head screws on the outside. Can I remove this and attach a new wire? Is there any kind of replacement boot that I can use to cover this up? Any other product that you would recommend? Thanks.
asked by: Matt
Expert Reply:
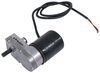
I do have a solution for you even though Lippert does not offer a replacement power cord/boot for your Lippert PSX2 Stabilizer Motor # LC759091. First we'll start with the wires running to your trailer's battery. Strip back the black casing and individual wiring casing to expose a little bit more braided wire. You can attach some 12 gauge wire # 12-2-1 to these wires using some heat shrink butt connectors # DW05744-5 for a water tight seal. You'll maybe only need a foot of wire to comfortably reattach the wires here.
Now that you have some extra length on the battery side we can focus on the wires coming out of the motor. Since your dog chewed it so close to the motor you will have to remove the boot to expose enough wire for the heat shrink butt connector to attach to. Once you have the boot off and the wires connected back together using the heat shrink butt connectors you can use some wire loom # 459075-1 and electrical tape # PP47FR to protect the wiring.
We do also carry the Valterra Rubber Stick Floating Dog Toy # A10-2000VP to give your dog something else to chew on for next time.


(click to enlarge)

Product Page this Question was Asked From
Replacement Motor and Gear Box Assembly for Lippert Components PSX2 Electric RV Stabilizers

- Accessories and Parts
- Camper Jacks
- Trailer Jack
- Motor and Gear Parts
- Gearbox
- Motor
- Lippert
more information >
Featured Help Information
Miscellaneous Media



Continue Researching
- Shop: Replacement Motor and Gear Box Assembly for Lippert Components PSX2 Electric RV Stabilizers
- Search Results: suburban water heater cover
- Search Results: trailer wiring
- Search Results: led lights
- Q&A: Replacement Motor for Lippert Components PSX2 Electric RV Stabilizers
- Shop: Optronics Flexible LED Light Strip - Weatherproof - White - 17' Long
- Shop: LaSalle Bristol Bathtub Drain and P-Trap for RVs - 1-1/4" and 1-1/2" pipe - ABS
- Video: Review of Lippert Components PSX2 Stabilizer Motor and Gear Box - LC759091
- Shop: Replacement Diverter Valve for B&B RV Water Centers - PEX Connections
- Shop: B&W Continuum Weight Distribution System w/ Sway Control for 2" Hitch - 16K GTW, 1.6K TW
- Q&A: Recommended AC Unit for Vintage Airstream Trailer Where Roof Is Only 1-1/2 Inches Thick
- Search Results: 94413
- Search Results: led clearance light
- Search Results: teardrop clearance lights
- Search Results: lippert ground control
- Shop: P-Trap Fitting - Union Joint - ABS Plastic - 1-1/4" Slip Joint - 1-1/2" Hub
- Shop: Specialty Recreation RV Skylight w/ Sealant - 28" x 10" - Neo Angle - White
- Q&A: Lippert Stabilizer Jack # LC298707 Mounting
- Q&A: Spacers for Lippert Power Stabilizer Jack
- Q&A: Replacement Options For Two Dometic Duo-Therm AC Units # 630516.331
- Q&A: Can I Bypass Lippert Stabilizer Jack Switch To Test Switch Functionality
- Shop: Gooseneck Hitch
- Shop: Fifth Wheel Hitch
- Q&A: What is the Difference Between a Class II and a Class III Hitch?
- Article: Trailer Wiring Diagrams
- Shop: Trailer Hitch
- Video: Firestone Ride-Rite Air Bags with Easy Mount Compressor Feature Breakdown
- Shop: Trailer Wiring
- Article: Brake Controller 7- and 4-Way Installation Kit (ETBC7)
- Video: How to Choose a Trailer Brake Controller

on Accessories and Parts













Tom H.
7/13/2026
Hey Kevin, thanks for your good info. I recently sheared the wires off (by backing across a little ditch so the motor was on the ground and the edge of the driveway pulled then cut the wires), so had to go inside. When I opened the motor (two long screws), the black wire with its circuit protector was there, and the red wire was absent. I was able to run the new red wire to the crimp connector for the brush cable and re-crimp it there (having unscrewed the pc board and opened the old crimp with a very small Phillips screwdriver). I butt-spliced the new black wire, re-attached the pc board (used light thread locker on these four screws), closed the motor (retracting one brush by pushing it against the motor armature, retracting the other by pulling gently on its braided cable with my finger)(light thread locker on these two screws). Applied RTV silicone sealer to seal the wire entry and protruding butt connector. Connected new wires to old with heat shrink butt connectors. Tested operation. Wrapped it all with self-fusing tape. I have a photo of unassembled motor cap, and can email it if anyone asks.