
Thank you! Your comment has been submitted successfully. You should be able to view your question/comment here within a few days.
Error submitting comment. Please try again momentarily.
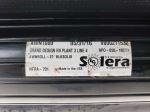
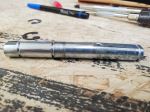
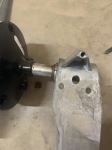
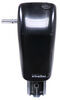
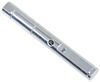
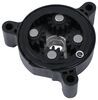
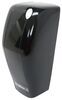
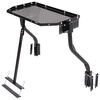
Replaces the Regal-style idler head of your Solera 12V, 18V, or Smart Arm electric awning.
Features:
Fits:
California residents: click here
Videos are provided as a guide only. Refer to manufacturer installation instructions and specs for complete information.
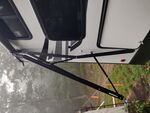
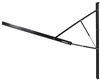
Hey there, neighbors, Kevin here with Etrailer, and today we're gonna be showing you how to install the replacement idler head for Solera powered RV awnings here on our 2022 KZ Sportsmen SE travel trailer. If you've owned a travel trailer with a powered or manual RV awning, you've probably had some issues with it, either getting smacked by something out on the highway, maybe you hit a tree when you got to your campsite or just general wear and tear on the unit eventually wore it out to where you're now needing to replace the head. Now, there's gonna be a few different options when it comes to this, and since these are all brand specific, you do need to know exactly what kind of awning you have to make sure that you're getting the correct replacement. This specific one that we have today is the regal style, and this is the one that you're typically gonna see on 99% of the trailers out there because this is the most common one used. There are a couple other options though, so there's a few different series and there's also ones where they'll have a built-in speaker into it. So you'll definitely wanna get up there and just double-check, make sure that you aren't accidentally picking out the wrong one.
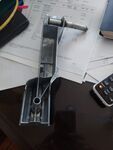
Aside from that, installation of this is super simple, it's only gonna be two screws. We have one right here on our arm assembly that's actually going to mount the head to it, and then one right here on this pin that runs into our roll tube for awning fabric. And that's just going to allow it to sit there and spin with it as the drive head is in motion. So this head can be totally replaced if you do end up damaging it, but if you just maybe have a small crack in the cover itself, you can remove this as well, and then just replace either the front cover, the backside of it, which will also have the bracket that mounts into our arm here, and you can do that for both the idler side and also on the driver's side. Now, there's also the difference in color as well.
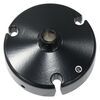
So you can either get this in white or black, so that way you can match it up to exactly what you already have there, or if you're just wanting to swap over to something new, maybe you wanna change up how your trailer looks, you can use one of those two colors. Now, as far as specialty tools, this really doesn't require anything that much extra. The only thing that's really different is the screw here, which is called the wax screw, is going to require a square-head bit. So if you don't already have one, you'll wanna pick one of those up. And then personally I recommend using a 3 Ace magnetic bit driver because typically from the manufacturer they're gonna have self-tapping screws that mounts up the arm assembly into the wall here, and that's usually gonna have 3 Ace head on it, so that way you can easily pop it in and out, and it's gonna have that magnet in the bit driver itself, so that way you're not losing the screw and then having to look for it as it's rolling around on the ground.
As far as insulation goes, this one is super simple. Shouldn't take it more than maybe 10 minutes to do. The only other thing, besides the tools that I've mentioned already, is just you're gonna need a ladder, so that way you can actually get up here and get the arm replaced. If you just don't have the time, maybe you don't have the space, typically a lot of HOAs aren't gonna let you bring your trailer home, and especially work on it. They'll probably be sending you something in the mail trying to fine you, or you just don't really have the room in a storage lot to do so, then please feel free to use our dealer locator.
You can enter in your zip code and find a shop to get it professionally installed. If you are willing to tackle this yourself and you have the time and the tools to do so, then please stick around and I'll show you how to do it. So we're gonna be replacing this entire arm, including the head as well. And to do so there's gonna be a few things you're gonna wanna have ahead of time. Typically at the manufacturer for the trailer, they're gonna be putting in some self-tapping screws. You can usually get these out with a 3 Ace bit driver. So there's two screws right here, two screws right here in the middle, and then there's two up at the top where it has that actual mounting bracket. I highly recommend picking up some butyl tape because as we pop this off, we're gonna be making sure that we're not allowing any new water to get through once we do shoot those screws back into the wall of our trailer. And then as you can see, I've already got this out about a foot, and that's gonna give us some room so we can get to those screws. And then we're gonna be using two longer zip ties, or if you have just one really big one, and I'm gonna get up here on my ladder and show you how to secure this, so that way once we do remove this, the arm's not just gonna flop right out. Now, with those zip ties, we're gonna be running 'em through the backside of this bolt here that the inner arm pivots on. We'll have that come around, and then we are going to just strap that on the outside of our arm. Just like so. You've still got enough room to where I could probably get in there. I may need to go a little bit bigger, probably just at the bottom, or I'm gonna have to get a little creative with my bit driver there, just for those bottom screws. But this is essentially gonna stop it so that the arm doesn't just pop right out, because there is a gas strut on the inner arm and that'll easily just fling this out, and we don't really have the space for that to fling out and we don't want this hitting anybody either. So now that we have that secured, I am gonna start popping out the screws that are holding in the hole arm assembly to the wall. And then we're gonna come back up, and right here we have a little screw that's gonna require a square bit, and we'll pop that screw out, and this head has this metal portion that you can see right here running into our roll tube. That's what's gonna separate that from the end cap. And then we'll be able to support our awning roll tube by just kind of hanging it up on top of the roof here while we get the new arm in place. And we're just gonna put it right back how we're taking it off. (bit driver whirring) Now, we are gonna hang onto this hardware because they do not give you any replacement. (bit driver whirring) Now, before I take my two top bolts out, I am gonna take out this what Lippert calls the wax screw. And this is that square screw that attaches the head of our arm assembly to the roll tube. (bit driver whirring) Gonna pop that back out. (bit driver whirring) And we don't wanna lose that, so I'm gonna get a hand on it real quick. There we go, set that aside. And now we can take out those last two screws. Although when you do this, you are gonna wanna make sure that you have some kind of support. And before I do that, since I don't really have any other support, I am gonna pop this off real quick. (arm clacking) And we'll just rest it up on the trailer. (bit driver whirring) All right, now, as I take that out, it looks like they did put at least some kind of butyl tape or something on here. So that's helping this stay up. I'm gonna come down a bit, as we peel this off. (arm clacking) There we go. And then we can just take a whole assembly and set it aside. Now, to put our head and our arm assembly together, it's gonna be just one screw, which unfortunately isn't included with this specific setup just because the arm and the head were both purchased separately by our neighbor. And in that case, they aren't assuming that you're gonna be swapping the whole thing out, they're really just thinking you're swapping out one part, so you're still reusing some of the old hardware. So I'm gonna take the screw out of our old arm right here. (bit driver whirring) And that's just the Phillips head. Now, with the new one, we'll slide it into this outer sleeve, and it literally just pops right in place. We'll have our screw go down, and then we can tighten it up. (bit driver whirring) And once that's good, we're gonna basically repeat the same thing. I'm gonna zip tie this, but at the same time, I do wanna make sure that I have enough room to get to everything. So what I might do is zip tie it, get my two top screws in, have that hold it in place, and then I can release the zip tie off here. We'll get that middle and the bottom, because as you can see, this is already starting to pop out 'cause of the gas strut that holds the arm assembly together. Before we put this up, I've cut out some butyl tape strips, and I'm gonna place that on my mounting brackets that I'm gonna be going through to help seal it up. And I'm gonna just match up exactly how the previous one was. So it's gonna be the middle right here, and then all the way down at the bottom, so that way we're all ready to go. And I'm gonna peel off the backing tape on each one of these, so that way when we go to set this up, the butyl tape's gonna help hold it a bit, but it's not gonna be enough to really get the full pressure here, just enough to kind of help stick it on there while we shoot those screws in real fast. Now I'm gonna do that same zip-tie trick just so this isn't flopping open on me. We'll get the top two in, and then we can cut that zip tie once we have the top two plus the wax screw all in place. Now, I'm gonna line up my screw. Get that tightened down just a bit, so that way I can still see my other one so I can make sure I actually have these going into the same holes that they we inchesre already in. (bit driver whirring) Now I can move my hand outta the way. (bit driver whirring) That's nice and tight. And now typically I would wanna use a level, but at least on this one you can kind of see exactly where the arm was just because there's a difference in the siding from where the arm was blocking the sun and then where we have sun fade. So we lucked out, and I can see I'm right where I need to be. But while that's like that, let's get the roll tube back in place. And I'm gonna spin the little pivot arm here until I have my holes lined up. And then we can grab back that square bit and our wax screw. (bit driver whirring) And with that back in place, now we can cut our zip tie and get the rest of our mounting screws in place. (bit driver whirring) Now, with all the mounting hardware back in, our wax screw back in place, that's pretty much it for the install. The only other thing I'd recommend to do is just run it in and out a few times and make sure everything is functioning properly. You don't wanna have any kind of bind ups where it can potentially end up breaking your arm again or potentially grinding out the gears that are in the head of the awning itself. Well, that'll do it for our installation of the replacement idler head for Solera powered RV awnings here on our 2022 KZ Sportsmen SE travel trailer. My name's Kevin, and if you're still looking for the correct replacement idler head for your travel trailer, please feel free to reach out to us via our Ask the Experts link, a comment on this video, or a phone call to our customer service department, and we'd be happy to help you out on your journey.

The part fit perfectly and worked good.
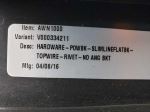
I think you should be clear that the part is different than the old original aluminum part.
The new Plastic, but seems to be made well. I just think you should let people know ahead of time.
Wrong item was sent. In pictures is the main part metal, I was sent all plastic which is not durable and won't last.
Nee head fit perfectly and is exactly what I needed to replace the damaged head. This is only getting a 4 star though as the hole that you put a screw through to hold the pin to the awning roller head came with bo threads so I had to go get a bit to create threads to make it work.

The part was an exact replacement for the part I foolishly damaged by hitting the side of my house while attempting to store my trailer. A third hand would have been nice but I was able to install this myself without any issues. Great product.
Perfect fit, fast delivery, priced right, and great customer service
Extremely grateful for the product support that you offer and the fact that you stock most of what you offer. Anytime I need support for my travel trailer, this is where I look first. Appreciate you.
You guys always give me quality parts and speedy delivery.
Thank you
My awning functions great with this idler head, like it's brand new
1. Replaced head and idler.
2. Cable found to be binding and damaged because of routing.
3. Cable rerouted to avoid further damage and existing damage repaired.
It is not installed yet, however it appears to be a match for the original LG OEM so it should work fine. Fast shipping too. Thanks

Robert 
11/27/2023
Couldnt use it because it was the wrong part, and unfortunately I was not able to begin installation until RV was out of storage and could not return it. Threw it out.
Got my part in less than a week it installed easilly ready to get on the road.
Fast shipping and perfect fit
OEM replacement for Solera power awning idler head. I hit my awning and bent the pin, so needed to replace pin at a minimum.
Perfect fit and relatively simple replacement.
Next day delivery
Have to install this weekend but e-trailer delivered a day ahead of schedule. Absolutely fantastic. I have to get this awning part to my camper on before I pull it 1000 miles to MS for my college son to live in. Hats off to e-trailer
producted as described, packaged very well bubble wrap, shipping was fast ordered monday evening items arrived thursday usps priority.
No issues in ordering, receiving and installing. Watched the video and said yes I can do the repair. Am enjoying the shade.
Exact match to the original and all is good. Prices are definitely cheaper than dealerships too!
This item is exact same as factory original. Went on perfectly and easily.
great price and quick shipping
Delivered very quickly
best customer service and fast on delivery of product.
Quick shipping, parts fit perfectly
Idler Head worked like a charm!
Every thing has worked great no problems

Joe
11/9/2022
Still working great and we use our camper a lots

Do you have a question about this Accessories and Part?
Info for this part was:
At etrailer.com we provide the best information available about the products we sell. We take the quality of our information seriously so that you can get the right part the first time. Let us know if anything is missing or if you have any questions.


Josef
4/3/2025
The product has held up perfectly since I installed it a year ago.