

 Arrives before Christmas
 To see if this custom-fit item will work for you please tell us what vehicle you'll use it with.


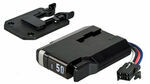
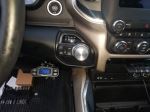
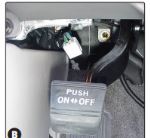
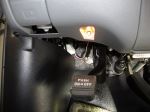
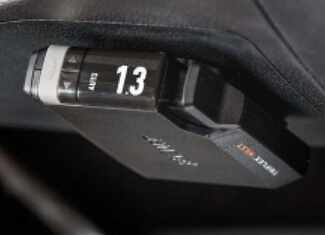
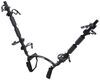
This compact brake controller fits nicely in your cab. It's designed to mount flush to the dash and is only 1" thick. The controls are simple, the LED display is large and bright, and the manual override is easy to reach in a pinch.
Features:
Specs:
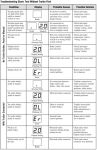
Gain is the maximum amount of power that will be applied to your trailer's brakes. How much braking output you need is determined by the weight of your trailer; a heavier trailer will need more power to bring it to a stop. You want to go as high as you can without the trailer brakes locking up. Use the gray rocker switch to adjust the gain on a scale of 0.5 to 9.9 in increments of 0.5.
Once you have the gain set, you can fine-tune your braking by adjusting the load control on a scale of 1 to 9 using the black rocker switch. This controls the aggressiveness of your trailer's braking, meaning how quickly the brakes reach the maximum braking level. If your vehicle takes too long to come to a stop, increase the setting. If it stops too abruptly, decrease the setting.
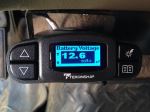
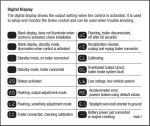
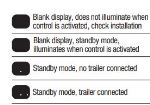
The LED display on the TriFlex is large and easy to read at a glance. You can adjust the brightness or trigger night mode so it won't glare obnoxiously on your dash. It also will give you error messages you can use to troubleshoot.
The TriFlex offers key safety features to prevent damage to various components of your towing setup. This starts with built-in protection against shorts and positive and negative power reversal, as well as continous diagnostic checks to alert you to any potential problems as they come up. To minimize the drain on your vehicle's battery, the TriFlex will automatically go into sleep mode after 5 minutes of inactivity. Sleep mode will turn off again the moment you press the brake pedal.
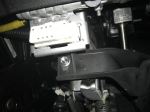
Automatic leveling means your mounting options are limitless, so long as you can still easily access the controller and the manual override. The included bracket is designed to mount the brake controller flush to the dash so it takes up almost no space at all.
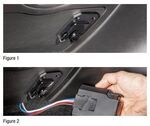
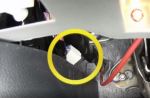
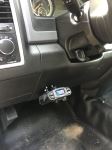
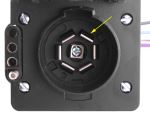
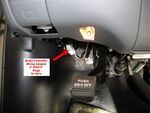
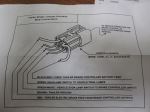
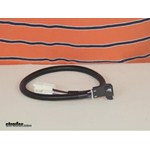
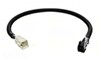
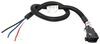
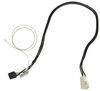
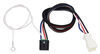
The included custom-fit adapter plugs into the port on your vehicle's built-in brake control wiring harness, which you'll find underneath the dash, to the left of the steering column, taped to another harness near the emergency brake pedal. Once you're plugged into the factory port, just plug the other end of the adapter into the TriFlex. No hardwiring needed!
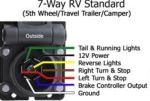
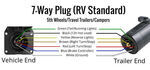
Note: If you don't already have a 7-way plug at the back of your vehicle, take a look at our exclusive 7- and 4-way brake control installation kit (ETBC7 - sold separately).
Proportional braking means that your trailer brakes mimic your tow vehicle's brakes. If you slam on the brakes in your vehicle, your trailer brakes will activate with the same intensity; if you brake lightly, your trailer brakes lightly too. The trailer's braking is in proportion to your vehicle's braking. This saves wear and tear on the tires and the brakes on both your vehicle and trailer.
The TriFlex uses an internal 3-axis accelerometer to sense how your vehicle is braking so it can send the right amount of braking power to your trailer. It measures the inertia of your tow vehicle and activates the trailer's brakes to slow at the same rate. The result is uniform braking across your towing setup. No push-pull action - just smooth, proportional braking every time.
 Alternate Instructions
California residents: click here
Videos are provided as a guide only. Refer to manufacturer installation instructions and specs for complete information.
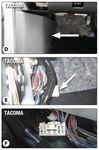
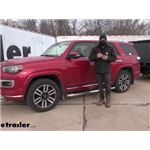
Hey everybody, how's it going Today we're gonna be showing you how to install the Curt custom wiring adapter for trailer brake controllers here on our 2015 Toyota 4runner. So the first step of our installation, we need to find the factory brake controller port on our vehicle. Now this is gonna be located underneath the dash here and sorta to the left of the emergency brake pedal. So let's go ahead and give you a closer view of that now. So we're underneath the dash here. Here is the arm for our emergency brake pedal and directly to the left of that, we should see a large wiring harness here.
So attached to this wiring harness. We should have our brake controller port, which is gonna be this rectangular white connector that we can see here. So if yours isn't quite visible, it may be taped up within the harness here. There is a separate lead that comes off this, but it is again tapes to the main harness here. So once we find that connector, we can still use it, how it is now.
And I wanna give you guys a little bit more room to work so we can actually see what's going on. Therefore, I'm gonna take a razor knife here and I'm gonna cut the electrical tape that's holding the brake controller harness to the main harness here. Now you wanna be careful while you're doing this because you wanna make sure you don't pierce any of the wires. So I've got most of the tape cut there. So I'm going to go ahead and just pull the harness down.
You can see here, we have a much clearer view. There is that white rectangular connector for the brake controller. And then we have about six inches of wiring going into that main harness there. So once we found the factory brake controller port, we need to take the vehicle specific Curt adapter harness here. So this end here, this is this white rectangular connector that matches the one we just found.
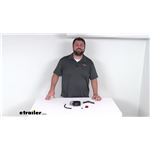
This is gonna plug into the port on the vehicle. And this plug over here, this black rectangular connector, this is gonna plug into any Curt brake controller. So what we're gonna do is, we're gonna take this white connector here. We're gonna go ahead and reach back under the dash and plug it into the factory brake controller port. So here we go. It should really only go in one way and we should hear it click into place when it's locked. So now, we can take our other end here and plug it into the back of the brake controller. Once we've mounted the brake controller and then zip tie all of your loose wire. So now that we have the brake controller adapter harness squared away, we're ready to plug in our brake controller. Again, we'll hear it lock into place. Now we'll get up under the dash there. I'll kinda show you a little bit better view. Over out talking about mounting this. So now that we can have our controllers securely mounted, the only thing left to do here is to secure our extra wiring. We can take some of the extra zip ties that come in your kit here and secure it to some brackets or some wires under the dash. Or we could actually just tuck it in behind this panel here. And that's gonna do it today for our look and installation of the Curt custom wiring adapter for trailer brake controllers here on our 2015 Toyota 4runner..


Do you have a question about this Trailer Brake Controller?
Info for this part was:
At etrailer.com we provide the best information available about the products we sell. We take the quality of our information seriously so that you can get the right part the first time. Let us know if anything is missing or if you have any questions.


Thank you! Your comment has been submitted successfully. You should be able to view your question/comment here within a few days.
Error submitting comment. Please try again momentarily.