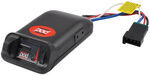
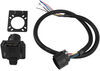
Tekonsha POD Trailer Brake Controller w/ Custom Harness - Up to 2 Axles - Time Delayed


To see if this custom-fit item will work for you please tell us what vehicle you'll use it with.


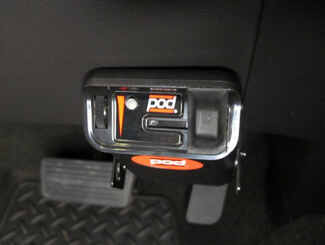
This time-delayed brake controller is designed to mount at any angle, even upside down. The controls are all up front for easy access, including a slide-bar manual override and a thumbwheel for braking output. LED indicator shows your braking status.
Features:
Specs:
The Tekonsha POD is designed to mount in any direction, and it's especially suited for mounting on near-vertical dashes. All the controls are on the front of the module, so you can still access them with the controller tucked away in a convenient place.
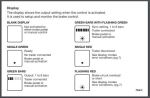
Braking output is the maximum amount of power that will be applied to your trailer's brakes. How much braking output you need is determined by the weight of your trailer; a heavier trailer will need more power to bring it to a stop. You want to set the braking output as high as you can without locking up the brakes. Once you've set up the brake controller the first time, you shouldn't need to adjust the settings until the trailer load changes, you switch trailers, or road conditions change. Use the thumbwheel on the side to change the braking output level. The output setting will appear as a number on the digital display, with a higher number indicating higher braking power.
The Tekonsha POD keeps the manual override within easy reach on the front of the module, great for stopping sway or controlling your trailer's momentum in emergencies. Push the slide-bar lever to activate the trailer's brakes and brake lights without you having to apply the brakes on your tow vehicle, perfect for limiting trailer movement while you're cruising.
Because inertia plays no role in the functioning of this controller, you do not have to mount the unit at any particular angle. Your mounting options are limitless, with the controller designed with all of the controls on the front of the module so you can access them even if it's mounted upside down.
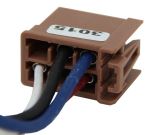
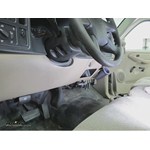
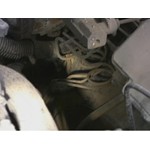
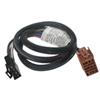
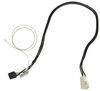
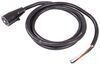
The included custom adapter plugs into the port that is built into the electric junction box beneath your vehicle's dash. This black box is located to the left of the steering column, just above the carpet. The adapter plugs into the second slot from the left, on the top row. Once you have the wiring connected to your vehicle, just plug the other end into the POD. Because there are no wires to splice, installation is not permanent. You can unplug and remove the brake controller at any time and securely stow it away.
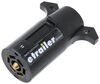
Note: If you don't already have a 7-way plug at the back of your vehicle, take a look at our exclusive 7- and 4-way brake controller installation kit (ETBC7 - sold separately).
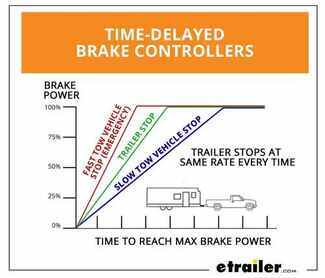
The Tekonsha POD comes equipped with time-delayed braking. Every time you apply the brakes in your vehicle, a signal is sent - via the brake switch - to the POD. The controller then sends power out to your trailer brakes to activate them with an intensity set by you, at a rate determined by you. The amount of braking power (output) can be adjusted to suit your preference, the road conditions, the type of trailer, and the weight of your load. To determine which levels are best for your application, test your towing setup and choose what feels right.
 Alternate Instructions
California residents: click here
Videos are provided as a guide only. Refer to manufacturer installation instructions and specs for complete information.
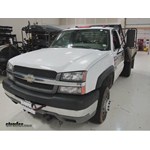
Today on our 2004 Chevrolet Silverado 3500 we're going to be installing the Tekonsha Prodigy P3 Trailer Brake Controller, part number 90195. In addition to the brake controller we're also going to be using the Tekonsha Plug-in Wiring Adapter for electric brake controllers for GM vehicles, part number 3015-P. Now here's what our P3 brake controller looks like. We get a couple different options for mounting it. We can use the standard metal bracket style or we can use the metal and plastic combination. This one here will allows you to remove the brake controller when you're not using it, but because it is out of plastic it is not quite as durable as our metal one here. Now this particular vehicle here is a work truck so we're going to go ahead and install the metal bracket to give us a little better chances of the brake controller staying connected onto the lower dash where we'll be putting it. Now that we've gone over the parts of the brake controller, here's the wiring harness that we're going to be using.
We're going to go ahead and get our brake controller mounted up, and then we'll make our wiring connections. Now here on the dash there's already a couple holes, as this vehicle has already had a brake controller installed previously, so instead of drilling some new ones we're going to go ahead and utilize those holes. Now that we have our bracket mounted we'll go ahead and take the wiring harness, plug it into the back of the brake controller. You'll notice here's a locking tab, lines up with this little tab right here built in on the brake controller. Want to make sure you hear it click. Next we'll go ahead and we're going to mount the brake controller, selecting one of the four options.
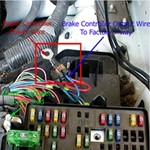
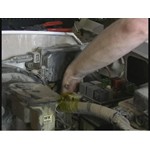
We're going to choose to mount it a little bit closer to the dash. We'll use one of these two holes. We'll be using the machine screw and threading it into the hole here, as well as on the other side right here. Next we're going to need to gain access to the fuse block or the electrical connections underneath this plastic cover. We'll need to remove this plastic nut right here and then lift the cover out of the way. Now once you have the cover removed, when you flip it over there's a diagram on the backside.
We're looking for this connector right here. As we're looking at it, it matches up with exactly what's up there so we'll look for the second one over from the left on the top, so this port right here. Next we'll need to route our wiring harness over to our fuse panel area. When you line up the plug you want to make sure the locking tab is on the top side and plug it in. You want to make sure you hear it click. Next we can go ahead and put our cover back in place.
With our cover back in place we'll go ahead and use a few zip ties to help secure any loose wiring. We can then go ahead and trim off any excess zip tie. Now we have all of our connections made. Go ahead and pull the manual override. You'll notice without our trailer connected it says no trailer connected. Now we'll go ahead and plug the trailer in. Now with our trailer connected and you do the manual overhead, see we get our reading. There's three different boost levels: one, two, and three, as well as off. The higher the level of boost the more aggressive the brakes will be applied. These two buttons here are what adjusts the maximum power setting. There's the down and there's the up, as well as several other functions. This button here on the lower right allows you to go into the setup screen, where you can do and adjust several other functions of the brake controller. With that, that will do it for the installation of the Tekonsha Prodigy P3 Trailer Brake Controller, part number 90195, in conjunction with the Tekonsha Plug-in Wiring Adapter for electric brake controllers for GM vehicles, part number 3015-P, on our 2004 Chevrolet Silverado 3500. .


Do you have a question about this Trailer Brake Controller?
Info for this part was:
At etrailer we provide the best information available about the products we sell. We take the quality of our information seriously so that you can get the right part the first time. Let us know if anything is missing or if you have any questions.


Thank you! Your comment has been submitted successfully. You should be able to view your question/comment here within a few days.
Error submitting comment. Please try again momentarily.