Tekonsha Voyager Trailer Brake Controller w/ Custom Harness - 1 to 4 Axles - Proportional

 Arrives before Christmas

2014 Keystone Springdale Travel Trailer
Will this fit?
To see if this custom-fit item will work for you please tell us what vehicle you'll use it with.
- All Info
- Reviews (751)
- Q & A (0)
- Videos (57)
- Photos
Tekonsha Trailer Brake Controller - TK46ER
- Electric
- Proportional Controller
- Up to 4 Axles
- Tekonsha
- Under-Dash
- Plug-In
- Under-Dash Box
- Single Trailer Only
- Indicator Lights
This proportional brake controller is designed to keep towing simple. Includes an LED braking indicator, a slide-bar manual override, and a knob to adjust braking power. Mounts easily within a 90-degree vertical range.
Features:
- Brake controller activates trailer brakes in proportion to your vehicle's braking action
- Automatically adjusts trailer's braking based on deceleration of tow vehicle
- Simple controls keep your settings within easy reach
- Gain setting lets you adjust the amount of power sent to the trailer's brakes
- Slide-bar manual override allows you to control trailer sway or stop in emergencies
- Sensitivity knob lets you set initial braking power and aggressiveness for smooth, safe braking
- Green LED on the top of the module monitors a secure connection with trailer
- Glows red to indicate that trailer brakes are being activated
- Quick and easy installation with included bracket and hardware
- 90-Degree vertical mounting range - must be horizontally level and parallel to direction of travel
- No need to wire into your vehicle - custom-fit harness lets you plug in and go
Specs:
- Application: trailers with up to 4 axles (8 brake assemblies)
- Compatible with electric brakes only
- Dimensions: 5" long x 3" wide x 1-1/2" tall
- Mounting: between -20 degrees and 70 degrees in the vertical plane
- Warranty:
- Limited 5-year on brake controller
- Limited 1-year on wiring harness
Power and Sensitivity Adjustment
Once the brake controller is installed, you can use the knob on the right side of the unit to adjust the gain (also known as output). Gain lets you set the maximum amount of power that will be applied to your trailer's brakes. You want to set it as high as you can without locking up the brakes. Typically, this setting is only readjusted when you experience changing road conditions or if you switch over from a heavy, loaded trailer to a much lighter, empty trailer, or vice versa.
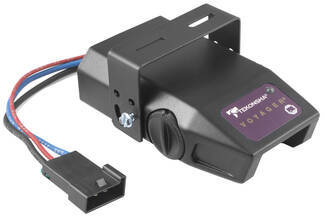
You can fine-tune the gain by adjusting the sensitivity of the internal sensor using the knob on the left side. This controls the aggressiveness of your trailer's braking, meaning how quickly the brakes reach the maximum braking level. You can adjust this when you're towing heavy loads and you need more umph to bring your trailer to a stop. Your tow vehicle doesn't need that much power to brake in time, but your heavy trailer does. A high sensitivity level will get the braking power to your trailer brakes faster and with more intensity so that it doesn't push your tow vehicle forward.
LED Indicator
Keeping with its simple design, the Voyager will not overwhelm you with information. An LED indicator on the top of the unit lights up green to show that your trailer is securely connected to your tow vehicle. The LED indicator will change to red when the brakes on your trailer are activated.
During installation and setup, this light is also used to ensure that the Voyager will be able to function correctly. Proper leveling of the internal sensor is crucial to the operation of this brake controller. When the sensor is level, the LED will change to a shade of orange.
Simple Installation
The Voyager is designed to be mounted in your cab at a vertical angle that is between -20 degrees and 70 degrees. The brake controller needs to be horizontally level and parallel to the direction of travel in order to function properly.


To connect the Voyager, just plug the included harness into your vehicle. The other end plugs into the controller - no hardwiring required.
Once the controller is mounted and connected, you must level the internal sensor. First, set the overall power to the maximum using the knob on the side of the controller. Then, while pressing the tow vehicle's brake pedal, adjust the level knob on the other side of the brake controller (this is the same knob that is used to fine-tune the power output) until the LED monitor is a shade of orange.
Note: If you don't already have a 7-way plug at the back of your vehicle, take a look at our exclusive 7- and 4-way brake controller installation kit (ETBC7 - sold separately).
Proportional Braking
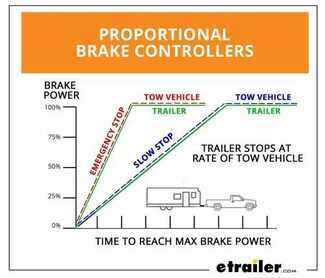
The Tekonsha Voyager brake controller comes equipped with proportional braking to give you the best towing experience. Proportional braking means that your trailer brakes mimic your tow vehicle's brakes. If you slam on the brakes in your vehicle, your trailer brakes will activate with the same intensity; if you brake lightly, your trailer brakes lightly too. The trailer's braking is in proportion to your vehicle's braking. This saves wear and tear on the tires and the brakes on both your vehicle and trailer.
The Voyager uses a pendulum system to sense how your vehicle is braking so it can send the right amount of braking power to your trailer. It measures the inertia of your tow vehicle and activates the trailer's brakes to slow at the same rate. The result is uniform braking across your towing setup. No push-pull action - just smooth, proportional braking every time.
9030 Tekonsha Voyager Electric Brake Controller - 1 to 4 Axles - Proportional
302600 Tekonsha Brake Control Wiring Adapter with 2 Plugs
Replaces 3026-P
Installation DetailsCalifornia residents: click here


Videos are provided as a guide only. Refer to manufacturer installation instructions and specs for complete information.
Video Transcript for How to Install: Tekonsha Voyager Trailer Brake Controller on your 2022 Chevrolet Colorado
Hi there, Colorado owners. Then your 2022 Chevrolet Colorado we're gonna be taking a look at and showing you how to install Tekonsha's Voyager proportional Brake Controller. This is a proportional brake controller so the inertia sensor inside will detect vehicle movement. So if you ever slam on the brake show your body like kind of slams forward the inertia sensor detects that, and it knows that it's your vehicle is slowing down based on that. And it uses that along with your adjustment controls to give you the best breaking performance at the back. This is a very simple brake controller beyond the adjustment for a level and the output control.
On the other side, you just have your manual slide which can be used for if your trailer starts to sway or anything you kind of hit the manual slide to apply the brakes on your trailer and to help straighten you back out and get rid of that sway. And that's kind of it. This brake controller is just very simple gives you that fully proportional break output. And it does work with trailers up to four axles. We'll begin our installation here on the driver's side.
We're right down here at the kick panel. There's the parking brake pedal. I'm gonna go ahead and push it down just to help make things a little bit easier to see. And this panel here we're gonna be removing to remove the panel. You're just simply gonna pull up on it.
So your fingers should be able to grip underneath of it here. And kind of at this middle point here we're gonna pull up and we're gonna be working our way towards the back of the panel, pulling up on it. There we go. Once you get the back released and get towards the front here, you're gonna kind of pivot it like this and pull away from the wall here. You got a clip right there and that'll pop out of there.
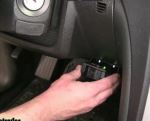
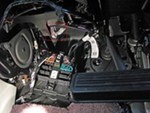
And then we can just set this panel aside behind our panel. You're gonna find your factory break controller wiring and it's just taped right here cut the tape and that'll expose our wires there. We've got four wires here and this will hook into our brake controller. We're gonna use a harness. It has four wires on it as well. So everything will just match right up to what we've got right here. So we can make our connections. Now for demonstration purposes today we're not gonna be fully mounting it. We're gonna use some hook fasteners to secure it and we're not gonna be opening up the little hardware pack that it comes with. So that way we can repackage that. So we're gonna strip back each one of these wires and hook them up. I like to do it one at a time just because the red wire here, is your hot wire. So once you strip it back, that wire's live there. So I kinda like to get that hooked up right away to prevent it being stripped and potentially shorting up. So we're gonna go ahead and just take our start with our red wire here. It has a green Stripe on it. That's our main power wire. So we're just gonna strip it back. You may wanna trim a little bit off cause it's got those little ends on it there. So we'll probably trim a little bit of this off and then strip it, just to make it easier to strip with that material that it had on there. So give it a little twist makes it slide into the butt connectors more easily. We'll slide our butt connector on there and then we'll attach our wire to it. We can now hook this up to the appropriate wire here on our new harness. That's gonna be the black wire on our harness to power up our module, our brake controller. So we'll slide that in the other end of our butt connector and make our connection. So now that we've got that connected there we're just going to repeat that process to connect the rest of our wires. We'll be hooking the blue wire in our harness to the blue wire here on the vehicle. That's the output from the brake controller. So that'll send it down this wire to the back. The uh, white wire here on our harness is ground. And that'll actually hook to the black wire here on our vehicle. That'll be our ground. And then the red wire here, on our harness is for the brake signal input to the brake controller. So that's coming from your brake pedal here. So it lets the brake controller know when you're pressing the brake pedal and that'll connect to the white wire with the small blue Stripe on it there. So I'm gonna strip each one of these back and then make those connections and then you'll see those here. All right. So now that we've got all of our connections made here I'm gonna reinstall this panel and kind of tuck my wiring out the top of it when I reinstall it and we're gonna be mounting our brake controller roughly in this location here, that way it's kind of out of the way our wiring will reach it easily position it just off to the left so we can still access our hood release switch. And that is now fully reinstalled. We still have access to our wiring there to be able to Mount our controller. Now, typically when you mount your controller you're gonna screw the bracket straight into the dash. But again, for demonstration purposes we're gonna be using some hook and loop fasteners just to stick it there. So that way we don't mess up the dash here. That is not really how you wanna leave your brake controller installed 'cause this is an inertia based controller. So it means to detect vehicle movement. So it is important you screw it in place. Now, after we've got it mounted up we'll simply just plug our controller in that'll plug right into that harness. Now this harness doesn't, did not come included with the Voyager controller here but you can buy it kitted that way here at e trailer, to ensure that you get it with your brake controller. But if you just need the brake controller maybe you've already got one of these harnesses, you can buy just the brake controller by itself without the harness kited with it. After you plug in your brake controller you can kind of hide the wiring behind the dash there. And at that point you can see it's powered up. I plugged in the tester here to simulate a trailer. And if we hit our manual slide you should see the gauges activating on our tester there. And we can see we've got output. It's actually pulling ampage and it was operating both or it was operating our brake lights as well. You can see you get a real time display on top of the amount of output that you're putting towards your trailer's brakes based on the L E D light on top. Green being basically like no output going to yellow for a minimal amount, transitioning up to red for maximum. And as you slide the manual slide, you can kind of control how much of that output you're putting up. So once you verify it's working we do need to level this system. It's this very quick calibration. So that way the inertia sensor knows the angle that you've tilted it at to adjust that with your trailer connected and everything hooked up you wanna make sure the knob here on the right side is set to the maximum. So turn it fully clockwise to maximum put it to maximum output. And then the adjustment knob you see here on the left this is your level adjustment. We're gonna turn that one fully counterclockwise. So that's gonna be kind of turning it this direction. We're then gonna press the brake pedal. Our output is red. Red is gonna be the most aggressive setting. We wanna turn our level knob clockwise. Now bringing it back towards us. Once it turns orange, that's kind of your typical setting. That's usually where you're gonna wanna set that level adjustment at to get the typical output. But if for whatever reason you need a little bit more aggressive breaking you can tilt it. You can turn it a little more counterclockwise to get to that darker orange or red to be more aggressive. But you kind of wanna hover around that area of orange between that orange and like lighter red like right when you're getting into the red that'll get you at a nice setting for the inertia sensor to operate properly. And then we can use our maximum control knob here. This is the output from our brake controller. Just properly set that for your trailer. The heavier your trailer is, the higher you're likely gonna need this set. The smaller your trailer is and you can might be able to back it off and turn it down. You'll again, when you adjust that knob when you hit the brakes that will affect the L E D. So I've got, it turned fairly low and you can see it's a very light shade of orange but as I increase that, it becomes more aggressive. So just find the setting that works best for your truck and trailer combination there. And then you're good to go..
Ratings & Reviews
4.8
750 reviews
See what our Experts say about this Tekonsha Trailer Brake Controller
- Most Economical Trailer Hitch Receiver and Wiring Harness For a 2023 Honda Pilot TouringOur etrailer Trailer Hitch Receiver # e27KR you found is our most economical custom fit receiver for your 2023 Honda Pilot Touring edition. For the wiring you can select from either the 4-Way # C48ZV or the 7-Way # C35ZV depending on the types of trailers you will be towing. If you have a trailer with a 7-way you are also most likely going to need a Trailer Brake Controller # 39510 along with the Wiring # 20127 to connect it. This is one of our most economical and reliable proportional...
view full answer... - Should Blue Wire From Brake Controller Have Constant PowerThe blue wire coming from the back of your Tekonsha Voyager Brake Controller # 39510 is for brake output to the 7-Way connector. This wire should only have power with the brake pedal depressed or the manual override activated on the brake controller. If you are getting constant power on this blue wire this may be an indication that the controller is bad but there is an easy way to test this. You will want to first sever the blue wire several inches from the back of the controller. Then...
view full answer... - Is Reese Voyager and Tekonsha Voyager the Same Brake ControllerThey are the same controller as Reese and Tekonsha are made by the same company. The Tekonsha part # 39510 does not come with the vehicle specific install harness part # 3035-P which is custom fit for your 2003 Ford F-250/350.
view full answer... - Tekonsha Voyager Brake Controller Not Activating Trailer Brakes When Brake Pedal Is PressedYes, we can help you test your brake controller and determine if the controller is bad or if there is a wiring issue that is causing the problem on your 2003 Ford F-250 pickup. Lets start with the easiest things first. Be sure that when you are testing the trailer brakes with the brake pedal that the vehicle is moving. The trailer brakes will not apply with the brake pedal if the vehicle is not moving because of the proportional sensor. The first thing I would check is the red wire that...
view full answer... - Troubleshooting No Green Light on Tekonsha Voyager Brake ControllerThe green light on top of your Tekonsha Voyager Trailer Brake Controller # 39510 indicates that a trailer is connected to your vehicle. If this light is not turning on when connected to a trailer there are a couple things, you can check. I first recommend inspecting both the vehicle side and trailer side connectors for any debris or corrosion built-up around the pins that needs to be cleaned out. If the connectors look good, you will next want to test the brake output pin on the vehicle...
view full answer... - Trailer Brakes Do Not Activate With Brake Pedal When Trailer is Sitting StillActually that is a possibility. Proportional brake controllers will not engage the brakes with the pedal unless the tow vehicle is in motion. Another possibility is the red wire from the brake controller isn't connected correctly. It needs to be connected to the cold side of the stop light switch or the wire that is hot only when the brake pedal is pressed. I would also check any fuses related to towing and replace if necessary. If none of these ideas solves your problem let me know...
view full answer... - Which Harness to Install Tekonsha Voyager in 2019 Ram 1500 ClassicWhat brand and model is the brake controller? The Rams changed quite a bit in 2015 so a new harness would be needed. But if you can get me the controller you have I can help pick you out what you'd need.
view full answer... - Fuse Location to Power an Electric Trailer Brake Controller on a 2005 Chevy SilveradoThe Tekonsha Voyager Brake Controller with GM Wiring Harness, # 39510 and # 3015-P, itself does not have a fuse. Since it is connected to the truck via the factory port under the dash, the fuse for the brake controller 12 volt power is located in the power distribution box under the hood. We actually have an FAQ article that explains the installation of a brake controller Chevy and GMC trucks that includes your 2005 Silverado. It covers the connections that need to be made under the hood...
view full answer... - Voyager Brake Controller Red Light Not Coming On with Brakes Applied on a 2004 Chevy SilveradoThere are several possible causes that would lead the red light not to come on when applying the brakes or manual override on the Tekonsha Voyager Brake Controller, # 39510. First, if truck is not moving, the brakes will not activate. You will also want to check to make sure the power setting is not too low. There may be no signal from the brake light switch. You will need to test the red wire from the back of the brake controller using a circuit tester like # PTW2993. If there is no voltage,...
view full answer... - Recommended Wiring for 1998 Ford F-150 to Add 7-Way to Factory 4-Way Trailer ConnectionFor your 1998 Ford F-150 Extended Cab with factory 4-way flat, you need the Tekonsha Ford Replacement OEM Tow Package Wiring Harness, 7-Way # 118242. This will give you the two additional relays needed as well as the wiring harness. Then you will need a brake controller. I recommend the Tekonsha Prodigy P3 # 90195 as well as the wiring adapter # 3035-P. This will give you an easy to use proportional brake controller with easy to use presets as well as a nice LCD screen for diagnostics....
view full answer... - Troubleshooting a Tekonsha Voyager Brake ControllerHey Scott! You're going to need to connect a trailer to your vehicle. You're not going to know what's working correctly or incorrectly on the Tekonsha Voyager item # TK29ER unless you hook a trailer up. If you run into any problems down the road feel free to comment below or email me directly and I'll be happy to walk through them with you.
view full answer... - What Are the Brake Controller Wire Colors for on a 1998 Dodge Ram 2500The factory electric trailer brake controller wires on a 1998 Dodge Ram 2500 are as follows: Power - Red/Orange Ground - Black/Orange Stop Light - White/Tan Brake Output - Light Blue For a brake controller, I recommend using the Tekonsha Voyager Trailer Brake Controller part # 39510. It sounds like the previous owner of your truck may have cut off the old brake controller port so you are also going to want to use the Replacement Brake Control Plug-In Harness for Tekonsha and Draw-Tite...
view full answer... - Troubleshooting Vehicle that Won't Start After Brake Controller InstallWithout knowing what truck you have it's hard for me to know if you have the correct harness. I will say that the problems you are describing are unlike any problems we have ever seen from installing a brake controller. If removing the brake controller makes the problems go away then I would strongly recommend you do so until you figure out why this problem is occurring. Make sure you have your truck shifted into park or neutral before you attempt to start it. You may have moved the shifter...
view full answer... - Where is the Brake Controller Plug In Located on a 2011 Ford F-250 Super DutyOn the 2011 Ford F-250 Super Duty, the brake controller port is located behind the center dashboard access panel on the passenger's side. One end of the # 3034-P adapter will plug into the back of the brake controller and the other end plugs into the brake controller port on your vehicle. If your vehicle has the factory 7-Way connector on the rear of your vehicle, then all of the wires for the brake controller have already been run. If you have a factory 4-Way connector on your vehicle...
view full answer... - Troubleshooting Voyager Trailer Brake Controller Not Working when Brake Pedal is PressedIt is possible that either the connection to the brake switch is no longer good enough to provide an adequate signal to the brake controller and a new connection will need to be made, or there is a short or possibly a bad ground causing the problem. You may want to also check the stoplight fuse. A blown fuse will not allow the signal to get through and the brake controller will not know you are stepping on the brakes. You can find the fuse by checking your owners manual which should have...
view full answer... - Troubleshooting LED Indicator Light on Tekonsha Voyager Brake Controller 39510The green light on the Voyager brake controller # 39510 should come on as soon as you plug the trailer into the vehicle. If it does not come on at all, this indicates that you either have some corrosion inside the trailer or vehicle plugs that is causing a short, or you have a loose power or ground connection. Check the plugs on both sides of the setup for any white or green corrosion. If you see any, clean the plug thoroughly or just replace it. If you don't see any buildup in either...
view full answer... - How to Find the Brake Wire on a 2001 Toyota Tacoma for Brake Controller InstallWhen we installed a brake controller in a very similar Toyota Tacoma as your (see attached install video), we found that the correct wire to use for the stoplight switch was dark green wire with a white stripe. You should still test this wire for voltage with the circuit tester to verify it is the correct one. But this would be an excellent starting point.
view full answer... - Recommended Brake Controller for a 2018 Thor Ace MotorhomeFor your 2018 Thor Ace Motorhome, I recommend using the Curt Spectrum Trailer Brake Controller part # C51170. The reason for this is because this unit is composed of two main parts, the control box and the output knob. The control box gets mounted out of site and then the output knob will get installed up on your dash for easy use and a very aesthetically pleasing look. The color output of the knob also helps with ease of use. Since your motorhome is on a Ford F-53 chassis, you can use...
view full answer... - Casita Travel Trailer With Repeated Issues On Left Side Of Axle OnlyHello Paul. It sounds like you have an axle, or axle mounts that are out of alignment. That is really the only explanation since the issue has been reoccurring even after several replacements. I wonder if the 1st axle sustained damage of some sort which bent the mounts. This would explain the bearings overheating also. At this point I suggest you take your camper to a shop and have them check the alignment of the axles and the mounts.
view full answer... - Troubleshooting A Tekonsha Voyager Brake Controller That Isn't Sensing The TrailerHi Howard, Typically if the Tekonsha Voyager Trailer Brake Controller # 39510 isn't detecting the trailer it's just an issue with the trailer connectors not making a solid connection. Check the pins on your trailer connector to see if they're corroded, damaged, bent, or dirty. A lot of the time the pins get bent back from connecting to the 7-way socket on the vehicle over and over and just need to be bent back into place with a thin flathead screwdriver so that they contact the pins in...
view full answer... - What To Do if an RV Dealership Installs a Brake Controller Incorrectly and Damages Cruise ControlIt sounds like the RV dealership that installed your Tekonsha Voyager Brake Controller part # 39510 did not install the controller correctly initially, and even though he attempted to rewire the controller the damage was done to your vehicle and now you have lost cruise control. I would recommend having the mechanic look at the circuits like you are doing, and then once they confirm that the initial install of the controller screwed up your cruise control circuit I would go back to the...
view full answer... - Correct Brake Controller Adapter for 2011 Ford F-150If you have one of the following brake controllers, we offer a complete plug-in application. No wiring needed, just plug one end of the Tow Ready Plug-In Wiring Adapter, # 22292, into your brake controller and the other end will plug into the built-in harness beneath the dash on your 2011 Ford F-150. Brake EVN # TK63VR Tekonsha PowerTrac # 39523 Tekonsha P2 # 90885 Tekonsha P3 # 90195 Tekonsha Primus IQ # TK90160 Tekonsha Voyager # 39510 If you have a different brand of brake controller,...
view full answer... - What Hitch do You Recommend for My 2022 Subaru Forester?Definitely! The main factors that determine the hitch are hitch receiver opening size (either 1-1/4" or 2"), weight capacity offered, and how the hitch installs on your vehicle. For example, if you are looking for a hitch that is compatible with most accessories and provides you with the most weight capacity, I recommend going with a 2" hitch like the Curt Hitch - 2" # C13409. Not only does this hitch provide you with the most weight capacity we offer for your vehicle (525 maximum tongue...
view full answer... - Trailer Brake Controller No Longer Works with Brake Pedal on a 2008 Chevy SilveradoThis sounds like a problem on the red wire. The red wire is the input wire from the brake switch that tells the controller when you are stepping on the brake pedal. Use a circuit tester like # PTW2993 if needed to test the wire. If there is no signal when you step on the pedal, then you know this is the culprit. There are a couple of things you can check but since it was working before the most likely problem is a blown stop light or CHMSL fuse. Use the vehicle owner's manual to find...
view full answer... - Where to Find Brake Controller Install Port on 2018 GMC AcadiaYour 2018 GMC Acadia actually has blunt cut wires for you to splice in a brake controller like the Tekonsha Prodigy P3 # 90195. The last Acadia to use the Adapter # 3026-P that you referenced was the 2017 Limited which was the same as the 2016 model year. The 2017 New Body and newer have the blunt cut wires up under the dash. I took a look at the online version of the owner's manual for your 2018 Acadia and on page 278 it says that the blunt cut wires can be found above the parking brake...
view full answer... - Installing an Electric Brake Controller in a 2018 Chevrolet Traverse with a Factory 7-Way ConnectorThe Electric Brake Controller Adapter, part # 3026-P, is confirmed to fit the 2018 Chevrolet Traverse Limited. If you have a Limited model you should have the connector underneath your dashboard. Since you don't have the connector under your dash instead of using the # 3026-P adapter you need our # 5506 wiring kit to install the Prodigy P3, part # 90195. The wiring kit includes everything to power a brake controller. I've linked a video from when we installed our # ETBC7 kit on an older...
view full answer... - Troubleshooting Brake Controller of 2018 GMC Adacia Not Working with Brake PedalSo the red wire of your brake controller needs to be connected to a circuit of your 2018 GMC Acadia that sees voltage only when the brakes are applied. If you used a custom install harness on your Acadia like the # 3026-P to install the controller then most likely you have a blown third brake light fuse since that's connected to the stoplight circuit for the brake controller. If the controller was hardwired to a stoplight circuit you most likely need to check the condition of the connection...
view full answer... - Installing an Electric Trailer Brake Controller on a 2010 Chevy Traverse with Tow PackageThe connector you need for a 2010 Chevy Traverse with Towing package is part # 3026-P. I have added a link to it below. I am looking at the instructions and it appears you will need a small flat head screw driver to gently pry the plastic push-rivets out to release the panel. I have added a link to the instructions below so you can see where the connector is located.
view full answer... - Brake Controller Recommendation for 2015 Chevy TraverseYour 2015 Chevy Traverse should have a 7-way trailer wiring connector present at the rear of it. If it does not you'd need the part # 118271 to give you one that taps into the factory wiring. Then all you'd need is a wiring harness designed for your vehicle like the part # 3026-P. For a brake controller I would recommend the Prodigy P3 Brake Controller part # 90195. This is our best selling brake controller because of how well it works and how easy it is to setup. This is a proportional...
view full answer... - Where to Wire Trailer Brake Controller In 2017 Chevrolet TraverseYes, the 2017 Chevrolet Traverse has a plug under the dash for an adapter. You can use part # 3026-P. Take a look at the installation video I attached. Our installer finds the plug behind the dash at the 3 minute mark.
view full answer... - Is there a Plug and Play Harness to Install a Brake Controller on a 2019 Chevy TraverseWe know that the 2017 Chevy Traverse with factory 7-Way trailer connector had a plug-in location for a brake controller but nothing is shown for the 2019 Traverse. I would check under the dash, to the left of the steering column, for that wire bundle mentioned in your manual. It is likely held together with a white tag (that is traditionally how GM has handled the wire bundles). If the wire bundle is present the tag should list the functions of the wires. On a brake controller such as...
view full answer... - Hardwiring Tekonsha Prodigy P3 Brake Controller in 2011 Chevy Traverse and 2015 Chevy ColoradoFor your Prodigy P3 # 90195 on your 2011 Chevy Traverse, if you have the factory 7-way then you just need wiring harness # 3026-P. If you don't have that then we recommend using the # ETBC7 kit that will have you hardwire from the battery using a circuit breaker. The circuit breaker used for the brake controller power is a 20 amp like # PK54520. I've attached a video of the 12V power wire connection, but it does not include the brake controller power connection that will be nearly...
view full answer... - Recommended Brake Controller and Wiring Adapter for a 2015 Chevy Traverse w/ the Factory Tow PackageHello Carl! Your 2015 Chevy Traverse does indeed come with a port to plug in a brake controller so long as you have the factory tow package. You mentioned it being tow ready so I wanted to clarify that as long as your Traverse came from the factory with a 7-way harness you'll have the necessary port. I have attached a picture below that will show you exactly where to find the port. As far as using the Tekonsha Primus IQ Trailer Brake Controller item # TK90160, I currently have this one...
view full answer... - Availability of Diagram for Brake Switch for Chevy TraverseWe don't have access to a diagram but have you checked the wiring for 12 volts with brake applied with a circuit tester like part # PTW2993? That's the only reliable way we have to find it.
view full answer... - Brake Controller Plug-In Connector Location on a 2017 GMC Acadia Denali with OEM 7-WayDid you remove the panel under your driver's side dash? The plug for the adapter # 3026-P should be located there, taped to another harness to the left of the steering column (see attached photo). This exists if your 2017 GMC Acadia Denali has a factory 7-Way connector at the rear. The plug-in adapter that I referenced will allow you to install a brake controller like the Tekonsha Prodigy P3 # 90195 without hardwiring anything. If you do not have a factory 7-Way then you need a 4-Way...
view full answer... - Recommended 7-Way Trailer Connector On A 2016 Chevrolet Traverse Without Factory Tow PackageIf you are looking to match a factory type set-up on your 2016 Chevrolet Traverse, then the round factory plug you are referring to is a 7-way trailer socket. Because you don't have the factory tow package, we need to take a couple steps to get us there. The first step is to see if the factory wiring for a tow package is present. Look behind the bumper on the passenger side for a connector. If there is a connector, we will just need # 18138. This will allow us to simply connect the...
view full answer... - Brake Controller Wiring Harness for a 2006 Chevy Silverado 2500HDFor a 2006 Chevy Silverado 2500HD you will need brake controller wiring harness # 3015-P for a Tekonsha, Reese, or Draw-Tite brake controller. Chevy trucks also some times need additional connections under the hood to make everything fully functional. I have included a link to a help article that explains this for you. I have also included a link to a video showing the harness being installed on a similar truck.
view full answer... - How Does Brake Controller Install in 2014 Chevy Traverse with Factory 7-WayYour 2014 Chevy Traverse that has the factory 7-way does not require accessing the brake controller wiring if your plan was to install the Curt Echo Mobile brake controller part # C74VV that you referenced. Basically you'd plug in the Echo directly into your 7-way and once you've synced it to your smart phone you'd be ready to tow. If you wanted to install a more traditional brake controller like the P3 part # 90195 you'd use the install harness part # 3026-P which plugs into a gray connector...
view full answer... - Brake Controller Installation 2020 Chevy TraverseYour 2020 Chevy Traverse is prewired for a brake controller. Instead of a connector, there are 4 blunt cut tow package wires located under the dash below and behind where the headlight switch is located. These wires will directly connect with the wires of the pigtail included with your brake controller. The wire bundle should be taped to a larger wiring harness, and will usually have a white tag or label on it. The 4 wires will connect as follows: The blue tow package wire connects to...
view full answer... - Does a Brake Controller Plug Into a 2007 Chevy Silverado New Body or Does it Hardwire InThe 2007 Chevy Silverado New Body does not use a harness to plug in a brake controller. That stopped in 2006 and 2007 Classic models. Instead your truck has a tow package wire bundle under the dash, to the left of the steering column, held together with white tape. You can keep the harness that you have and just cut off the end that would normally plug into the truck. Brake controller white goes to truck white for ground. Controller black goes to truck red for 12 volt power. Controller...
view full answer... - Trailer Brake Controller Installation in 2013 Chevy Suburban 1500 LTZNeither the 2013 Chevy Tahoe nor the 2013 Suburban have an under-dash connection port for installation of a trailer brake controller such as the Prodigy P3 # 90195. Both vehicles do however have the necessary wiring already run. The 2013 Traverse with a factory 7-way DOES have such a port under the dash and uses part # 3026-P for any Tekonsha controller. You can refer to the linked article for specific details about brake controller installation in your Suburban. This article includes...
view full answer... - Installing Tekonsha Prodigy P3 Brake Controller on 2008 Chevy AvalancheThe 2008 Avalanche doesn't have a connector under the dash. The Avalanche will have bare ended tow package wires under the dash between the steering column and the emergency brake pedal. Look for a wiring harness with a white tag hanging from it. There should be 4 or 5 wires in the harness, and they would connect to the pigtail included with the Prodigy P3 # 90195 brake controller as follows: Red/black striped tow package wire to black pigtail wire White tow package wire to white pigtail...
view full answer... - Trailer Brake Controller Installation on a 2015 GMC AcadiaThe vehicle is indeed pre-wired, as you suspected. To get completely set up, you'll need a brake controller, the appropriate wiring harness to connect the controller to the vehicle and a trailer connector for the rear of the vehicle. All the rest of the wiring is ran, but you'll need some fuses and relays to activate the tow package wiring. For a brake controller, you can't go wrong with the Tekonsha P3, part # 90195. The P3 is one of the most user-friendly brake controllers available....
view full answer... - Brake Controller Installation in 2016 GMC AcadiaThank you for your purchases and for your photo of the under-dash brake controller connector in your 2016 Acadia. I checked your order history, and it looks like you initially purchased wiring adapter # 3015-P which does not fit your Acadia. This may have been the cause for the clicking sound since adapters can be pinned out in different ways. The correct Tekonsha wiring adapter for your Acadia is part # 3026-P. This has a grey vehicle-side plug that matches the design of the one in...
view full answer... - Installation of P2 Brake Controller in 2022 Chevy Traverse With Factory Tow PackageWe can help get the Tekonsha Prodigy P2 Trailer Brake Controller, # 90885 connected to your 2022 Chevrolet Traverse. But there is not a simple plug-in wiring adapter such as the # 3026-P available. From our Tech Support contact at Tekonsha they informed us that when GM changed the wiring of the platform the Traverse is built on, the previously used wire adapter no longer works so you need to use the following parts and steps: T-One Vehicle Wiring Harness with 7-Way Trailer Connector,...
view full answer... - Wiring in a Trailer Brake Controller on a 2013 Chevy Suburban 1500Chevy used to have a plug in port for a brake controller harness for trucks and full size SUVs but they stopped doing that several years ago (2006 was the last year). Now there should be a bundle of wires tucked up underneath the dash held together with a tag. The tag also lists the functions of the wires on it. You will just need to splice the brake controller wires to the tow package wires by functions. On the controller, the white wire is ground, black is 12 volt power, blue is output...
view full answer... - Brake Controller Install on 2007 Jeep Commander with Factory Tow PackageAlthough your 2007 Jeep Commander is equipped with the Mopar tow package, it isn't fully wired with a plug-and-play connector under the dash. Jeep ran the brake controller output wire from the 7-way up into the passenger compartment, look for a coiled up blue or light green bare-ended wire near the top of the e-brake pedal. To complete wiring the controller, you'll need the # 5506 kit which includes the wire, hardware and circuit breakers necessary to complete the installation. You'll...
view full answer... - Where is the Tow Package Wiring on a 2011 GMC Yukon to Install a Prodigy Trailer Brake ControllerOn a 2011 GMC Yukon, there will only be bare tow package wires tucked up under the dash instead of a plug. Look below the steering column and to the left of the brake pedal for the wire bundle. The wires you need will be held together with a white tag that also tells you what each wire does. The tow package wiring should be as follows unless otherwise noted on that white tag: Red/black tow package wire connects to black brake controller wire. White connects to white. Light blue/white...
view full answer...
Do you have a question about this Trailer Brake Controller?
Info for this part was:


At etrailer.com we provide the best information available about the products we sell. We take the quality of our information seriously so that you can get the right part the first time. Let us know if anything is missing or if you have any questions.







Thank you! Your comment has been submitted successfully. You should be able to view your question/comment here within a few days.
Error submitting comment. Please try again momentarily.