

 Arrives before Christmas
 To see if this custom-fit item will work for you please tell us what vehicle you'll use it with.


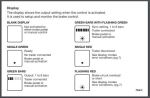
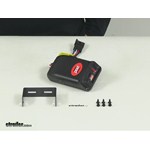
This time-delayed brake controller is designed to mount at any angle, even upside down. The controls are all up front for easy access, including a slide-bar manual override and a thumbwheel for braking output. LED indicator shows your braking status.
Features:
Specs:
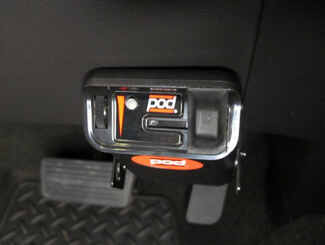
The Tekonsha POD is designed to mount in any direction, and it's especially suited for mounting on near-vertical dashes. All the controls are on the front of the module, so you can still access them with the controller tucked away in a convenient place.
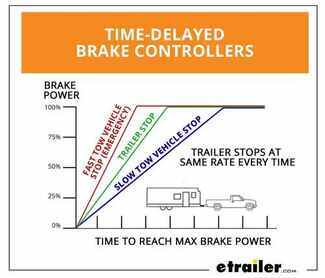
Braking output is the maximum amount of power that will be applied to your trailer's brakes. How much braking output you need is determined by the weight of your trailer; a heavier trailer will need more power to bring it to a stop. You want to set the braking output as high as you can without locking up the brakes. Once you've set up the brake controller the first time, you shouldn't need to adjust the settings until the trailer load changes, you switch trailers, or road conditions change. Use the thumbwheel on the side to change the braking output level. The output setting will appear as a number on the digital display, with a higher number indicating higher braking power.
The Tekonsha POD keeps the manual override within easy reach on the front of the module, great for stopping sway or controlling your trailer's momentum in emergencies. Push the slide-bar lever to activate the trailer's brakes and brake lights without you having to apply the brakes on your tow vehicle, perfect for limiting trailer movement while you're cruising.
Because inertia plays no role in the functioning of this controller, you do not have to mount the unit at any particular angle. Your mounting options are limitless, with the controller designed with all of the controls on the front of the module so you can access them even if it's mounted upside down.
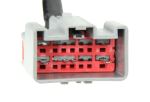
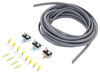
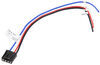
The included pigtail harness splices into your vehicle's wiring beneath your dash to provide an easy-to-access plug for the POD. This way installation of the controller isn't permanent. You can unplug and remove it at any time and securely stow it away.
Note: If you don't already have a 7-way plug at the back of your vehicle, take a look at our exclusive 7- and 4-way brake controller installation kit (ETBC7 - sold separately).
The Tekonsha POD comes equipped with time-delayed braking. Every time you apply the brakes in your vehicle, a signal is sent - via the brake switch - to the POD. The controller then sends power out to your trailer brakes to activate them with an intensity set by you, at a rate determined by you. The amount of braking power (output) can be adjusted to suit your preference, the road conditions, the type of trailer, and the weight of your load. To determine which levels are best for your application, test your towing setup and choose what feels right.

California residents: click here
Videos are provided as a guide only. Refer to manufacturer installation instructions and specs for complete information.
Today on our 2006 Honda Ridgeline, we'll be installing the Tekonsha PowerTrac Electric Brake Controller, part number 39523. We'll also be using the wiring kit, part number ETBC7 and part number TM75127, which is a wiring harness that plugs in to your brake controller. Now we can hook our trailer up to our vehicle, and test our brake controller. As you can see, it's got a green light. That means we're connected. We'll use the manual override right here, and as you can see, the higher the signal, your light will turn from green to red. You have your dial up here to adjust the level of your brake controller.
As you see when we hit our brake pedal, it lights up. Now that everything's working, we can hook our trailer up and hit the road. To start our install, we'll go to the back of the vehicle and mount our 7-way. Here on our Ridgeline, it had a bracket holding up the 4-way here on the back, so we want to remove that. We're just going to use the holes that are here in the hitch and take some self-tapping screws here to mount our 7-way bracket. Now we'll take our 7-way plug that comes with our ETBC7 kit, feed the wires in here, and we'll mount it with the hardware that comes with the kit.
Now that we have all those on the hand tight, we'll take a small flat head screwdriver, tighten down the bolts. Since they are star washers on the nuts, as those hold in place, we can tighten them down. Now that our 7-way is access secure, we can start making our electrical connections here in the back. Here's the factory 4-way that's on our vehicle. We're just going to snip this cap off since we don't need it anymore. We'll just snip the rubber band off here to get our wires, and we can take our 4-pole that comes from our 7-way bracket and plug it into the factory one.
We'll just use a little Dielectric Grease here, part number 11755, on the connection points just to help prevent from rust and corrosion. plug those two together, then I'm just going to take a zip tie, wrap it around there just to hold them tight, and then I'll take some electrical tape to wrap it up just for another layer of protection. Now that we have that connected, we'll work with the white and the purple wire. The purple wire coming out of the back of our 7-way plug is typically used for the reverse light circuit if you're towing a boat trailer and you need to do reverse lockout. Or you can use it as a second auxiliary 12-volt source. For this application, we won't be using it so we're just going to clip it short and put it with our bundle of wires.
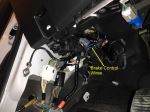
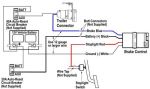
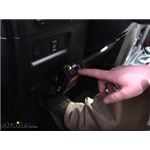
Now it is here at the back of our vehicle. If you ever need to use it, all you have to do is extend the wire with a butt connector, and you can hook it up to whatever source you need. Now I'm going to find a suitable mounting location here for our ground. You see there's a 4-flat wiring ground. It's located right here behind our hitch, so we'll go right next to that and put our ground into place. Take the self-tapping screw that comes with our install kit, shoot our ground in, and then we can bring in our duplex cable that comes with our install kit to hook up to our blue and black wires. We need to trim back some of the sheathing on it, so let's take a utility knife. Be careful not to damage the wires on this. I'd slice right down the middle to expose the two wires. Then we'll strip those back, and we can put them in our butt connectors here. The black wire will connect to the black wire, and the white wire will connect to the blue wire. The black wires are 12-volt constant power here for our 7-way, and the blue wire will be the wire that'll hook to our brake controller eventually in the cab and give us signal to our trailer brakes. With those crimped down, we'll take some electrical tape and tape them up to protect our connections. Now we can bundle our wires up here. Use some zip ties to hold them into place. The next step is to take our gray duplex cable and run it towards our engine compartment. We took our duplex cable here, once we connected it to the blue and black wire on the back of our 7-way. We ran it here along the frame, up over the gas tank, here along the side at about where the hitch mounts, and up here over the sub-frame in the back. We'll keep it away from the suspension. You always want to stay away from suspension, moving components, and heat, such as the exhaust, when running your wire. Over the sub-frame here to the gas tank. Down the frame. Just follow some brake lines, you're able to go above this cover right here, zip tie it off, and, following our line, jump into our engine compartment. We have it here behind this heat shield. Then we just took a pull wire, shoved it up from underneath up into the engine compartment, taped our wire up to it, and then pulled it up through the engine compartment. The next step is to mount our breakers. There comes with three breakers with our kit. It's 40-amp, which will be the breaker for your 12-volt casses 00:04:43 and for your 7-way, a 30-amp, and a 20-amp. We're going to use the 30-amp here for our brake controller. We're going to double them up right here in the middle, and mount them right here to the sheet metal in our engine compartment. Now that our breakers are mounted, we can start making some electrical connections. We'll take the gray duplex cable we ran from the back and cut it to length. We'll measure it out and make our cut. Remember to keep the excess wire, as we will be using it later. On our duplex cable, we'll strip the gray sheathing off of it. Now our white wire will get ran inside, and the black wire here will get ran to the silver side of our 40-amp breaker. We'll do the black wire now and leave the white wire sitting aside. We'll measure out our length of black wire, trim it back, strip the wire, and add a small ring terminal. Hold on to this extra black wire, because we'll use this to make our jumper wire from our copper terminal to our 12-volt source. For this application, it will be the battery. Go to the silver side of our 40-amp breaker, take the nut and the star washer off, and add our ring terminal. Since we need wires going from both copper posts to our battery, we'll take the length of black wire we just trimmed off and measure both those out now. We'll cut it in half and make those leads. Strip back both sides and then add a larger ring terminal that comes with our ETBC7 kit on one side and a smaller one on the other. The smaller ring terminal will go to our breaker, and the larger one will go to our battery. Crimp those down nice and tight, and we'll just repeat the same process for our other jumper wire that'll go from our breakers to our battery. Now we'll put our new jumper wires that go from our breakers to our battery onto our breakers, and then we'll just route our wires towards the battery but not hook them up. Again, the copper side is always the battery side, and the silver side will be whatever accessory you're using for the breaker. The next step is to find a grommet 00:07:08 to run our white wire here. That'll be our blue wire on our brake controller harness, and that'll be the signal wire from our brake controller back to our 7-way to the trailer brakes. Then we need to run that extra duplex cable we trimmed off. The black wire will be the power for our brake controller, and the white wire will be the ground for our brake controller. We'll find a grommet to run our wires through. We'll just cut a small slice with our box cutter. Just enough to get a pull wire through there, and that'll give us enough room to run our white wire and then our duplex cable to the inside. That will be kind of a tight fit going through the grommet, so you want to use a decent amount of tape just so your pull wire doesn't come off your wires. When you're pulling, you want to be gentle enough to where you don't pull the grommet through to the inside. Now I'll go to the cabin of the vehicle, pull our pull wire through, and pull our wires through our grommet. Here's our length of duplex cable we just ran through to the inside that has the black and the white wire. We'll just measure it out for the white wire. Then we'll trim the duplex off of it, so we can run our white wire here that'll go to the negative post on our battery. Then our black wire here will go to the silver side of our 30-amp breaker, so we'll trim the black wire and put our small ring terminal on it. Then we go to the white wire, add a larger ring terminal, and that'll go to our negative battery post. We'll just leave that alone because our battery connection will be the last connections we'll make for our hook-up. With all our wires and our breakers installed, we can snug those nuts down. Now we can go inside our vehicle, bring in our brake controller and our brake controller wiring harness, and start making our connections on the inside. We can trim our wires here to length on the inside because we don't need all this excess. Then we can, again, trim back our duplex cable and strip our wires back. We're going to add butt connectors now to our wires. Now that we have our butt connectors on here, we can bring in our TrailerMate brake controller adapter that'll plug in to the back of our brake controller and will connect these wires to the wires we've ran. The black wire will go to the black wire here in the duplex cable. That'll be the power for our brake controller. The white wire will go to the white wire here on our duplex cable, and that will be for the ground for the brake controller. The blue wire here will go to the white wire, the single white wire, that we ran in, which is hooked to the blue wire on our 7-way. That'll be the signal from our brake controller to our trailer brakes. Then the red wire on our TrailerMate wiring harness will need to go to the brake light switch wire. Here's our brake light switch, and we need to test the wires here in the back of it to figure out which one gets 12-volt source when it's pressed. Take our test light, ground it, and then we can put up the wires. To make it a little easier, I'm just going to trim back some of the electrical tape from the factory that's holding it together, so we can separate the wires a little bit. As you can see, the white wire with the black stripe, when you hit your brake pedal, it gets the signal. So that'll be the wire we'll be tapping in to. We'll use the quick splice connector that comes with our ETBC7 kit to make that connection. Now the red wire coming from our brake controller harness is a little short, so I'm going to just add about 8 inches worth of wire. This way we can get it to our brake light switch. Now we'll take our wire, put it into quick splice connector, crimp it down, and close the latch. Now that we have that connection made, we need to mount our brake controller. We're going to mount our brake controller in this area right here. Since it is a time-delayed brake controller, if it is a little off, it'll be okay. I'm going to line our bracket up here, . Make sure it's flush with this. This way you know it's straight. . and mount our bracket. Now that our bracket's nice and secure, we can bring in our brake controller. You can mount it up like this, or you can mount it over like this. I think we're going to mount it in this orientation right here. Now that our brake controller's nice and secure, we can plug in our brake controller with our wiring harness. Then zip tie our wires here underneath our dash. Now the last step here for installing our brake controller is hooking up our ground wire on our negative battery post and our two wires that come off our copper sides of our breakers to the positive side of the battery. Start with the negative side. Now we'll take the nut off this stud right here, and that's where we'll go with our positive wires. All right, now that we have our power wires hooked up, we can check our brake controller to make sure everything's working. That'll do it for the Tekonsha PowerTrac Electric Brake Controller, part number 39523, along with installation kit, part number ETBC7, on our 2006 Honda Ridgeline. .


quick delivery
Simple install and fit like a glove! Great product and great company to work with!
Had all wires just plug in. No splicing. Great. Thanks

Do you have a question about this Trailer Brake Controller?
Info for this part was:
At etrailer.com we provide the best information available about the products we sell. We take the quality of our information seriously so that you can get the right part the first time. Let us know if anything is missing or if you have any questions.


Thank you! Your comment has been submitted successfully. You should be able to view your question/comment here within a few days.
Error submitting comment. Please try again momentarily.