Thank you! Your comment has been submitted successfully. You should be able to view your question/comment here within a few days.
Error submitting comment. Please try again momentarily.
- All Info
- Reviews (577)
- Q & A (0)
- Videos (2)
- Photos
Powerbuilt Automotive Tools - ALL648544
Highlights
- Safely removes fasteners: Ideal for removing plastic or metal trim fasteners without damage.
- Comfortable, contoured handle: Ergonomically designed handle for easy use and precision.
- Chrome plated shaft: Increases durability and provides rust resistance for long-lasting use.
- Prevents damage: Protects surfaces from scratches, dents, and dings during trim removal.
- Fits various panels: Works effectively on door panels, dashboards, and consoles fasteners.
- 9" length: Long reach for accessing hard-to-reach trims and fasteners in vehicles.
Features to know about
Simplify Panel Removal: Contoured Handle
Removing trim fasteners can be a tedious task, especially in tight vehicle spaces. The Powerbuilt Trim Pad Remover boasts a contoured handle that fits comfortably in your hand, providing the leverage you need to access and remove fasteners effortlessly. With its ergonomic shape, this tool ensures a secure grip, making the job less strenuous so you can focus on getting the task done efficiently.
Preserve Your Cars Finish: Chrome Plated Shaft
Say goodbye to unsightly scratches and dents on your vehicle's panels. The tool’s chrome-plated shaft provides a smooth, protective surface, which helps prevent any accidental damage while prying. This feature is perfect for car enthusiasts who take pride in maintaining their vehicle’s pristine finish during mechanical and cosmetic endeavors.
A Must for DIYers: Universal Trim Fastener Compatibility
If you’ve ever had trouble removing fasteners of various shapes and sizes, this tool is the solution. It's designed to remove both plastic and metal fasteners, making it a universal fit for different car models and fastener types. It’s an essential tool for DIY auto projects, whether you’re working on door panels, dashboards, or consoles.
Save Time on Projects: 9-Inch Long Design
The 9-inch length of this trim remover gives it the reach it needs to access fasteners in deeply recessed or hard-to-reach areas of your vehicle. This feature is especially beneficial when you’re tackling larger projects that require disassembly of significant interior or exterior panels, helping you save time by avoiding unnecessary tool swaps.
Effortlessly Avoid Broken Fasteners: Sturdy Construction
Made from high-quality materials, the Powerbuilt Trim Pad Remover is engineered to provide just the right amount of flex and strength to remove stubborn fasteners without breaking them. This means less frustration from broken clips and more reliable repeat use, ideal for both hobbyists and professionals working in automotive care.
Perfect for Every Toolbox: Lightweight and Portable
This tool is as easy to carry as it is to use, thanks to its compact size and lightweight build. It’s perfect for slipping into your toolbox or even a glove compartment, ensuring it’s always on hand when you need it. Whether you’re on the go or working in your garage, having this tool at your disposal ensures you're never caught unprepared.
648544 Alltrade Tools Power Built Trim Pad Remover
California residents: click here
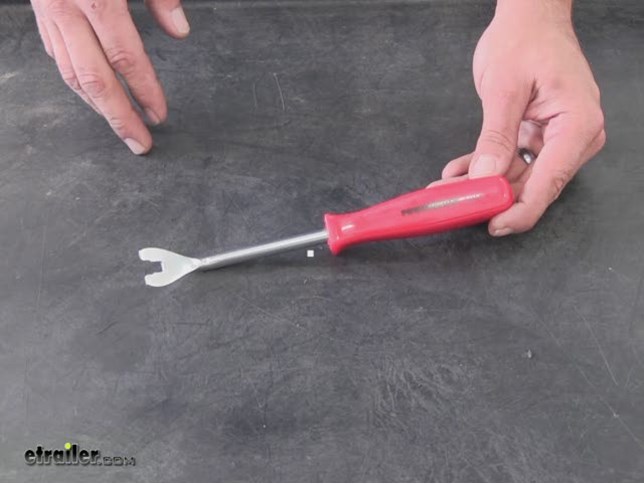

Videos are provided as a guide only. Refer to manufacturer installation instructions and specs for complete information.
Video Transcript for Powerbuilt Trim Pad Remover Spec Review
Today, we're going to be taking a look at the Powerbuilt Trim Panel Remover Tool. This is where it comes in handy for all types of fasteners, whether they're plastic or metal. Part number on it is ALL648544. Now, let's take a quick look since we're here in the hatch area. There are few different uses or a few different areas where our Powerbuilt trim remover tool will really come in handy. To start our push pin fasteners here, we'll be able to use the almost similar to a screwdriver edge there.
To pull out the center core, then we can go right in behind it with the panel tool and pull that right out. Another place where it really works out well is being able to get that along the underside of our trim panels themselves, and then you can see all we have to do is kind of tip up on it slightly. Then, we can hear our fasteners popping out of place. We can continue that all the way across to free up that rear panel. Another great aspect. Again, the screwdriver kind of style here, we'll be able to tip that right in there.
Pop off our panel giving us access into the bolts below, if we wanted to remove that or something of that nature. That's going to complete today's look at the Powerbuilt Trim Panel Remover Tool, part number ALL648544. .
Customer Satisfaction Score:
99% were satisfied with this product
1% of customers were not satisfied
- Product did not meet expectations
- Wrong item was ordered
- Alternate product found
Ratings & Reviews
4.7
577 reviews

Installed myself with help of one friend. Assistance with install using the videows was invaluable. The installation on a brand new vehicle brought praise and comments on how clean the install looked. Great job etrailer.
Haven't been able to use it yet. UPS delivery was delayed 2 days so I gotten fasteners out with a screwdriver and with a home-shop-made tool. Looking forward to using it later.
Robert

7/2/2025
Dont use it often, but it remains a go-to tool in my tool box.

A great tool to have when working with push pins. I would highly recommend this one tool. I have taken the rear bumper cover off twice, once with and once without this tool. I was able to remove the push pins much more efficiently and stress free with this tool and also prevented any of the push pins from breaking.
Helped removing the trim clips and hold them in place for replacement. Glad I bought it. I put it in the back of the car to help remove the 2020 Subaru ascent hitch cover.
The tool looks like it should hold up well for removing plastic clips. Would be five stars but made in China like almost everything else.
After watching the etrailer video I installed the hitch in about 2 hours. The rear panel popped out and back on easily. I removed the lower bumper panel after removing the main panel, installed the hitch, reinstalled the main bumper panel, cut the subpanel around the hitch and reinstalled it last. I also bought the
Trim Pad Remover Tool to take out the securing clips and it was worth the $10.00. You guys have great videos.
Ultimately the product is excellent I am completely satisfied with the end result. I included a few installation tips for those of you who plan to install this by yourself. (1st jpg) The trailer hitch + bumper are heavy and are difficult to hold up and get the bolts started. I stacked up some blocks and scrap wood and threw a towel over it to protect the paint on the hitch. This holds the hitch to the right height and makes it much easier to hold up just the aluminum bumper to get the bolts started. (2nd jpg) Because the hitch has slotted bolt holes it is easy to accidently install it off center. I thought I had it installed right the first time because I measured the outside of the hitch to outside of the aluminum bumper on both sides, but it ended up being installed 3/16 of an inch off to the passenger side which way off of where it needs to be. To correct this I drew a line down the center of the Honda aluminum bumper and made sure the center of the hitch was lined up to the center of aluminum bumper before I tightened the bolts. The outside of the hitch mount may seem off alignment compared to the Honda aluminum bumper, but this doesn't matter. The center of the hitch being dead center to your car is what matters. (3rd jpg) The end result is excellent so I am happy! :-)
The products are great and easy to install. I am disappointed that the hitch has no provision for mounting the trailer light connector.
The video made installation simple!! I almost bought a hitch from uhaul with installation would of cost me $[XX] total. I just saved around $[XX] and learned the process. I’m not a professional and did it myself in about an hour. Freakin love the hitch and etrailer’s highly competitive pricing and very informative video!
I have not used it yet but it looks good
Delivered on time
Worked like a charm in getting the bumper off
It made removal much easier for my first time doing this. I would not have been as content had I just pried with a flat screwdriver or a needle-nose pliers.
This was a relatively simple and straightforward installation on my 2019 Volvo XC40. The directions were clear, although the black and white pics can be a bit hard to follow. I would add the following points. First, the left plastic rail in the spare tire compartment needs to be removed, and it has an odd hook at the front that is a challenge. It will come with some wiggling. It's equally challenging to put back on. Second, I used the Volvo ground terminal to ground the T-One module. Third, I ran the wire from the module to the positive terminal down through a grommet in the spare tire compartment, then along the brake lines under the car to the battery. This was easy to do with the vehicle on a hoist, but will be more challenging if you don't have access to a hoist. I removed 2 of the protective panels under the car to route the wire. It was fairly straightforward. The product works as advertised and fits very well in the car.

Worked perfectly

I don't remember using it.

The Powerbuilt trim pad remover worked perfectly. I was able to remove all of the plastic fasteners around the entire front end of my vehicle enabling me to to do a necessary upgrade and repair. I purchased this item knowing how difficult it can be to remove the fasteners without damaging them or surrounding parts. I can't recommended this inexpensive tool enough!
I want to thank "Tom" for his review on 1/10/2019 as it helped me out tremendously to use his same parts list for my own installation on our 2015 Toyota Highlander XLE vehicle. I luckily had a friend from church that had a lift so it made it a lot easier to get all the bolts in place and reassemble all the parts of the vehicle after installation. Here is my parts purchase list from etrailer: The Draw Tite 76156, 18144 plug mounting Bracket, Curt C56217 wiring kit, the ALL648544 Trim Pad Remover, and the Curt I26 Light Tester. You may not need the Trim Pad Remover but it was handy to have so we didn't break the plastic Grommets that hold a lot of the trimmings of the car together. These items also made for a clean look on the installation and this particular hitch (Draw Tite 76156) hides real well behind the bumber. I am very happy with the experience. I will definitely be using etrailer.com in the future.
P.S. definitely watch all the videos attached to this product page. They were very helpful in find your way around the car and tricks for making the installation easier and cleaner.
works exactly as intended. used to install a trailer wiring harness connector in my outback, and can conveniently use this same tool for getting behind the wheel well mud guard to replace the headlights.

Excellent tool, great value
Im a busy man. asking for a review a few days after my package arrived is ridiculous. it would be much more reasonable to ask after three weeks
Definitely makes pin removal easier.

No more prying off plastic retainers with a flathead screw driver or a pry bar. I used to dread removing the plastic retaining bolts off of vehicles because they would destroy the piece or worse, the body of the vehicle itself. Thanks for proving such a useful tool!
Worked as advertised
Works way better than just using a flathead screwdriver
See what our Experts say about this Powerbuilt Automotive Tools
- 2019 Jeep Cherokee Trailhawk Trailer Brake Controller InstallationVehicle passenger compartment plastic trim panels, like the dash panel on your Trailhawk that comes off to give you access to the brake controller port, usually have tabs that fit into slots or metal fasteners, in addition to the visible retaining screw. Once the visible fasteners are removed it may still require a bit of force to release the panel, especially on a brand new vehicle. Often a trim panel tool set like # PT73HJ can help loosen things up. These plastic tools will be less...
view full answer... - Installation of 4-Flat Wiring Harness on 2019 Nissan FrontierInstallation of the T-One Vehicle Wiring Harness with 4-Pole Flat Trailer Connector # C56225 that fits your 2019 Nissan Frontier (without a factory connector) is very straightforward, but installing a harness on a Nissan does require the use of relays, which are included with this kit. Start the install by attaching the relays, with the blue ones going on the white plugs and the brown one going on the brown plug. Then simply locate where you need to plug in the connectors and that's all...
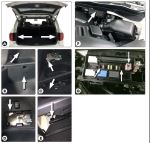
view full answer... - Removing Cap of 2017 Honda Ridgeline to Install Trailer WiringWhile we don't have a video I can hopefully explain how to remove the cap of the wiring on your 2017 Honda Ridgeline to install the trailer wiring # 118288. Remove the connector from the cross-member using a pry tool like # ALL648544. Remove the dark blue fastener from housing by sliding it rearward. Remove the protective cover taking care not to damage the locking tabs (picture with G in corner). The tabs need to be fully pushed down and released to allow the cap to come off. Insert...
view full answer... - What Hitch has the Highest Ground Clearance for My 2021 Subaru Outback Wagon?The hitch that has the highest ground clearance that we carry for your 2021 Subaru Outback Wagon is the Draw-Tite Max-Frame Trailer Hitch Receiver - Custom Fit # DT94YR. The measurement from the ground to the upper inner tube of the receiver is 15-3/4 inches high. Another great thing about the # DT94YR is that it only measures 1-3/4 inches from the end of the receiver tube to the front face of your rear bumper. This is important if you wish to mount accessories to your receiver. With this...
view full answer... - When Installing 4-Way in 2017 Volkswagen Tiguan Can Hot Lead Wire be Run Through CabinYes, you can absolutely run the hot lead of the Wiring Harness with 4-Pole Flat Trailer Connector # 118675 through the cabin of your 2017 VW Tiguan. You are certainly not alone in not having access to a lift and feeling that going underneath the vehicle can be a pain, so you can route it through your cabin, using Trim Pad Remover # ALL648544 to loosen the trim. In fact, we have a help article about running a hot lead, and I added the section about routing the wire through your vehicle;...
view full answer... - Factory Connector Location On a 2022 Subaru Outback Wagon For Installing Tekonsha 4-Way HarnessThe factory connector for the Tekonsha T-One Vehicle Wiring Harness # 118467 is located under the rear trim panel on the passenger side, just inside the rear storage compartment on your 2022 Subaru Forester. We have a video of the installation process that I have linked below that will help you through the entire installation process. A Trim Pad Remover Tool # ALL648544 will help you to safely remove the rear trim panel to access the connector. If you would rather route your 4-way outside...
view full answer... - Removal of the iRV RV Stereo part # 292-101809To remove the iRV RV Stereo - Single DIN part # 292-101809 you will need to remove the snap on end cap on each side. Behind these you will find the two mounting screws on each side which can be removed giving you the access yu need behind the stereo.
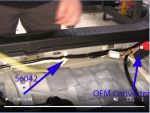
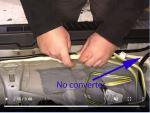
view full answer... - How To Determine If 2019 Toyota Highlander Has A Tow Package With ConverterThe easiest way to determine if your 2019 Toyota Highlander has a towing package with a converter is to remove all of the floor coverings on the inside rear of the Highlander. You will need a trim panel removal tool part # ALL648544 or a flat head screwdriver. If you have the factory package with a converter you will already have a black box with wiring against the wall of the rear cargo area like I have pictured. If you already have the converter, the Curt T-Connector Wiring harness for...
view full answer... - Installation of Trailer Wiring Harness on a 2022 Honda PilotThe installation of a trailer wiring harness on your 2022 Honda Pilot may seem difficult but it is not as complicated as you would think. The first thing would be deciding on what wiring harness to use, I recommend the T-One Vehicle Wiring Harness # 118760. This harness is going to be our easiest wiring harness to install while also being one of our most reliable. This is an easy plug and play harness, you will need to plug the harness into a tow plug that will be in an access panel in...
view full answer... - Are Stabilizer Straps Required for Curt # C11900 Hitch When Used With Cargo Carrier?Curt requires the use of # 18050 stabilizing straps on the hitch # C11900 for non-supported loads like bike racks or cargo carriers like the Curt # C18145 cargo carrier. I really like how well hidden this hitch is. If it were me, I would add the etrailer # 22281 rubber hitch cover. I looked into the installation instructions, and among the typical tools required, there were a few special tools that you should consider getting to make the install go easier and faster. You may want the...
view full answer... - Location Of Brake Control Port Under Dash On 2008 Ford F-250/F-350 Super DutyA wiring adapter like the Tekonsha Plug-In Wiring Adapter for Electric Brake Controllers, Item # 3034-P, plugs into the connector behind the vehicle's dashboard. To reach the connector, first locate the notch in the access panel in the center of the dash, near the passenger side. Use a trim panel tool like Item # ALL648544 to carefully pry the panel off. The mating connector will be behind this part of the dashboard. I have attached a picture and an install video for a brake controller...
view full answer... - Plug-In Location For 4-Way Wiring Harness on 2022 Subaru OutbackYes, the 2022 Subaru Outback - including the Premium - does have a location to plug in the 4-way. It is under the rear threshold plate in the cargo area, near the passenger side. I have added a photo for you showing the location, and you can get to it easily by using Trim Pad Remover # ALL648544. The correct 4-way wiring harness for your 2022 Subaru Outback is the following: - T-One Vehicle Wiring Harness with 4-Pole Flat Trailer Connector # 118467
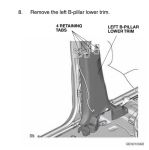
view full answer... - How to Wire Pop & Lock Tailgate on Honda Ridgeline Using Wiring Behind B-PillarThe B-pillar is located where the driver's seat belt is stored (see photo). You will need to remove the driver's door sill trim, left rear door sill trim, door opening seal and the B-pillar lower trim cover before you can remove the B-pillar cover itself. There are several retaining tabs and clips that come off with each piece. I recommend using a trim removal like # ALL648544 to lower the chances of damaging one or more of these pieces since you need to re-install them. Once you remove...
view full answer... - How To Install The Tekonsha Wiring Harness 118760 On 2020 Honda PilotInstalling the Tekonsha wiring part # 118760 on the 2020 Honda Pilot is a simple process so please do not worry. I do recommend to obtain a trim panel remover like part # ALL648544 or a flat head screw driver before starting. You will also need a 3/32" drill bit and a philips head screw driver. Open the Honda Pilot's tailgate and open the access panel inside the storage compartment like pictured in photo B and C. Then remove all of the floor coverings to have better access to the plug....
view full answer... - Does The Rear Bumper Panel Of 2019 Subaru BRZ Come Off To Install EcoHitch 306-X7293Yes, when installing the EcoHitch Stealth Trailer Hitch Receiver part # 306-X7293 on the 2019 Subaru BRZ the bumper panel needs to be removed with a flat head tool like a screw driver or part # ALL648544. The EcoHitch will be attached to the impact bar under the bumper fascia. I have attached a photo for your reference.
view full answer... - Is There a Tool Needed to Install Rubber Top Lip Wiper Seal for RV Slide Out - Press OnI do have an option for you but there isn't really a specific tool needed for the Rubber Top Lip Wiper Seal for RV Slide Out part # SR23VR. It features a simple press-on installation so there will be no tool needed for this. That said, I could see how removal would be a bit more challenging, if you just simply pulled up on the top of the seal you would likely tear it so it might help to use a pry tool and lift up at the bottom of the seal where it's pressed onto the flange. In which case,...
view full answer... - Where Do I Connect My 4-Way Wiring Harness On My 2021 Chevrolet Express Van Without Tow PackageIt does not matter which 4-way wiring harness you have. It can be the T-One Vehicle Wiring Harness with 4-Pole Flat Trailer Connector, part # 118392, the Curt T-Connector Vehicle Wiring Harness with 4-Pole Flat Trailer Connector, part # 55540, or the Hopkins Plug-In Simple Vehicle Wiring Harness with 4-Pole Flat Trailer Connector, part # 31345. They all plug in to your vehicles lights at the same spot. Personally, I am a fan of the Tekonsha T-One wiring harness. If you look at the rear...
view full answer... - Installation of Trailer Wiring Harness on 2020 Mitsubishi OutlanderYou made really good choices with the T-One Vehicle Wiring Harness # 118482 and Curt Trailer Hitch Receiver # C13163 and I can help you along with the installation of the harness (I also added a link to a video install of the hitch on an Outlander for you to take a look at). I have added a link to the installation instructions of the harness for you, but in general it is not an overly complicated installation. You will need to remove some trim panels at the rear cargo area in order to...
view full answer... - Two Piece Coleman Air Conditioner Shroud RemovalThe MaxxAir TuffMaxx Replacement Shroud - White # MA00-325001 has 4 holes in the top for fasteners that need to be removed. Then you will pry the two pieces apart using a trim remover like # ALL648544 or a screwdriver.
view full answer... - Best Way to Remove Push Pins Holding Fairing onto Thule MOAB Roof Mounted Cargo BasketI'd recommend a panel removal tool, part # ALL648544. Gently wedge the tool under the fastener, and pry gently. If you should happen to damage any of the push in fasteners, we sell replacements as part # 853-5482. We also carry the replacement fairing clamps that hold the fairing to the roof basket, part # 853-5818.
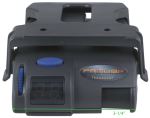
view full answer... - Where Can I Mount The Tekonsha Primus Brake ControllerI went to the warehouse to measure the Primus and it does not take up as much space as you would think. The Tekonsha Primus part # TK90160 measures: Width- 3-3/8" Height- 1-1/4" Length-4-5/8" Most customers mount the Primus to the right side of the steering wheel low enough to where it doesn't interfere with driving. It does need to be mounted on a level horizontal plane and be lined up with the direction of travel. Vertically it can be mounted at any angle between 0 and 90 degrees. If...
view full answer... - Location of Brake Controller Port Under Dash of 2015 Toyota Tundra with Factory Tow PackageThe brake controller port for the 2015 Toyota Tundra is located behind the section of the dashboard with the tow/haul button. To reach the connector you will need to locate the notch in the access panel in the center of the dash near the driver's side. Using a trim panel puller like # ALL648544, carefully pry the panel out and undo the locking tabs to remove the panel. You will find the mating connector behind this portion of your dashboard. The correct harness for your 2015 Tundra is...
view full answer... - Removing Plastic Tray in Rear of 2019 Acura RDX to Install Trailer WiringWhen installing the Tekonsha trailer wiring harness part # 118800 in your 2019 Acura RDX the lower storage compartments you mentioned in the rear cargo area does just pull out. Once you get past that point though there are some panels you'll need to be careful removing and a trim panel removal tool like part # ALL648544 would be what you'd want.
view full answer... - Tools Needed to Install EcoHitch Trailer Hitch Receiver on a 2016 Subaru OutbackI've linked an install video of the EcoHitch, part # 306-X7601, being installed on a 2016 Subaru Outback for you. The tools you need are: Phillips and flat head screwdrivers Ratchet with 10 mm socket Trim Remover, part # ALL648544 Mallet Utility Knife Tape Measure Grease pencil Straight edge Torque Wrench, part # ALL644044
view full answer...
Do you have a question about this Automotive Tool?
Info for this part was:


At etrailer we provide the best information available about the products we sell. We take the quality of our information seriously so that you can get the right part the first time. Let us know if anything is missing or if you have any questions.











Larry
12/22/2024
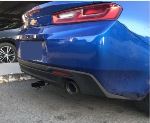
Still looks great and performing well for us. Hauled the car all the way to Canada and back from Texas with no issues.