
To see if this custom-fit item will work for you please tell us what vehicle you'll use it with.


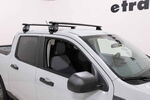
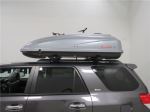
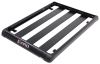
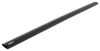
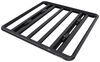
This sleek, aerodynamic roof rack provides space to carry gear on your vehicle. Crossbars with push-down rubber strips in top channels work with channel-mount and clamp-on accessories. Installs to raised rails on your vehicle's roof.
Features:
Specs:

Videos are provided as a guide only. Refer to manufacturer installation instructions and specs for complete information.
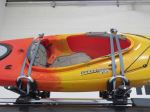
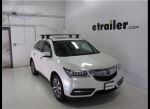
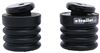
Hey, everyone, it's Evangeline right here at etrailer. Today, we're taking a look at how this INNO roof rack fits on our 2025 Hyundai Santa Fe. If one of my friends came up to me, and they had raised rails on their roof, and they asked me for a recommendation for their Santa Fe, this is probably the very first one I would recommend. I really like the straps that this roof rack utilizes 'cause that just cinches around your raised rails, giving you a solid base. And with this all set up, you can now carry all kinds of fun things, whether it's a rooftop tent, some kayaks, even some baskets or boxes for extra cargo space, the very first thing you need is a roof rack for your rails. So, let's go take a look at some of its features and why I like it, but also how to help you get the best fit for you.
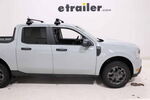
INNO actually offers recommendations for two sizes for the Santa Fe. One is gonna be the 54-inch long bar, the other is the 57-inch bar, which is what I have here. I always go with the longer bar right off the bat, just because I appreciate having more overhang. Overhang is measured from your tower to right before your end cap, and here we have 2 1/2 inches. Now, that number will change a little bit, depending where on your raised rail you put your roof rack, how you set it up, but that's just gonna be the overall overhang that you're going to get here.
You can clamp items around that overhang. If you want to utilize the top of the bar, you now have more crossbar space that you can use. And some people prefer a shorter bar because they think it looks sleeker, and that is true. But I think here on a Santa Fe, with it being a larger vehicle, having a larger roof rack is not bad at all. Another important measurement when choosing a clean roof rack is roof rack clearance, especially if you have this glass roof up here.
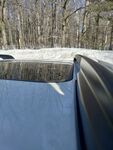
So if you measure from the glass to the bottom of our crossbar, I have it at 3 1/2 inches, maybe 3 1/4 inches of clearance, which is plenty. I'm not as concerned about if I have clamps when they go around they're gonna scratch up the roof, things like that. But also you'll have that measurement for how much height this is adds to the roof overall. So, top of the glass, to top of the roof rack, about 4 3/4 inches, that's where your cargo sits. Imagine you have skis with extra tall bindings.
You wanna make sure you have clearance for those bindings. And if you find you don't, that's when you start looking at accessories, like ski carriers that we have here at etrailer that give you that extra height. So, in terms of height and clearance, this sits really good on the roof and with the raised rails on your Santa Fe, there's also a good thing to it, and that is that you can put your crossbars pretty much anywhere you want, but you do have to plan out a little bit. Now, I put the crossbars up here, just because it sits right in between the glass. I don't like having a crossbar on top of where a roof may open just because it adds a lot of wind noise. I've experienced that a lot on my own personal car. Now, crossbar spread is measured from one bar to the other. Usually, it's center to center. Now, our crossbars here are at 40 inches apart. That's a bit far for most applications. You would usually bring that one bar, the rear one a little bit more forward. But that really does depend on what you are carrying. Are you carrying extra long kayaks Are you carrying a really small roof box that requires a very specific crossbar measurement So double check your accessories and see what they require. The good news is this can move pretty much anywhere you want on the roof to match that number. Here at etrailer, we send you roof rack kits, and that's gonna be your different components all kitted together for a custom fit for your car. That's why it's really important to use our Fit Guide here where you put your year make model at the top of the page and then you select Roof Rack, so that way you can find the fits for you. Now, this is gonna be the 57-inch bar like I mentioned earlier. We also have a kit with a 54-inch bar. They have the same tower, though. Power, or foot pack, or feet, whatever you wanna call it, is what's creating your base support for this system. I really like INNO towers, these three feet especially, just because they have these straps that go around the rails. Some other towers have clamps, and those work well. I just have a personal like comfortability with the straps. Now, this is also gonna be a tool-free roof rack, meaning once you take off that end cap, you can see that there's this lever. This lever is what heightens down, as well as loosens that strap. So, if you need to install this or uninstall it really quick, you're not digging around for tools, you're just unlocking the whole thing and using that lever. This is also a good time to be able to see how that strap goes around the rail. This is actually a metal strap with a rubber outside, and that gives you a little bit of extra grip but also prevents scratching up your rails. The metal strap is what's doing most of that work, though, so that's why everything is kept safe behind that end cap because it is pretty easy to remove once you have that off. But that would be pretty much everything that I try to cover with a friend if I was trying to recommend a roof rack for them. I mean, there's also a bunch of extra features that this has. Like, it is a channel mount rack, it has aerodynamic bars, it has pretty end caps, but those are just extra things. The important thing is: Will this be able to carry my cargo Will I be able to put things on it without scratching up the roof Will it look good on the car And hopefully, this video just helped explain that. Now, this is pretty reasonably priced relatively in the land of roof racks. It does sit in the middle-of-the-road option for price point, and that's because it just doesn't have the same type of name brands, as well as compatibility with other accessories. What I mean by that is that some of your more premium brands, like Yakima and Thule, have their one-key or same-key system. So if you have other Yakima products, you can then have it all key alike with your Yakima roof rack, and that's a pretty helpful feature that you INNO roof rack will not have. Now, if that's the route you would like to go, a really good option there is the Yakima TimberLine Towers. Those also have straps that go around your raised rails. Those are super strong. They have some more pivot points to them, which is really good if you want the extra best fit in a super-level rack. Now, it is a bit more of a pricey roof rack compared to the INNO. So if you don't really care as much about if it matches your Yakima accessories, or maybe you don't have those accessories and you just want a roof rack, then that's where the INNO roof rack might be the best option for you. But if you have any questions, just check out our website, give us a call, check out our descriptions and pictures, and send us a message, and that way if we can help you find the best fit for your car. Now, I kept talking about how easy this roof rack was to install. So if you wanted to see that, stick around. Getting your roof rack installed is super simple. Well, it might look a little confusing because you have different crossbars, you have end caps, you have towers, things like that, is actually very simple. So the first thing you're gonna do is you're gonna go over to your crossbar, and you're gonna take a look at the track underneath it. So see how this can slide on over, just like that. And then you can press this button and you can continue pushing it in towards the inside of the bar. That way, we can grab your tower, and you're gonna have tabs on the bottom of the tower that will line up with the tabs in that plate. So, just fit that over and slide that on out just like that. So, very easy to get it all set up. You just need to make sure you have your towers facing the right way. At this point, this is also when some people put their end caps on. If you had them off, those just pop on through. Once you have that lined up the right way, that's the wrong end cap. This one's better, there you go. It says right and left on the end cap so you don't get confused. Now, keep those tower straps open because we're gonna put them on the rails. When you're up here on the roof, you wanna make sure that you have the roof rack facing the right way. So that's the taller portion facing the front and the tapered end of the bar facing back. Now, this is a lot more easy when you have a second person with you, but still doable by yourself. Just gonna get those towers up and around the rails. And then here's what it looks like on this side. You want the foot pack pushed up against rail. Look how nicely that fits against that curve. And then you're gonna bring the strap over. If the strap does not fit, you can loosen it with this lever until that fits on there. Now, don't tighten down just yet because you wanna make sure that your tower's on the same part of your roof on both sides, and you also wanna have the same amount of length of the crossbar on both sides. So just go back and forth, take some measurements to make sure that's all good. As I do tighten the towers down, what I like to do, mainly out of habit at this point, is to tighten them down evenly on both sides. Meaning, I'm gonna tighten this down about halfway, and then I'm gonna go back to the other side, tighten that past a halfway, just go back and forth. And that makes me feel better. 'cause then I'm not pulling all the tension one way to the other, and I know for sure that it is even, even as I tighten down. Fully tighten down those towers. That's gonna be when you have a good amount of tension on those levers. And you can see visibly that the strap is pulled tight against your tower. And once that's all done, your next step is to attach the end cap. So, your end cap is keyed alike on both sides. It will fit right onto the tower, but you do need to get the included keys to tighten that into place. Otherwise, it will just fall off. The good news is all these end caps are keyed alike, and you get two keys. So at this point, when I put all the end caps on, I double-check that everything is secure. I then put one key on my keyring, the other key in the glove box. You can put yours wherever. But now, I'm ready to load up my roof rack and hit the road because roof rack is all installed. Today, you saw the INNO roof rack with a 57-inch long crossbars and the INNO three feet for raised rails here on the 2025 Hyundai Santa Fe. My name is Evangeline, and I hope you enjoyed this journey.


Do you have a question about this Roof Rack?
Info for this part was:
At etrailer we provide the best information available about the products we sell. We take the quality of our information seriously so that you can get the right part the first time. Let us know if anything is missing or if you have any questions.


Thank you! Your comment has been submitted successfully. You should be able to view your question/comment here within a few days.
Error submitting comment. Please try again momentarily.