
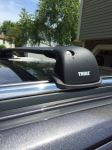
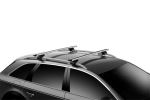
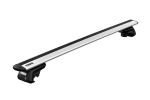
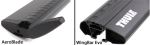
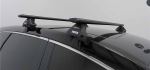
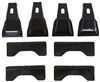
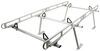
Thule WingBar Evo Roof Rack for Naked Roofs - Aluminum - Black - Qty 2


To see if this custom-fit item will work for you please tell us what vehicle you'll use it with.
This Thule roof rack lets you carry cargo and gear on your vehicle. Aerodynamic crossbars with split rubber strips in top channels work with channel-mount and clamp-on accessories. Installs on your vehicle's naked roof.
Features:
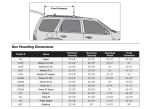
Specs:
 Alternate Instructions
California residents: click here
Videos are provided as a guide only. Refer to manufacturer installation instructions and specs for complete information.
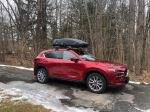
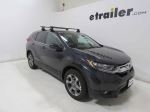
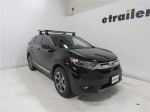
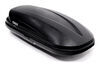
Kurt with etrailer, and today we're gonna take a look at the Thule Wingbar Evo roof rack, and we're gonna see how it fits and how it installs on our 2020 Honda CR-V. (transition whooshing) A roof rack is a great way to carry that cargo with you that you either don't want in the vehicle with you or it's just simply won't fit. So for instance, if you're going on a trip, you got three passengers with you. While the CR-V does have a decent amount of cargo space for the vehicle's size, that can fill up really quickly when you got a car full of passengers going to a long destination. The roof rack is gonna provide an opportunity to carry that extra cargo either with a roof box, a roof basket, something along those lines, or if you have items like a kayak or a bike or something like that that you want to take with you, those are things that can be carried up here as well with the right accessory. And the Wingbar Evo has a couple of great features to it.
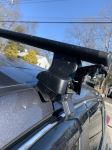
First and foremost, it has a 165 pound weight capacity. However, you always want to double-check your owner's manual for the vehicle rooftop capacity. Whichever number is lower, that's gonna be the limit to the weight that you can carry up on your roof. It's also an overhanging roof rack, meaning that the crossbar comes out past the towers. This is gonna give you the opportunity to use a lot more of the bar space than a flush rack would.
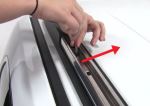
A flush rack is where it dead ends into the tower and you're generally forced to have a smaller bar space and keep things toward the middle of the vehicle. This gives you the opportunity to maybe put things up there side by side as long as they're under the weight capacity and bring 'em closer to the edge of the vehicle just for ease of access. The bars themselves can take your clamp-on accessories, or the end cap folds open here to give you access to this T-track through the weather stripping here, so you can use your T-slot mounted accessories. Now you got 53 inch bars up here, so you've got 53 inches of usable bar space to load up your cargo and your accessories. But we're gonna take a few measurements up here to check on some other things.
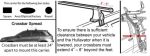
First and foremost, I'm gonna check on our crossbar spread, and that is the distance between our crossbars. The reason that number is so important is because every rooftop accessory has a minimum and a maximum crossbar spread that is allowed in order to use that accessory. So knowing what your spread is is gonna help you pick out the right things to put up here. So if I go from the middle of my back bar to the middle of my front bar, I am right at 27 1/2 inches, and that's a good place to be. The sweet spot on most of these rooftop accessories is kind of between 25 and 30 inches.
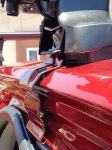
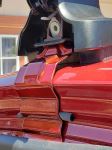
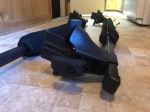
So at 27 1/2, I'm pretty confident that I'm gonna find several accessories that are gonna work with this setup. I'm also gonna double-check on the height that this adds to the vehicle. So the top of my bar comes out to being just under four inches. So if you know your vehicle height and you know your accessory height, add that four inches, and you'll get your overall height when it's loaded up up here. And if you come across a low-clearance area, like maybe a low bridge, garage, something like that, you'll know whether or not you'll be able to pass safely. The last measurement I'm gonna take up here is going to be, how much room do I have under my bar Now I got about 2 3/4 inches in the front here. Now, that is gonna be enough for my sunroof to pop open. However, if I've got an item up here, it's gonna be pretty difficult to do that. I'm a little worried about opening it all the way up too because of how close in proximity this bar is back here, there's a chance that it could come into contact with that. Now, with that being said, if you've got a bunch of stuff up on your roof, honestly, you're probably not gonna wanna be using that sunroof anyway. Wouldn't be a whole lot of point. But if you did want to have the vent popped open while the roof rack was empty, I think you'd be perfectly okay doing that. And the reason it's so important is because when it comes to the installation, on a naked roof like this, something without any rails, the pads and the clips for installation on this roof rack need to go into a very specific spot. I can't just move these up here wherever I want to. It wouldn't fit correctly. So follow along and I'll show you exactly what I mean when I get these installed on our CR-V. (transition whooshing) The first thing that you want to do when it comes to the installation is lay all your parts right. Your fit kit is going to be coming with these rubber base pads along with these clips. Now, on each of these, there is a number stamped on 'em, and you wanna check your instructions. They do go in a very specific place. So for instance, we've already got our front crossbar put on. That is going to use footpad 207 on the driver's side, 208 on the passenger, and it's gonna use the clips that are stamped with a 154. When it comes to the rear bar, which is the one we're gonna be putting on for you, 212 is gonna be your pad on the driver's side, 213 on the passenger, and they're gonna use clips 155. Now once you establish what's going where, you can lay down your crossbar. These are going to be aligned on the roof so that the wider part of the bar faces the front of the vehicle, the narrower part faces the rear. So lay that out. This is going on my driver's side, this is going on my passenger. I'm gonna go over here to the driver's side, I've got pad 212. This plastic piece at the bottom of my tower is what this is going to fit onto. So I'm just gonna kind of clip that around the back and press it on. Now, I'm gonna make sure that it's flush going all the way around. These rubber pads are made to contour the roof in the place that they are going so that they fit very snugly. The next thing I'm gonna do is take my clip, and through this slot right here, I'm just gonna insert that until I hear that click. Once I hear that click, it's good and locked in. And I'm gonna repeat this process on the passenger tower. Take our crossbar, we're just gonna turn it over. And here we're gonna have the tabs to our end caps. So I'm just gonna depress that tab, remove the end cap, and then I'm gonna take my tower. Now my tower here needs to be aligned. So this clip is going to the outside of the crossbar. The other thing you can do is this little clamp up here is T-slotted to go right into this section underneath the crossbar. If you depress this in, like this, it's going to raise that section up and give you clearance to be able to slide that on. So I'm gonna do that right now, just like that. And once I release it, it ends up being stuck in place. I'm gonna do the same thing over here on the passenger's side. Right here, we have this tab. If we slide it over, we're gonna find a numbered scale here. And in your instructions, you're gonna come up with an x-measurement and a y-measurement. The x-measurement is basically this scale right here on your front bar, which gives you a measurement of 47 1/2. We're doing the rear bar, which calls for a measurement of 40 1/2. So I'm gonna slide this tab down, and they do have hashes for the hole and for the half, until I get to 40 1/2. And I'm gonna line the hash for that right up with the edge of the opening right here. Once I do that, I'm gonna depress this in so I can slide it and move it right over till it butts up against that tab. And at that point, I can replace the end cap. I'm gonna do the same thing over on our passenger's side. My suggestion just for ease of installation, is right through here, we've got a bolt. I'm gonna use the Thule tool, and I'm gonna loosen that all the way. Now what this bolt controls is how loose and how tight my clips are, my clamps, so I want to just create as much slack as I can. It just makes it easier to get it up on the roof if I have more mobility outta my clamp. We can get it up on our roof. Now, whether you wanna grab a ladder or a stool or use the door threshold, you can. You can do it from the ground if you're tall enough. But essentially what I'm gonna do is get that clip to the outside over on the other side of the vehicle, and I'm gonna kind of work it back. And that pad is gonna kind of just rest right up there in place. And I'm gonna put the other side down right here. Plenty of length for the clip to get around this lip right here. And now I'm gonna take some measurements for our bar placement. In your instructions, you're gonna find a z-measurement and a w-measurement, and both of those measurements to do with where your crossbars are placed on your roof. The z-measurement for your front bar is gonna be from the front of this rubber pad here to the top of the glass on the windshield. That measurement comes out to 11 3/8. The next measurement is gonna be from the front of our first crossbar to the front of our second crossbar, and that measurement should come out to 27 1/2, and we're right at it. So we've got our bars in place. We're also gonna double-check to make sure it's seated okay. So the rubber pad is seated on here perfectly. The little lip or notch in the back is seated around here perfectly. Grab the tool that's provided by Thule in your kit. Again, I'm just making sure everything is seated nice and flush. What I'm gonna do is I'm just gonna push up on this clip until it catches, and I'm gonna use my tool through this bolt right here to tighten it down. Now, I'm not tightening it all away. I just want to get this snug so it's not going anywhere. The reason being is I've done this before where one side gets tightened down all the way and the other side isn't. It can knock it out of place and you end up undoing everything and starting over. It's a lot better to get it nice and snug on here, making sure that everything stays right where it should. And what I'll end up doing is just incrementally going back and forth. Might give it a few turns here, go to the driver's side, do the same thing, and just work myself back and forth until everything's all the way tightened down. The tool that you get from Thule here, this is a torquing tool. It's gonna give a loud pop like that when you're all done and completely tightened down according to Thule specs. And the last part of our installation is going to be to put on our tower cover. But before I do, I just wanted to go over something really quick. Outta the box, you're gonna get these plastic locked cores. And while they will do a good job of locking your tower cover on, anybody coming along with like a coin or a flathead screwdriver can unlock these, get 'em off, loosen up your roof rack, and make off of it. My suggestion would be to take advantage of Thule's One-Key system. What that allows you to do is buy lock cores and keys for all of your towers. They'd all be keyed-alike. But it also gives you the opportunity to get those lock cores keyed-alike to other Thule accessories you may have. So if you have a roof box or maybe a bike rack or something like that that has a lock on it from Thule, you have the opportunity to get it keyed-alike to that. That way you don't end up with several, you know, different Thule keys, not sure what works with what. You can end up with one key that works with all of your Thule items. But essentially all you're gonna do is put these two tabs in here up at the top, swing it down, snap it on. And if you had the the metal, you'd just lock it. In this case, we take a flathead, turn it, and lock it in place. And that's really it for the installation. So that's a look at the Thule Wingbar Evo on our 2020 Honda CR-V. And if after watching this video you've still got questions about it, go ahead and drop those in the comments below. We would love to share those questions with other neighbors just like you so they can make the best decision for themselves. Once again, this is Curt with etrailer. Thanks for stopping by.
Customer Satisfaction Score:
91% were satisfied with this product
9% of customers were not satisfied
Ratings & Reviews


Do you have a question about this Roof Rack?
Info for this part was:
At etrailer we provide the best information available about the products we sell. We take the quality of our information seriously so that you can get the right part the first time. Let us know if anything is missing or if you have any questions.


Thank you! Your comment has been submitted successfully. You should be able to view your question/comment here within a few days.
Error submitting comment. Please try again momentarily.