


Thank you! Your comment has been submitted successfully. You should be able to view your question/comment here within a few days.
Error submitting comment. Please try again momentarily.
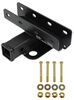
This clamp-on receiver attaches to your 4" x 4" or 4" x 4-1/2" RV bumper and provides a 2" x 2" receiver opening for a hitch-mounted bike rack, cargo carrier, or other accessory.
Features:
Specs:
Notes:


Tech Tip
No drilling required for installation
Videos are provided as a guide only. Refer to manufacturer installation instructions and specs for complete information.
Randy: Hey guys, it's Randy here at etrailer.com. Today we're taking a look at a Bumper Style Receiver Tube Hitch. We're going to work on RVs and travel trailers. This one's from Stromberg Carlson.Now this bumper mount receiver tube is going to be an excellent way to solve the problem of getting either dirty, muddy gear to or from the campsite, or getting some bikes. This is going to work out with bike racks. It's going to work out with cargo carriers.This is going to give you some additional capacity.
Or, if you don't like the idea of hanging your bikes off of your ladder to get up top, it can be kind of a pain to get the bikes up and on. This is going to allow you to use a nice Class 3 bike rack, and have it hanging on the bock of your inaudible 00:00:36. You just want to ensure that that is rated for travel trailer or RV use, depending on what your application is.Now, this gives us a 2" by 2" receiver tube opening. That's where we get the Class 3, or any accessory you choose to put in there. You want to be sure that's rated for Class 3 use.It's going to have a 200-pound limit.
We don't want to exceed that with whatever item we're putting in. You also want to check with the manufacturer of the bumper to ensure that it's rated for that weight. If not, go up whichever number is the lowest.Now, this has been designed to work with 4" x 4" bumpers, like what we have here. And also the 4 x 4-1/2. The only real stipulation to that is that it's a solid, continuously welded bumper.
It should have four sides on it, and there shouldn't be any gaps in that anywhere at all.Sometimes you'll see bumpers that look similar to this. But the back of them will be open. In that situation, this isn't going to be the one for you.Now, here we've got our 5/8ths diameter pinhole. That's what will be securing all of the items in the receiver tube with. You want to choose a Class 3-rated pin or clip for that.
There's also plenty of room if you want to do an anti-rattle device, or even a locking hitch pin. But the anti-rattle bolt here that is provided does a great job.As far as finish quality, it looks pretty much on par with some of the other ones that I've seen. I've seen cleaner welds and I've seen more complete welds on some of the other ones. But all in all, it has a really good finish on it. And I think it's going to do the job very well for you.Something else you'll really appreciate about this that we don't often see on all of the other ones. You'll notice now we've got our bolts in, holding our rack in place. But you can see it's got some movement to it.By using this bolt right here, we can tighten that in so it makes contact with whatever accessory we've got installed. And once tightened down, it's going to eliminate that movement. Now you can see with that tightened down, no movement or play here at the connection point whatsoever.Now to begin your installation process, you do want to find the center point of your bumper. We're going to use that to place ours. If you have a spare tire carrier, or in our case, we have a ladder back here, you can offset that a little bit if want.But just keep in mind, whatever cargo carrier or bike rack that you're going to be using, don't let that hang out past your camper. At least that way you'll have some frame of reference on where that's at.Now once you've decided on your location, we need to take our bolts. These are going to be dropped down through the top. Now you can mount this on the underside as well; that would be option number two. This is our first option. The only reason you're really going to do that is if your camper overhangs, and it's too low here. In that case, you would flip this over, mount it up here, bolts up from the bottom.Once our bolts are through, we'll place the plate on. And then onto each one of those, we need to thread one of our nylon lock nuts. Now we're going to take the play out of this. We're going to tighten this up so that our plate comes up to the bottom. We'll just get rid of that slack. We'll make our final adjustment then, torque it down.Now, for the head of the bolt, you'll use a 19-millimeter or a 3/4 . for the nut you'll need an 18. Now, we want to grab our torque wrench, same set of tools. But we want to get these torqued down to the proper specifications. You'll find that listed in your instructions there.And that's going to complete our look at the Stromberg Carlson Bumper Mount Receiver Tube.
Customer Satisfaction Score:
96% were satisfied with this product
4% of customers were not satisfied
Ratings & Reviews


David

7/14/2026
Still a great product and helped us make many memories.


Alan
7/18/2020
Working perfectly still! Thanks again Etrailer!
Scot L.
6/12/2019
Great
Randy
5/18/2021
receiver is working great, only regrets is I didnt do this sooner.
Randy H.
4/16/2020
It fit as advertised and has stayed out. No complaints at all.
Gregory W.
10/4/2021
Great
Chris
12/6/2022
Great addition for using a small cargo carrier or back rack. I use mine for 2 purposes, first use is to haul my large cooler with our ice and drinks. The second use is after we get set up I have a raise platform to use my outdoor shower that is mounted right above to give my 4 legged baby a shower if he decides to play in the mud or such. The other good thing the way mine just happened to be placed, when I dont need it I just slide it under the camper and hitch it back on the hitch backwards underneath the camper. Makes it harder to steal or forget and its out of the way. Great product!! The only thing that would make this any better is if you could just pull a pin and rotate it underneath the camper. Im working on that idea for summer. Lol!!!
Jacklyn
5/19/2020
perfect we installed the part ordered from you then ordered a bike rack for the back of our 5th wheel and it is secure and sturdy.


Do you have a question about this RV and Camper Hitch?
Info for this part was:
At etrailer we provide the best information available about the products we sell. We take the quality of our information seriously so that you can get the right part the first time. Let us know if anything is missing or if you have any questions.

























Bradley
8/15/2023
Getting ready to use this hitch for the first time since I’ve gotten it. This allows me to move by electric bicycle rack from the back of my truck on a 2 inch hitch to the back of my trailer when I’m ready to go camping.