


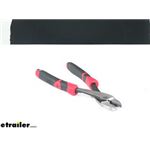
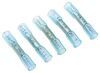
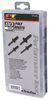
These 9-1/2" crimping pliers crimp and cut insulated and non-insulated solderless connections and terminals and 10-22 AWG wire. Compact design for use in tight spaces. Constructed of drop-forged steel with reinforced edges. Non-slip handles.
Features:
California residents: click here
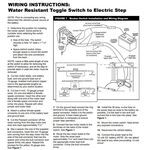
Videos are provided as a guide only. Refer to manufacturer installation instructions and specs for complete information.
Today we'll be taking a quick look at the Performance Tool Crimping Pliers. These are going to help you make those wiring connections tight and secure, with these crimping pliers. They're going to be a durable construction, fairly compact to fit in tight spaces. From end to end, they're about 10" long, and the widest point at our handle here is about 2 1/2" wide, and then about 3/4" thick. They're made of a heavy-duty, drop-forged and hardened chrome, vanadium steel construction. The cutting edges are induction hardened, and precision sharpened.
Say that three times fast.So we're going to demonstrate how these are going to work, just to show you how well they cut and crimp. We'll have our straight portion here, or just the cutting portion at the very end so we can cut our wire to length. It works fairly well. And then, as far as crimping, I'll grab one of our butt connectors, and using that center portion, crimp that in place. This can be used for both insulated and non-insulated butt connectors.
That middle portion is where you want to actually crimp down your insulated butt connectors, like this one I have here. For the non-insulated metal-type, that's where you would use that little, sort of punch style. If you do that with one that is insulated, that'll punch through that insulation, and then actually make it a not very good connection, since it'll cut through that insulation and now we have open wires. But, that gives you the option for either one.I'll show you how it works for a thicker wire, some 10 gauge wire. This is designed to work for 10 to 22 AWG wire.
For this thicker wire, of course it is a little harder to cut, but it does get through there. You might have to get a good two-handed grip on there, but that handle is long enough that I can get both my hands on with a pretty good grip. Then doing our larger ring terminal, still fits in there, and we can get that crimped down. You can see our crimps are nice and solid, for both the larger and smaller style butt connectors, although I didn't get that one crimped on quite well enough. It's always a good idea to check it to make sure that that wire's crimped on in place.
So now, we've got a good crimp on the other end of that wire.Handles feel pretty comfortable in my hand. Has a little, kind of bump out there at the top to help you get your finger's index on there pretty well. It's a nonslip grip. We have a few little cutouts in that handle to give us a little bit better control over it. I think these would work out well for a long time. They feel pretty solid, and make a great addition to any tool belt, or toolbox that you might have.That's going to do it for our look at the Performance Tool Crimping Pliers.

High quality crimping pliers. Fast shipping. Very pleased.
I was given this tool to try out in the shop. The good is the crimp part works good ,I only use the the side for the insulated butt connectors that we use on a daily basis. You can get a good grip on the handles. Wish my "good" ones had the same handles! The cutters for the wires work OK for 10 and 12 ga wires smaller than that it does not cut all the way thru and folds the wire over to the side. Sometimes you want to trim the grey jacketed around the wire such as our wire part number 10-2-1 . Really doesn't work at all for that purpose. Cant even cut a ziptie either. Home use just for crimping, OK for everyday use in the shop it would get frustrating fast.

Exactly what I needed. This rim heavier duty than the factory version. Will be ordering from etrailer soon.
Reasonable price, great quality, fast shipping
High quality tool works great.
Arrived on time. Works well.
Great product! Well made!
Great service and fast delivery! Awesome website and easy to find what I needed!

Do you have a question about this Electrical Tool?
Info for this part was:
At etrailer we provide the best information available about the products we sell. We take the quality of our information seriously so that you can get the right part the first time. Let us know if anything is missing or if you have any questions.


Thank you! Your comment has been submitted successfully. You should be able to view your question/comment here within a few days.
Error submitting comment. Please try again momentarily.