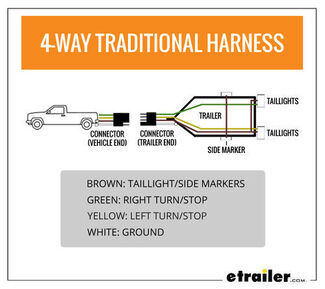
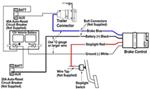
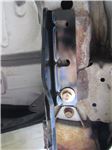
To see if this custom-fit item will work for you please tell us what vehicle you'll use it with.
Thank you! Your comment has been submitted successfully. You should be able to view your question/comment here within a few days.
Error submitting comment. Please try again momentarily.
Forget the hassle of complicated wiring and modifications. The T-One Vehicle Wiring Harness with 7-Way Trailer Connector is designed for easy installation with your vehicle's factory wiring. Simply plug it into your Nissan Frontier, Xterra, or Pathfinder and you're ready to go. This custom-fit solution fits snugly, requiring no cutting or splicing, streamlining the installation process so you can hit the road quicker.
This harness is not just a one-trick pony. It seamlessly works with 4-pole, 5-pole, and 6-pole adapters, making it versatile for a variety of trailer types you might own or rent. Whether you're towing a boat, a camper, or a utility trailer, this connector has you covered with ease and adaptability.
Engineered with 16-gauge bonded wire, this harness ensures reliable and durable performance in all weather conditions. It’s built to last, providing consistent power to the lights and brakes on your trailer. The high-quality materials used in this wiring harness mean you can trust it won't let you down during long hauls or repeated towing trips.
Worried about wear and tear? This 7-way connector comes with a protective cover that shields it from the elements when not in use, prolonging the life of the connector and ensuring it performs under various conditions. This peace of mind allows you to focus on your journey, not on maintenance issues.
No need to scramble for extra parts. The kit includes required relays to ensure all wiring functions operate correctly once installed. This thoughtful inclusion makes sure your trailer's lights and signals are fully integrated with your vehicle’s system the moment you finalize the setup.
Make the installation as seamless as possible. This wiring harness is specifically designed to follow the lines of your vehicle’s frame, ensuring a perfect fit without any drilling or additional modifications needed. It’s tailored for your specific Nissan model, ensuring minimal hassle and optimal functionality on the road.
California residents: click here
Videos are provided as a guide only. Refer to manufacturer installation instructions and specs for complete information.
Hey everyone, how's it going Today we're gonna be going over and showing you how to install the Tekonsha T1 trailer wiring harness here on our 2022 Nissan Frontier. So a trailer wiring harness is gonna be one of the many things that we need in order to successfully tow a trailer with our Frontier. Now, in addition to this we need the trailer hitch, the ball mountain hitch ball, and also a brake controller, as well, if our trailer has brakes. All of these parts, we carry here at etrailer. Our trailer wiring harness is simply going to transfer the signals from the truck to the lights on our trailers. We can let other motorists out in the road, know what we're gonna be doing, allowing us to ride to our destination, safe and sound.
So this is a legal requirement in pretty much every state. A lot of the times, your larger trailers, such as your camper trailers, actually block the tail lights on the truck here, so we need a way to, as we said, let other motorists out in the road, know what signals we're gonna be making just so we can arrive safe and sound to our destination. So this kit here is a seven way. So this is gonna be one of the more standard types of trailer connectors for the larger trailers. Now, if you have a four way there's another kit you can purchase that has only the four way.
But if you ask me, I recommend the seven way with the seven to four way adapter. That way you have the capability to tow those larger trailers, as well as the smaller trailers should you have the need to do so. So here's what that adapter looks like. It's very easy to use. You just plug it into your seven way.
And then here is where you plug in your four way trailer connector. So the seven way trailer connector is gonna be used on those larger trailers that have electric brakes. So we're gonna have all of our standard lighting functions in addition to the electric brake circuit as well as a battery charge line circuit and a reverse light circuit, should we need it. The four way is only gonna carry your lighting signal, so just make sure you know what your trailer needs. But regardless I do recommend the seven way.
You just might also need an adapter but these are fairly cost effective, and you can pick one up here at etrailer along with your trailer wiring harness. So keep in mind your wiring harness doesn't come with the brackets that you see here. These are actually sold separately. And the reason for this is you can mount this in a number of different ways. We'll give you the exact options later in the video. Just know that you will need a couple extra things if you want to mount it like we see here. So our trailer connector here lid, this is actually gonna be spring loaded. So whenever not using it, it's gonna spring shut. There's actually a nice gasket material in there which is gonna seal up the pins inside. That way, you don't have to worry about any water getting in there causing corrosion issues which could then in turn affect your lights there. And the way this works is your trailer connector is actually gonna catch on the stop here on the lid to hold it in place so it's nice and snug. So in regards to installation this harness is very easy to install. It's definitely something you guys want to do yourself. You certainly don't wanna pay someone to do this for you. You really don't need any special tools whatsoever. Everything is plug and play. There's no splicing into the vehicle. I would, I would say, give yourselves around an hour or two to get this done. You don't have to lift the vehicle in the air or anything. It is a very simple installation. One we will walk you through step by step now. So to start your installation today you're gonna come underneath the rear of the truck here over on the driver's side. You're gonna take your wiring harness that comes in your kit. There's two ends. This is the trailer connector end, and then these are the two vehicle connector ends. So we're gonna be plugging these in first. There's gonna be two plugs on the vehicle here that we'll plug these into, but there is gonna be caps on there we have to remove first. So let's go ahead and jump underneath the vehicle so we can show you that. So directly above our trailer hitch on the driver's side frame sort of in between the spare tire these are our two factory tow package ports. Now there are plugs on these as they said so we need to go ahead and remove those. So it should just be a little clip there you depress and then just pull down. There's one plug and there's one on this as well. Now, sometimes you can't get'em with your hand and you need to grab a screwdriver. If you have fingernails you can usually get'em out a little bit easier. I have none, so I think I'm gonna get a screwdriver there to help us remove that one. Now that we have our plugs removed we'll go ahead and plug in our harness. The connector should only go in one way. We should hear them click when they've locked into place successfully. There we go. So now we're gonna take this end here and attach it to our trailer connector but we do need to find a way or devise a way rather to mount our trailer connector to the vehicle. So for this particular customer here they have a Draw-Tite trailer hitch. And Draw-Tite offers a welded on tab onto their cross tube that you can attach your trailer connector to when you purchase this bracket, which is sold separately. So you will need to pick this up with your kit. Now, if your trailer hitch doesn't have that welded tab on there, you can actually use a different bracket that sort of wraps around the hitch cross tube with the band clamp. So if you have the Draw-Tite hitch you just need this bracket here. If you have any other hitch, you're gonna need this bracket and one that clamps around. We sell both of 'em here at etrailer. And if you wanted to, you could probably drill this into the bottom of this beam here. It really just depends on what you wanna do. If you don't wanna drill into the vehicle, then I do recommend those two clamps. But now that we have our bracket already secured I'm just gonna take this end here of the trailer connector, run it through there, and then just attach it to the back of the trailer connector. It only goes in one way. Press it down until it locks into place, and then we'll just go ahead and mount this here to the bracket using the provided hardware. So now we've got some extra wire hanging down here underneath the vehicle, which we obviously don't want. So in your kit, you're gonna get some zip ties or we're just gonna secure this up underneath the vehicle here so we can get it out of the way and it's not dangling on the ground. So next thing we're gonna do is we're gonna take the other harness that comes in your kit. Looks like this. So we're gonna be focusing on these three connectors here and the three relays that come in your kit. Two blues, one brown. So we're gonna be plugging the relays into these connectors. They're only gonna go in one way. And they are kind of tight to get in there, so you do need to squeeze kind of hard. We'll just repeat this same process here for our other connectors. And there we go. Once we have them all locked into place you're gonna take your foam tape here, peel off the backing and then you're just gonna be wrapping them around these connections here. So now that we have our harness assembled we're gonna be installing this inside the vehicle. So the port that we need to locate is gonna be on the passenger side, underneath this kick panel. So we're gonna grab a trim panel tool. We're gonna remove this threshold panel and then this kick panel here to reveal our connectors. So all we're gonna do is just take your trim panel tool and just pry up first on this little threshold panel. So there we go, go ahead and set that aside. And now we have our kick panel here. So go ahead and just pull that out here. So once we have our panel peeled back we just release these two fasteners here. They we're kind of tough to release, but I just used a long trim panel tool to really dig in there and just pry those out. It looks like there's still something else holding that panel on but I'm not gonna worry about removing that because we have it tilted back enough to work. And then tucked back in here is where our connector's gonna be. Now, it is kind of hard to see. There's actually some tape on it, so what I'm gonna do is I'm gonna remove that tape there and then that should free up the connector so I can pull it forward a little bit more towards me, and then we'll just simply plug in our harness to this. Now we'll take our relays here and try to tuck them away as best as we can just to get a small as a footprint as possible. And then we're just gonna go ahead and reinstall our panel here. So now we're gonna go ahead and run through our signals, now that we have everything hooked up. Now we're using a little plugin, seven pole tester here. You guys can just use your trailer at home, but you can see we already have our 12 volt circuit active. So that's good. Go hit our brakes. Left turn. Right turn. Then finally our taillights. Now we don't have a brake controller hooked up right now but we can't show you that, but everything else works, so I have no doubt that'll work as well. And now with everything working correctly that's gonna do it today for our look at installation of the Tekonsha T1 trailer wiring harness here on our 2022 Nissan Frontier..
One couldn't find an easier way to add trailer wiring to a Nissan Frontier, it's just plug'n'play! There is one complaint, though. I finally got electric brakes on my trailer, and almost burned up the brakes on the first outing. It appears that Nissan has the color codes for the electric brakes and the 12V lead reversed. This puts 12V to the brakes all the time. As simple swap of the wires in the harness solved the problem.
Perfect custom wiring kit for my 2012 Xterra which utilizes the existing pre-wired towing connectors next to the left rear wheel and the front passenger kick panel. After seeing some other examples in reviews for installing the 7-way connector ended up with a clean looking install through the rear bumper.
Excellent hooks up to factory cut outs
Heather A.
4/30/2025
Hi Charles, glad to hear the install was easy peasy! How's the towing life treating you? Anything we can help with?
Product itself is great. Plug and Play taking off a star because the instructions call for pulling off the frame rail the existing plug which is not necessary and also the way that it's described in the video damages the plastic piece that holds it onto the frame rail it's supposed to slide down not be pulled directly off so now I have a broken plastic bracket and had to zip tie it to the frame. Otherwise easy install
Product came well packaged and quick delivery - 2 days. I will recommend etrailer to friends and family. I’m most likely not done ordering for myself! Thank you for the helpful videos for installing the items.
Okay, so I've finally had a day off to fully install the kit in my 2013 Pro-4X Xterra. If you're looking to do the same and are wondering if it has everything you need, don't worry, it does. I didn't time myself during install but I know it took me less than 20 minutes, you don't even have to remove the spare tire to hook up the wiring in the rear. Literally plug and play. It took me a lot more time to figure out where to install the connector.
Nissan went out of their way to make this an easy install if you don't have a factory towing package, this kit is worth it. Buy it, use it.
Shawn K.
6/11/2018
Great. Havent had any problems and dont expect any. Ive since added a brake controller and airbags. They all work in conjunction perfectly.
Plug and play is the best way to go
This kit worked great. It took about an hour to install on my 2005 Xterra. The process was just like the video on etrailer.com. The only difference was that I mounted the bracket directly to my bumper instead of the hitch.
Keith
7/16/2020
Working great. Im glad I purchased the 7-pin version for this car
Easiest trailer wire install I have ever done! E trailer is the best!
Excellent product, straightforward, installation, instructions, no issues.
Super easy install on my 22 Nissan Frontier. Completely installed in 15 minutes
This #118266 7-Way connector harness kit contains everything needed to install basic trailer light wiring on ALL 2015 Xterras, regardless of trim level. The vehicles are completely factory prewired for a simple plug-in installation as described below (other recent model years are most likely also prewired, just check out my photos of the three connectors and see if they are on your vehicle. If you do indeed have the three connectors, the wiring harness plugs into the two factory installed connectors located on the frame, to the left of the spare tire area (one contains the wiring for the lights, the 2 conductor connector carries the +12v charge line and the brake control wire). The relay cable & relays are installed behind the plastic panel on the right side of the front passenger footwell. The trickiest part is removing that panel, along with the plastic doorsill trim to the right of the seat without damaging them. Be very careful not to break the plastic tabs and grabbers that hold both panels in place.
This harness kit does not contain a mounting bracket for the 7-way connector. I recommend the
#TM76474 bracket, necessary to mount the 7-way connector to your bumper.
If you do need to control electric brakes on your trailer(s), consider the additional two items, below. If you choose something other than a Tekonsha controller, you will need the short wiring pigtail that is compatible with that brand, instead of the #3050P.
#90195 Tekonsha Prodigy P3 brake controller. An excellent, top performing unit. Other lower priced Tekonsha controllers may meet your needs.
#3050P Wiring pigtail. Connects Tekonsha brake controllers to the factory installed connector (see photo) under the dash, above the right side of the driver footwell. If you use a different brand of brake controller, pick out the appropriate pigtail to match it.
NOTE: There are apparently two major wiring standards associated with 7-way connections. One of them has the brake control line swapped with the +12v charge line. Make sure to check your trailer plug and wiring before hooking up to your vehicle. You may need to cut and cross the two lines leading to the vehicle’s 7-way connector. If you need to occasionally swap between the two wiring standards, install insulated male & female crimp-style connectors in the lines. Use heat shrinkable tubing over the connections to make them more resistant to the weather. For a more permanent, reliable connection, solder them instead of using the crimp connectors and apply shrink tubing over the joints.
Shipping that etrailer uses SUCKS. Take lessons from Amazon, or 1 of the others. Wiring as described.
Easy installation except, like a previous reviewer noted, my Gen 3 (2022) Frontier was sending 14 volts to the brakes and the controller was not seeing the electric brake units. I switched the two wires at the plug and everything is good now!
Very easy installation on wiring and trailer hitch. Also very sturdy and seems to be very durable
Leonard
6/9/2024
To be honest i was not impressed as for my 2022 nissan frontier the trailer wiring harness had the constant power and electric brake wires switched. Which i never noticed until I recently b i ught a new trailer equipped with electric brakes. So maybe your team can look into this problem as I bought 2 wiring harnesses from you and both had wires switched
Fantastic plug and play installation of your product. Hardest part of the install was wrestling with my panel trim. Thank for your online tutorial and great on time delivery.
Ken
2/3/2020
Everything still working great. Boat was launched 14 times since install.
The hitch is great, but the screws for the electrical connector have rusted.
Tim M.
7/18/2020
It’s still working. The screws are still rusted, though.
2016 Nissan Frontier 4 door Desert Runner. All the wiring fit great. True plug and play. Giving it a 4 star because it did not come with a mounting bracket for the 7 way plug. Should have been included. There are 2 different size plates for mounting. Make sure you order the correct mounting bracket. I used a Hopkins #48625. And get screws and nuts for mounting. # 10 x 3/4" worked for me. Shipping was on time. Support from etrailer is great
Fast shipping and good quality product.
I didnt need the blue relays since my Pathfinder alreay had it. What I did need was the brown relay. Gray plug came with a 6 cable plug where mine in the truck was 8, I used the original plug that came with 4way, the color combination was exactly the same, I was able to replace the plug without cutting the cables. The black plug locked the wheels so I just switch the cables, there is a video here somewhere showing how to do it. Good on price, nissan was selling me the same setup for about 141 without the extra stuff that I bought. Found this webpage a while a go, and I always find what I need at good price. Thanks a lot!!!
Really easy plug and play kit. Removing inner cab plastic pieces is easy(er) if you have a plastic tool like the photo I’ve used these tools a few times for plastic trim removal and its been a good purchase. Anyway easy install as I said but I forgot to include the mounting bracket that attaches to my hitch bar and secures the trailer plug. Thats why you see the harness zip tied until I order that part. Then I’ll be done. Total time on this trailer wiring install on my 2020 frontier pro 4x was about 10 minutes.
Easy to install well made all the welding looks good should last a life.
Every thing was in the box I needed to install and prepare my truck to pull trails.
Simply awesome. So happy that this harness system is just plug & play for my 2011 Suzuki Equator!!
Instead of using the optional mounting bracket, I drilled a hole in the bumper for a clean/better than factory look!! Took an extra 5 minutes!!
Installed as directed and everything worked - almost. called etrailer, spoke to Derek and he advised me that for my 2011 Nissan Frontier some wiring might need to be switched to correct the problem. He sent me and article with pics to fix the issue, in the attached picture the black and blue wires needed to be reversed. Now everything works fine. Thanks for the great customer service.
Easy plug and play install on my 2024 Nissan Feontier
Info for this part was:
At etrailer.com we provide the best information available about the products we sell. We take the quality of our information seriously so that you can get the right part the first time.
Chuck
3/14/2025
Been working flawlessly. I added a snow plow to the truck, and its wiring harness plugged right into this one.