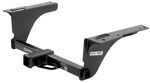
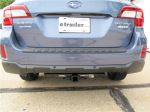
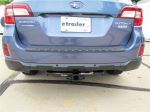
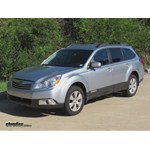
Draw-Tite Max-Frame Trailer Hitch Receiver - Custom Fit - Class III - 2"


To see if this custom-fit item will work for you please tell us what vehicle you'll use it with.


Fully welded vehicle trailer hitch is strong and durable. Draw-Tite's Tested Tough guarantee ensures that this hitch exceeds industry standards. The combination of an e-coat base and a powder coat finish provides excellent rust protection.
Features:
Specs:
Draw-Tite's Tested Tough program provides testing standards far superior to those outlined by the Society of Automotive Engineers (SAE), the go-to source for engineering professionals.
Each Draw-Tite trailer hitch receiver undergoes extensive fatigue testing and static testing with the ball mount that is either supplied or recommended for use with that particular hitch, thus ensuring results that are applicable to real life use. Fatigue testing is also conducted on hitches rated for use with weight-distribution systems.
In addition, Draw-Tite performs static testing on a simulated automobile, as opposed to the rigid fixture used for SAE testing, resulting in a more true-to-life scenario.
At etrailer.com we're committed to the products we sell, and to our customers. Our experienced and knowledgeable staff are available via both phone and email to address your questions and concerns for the lifetime of your hitch. The technicians at etrailer perform hitch installations on a daily basis, making them a valuable resource for do-it-yourselfers. The one-on-one, personal service you'll receive comes straight from an expert in the towing and automotive field. We've installed it, we've wired it and we've towed with it, so whatever your question, we can answer it.

California residents: click here

great product, fast delivery
As described, excellent fit and finish
Box was pretty well banged up when it arrived but the hitch only had some minor cosmetic damage. Some Rustoleum enamel fixed it up. Bubble wrap to keep the hitch from slamming around in the box?
The Hidden Hitch is a high quality product. Very well made!
Product was shipped very promptly and was exactly what I ordered. I haven't mounted it on my car yet, but because of previous experiences with Hidden Hitch I expect no problems.
Great service and prices. The hitch install took less than an hour. I would recommend Hidden Hitch and etrailer to anyone looking for a hitch.
Thanks again, Jamie
I purchased a Hidden Hitch and it was easy to install per the instruction sheet. I had to watch the on-line instructions as to the specific way to wire a 2015 Subaru, but after I did, that too was easy. I installed the hitch by myself with the aid of a jack. No problems and I recommend both the product and the e-trailer company.
Great hitch for the OutbackJust finished installing the Hidden Hitch on my 2011 Outback this morning. It arrived via UPS very quickly from etrailer.com. Thanks to the great installation video on this website, the install was pretty easy. I bought the entire package - hitch, ball mounts, and wiring and it all works great!
Bought a Hidden Hitch for my 2012 Subaru Outback. Box arrived beat up, but hitch was in good shape. etrailer delivered it quicker than expected. Installation was pretty straightforward. Needed to buy a 1.125 inch metal hole saw, and borrowed a torque wrench from the local auto parts store.
Very happy, and would use etrailer again.
This is the second time I used etrailer and have been pleased both times. It is a great product and a super quick and easy dealer.
I like how etrailer gave me options with regards to make of hitch. I wanted the block Hidden Hitch and not the rounded one. They had both!
Plus the prices are spot on!
Everything came as expected and in good shape. I decided to go with the heavier Hidden Hitch and am glad I did.
Instructions worked as stated. I did use some suggestions from the reviews that were helpful.
The hardest part was finding and getting out the hookup for the lights. The plug was where stated on the instructions, but tight and hard to pull down. The instructions all mentioned 2014 and I was doing a 2015 so I was a little hesitant that this was the right wire - it was!
Awesome service and help from etrailer.com
This review is for the Hidden Hitch, 2014 Outback. I used a no-drill method by removing the rear bumper, as discussed on subaruoutback dot org. Bumper removal was simple; The install took 3-4 hours, but would have been *much* faster by removing the muffler. The hitch was in good shape, only difficulty was the forward left hole for the muffler heat shield bolt, which just barely met up with the frame's bolt hole, after shifting the hitch as far as possible in that direction.
What sold me on purchasing my hitch from Etrailer.com was the installation videos and other information that was available on line. I received exceptional service throughout the purchase and I was very pleased with the product when I received it within three days of placing the order. I purchased the Hidden Hitch Custom Fit Class III - 2" for a Subaru Outback, and the installation took me about an hour and 20 minutes, and it was exactly as shown on the videos. I bought the hitch primarily to mount a bike rack, the Hollywood Sport Rider II, which fits perfectly on this hitch. I'm very pleased with etrailer.com and the Hidden Hitch product.
MY Hidden Hitch for my '14 Outback was a great price, arrived promptly, fit perfectly and installed easily (I used the method where you make your holes to install the bolts from inside the spare tire area). Took me about an hour and a half from start to finish, with a extra pair of hands needed only to help me actually bolt it up.
Only knock I can think of is that I can see why some people report that their trailer hitches arrived hanging half out of their boxes, as my box had a softball size hole in it where one corner of the hitch had torn through in shipping. eTrailer should definitely work on improving their packing dept's procedures to ensure that the boxes contents (ie: heavy steel items with serious corners) can NOT shift around and so easily punch through their boxes.
A few pieces of cheap pallet wood, or thick cardboard zip tied to the hitch would go a long way toward that goal.
I needed a hitch for a 2013 Subaru Outback. etrailer provided great advice, service, and follow up. I had the hitch installed locally with the instructions I pulled from the etrailer page. Hitch (Hidden Hitch 87568) fits and looks great. I placed the Thule Vertex 4 bike rack on the hitch and I am ready to go. I also ordered and self-installed the T-One wiring harness 118467. Easy installation with no problem.
Just installed hidden hitch receiver on my 2016 Subaru Outback
Looks fine
As for installations instructions were simple and easy to follow
At 1 st peek looks a little daunting - drop muffler - remove heat sheied
I found step drill easy to use - did utilize drilling oil multiple times seemed to help
Silicone spray with straw helped in dropping muffler- there are 3 rubber holders 2 in back on front & rear of muffler and 1 close to axel
We did not need to trim heat sheied - but used step drill bit to make hole to fit shield over hitch bolt furthest from bumper
Took about 2 hours total. I also used a rubber o- ring on bolts furthes from bumper to snug washer spacer seemed to help when attaching hitch
Etrailer staff was great. Now to use??
Excellent product, and quick shipping. LOVE how the hitch is hidden and you won't bang your shins on it. I drilled the holes using a step drill bit on the top side (inside spare compartment), and installed the trailer lighting harness at the same time. I used extra wire from the bottom to feed up and attach to the fish wires, then pulled them all the way through - took about 10 minutes total to get all the bolts/plates in place. Used same step drill to drill hole into the heat shield. Used my chest to rest the hitch on, and attached one nut at a time. Total install took about 2 hours and 15 minutes from beginning to end, with clean-up. Works perfectly with a trailer, and an Allen hitch-mount bike rack. Was going to purchase a competitor's "no drill" version, but price, style, and quality got me to buy this instead. VERY HAPPY with Hidden hitch, and eTrailer!
As part of a complete package for a 2015 Subaru Outback 3.6R, I also purchased a wiring harness, ball mount, ball, cover and assorted other items. As this has been approximately my 5th hitch assembly purchase with etrailer, and other trailer based items (springs, bearings, etc...), they continue to provide outstanding timely shipping and a top-notch web site with top quality parts.
The issue I had with the hitch had nothing to do with etrailer.
The hitch was described as being compatible with my vehicle. My understanding was the only modification I'd have to make was drilling an access hole to get the bolts inside the frame, as per the instructions. This is not entirely true. Unfortunately I did not find this out until I was bolting up the hitch to the car's frame, that I then had to unbolt and remove the hitch from the car.
Turns out that there are 4 small holes that are drilled into the hitch to create room for the bolt heads that hold up the exhaust heat shield (2 on each side). The 2 bolt holes for those bolt heads that are oriented to the rear of the car do not line up. They were at least about 1/4 of an inch off on both sides, if not more.
I had to spend a fair amount of time and sweat to file those bolt holes large enough to clear those bolt heads so that the frame of the hitch would sit flush with the 2 support frames on the car. If at least I knew about this needed modification ahead of time, I could have saved well over an hour of aggravation and additional effort.
The pictures of the hitch for the other manufacturers look identical so I don't know if it was just this Hidden Hitch model or if all the other hitches have the same issue.
Anyway it's mounted now, looks to be of excellent quality and build, and works just as it should.
I installed the 87568 Hidden Hitch 2" Receiver on my 2014 Subaru Outback (2.5). etrailer.com was great to deal with. I didn’t know much about installing a trailer hitch but with the informative site and excellent videos I felt confident about selecting the hitch from the many available choices and installing it myself.
The product arrived on the date it was as promised. The packaging was intact and the hitch was in fine shape upon arrival. Other reviewers suggested checking the hardware for mismatched nuts and bolts. I did and everything was all right. I followed the video links sent in my email from and the install went as planned. I’m a big guy but installed the hitch without having to jack up the car as there was plenty of ground clearance. I even flattened the box and used it as a pad, which made it much easier to wiggle around then lying on my concrete driveway.
It took about an hour and a half to install. Some of that time included pulling out the right tools and making them available before starting to work on the car. The hitch is heavy and awkward to keep in place while your setting then tightening the bolts. I used a hydraulic floor jack to lift it in place and hold it steady while I fastened the bolts. I didn’t know the torque setting for final bolt tightening so an email to etrailer.com and a their quick response was very helpful. (You should tighten the 7/16" GR5 bolts to 50lb-ft).
I’m happy with the product and the experience using etrailer.com.
I just installed the 87568 Hidden Hitch 2" Receiver on my 2014 Subaru Outback (2.5). Dealing with etrailer was wonderful and I highly recommend them - not just OK - they are a real pleasure to deal with. The website is helpful and clear, product was exactly as described and was shipped the same day I ordered (delivery in 5 days). It arrived in excellent condition with everything I needed (including fish wires they used to sell separately). Videos, written comments/pictures from other customers and even the instructions that came with the hitch were very helpful. It took me about 2 hours to install in my garage. The Outback is pretty high off the ground so I had no problems fitting under the car. I followed the approach other customers suggested, expanding access holes inside the car, instead of drilling new holes in the frame below the car.
Basic procedure was as follows. 1) Remove muffler by spraying rubber hangers with WD40 and loosening 2 bolts. 2) Remove the heat shield. 3) Remove cargo tray and spare tire cover from inside the car. Snap off the carpeted covers from the left and right sides (these just snap off). 4) Remove the polystyrene trays on left and right - note these are clipped to the metal below (I found it very tricky to get these loose and actually broke the tabs on a couple of the clips). 5) Peel off the black tape circles covering access holes (you can see the hitch attachment holes by looking through these). Enlarge holes (2 on each side) to 1 1/8" using a step drill bit. Note that metal shavings will fly so use safety glasses and cover spare tire so they don't get where you don't want them. 6) Fish the bolts through holes as described in the instructions. 7) Flatten the cardboard box and use it to slide the hitch under the car below the mounting bolts. 8) Raise the hitch and put washers and nuts on as described in instructions. Note this step is a little tricky physically. I did it alone but an assistant would be helpful. The rubber muffler hanger has to go through the cutout in the hitch so think this through before you start. I did it by raising the right side of the hitch (non-muffler side) first and securing loosely with washers/bolts. I then raised the left side and slid under it so hitch was briefly supported on my chest. I pressed the hitch up while twisting the rubber muffler hanger to guide it through the hitch hole. I then tightened all fasteners as instructed. I sprayed some undercoating material on the bolts. 9) Hold up the heat shield to see where on of the hitch bolts interferes. I used the step drill to create a hole in the heat shield instead of cutting as instructed. Attach modified heat shield. Reinstall muffler. 10) Inside car, cover access holes with tape and reinstall interior padding and trays. Clean up and done!
I bought the Hidden Hitch Trailer Receiver with electrical harness and ball mount. It was all very easy to order using the step by step method on etrailer's web site. I have a 2010 Subaru Outback and it took about 20 seconds to figure out what I needed. I wanted a hitch that I wouldn't be hitting with my chins everyday and etrailer had it. I haven't installed it yet, but it looks easy, and the videos etrailer supplies will answer any of my questions. I've ordered from etrailer before and have always received the right parts in just a few days....and the parts are always of the highest quality in my opinion. Their free shipping is another amazing service they supply. I am completely satisfied with the products and service I receive from etrailer.
Installing the Hidden Hitch was a lot easier then I expected since I was doing it on my back. I used it today for the first time since I installed it to carry a ton of top soil with my Subaru Outback since I got rid of my truck. The hidden hitch did the job flawlessly.
I am getting old enough that the idea of putting a trailer hitch on was not appealing but several reason drove me to etrailer. The dealer cost was staggering but the deal breaker was their hitch stuck out of the bumper and I just knew I would be banging my old shins on it every time I reached into the rear of the Outback. After doing a Google search, I found etrailer and was encouraged by the installation videos and the reviews. Based on reviews, I chose the Hidden Hitch and the T-one wiring harness. They arrived incredibly fast and in good condition. Based on all the reviews, I was able to install it myself in about three hours without even jacking up the car. All of the helpful hints discovered reading the reviews really helped. Removing the muffler completely really helped and was not that difficult. I also drilled the 1 1/8" holes for the bolt installation from the top and that worked great. I sprayed undercoating on all the exposed hardware underneath and sealed the holes I drilled on top. I used the 1 1/8" hole saw to drill the heat shield instead of cutting the entire corner off. One thing I would definitely recommend would be to use a torque wrench on the final tightening of the mounting bolts. I was able to get the wiring harness connected easily without removing the side panels - I just reached under the panel right were they said it would be and was able to pull it down enough to plug in the harness. Definitely would have been easier with a hoist and two people, but this old man got it done anyways! I would recommend the Hidden Hitch because of its perfect fit and no need to drill any additional holes into the bottom of the frame rail. It looks great on the car - definitely "hidden"!
Excellent hitch, and super fast shipping! Arrived in pretty good condition (see picture of my "Frankenbox" which likely helped), especially considering how mangled the first one arrived (*see below). The only damage was to the labels - both the Hidden Hitch label and the weight-rating label were scraped up. I don't really care about the HH label, but having the weight ratings visible is a nice safety feature.
Installation went really well. Hitch and Wiring Harness took about 3 hours, and that was working slowly and includes all cleanup. I love the video (in fact, I stumbled across it the night before my car was scheduled at the Subaru dealer for the hitch install, and it prompted me to cancel my appointment and buy/install on my own - SO glad I did too - saved me over $400!). That said, I did make a few modifications to the process shown in the video.
I decided to access the frame holes from the top, as others have mentioned, rather than the bottom as shown in the video. This meant drilling through much softer metal, and cutting a hole in a place much less likely to be exposed to the elements. I had a whole saw bit (vs. step bit) so I opted for a new hole rather than expanding one of the existing holes. This also worked well because I was able to center the hole between the two "peek holes" giving fairly easy access to both the front and rear holes in the frame when snaking the bold leader cables through. That said, coming from the top did make this step harder than it would be from the bottom because the leaders are curved, and want to bend back in the direction they came from. This meant that they want to curve UP when you put them in from the top, but they need to go down. Since I had a partner in crime, it worked out alright, but it would have been very tough alone.
After the hitch was installed, I simply held the heat shield back up in place and marked where the front bolt hit it with my finder. Then I drilled a hole there with the same 1 1/8" hole bit, and it worked perfectly, leaving much more heat shield in place than if I had cut off the entire corner as seen in the video.i
* I originally ordered a 1 1/4" Hidden Hitch Mount (see below), which arrived in a smaller box. The box was clearly too narrow, and because it bulged out, it was ripped open and the metal was sticking out a bit. I had already ordered the 2" version at this time, and was returning this one, so I didn't open the box.
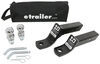
Product Review:Ordering from etrailer.com was great. Customer response from email was quick. The Hidden Hitch, Ball Mount Kit and the T-one Vehicle Wiring Harness all arrived within a few days. Installing the wiring harness was an easy plug in. The ball mounts are great, ready for any trailer tongue height. The hitch receiver did require an extra set of hands but everything lined up perfectly making installation easier.
I wanted a 2" hitch for my 2013 Subaru Outback.I was not looking for a specific manufacturer or model. I found etrailer.com via google results. I was very surprised to find as much information regarding installation of this hitch, including a detailed instructional video on installing the hitch on a 2011 Subaru Outback which is nearly identical to the 2013 model from a structural standpoint. I was completely impressed. Without this video, I probably would not have had the confidence to install the hitch myself, especially once I would have realized I had to drill holes in the frame of my brand new vehicle.
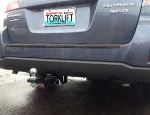
The hitch is sturdy and well built. It fits extremely well on my car. It does not stick out from under the rear fascia. In fact, just as the video shows, it is quite nicely recessed underneath. I probably would not be able to tell you the difference between the Hidden Hitch, the Curt or the Draw-Tite. I bought this hitch simply because of the incredibly accurate and helpful installation video.
The installation process took about 2 hours working solo. I am not extremely handy, but I can follow directions well. I probably would have been done sooner, but my hammer drill battery was not fully charged. It took me probably 40 minutes to drill two holes in the frame because I had to quick charge the drill battery several times. Installing the hitch was not difficult with one person. The Outback has nearly 9" of ground clearance, so I was able to slide under the car myself and align the hitch with the mounting bolts fairly easily. Also to note, the instructional video is installing on a 4 cylinder Outback, thus there is only one exhaust pipe and one heat shield to mess with. I have the 6 cylinder version so I had two mufflers and two heat shields to deal with. Instead of lowering the exhaust as the video shows, I removed the two mufflers by removing the two bolts on each muffler pipe about 8" from the actual muffler using a 14mm (I think) socket wrench. Doing so really opened up the underside of the car and made it very easy for the rest of the installation. I did not have any issues removing the rubber muffler hangers as some other reviewers mentioned. I simply sprayed them with some Tri-Flow lubricant and was able to remove them by hand. Perhaps this is because my car was fairly clean and fairly new.

Do you have a question about this Trailer Hitch?
Info for this part was:
At etrailer we provide the best information available about the products we sell. We take the quality of our information seriously so that you can get the right part the first time. Let us know if anything is missing or if you have any questions.


Thank you! Your comment has been submitted successfully. You should be able to view your question/comment here within a few days.
Error submitting comment. Please try again momentarily.