bing tracking image
  1. Trailer Brake Controller
  2. Draw-Tite
  3. Electric
  4. Time Delayed Controller
  5. Up to 2 Axles
  6. Plug-In
THIS ITEM IS NOT A FIT FOR
2004 Mini Cooper
etrailer Installation
We'll connect you with nearby partnered installers who know this exact setup.
Draw-Tite

Custom Fit Brake Controller Kit With 5100 | 7865

Part Number: DT256MR
$107.36
Trailer Brake Controller
Not Confirmed to Fit

2004 Mini Cooper

Will this fit?

To see if this custom-fit item will work for you please tell us what vehicle you'll use it with.

zoom in icon
slider vertical icon
zoom out icon
Comment field cannot be left empty.
Name field cannot be left empty.
By submitting this form, you understand and agree to our Terms of Sale, Website Terms of Use and Privacy Policy.

Thank you! Your comment has been submitted successfully. You should be able to view your question/comment here within a few days.

Error submitting comment. Please try again momentarily.

Product Images

In Use/Installed

etrailer Installation
We'll connect you with nearby partnered installers who know this exact setup.
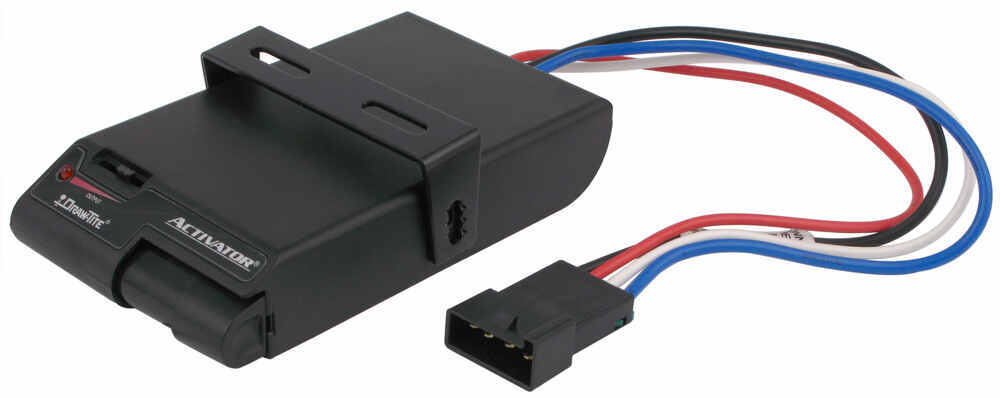
Electronic controller activates electric trailer brakes with a preset intensity when you apply the brakes in your vehicle. Power output and braking aggressiveness are easily adjustable to suit your preference. Great Prices for the best trailer brake controller from Draw-Tite. Custom Fit Brake Controller Kit With 5100 | 7865 part number DT256MR can be ordered online at etrailer.com or call 1-800-940-8924 for expert service.
  • All Info
  • Q & A (0)
  • Videos (11)
  • Photos

Draw-Tite Trailer Brake Controller - DT256MR

  • Electric
  • Time Delayed Controller
  • Up to 2 Axles
  • Plug-In
  • Under-Dash
  • Draw-Tite
  • Under-Dash Box
  • Single Trailer Only
  • Indicator Lights

Electronic controller activates electric trailer brakes with a preset intensity when you apply the brakes in your vehicle. Power output and braking aggressiveness are easily adjustable to suit your preference.


Features:

[NLA]BRAKE CONTROLLER - ACT 1:
  • Brake controller activates trailer brakes with preset intensity
    • Signal is sent to trailer brakes when tow vehicle's brakes are activated
  • Adjustable output control lets you determine the amount of braking force
    • Set to maximum when you travel through hilly terrain with a fully loaded trailer
    • Back off the power output when you tow a lightweight trailer
  • Sync setting lets you adjust the aggressiveness with which the brakes are activated
    • Get full power output faster by moving switch forward to increase activation speed
    • Achieve smoother braking by moving switch in opposite direction to supply power gradually
  • LED indicator on front of unit shows when trailer's brakes are applied
    • Light glows brighter as power output increases
  • Built-in, slide-bar manual override
  • Quick and easy installation
    • No need to mount level like proportional brake controllers
    • Mounting bracket, wiring harness and hardware included
    • Plug-in, vehicle-specific brake-control adapter can be used for certain applications to reduce installation time
    • Pulse preventer (5501) recommended for installation

[NLA]Pigtail Wiring Harness with Diode for Brake Controllers:
  • Harness lets you install your brake controller in another vehicle
    • Can also be used to replace a lost or damaged harness
  • Diode on red stoplamp wire prevents feedback while using manual override
    • Designed for vehicles that are sensitive to backfed circuits
  • Simple installation
    • Insert plug into the back of your brake controller
    • Hardwire pigtail end into your vehicle
  • Total length: 30"

Specs:

[NLA]BRAKE CONTROLLER - ACT 1:
  • Application: trailers with up to 2 axles (4 brake assemblies)
    • Designed for use with electric brakes only
  • Dimensions: 3" wide x 5-3/8" long x 1" tall
  • Limited 3-year warranty

5100 Draw-Tite Act I Time-Delay Trailer Brake Control

7865 Replacement Wiring Harness for Tekonsha Brake Controllers

Installation Details DT256MR Installation instructions


Video of Custom Fit Brake Controller Kit With 5100 | 7865
Video Thumbnail Video Player Dialog

Videos are provided as a guide only. Refer to manufacturer installation instructions and specs for complete information.


Video Transcript for Tekonsha Prodigy P3 Trailer Brake Controller with Adapter Installation - 2019 Toyota Highlander

Conor: Hey everybody, Conor here today at etrailer.com. We're going to be going over and showing you how to install the Tekonsha Prodigy P3 Trailer Brake Controller here on our 2019 Toyota Highlander. So our universal trailer brake controller install kit is going to do just what it sounds like with the title. It's going to allow us to install a trailer brake controller and tow a trailer with brakes using our Highlander here. So it is a universal kit so we're going to be able to use it on any vehicle, but it is going to be a perfect option here for this Highlander.It does come with everything we need for this process to install a brake controller. Some of these components are going to be the circuit breakers.

We're going to have the four and 7-way trailer connector adapter, and we're also going to have our bonded wire as well as any of the other connectors we need to make this possible. So what's really nice about this kit is that we're going to have both a four and 7-way trailer connector. So we have the 4-way on the side here when we're towing our smaller trailers without brakes and we're also going to have our 7-way over here when we do need to tow that larger trailer. And it's going to have an additional circuit for both the battery charge line, as well as the electric brake output.So our key here, it does come with this bracket, which attaches both of our trailer connector to another bracket on the vehicle here. So if you have the factory hitch on your Highlander, you're going to have this little bracket welded to the trailer hitch, that'll allow you to attach the bracket for the trailer connectors.

So that can get kind of confusing, but essentially there's going to be two brackets. The main bracket here for our trailer connector and then the bracket that allows us to attach our trailer connector to the trailer hitch.If you don't have a factory hitch, you have an aftermarket hitch. We actually sell some no-drill brackets that'll pretty much duplicate or mimic the same bracket we have here. They offer a no-drill design. They simply wrap around the crosstube on the trailer hitch and provide a connection point for our bracket here.

So in regards to install, this is definitely something you guys can do at home by ourselves. We really don't need any specialized tools and you really don't need to have a lot of mechanical know-how to be able to do this on your own.So as regards to the seven and 4-way, this is actually going to plug into a 4-way. So we're actually going to need one of these already on our vehicle. If you don't already have an existing 4-way, you can pick one of these up here at etrailer. We have tons of great plug and play options.

So this is the screen we're going to get when we have our trailer connected here. Now what we can do is we can go ahead and adjust our power. We can do this with the gain settings on the left-hand and right-hand side of the controller. So this is pretty much going to be geared towards our specific trailer and how much weight we have or how much we're hauling.We're going to be able to fine tune our brakes here. So we're not locking up our wheels or driving down the highway, but we're able to come to a smooth and clean stop with both the tow vehicle and trailer. And once we find the correct gain for our trailer, we can go ahead and hit okay. So the thing I really like about the P3 is that there's actually going to be five storable settings. Meaning we can go through that gain adjustment procedure and store this for five different trailers. So if we have multiple trailers, then the P3 is going to be the perfect option for you.So the P3 is going to be an excellent option here for a Toyota Highlander. It's actually one of the top brake controllers on the market and for good reason. It's been around a long time, it's well-reviewed and it's proven that it works great day in and day out. The P3 is a proportional brake controller. And what that means is it's going to apply brakes to our trailer in an amount proportional to that and the towed vehicle. So say we're on the highway, somebody cuts in front of us, we really need to slam on her brakes and slow both us and our trailer down. The vehicle is going to send a lot of braking force to our trailer in order to help to come to that stop.However, say we're just moseying around in town, we just need to come to a slow stop at a stoplight. We're not going to get that huge in rush of braking force to our trailer. We're just going to get a slow, steady current to help us come to a stop. So something else that P3 has that I really like. So say we're at the upper end of the towing capacity on our Highlander. So we really want those brakes, we're going to set our game pretty high, but there's also another feature that we can help to really get on the brakes sooner. And that's going to be the integrated boost settings.We're going to have three different boost settings here, which are really going to help those trailer brakes grab right away. So it is a proportional brake controller so we don't have to wait for that delay, but the boost feature is going to let you get that maximum power much sooner than you would normally. So if you want to turn on the boost settings, it's super easy to do so. This button in the upper right-hand corner allows you to select the first boost setting, the second, the third or you can turn it off altogether.So for those special occasions where we really need to get on the brakes really quick, we're going to have our manual override button here. It's a nice, easy-to-use slide lever on the bottom that'll send full power to the trailer's brakes. So as the P3 is a premium brake controller, you're going to get a little bit more finer details, which is the ability to adjust the color or the backlighting of our LED display as well as the brightness, which you can do here. We can also within these displays select our brake type. So that brings me to my next point about the P3 is that it's going to be a great option if you have a boat trailer with electric over hydraulic brakes.Because keep in mind, not all brake controllers are compatible with such. So if you do have that, the P3 is going to be an excellent option because you can effectively control those trailer brakes. Here we see the option for hydraulic, which means we can use this with electric over hydraulic brakes. But most of the applications are just going to be standard electric, so we'll make sure we're on that setting.So in summary, you really can't go wrong with the P3. As we said, it's really tried and true brake controller. It's going to work well for pretty much any vehicle and any trailer. We have tons of storable settings that we can use for different trailers, all sorts of features, such as the boost settings that are really going to help us take full control of our trailer.So the first step is going to be to go ahead and mount both of our trailer connectors here. Now we touched on this earlier, but if you have a factory hitch, there's going to be a bracket that we can utilize. But if not, you're going to need to pick up an additional no-drill bracket here through etrailer. So once we get our trailer connector mounted, we can go ahead and begin making a few of our connections.The first one we're going to do is going to be the 4-pole, which is going to come through these two adapters here. We have part of the 4-pole here and that's going to plug into the vehicle side 4-pole on the other side of here. Now, in order to keep those together in order to keep them from coming undone, we went ahead and used a zip tie to squeeze them as well as some electrical tape to make sure we seal the connection so we don't get any electrical issues caused by water getting in there.So the next thing we're going to do is go ahead and ground our white wire. As you can see here, we just have it ran through here. We used a self-tapping screw into the vehicle's body. We're going to have a few more wires. We should have three wires left, a black wire, which is for the battery charge line, a blue wire, which is for the brake output and then a yellow wire, which is for the reverse lights. So keep in mind, a lot of trailers don't actually have this reverse light circuit. So we just went ahead and taped that off, but then we're going to take our black and our blue wires and we're going to attach them to the gray duplex wire that comes in our kit. If we look up here, we can actually see that duplex wire.So the blue duplex wire has a white and a black wire. I attached the black wire from the duplex wire to the black wire from our trailer connector, and then the white wire from the duplex wire to the blue wire from our trailer connector. So once we have those connected to the duplex wire, we went ahead and ran the duplex wire all the way up to the front of the vehicle. We'll show you the path we took for this.So a little tip when you're installing your 4-way, there's actually going to be a nice little grommet here right behind the rear wheel well in this little pocket. We actually just cut a slit in that grommet and then it allows us to pass our trailer connector from inside the vehicle where the factory tow package port is, and run the wiring harness down to the plug for our four to 7-way adapter.So here's how we got the duplex wire to the front of the vehicle. I actually used the ring clamp here just to hold it from falling down. We have it ran along here and then I actually have it ran over the subframe here. So we have it ran all the way at the top of the sub frame. And I'll be able to show you where we came out over here, but we're going to come down in this pocket here, which is right between the subframe and our gas tank. And basically what I did is I have it ran over this bracket to secure it. And then my first zip tie is actually going to be down here.So basically the rest of this install or for the rest of the length that we're running this wire, we're going to be zip tying our duplex wire to some existing panels, some existing wires and cables to keep it from falling down. But we have it ran above this little black plastic panel here all the way up to the front of the vehicle. Now we didn't actually remove this panel completely. There's going to be some 10-millimeter screws on the outside. There's two or three of them that we removed so we could drop down the panel. And then we just ran the wire on top of this panel all the way up to the front here.So once we get to the front of the vehicle here, about the midway point on this black panel right around this area here, we're going to need to separate our black and white wires. Because the white wire, which if you remember, we attached it to the blue wire from our trailer connector. That's going to be for the brake output circuit, and that actually needs to be run inside the cab of the vehicle.Now we'll show you a grommet next to show you how we got that white wire up inside the vehicle. But the other wire, the black wire, that's the battery charge line circuit, that needs to go to the vehicle's battery. So we continue to run that wire actually all the way to the front. And you can see where it just comes out of our black panel here. We have a couple of zip ties and basically what I did from there is I went ahead and ran that wire all the way up into the engine bay, pulled it through, and we'll show you that a little later.So we're inside the vehicle here. We're directly underneath the driver's side floorboard. So the first thing you're going to have to do is you're going to have to take out, there's going to be two panels. We have a kick panel, which is actually combined with our threshold panel. We need to remove both of those. It's super simple to do so. There's just going to be some push fasteners along here. And then one little hand nut will loosen by hand on the inside there.But once we have those panels removed, we can go ahead and peel up some of this fabric and our carpet. In about under this area here, sort of directly below this carpet around this area, we're going to have a grommet. So I went ahead and removed that grommet and I just fed our white wire from underneath up through that grommet, and pulled it into the cab here. So this wire is going to be for the brake output. We're actually going to attach this directly to our brake controller, to the blue wire on our brake controller to be exact.So we're up here in the engine bay now and we can just barely see our black wires that we have it snaked back on the backside of the firewall up into the engine bay. We can see them tie here to the cooler reservoir line and we basically just have it ran the backside of our fuse box here. And now you're going to notice our two circuit breakers. So we're only going to focus on one now, which is going to be our 40 amp circuit breaker. So we have our black wire that came from the trailer connector, and it's going to be ran to the auxiliary post on our circuit breaker, which is this bottom one here. We're going to attach that with a ring terminal. Again, this comes in the kit.So the other terminal in our circuit breaker, this top one, which is copper, this is going to be labeled battery, and this actually needs to be run to the positive battery terminal. So we'll trace this back down here using our butt connectors coming along here. And we actually have it ran to the stud here on the positive battery terminal. So this is going to be a 10-millimeter socket it takes to remove this and we'll attach it with the larger ring clamps. So you're going to get two different size of ring clamps. We're going to get this larger stud ones, which we have here, and then the smaller stud ones, which go to the circuit breaker.So that'll finish up our connections for our trailer connectors, but there are a couple more things we still need to do. The next one is going to be power to our brake controller. So essentially we're going to be doing a similar process to how we just did it with the battery charge line. We're going to first start by mounting either our 20 or 30 amp circuit breaker. For our Highlander here, 20 amps should be fine. So we go ahead and mount our circuit breaker. The top one here is again to the battery.We'll just do the same thing we did with the other circuit breaker, we're route this wire down here and then attach it to this stud here, which is the positive terminal on our battery. And then the other stud here, which is the auxiliary. What this needs to do is this actually needs to be run inside the cab of our vehicle, because this is going to be responsible for powering our brake controller. So for this one, we went ahead and just trace the wire that we did for the battery charge line back down through here, and then back down into the engine bay and down up underneath.So we have our black wire here. What I did is I just went ahead and ran it through the same grommet that we used earlier for our white wire. We have to peel back some of the carpet and there's going to be a grommet we'll punch out, sort of in this general area here. But then we can pull the power wire for our brake controller up inside the vehicle. And now we have both the power and ground that will connect to our brake controller. So now we have our black wire inside the cap here, which is for the power to our brake controller. We have our white wire here, which is going to be for the brake output. This will go to the blue are on the back of our brake controller and now we're going to have two other wires.We're going to have to use a ground wire, which is usually the white wire in the back of the brake controller. And then the stoplight switch circuit, which is the red wire on the back of the brake controller. Now, in order to obtain a stoplight switch circuit on this vehicle here, we need to reach up under our dash here and on the brake pedal, we need to take off the pigtail that attaches to the brake pedal. So in order to access the pigtail to our brake pedal, we're going to have a little panel here that needs to come out. There's going to be one screw here and one screw over here. Pretty easy to take out.But once we get that panel off, we're basically just going to reach our hand up in here and directly above the brake pedal, you're going to see the pigtail. Now, we're not really going to be able to show you this because it's really far back up in there. So here's what that pigtail looks like. That's the connector we're going to be undoing. Now the tabs for it are up here. They're pretty hard to reach. We're really only going to be able to do it with one hand. But before we pull that down, you're going to have these two other clips here and here, which attached to bracket up there right where the pigtail is. We'll need to remove those so we can pull this down some.But the next thing we're going to do is we're going to go ahead and splice off or remove some of this jacket here so we can begin testing our wires, and we know which circuit we need to splice into. So with our red wire here connected to the cold side of the brake pedal, which is our stoplight switch. We have our other two wires. And then finally, we just run a ground anywhere to a bare metal surface. And that'll complete the four connections we need to install a brake controller of our choosing.We're going to take our actual controller and we're going to find a place to mount it. Now really the only restriction we have is it needs to be parallel to the direction of travel, meaning we can't have it crooked like this or crooked like that. It needs to be parallel. So you can see here, this location is probably going to be our best bet. It's not going to interfere with our knee too much, sort of going to be out of the way, but it's still going to be within reach for us to manipulate the controls.So what we're going to do now is we have two options for mounting. We can use the traditional bracket, which you see here that comes with the kit, it screws into the side. Or we can use this other mounting bracket that comes here. It's a little bit of a cleaner install fit. Installs like this. Pushes into position and then there's actually going to be another bracket here, a smaller bracket, which is what we drill into the dash most likely around there, and then we mount it to this bracket here. So let's go ahead and drill this bracket now then we can mount the controller.Now, keep in mind, we do need to check behind this panel first, before we drill into it to make sure we're not drilling into anything and damaging it. We do have our airbag right here so we want to use extra precaution. So now in our kit here, we're going to get these tiny screws. We can go ahead and attach our two brackets here using these screws. So now we can take the pigtail, keep in mind, we're going to be using the separate pigtail that's specific for these Toyota vehicles as there's an integrated diode. We don't want to use a pigtail that actually comes with the brake controller, but we can go ahead and out and connect it to our connections we've made.Now your wire colors may look a little bit different. We ran the black. This is for the battery. This is for the 12 volt battery. This is going to go to the black wire on our harness. So this one will be color to color. The rest, however, are not all color to color. It really just depends on what color wires you used when you ran your circuits. But we'll go ahead and splice that on. We use this thick white wire for the brake output circuit. So that's the one we're going to attach to the blue wire.Our other white wire here is for the ground. We actually just made a little ground here on the inside of this panel with the ring terminal. Go ahead and attach this. And then the final connection will be red to red, which is for the stoplight switch circuit. And there we have it. What I'm going to do next is I'm going to go ahead and tape up these connections here, then I'm going to tuck the wiring harness under the dash and we'll plug it into the back of the brake controller to make sure everything works.So now once we have our crimps made, we have the two harnesses spliced together. All we did was route the wire up and along the top side of this panel here and to the back of our brake controller. Now, once we plug it into our brake controller, we should get this screen here, which lights up and lets us know everything was done correctly. So now with everything hooked up, we can begin testing all our circuits to make sure they're active. We're going to be using these little plug-in testers. We do sell these here at etrailer. If you have your trailer with you, you can use that as well. Just keep in mind, these testers are going to be preferred since they allow you to isolate an issue, a potential issue between the vehicle or trailer.So we have our running lights on already. As you can see, the lights on both testers are illuminated. Now we're going to do our brakes, our left turn, our right turn. So now that we've verified all the signals are working, let's go ahead and test the battery charge line and the brake output. As we can see, the battery charge line is going to be a constant on because it's wired directly to the battery. Let's go ahead and test our brake output circuit with our brake controller now. So there we go. Now we know everything's working correctly.And that will do it today for our look and installation of the Tekonsha Prodigy P3 Trailer Brake Controller here on our 2019 Toyota Highlander..

Ratings & Reviews

4.8

320 reviews
5 Stars
(269)
4 Stars
(39)
3 Stars
(5)
2 Stars
(6)
1 Star
(1)
Review Sort Icon
by:
2006 Chevrolet Suburban
I have to say..... installation was super easy!!! Installed this in an 06 Chevy Suburban, to pull our camper.
Kyle I. profile picture

Kyle I.

3/27/2018

No complaints!

by:
2019 Ford Ranger
Installed on a 2019 Ford Ranger with factory 4 pin connector, no tow package.
To save others time here is what i found out while trying to wire this in. Disconnect the negative battery or you may blow 2 fuses while doing this.
There should be 4 wires under the dash bundled together with heat shrink on them.
They will be Blue, Yellow with Red tracer, White, and Purple with White tracer.
Blue is trailer brakes, Yellow/red is batt+, White is ground, Purple/White is brake light switch.
by:
2016 GMC Sierra 1500
Not only did my packages arrive in a timely manner, but George kept me posted ont their progress every mile of the way. When I got the brake controller, it was everything the said it would be, and along with my final email from etrailer was a link to instructions for installing it and another link to questions and answers about the product and the installation process. How could anyone possibly ask for more. Thank you George, and thank you etrailer.
Garth C. profile picture

Garth C.

1/19/2019

Its been a year since I received and installed this braking system. Ive used it may times and it works perfectly. Easy to install and easy to use and affordable you cant beat it. I highly recommend, even though I know you can bet much fancier and more expensive items, you probably dont need fancier and more expensive when this fairly inexpensive item does the trick.

by:
2000 Dodge Ram Pickup
Super easy installation since my truck was pre-wired. Trailer brakes work as they should. Very good product.
by:
got this so I could tow my tiny home ! both pieces fit perfectly , had it installed and dialed in in what seemed like less than 10 mins , very happy with the whole experience here at etrailer. I will use them again!!
by:
It took longer that it should have to connect the controller, but I was being very careful, I would check and then double check to make sure everything was alright. I wanted to do a nice clean job so I took my time.
The hardest part was making sure I had the right wire connected for the brake signal to the controller, but even that was not difficult to do.
I took some pictures of when I started a task and the end result. I will probably move the controller from the ash tray area at a later date, but for now it is fine where it's at since I don't smoke and I don't let anyone else smoke in my truck.
by:
Its works good, it depends on how much towing you do but they can go bad. My trailer has 2 axles so it may be too much for this unit to handle
Rachael H. profile picture
Etrailer Expert

Rachael H.

11/13/2017

Thanks for the feedback Francis, this brake controller is rated use with up to 2 axles.

Francis profile picture

Francis

11/12/2018

There still working

by:
2006 Chevrolet Silverado
I LIKE HOW YOU DO BUSINESS.

Did have one issue, I must have overlooked the fact i needed the wiring harness from the controller to my truck. Not sure how i missed this during my ordering process. 2006 Chevrolet Silverado Truck
Heather A. profile picture
Etrailer Expert

Heather A.

6/6/2018

For your 2006 Chevrolet Silverado truck you will need part # 3015-P. This Tekonsha Plug-In Wiring Adapter plugs into the back of the activator brake controller and the other end plugs in under the dash. 3015-P will be the only part you need if your Silverado has a factory 7-way. If your vehicle did not come equipped with the factory 7-way plug you will need one of two parts. If the Silverado has a bundle of wires above the spare tire you will need to wire in part # PK11898 to finish the wiring. If the Silverado has a round plug with a cap then you will need part # 30955 that will plug into the existing plug, giving you a 7 way connection.

by:
nice product and easy installation and thank u jean 4 your help on customer services the video was veryyyyyyyyyyy helpful
M.m profile picture

M.m

8/19/2015

still working and easy to adjust your brakes to tt

by:
2014 Kia Sedona
Brake controller (5100) seems to be operating as wanted, no complaints, glad I got it. Installation was pretty simple, first time always takes longer because some of us like to double check the connections, and there is always a little hesitation about placement. But any real problems are solved by a simple contact with someone at etrailer anxious to help and put your mind at ease. I have not had any problems with the several etrailer purchases I have made. My Vehicle is a 2014 KIA Sedona and I pull a Casita with it. I bought the receiver hitch, brake controller, air suspension enhancement, and maybe 1 or 2 other things. All good. Great people to deal with.
by:
2008 Chevrolet Tahoe
This electric brake controller was just what I needed for my 2008 Tahoe. The videos and info on the etrailer website were a great help in locating the wires I needed to hook up. In addition to the DrawTite 5100 I bought a 20127 cable so that I can easily removed the brake controller should I ever want to. I mounted my brake controller on the left side just above the parking brake pedal. There is a single screw on the underside of the dash there that I was able to use without having to drill any holes. Being able to reach down with my left hand to squeeze the braking button seemed more ergonomic to me than doing it with my right hand and a right hand location didn't have as good a visibility.
by:
2012 Ford F-150
This product is everything I needed for the tandem Car Hauler I purchased to pull with my 2012 F-150. Etrailer.com was very helpful and responsive to my order. all in all a very pleasant experience.
Thank you..
Mac C. profile picture

Mac C.

3/12/2015

Thanks Pat I have had very good success with this Brake Controller it works as expected Very good Thanks.

by:
I was replacing my brake controller with the same one. The previous one was used for two different popup campers and was giving me trouble. The one I bought from etrailer worked as good as the old one . I am very pleased with my purchase. I would also like to tell you I had purchased an entire brake replacement from etrailer and was very satisfied with parts and the videos you provided to install the parts . I have recommended your site to friends when they need trailer parts!
by:
I bought trailer hitch, break controller and universal install kit was very easy to install
works great stopping my 16' trailer full of tools without pushing my truck through intersections great product and would recommend etrailer.com for any needs of this kind
by:
1997 Dodge Ram Pickup
My trailer brake controller has worked flawlessly since the day I installed it . Installation was a breeze,just plug it in and go . We have pulled multiple trailers with no problems at all .easy to adjust braking pressure for any load situation you may encounter. etrailer. Knows what they are doing . Easy to deal with and eager to help in any way .pleasure doing business with you guys .will come to them for all of our trailer needs .sincerely, Richard Vaughn ,oklahoma
by:
Although I replaced my Activator II with an Activator; both units ended up being fine....

After replacing the Activator II, after further troubleshooting, I found that I had two independent problems.
1. The brake power wire (blue) was corroded in the truck outlet 7 way receptacle; which I replaced.

2. The actuator brake activation wire (red) was no longer
getting power out of the trailer wiring plug unit located under the dash. This was resolved but cutting that wire near the harness plug, and splicing it with the cold side of the brake pedal unit’s brake light wire (white).

Your wiring diagrams on the subject proved very helpful in the solution.....


by:
We purchased a wiring kit with trailer brake. Kit wired into existing wiring with out cutting and splicing my existing wires. Pulled trailer several times and very happy with the results. Tanks Adrianne for your help.
by:
way to go. There prices even with shipping are about the same, if not cheaper, than a brick and mortar store with a lot more to choose from. Shipping was very fast and everything installed and worked in about 15 minutes. That being said, I'm not real impressed with the brake controller. It's about as basic as it gets. No numerical output reading, just a little red light that is supposed to get brighter the harder you push your brakes. Kind of hard to tell when the sun is out. It does work, and if bare bones is what you want, this would probably work for you. I will be calling or emailing to see about an exchange. I would rather spend an extra $10-20 and get something a little nicer. Will let you know how that goes.
by:
This my third one of these controllers. Nice and simple. Good quality.
by:
2010 Nissan Titan
needed a brake controller for my nissan titan to use the electric brakes on my 33 ft travel trailer. Install was easy, took about 10 mins to read instructions and install in truck. Brake controller works great and comes in a small size so it dont get in they way of leg space under dash. Also like it can be installed in any position unlike others that have to be level to work.
by:
a couple no drill hitches, no ordering problem and as it says no drill!
Brake controller was plug and play!
shipping was as they stated time wise . I will definitely order again !
by:
I've been using this model brake controller since the 1990's....It's simple to install, and operate. It is very slender, so it doesn't take up much room. I currently have 3 vehicles with this unit installed, and they easily handle the 2 and 3 axle trailers I own.
by:
2017 Ford F-350 Super Duty
This was a replacement for my old electric brake on my F350 Ford truck which pulls my 3 horse Featherlite trailer. The old brake went out after 17 years. Assistance from etrailer was excellent on the replacement. Plug n play as advertised. Easy installation and works well.
by:
This controller worked perfectly for my situation, the install was super easy, the entire install took 15 minutes, the hardest part was finding the wiring harness under the dash. The slide dial for more or less braking power was so easy to dial in and the manual slide bar was easy and convenient. I would definitely recommend this product to anyone who tows an rv or trailer with electric brakes
by:
I received the brake controller and wiring harness. took about 10 minutes to install. It works great. would highly recommend these products to any one that is in need of a good, easy to install controller for their trailer that works just fine.
25
320
true
Show More Reviews

See what our Experts say about this Draw-Tite Trailer Brake Controller

  • Can 2006 Ford F-350 with Integrated Brake Controller be Bypassed with Aftermarket
    I spoke with my contact at Tekonsha and he stated that there are two ways that you can install an aftermarket brake controller in a 2006 Ford F-350 with an integrated brake controller. The first way is to hardwire in the controller. The white wire goes to the negative battery terminal, the black wire to the positive battery terminal via a 20 or 30 amp circuit breaker, # 9506P. The red wire connects to the circuit on the brake switch that shows a signal on a circuit tester like, # PTW2993,...
    view full answer...
  • Trailer Brake Controller Wont Light Up and Trailer Brakes Do Not Work Even with Manual Override
    When a brake controller like your Draw-Tite Activator # 5100 does not light up to indicate that is senses a connected trailer, then often the problem is in either the vehicle-side or trailer-side connectors. Since the manual override does not activate the brakes then we know there is a problem with the output signal reaching the trailer. First, check both the vehicle socket and the trailer plug for signs of corrosion (even slight green or white discoloration) on the electrical contact...
    view full answer...
    Image 1 for
  • Brake Controller Installation on 1998 Chevy Suburban
    GM did not start using the port under the dash until the 1999 model year. You will need to hardwire the controller into the existing vehicle wiring. Depending on what the tow package on your vehicle included, some of the wiring might be in place. Does the Suburban already have a trailer connector? If so, is it a 4-pole or a 7-Way? GM typically ran a blue and an orange wire from the rear of the vehicle up to the engine bay that terminates under the brake booster. In a 12 year old vehicle,...
    view full answer...
  • Parts Needed to Install a Voyager Brake Controller in a 2006 Toyota Tacoma
    A brake controller will have to be hardwired to your 2006 Toyota Tacoma. On the brake controller the white wire is ground and will need to be connected to the negative battery terminal. No other ground location will work. The black wire is 12 volt power and will connect to the positive battery terminal via a 30 amp circuit breaker. Blue is output to the trailer brakes. Red is input from the brake switch. If your Tacoma does not already have a trailer connector you will start by adding...
    view full answer...
  • Trailer Wiring Harness Needed to Add 7-Way Connector to 2019 Toyota Highlander
    When it comes to supplying power to the brake lights to your trailer your 2019 Toyota Highlander actually has an existing connector so you don't have to splice into the OEM wiring on your vehicle. To add a 4-Way connector for your basic trailer lights you either need the T-Connector Kit # 56042 if you have the factory tow package or the T-Connector Kit # C56217 if you don't have the factory tow package. If you're referring to controlling the brakes on your trailer then you will actually...
    view full answer...
  • How to Install a 7-way and Brake Controller on a 2022 Toyota Highlander
    The first thing you will need to do to get a 7-way and brake controller installed on your 2022 Toyota Highlander is to get a 4-way connector. The T-One Vehicle Wiring Harness with 4-Pole Flat # TK99FR will be plug directly into existing wiring located behind the trim panel near the driver's side rear seat belt bracket. You will have to pull back the side trim panel to access this harness. You will then want to use the 7-Way RV Upgrade Kit for Trailer Brake Controller Installation # ETBC7...
    view full answer...
  • Installing 7-Way Trailer Connector on 2019 Toyota Highlander Hybrid
    The particular parts you need to install a fully-functioning 7-Way on your 2019 Toyota Highlander Hybrid will depend on what exactly it's already equipped with. Either way you will need to start by adding a 4-Way connector harness. If your Highlander has the factory tow package I recommend the Curt T-Connector # 56042. If it does not have the tow package you will want the Curt T-Connector # C56217 instead. Both custom harnesses install by simply plugging into existing ports on the Highlander...
    view full answer...
  • Installing 7-Way Trailer Connector on 2019 Ford Ranger With Existing 4-Pole
    The Tekonsha # 22124 wiring harness would plug inline at the point where your exisitng 4-pole plugs into the factory harness. Once installed, you will have a functional 7-way, and will still retain a functional 4-pole. If the trailer you're planning on towing has brakes, you'll need a functioning brake controller to actuate them. I really like the Brake EVN, part # TK63VR. The i-Command is reasonably priced and easy to use. You'll also need the # 7865 diode wiring pigtail. The tow package...
    view full answer...
  • Solution for Trailer Brake Controller Causing ABS Error Message on 2015 Toyota 4Runner
    The issue you described when using a brake controller isn't too uncommon on certain late model Toyota vehicles like your 2015 4Runner. These particular vehicles are more sensitive to the controller's red wire backfeeding to the stop light switch, which is what triggers the ABS error message. The only way to prevent this is to use the a diode with the harness and the Pigtail Harness # 7865 that you mentioned offers a perfect solution as it features a diode on the red wire. The Plug-In...
    view full answer...
  • How To Find Stop Light Switch Wire On 2019 Toyota Highlander for Trailer Brake Controller
    The stop light switch circuit on a 2019 Toyota Highlander which will be needed to install a brake controller like the Tekonsha Prodigy P3 Trailer Brake Controller part # 90195 can be found by testing the bundle of wires attached to the brake pedal. The one you're looking for should only have power while the pedal is depressed. We don't have access to wire color info. Please note, you will also need the Pigtail Wiring Harness with Diode for Tekonsha and Draw-Tite Brake Controllers part #...
    view full answer...
  • ABS Error Warning Light on 2018 Toyota Highlander When Installing Trailer Brake Controller
    In order to prevent the ABS error on a 2018 Toyota Highlander when hooking up a trailer brake controller to the stop light switch circuit you need the Pigtail Wiring Harness with Diode for Tekonsha and Draw-Tite Brake Controllers part # 7865 which has an in-line diode to prevent the error. This harness is designed for use with Reese, Tekonsha, and Draw-Tite trailer brake controller such as the Tekonsha Primus IQ Trailer Brake Controller part # TK90160 which is what I recommend.
    view full answer...
  • Attaching Brake Controller Install Harness 7865 to Tekonsha Voyager
    You'd just have to cut the connector your Voyager has now off so that you can hardwire the # 7865 to it matching color for color since yours was already cut and wired. We don't have a harness that fits to factory wiring of your vehicle.
    view full answer...
  • Why Is Pigtail Wiring Harness with Diode for Brake Controllers Required for a 2019 Toyota Highlander
    The Pigtail Wiring Harness with Diode for Tekonsha and Draw-Tite Brake Controllers part # 7865 is required for a 2019 Toyota Highlander no matter which trailer connector or brake controller you're using as the diode is on the stop light switch connection which splices into the vehicle's brake pedal. This connection is independent of the harness or controller. The Tekonsha Prodigy P2 Trailer Brake Controller part # 90885 and Tekonsha OEM Replacement Vehicle Wiring Harness part # 22119 are...
    view full answer...
  • Solution For Brake Controller EBS/Error Message On 2020 Toyota 4Runner
    This is a common issue I've seen in many different Toyota 4Runners as they seem to be more sensitive to backfeeding from the red wire of the brake controller to the stop light switch. This causes the issue you're seeing, triggering the ABS error message. You are correct when thinking that a diode will prevent this from happening but the Tekonsha 3041-P harness does not feature a diode in the red wire; the harness you need is the # 7865.
    view full answer...
  • Brake Controller Causes Brake and ABS Dashboard Troubleshooting
    The issue you described when using a brake controller isn't too uncommon on certain late model Toyota vehicles like your 2016 4Runner. These particular vehicles are more sensitive to the controller's red wire backfeeding to the stop light switch, which is what triggers the ABS error message. The only way to prevent this is to use the a diode with the harness and the Pigtail Harness # 7865 offers a perfect solution as it features a diode on the red wire. So you'd plug this into the back...
    view full answer...
  • Brake Controller that Works with Emergency Braking of 2019 Ford Ranger
    I have a similar brake controller solution that does work with the emergency braking system of your 2019 Ford Ranger with the P2 part # 90885 and the diode kit part # 7865 but Redarc doesn't have a diode kit yet to allow the Tow Pro Elite part # RED44FR to work. This controller will work a lot better than any OEM controller for sure.
    view full answer...
  • Wiring Needed To Install A Tekonsha Trailer Brake Controller On A 1991 Ford F-450 Cab & Chassis
    If you have a Tekonsha Trailer Brake Controller like # 90885, trailer wiring is needed and you found a good universal 7 pole wiring kit # ETBC7. Once that is installed you can install your Tekonsha Brake controller. If you bought the Prodigy P2 it should have came with the # 7865 connector, but if not the # 7865 is what you need. I've included a bunch of videos for you to watch to help with the install!
    view full answer...
  • Brake Controller Installation 2017 Nissan Rogue
    You're looking for a light green wire, exiting terminal # 2 of the stoplight switch connector. Tekonsha also recommends using the # 7865 pigtail on your vehicle, rather than the one included with the controller. The pigtail has a diode in it to prevent anything from feeding back into the vehicle.
    view full answer...
  • Recommended Trailer Brake Controller and Weight Distribution Hitch For 2017 Toyota Highlander
    I would be happy to help! Starting with the trailer brake controller you will need to first have a 7-way trailer connector installed on your 2017 Toyota Highlander XLE. If you do not you can add one using the Tekonsha OEM Replacement Vehicle Wiring Harness w Brake Controller Adapter - 7 Way Trailer Connector # 22119. When we did this install we use no-drill mounting bracket # 18136 to mount the 7-way to the trailer hitch receiver. For a trailer brake controller I recommend the Tekonsha...
    view full answer...
  • What Hitch, Wiring, and Brake Controller do You Recommend for My 2022 Toyota Highlander Limited?
    For a great hitch for your 2022 Toyota Highlander Limited without a factory tow package, I recommend the Curt Hitch Receiver - 2" # C99FR. The Curt hitch is compatible with your Limited model and comes with all mounting hardware required for a bolt-on installation. As far as weight capacity, the hitch has a 500 pound maximum tongue weight and a 5,000 pound gross towing rating. In order to confirm whether your vehicle can accommodate this much weight, I recommend confirming your vehicle's...
    view full answer...
  • Does 2018 Toyota Highlander Computer Need to be Reprogrammed When Installing Brake Controller
    The computer system for your 2018 Toyota Highlander will not need to be flashed/reprogrammed to install the Tekonsha Prodigy P2 Brake Controller # 90885 using the Wiring Kit # ETBC7 and Pigtail Harness # 7865 for installation. If your Highlander doesn't already have a 4-Way trailer connector installed, you will need to first add this as well using the Tekonsha T-One # 118449 if the Highlander doesn't have the factory tow package or the Curt # 56042 if it does have the factory tow package....
    view full answer...
  • Parts Needed To Install Draw-Tite I-Stop IQ In 2021 Toyota Highlander.
    I am happy to help! You are correct that your 2021 Toyota Highlander does not have a factory trailer brake controller port, so you will need to use Pigtail Wiring Harness with Diode for Tekonsha and Draw-Tite Brake Controllers # 7865. The Tekonsha Primus IQ Trailer Brake Controller - 1 to 3 Axles - Proportional # TK90160 you mentioned is the exact same controller as the Draw-Tite I-Stop IQ and will require a 20 amp circuit breaker on the power wire for the controller. The # ETBC7 includes...
    view full answer...
  • Brake Controller Installation on 2018 Toyota Highlander
    You'll need to choose a brake controller and the # ETBC7 brake controller installation kit. The install kit includes an adapter to convert the 4 pole you recently installed to a 7-way. I'd recommend a proportional controller like the Tekonsha Primus, part # TK90160. Your Highlander is very sensitive to power feeding back into the brake lamp circuit, so instead of the pigtail included with the Primus, you'd need to use the # 7865 which has a diode installed on the brake lamp circuit to...
    view full answer...
  • Recommendation for Installing Draw-Tite Brake Controller in 2018 Ford F-550XL Truck
    If the 2018 F550 Cab and Chassis has a factory 7-way on it, then you will be able to simply use wiring harness # 22292 to work with the Draw-Tite Activator IV # 5504. If you have the factory 4-way flat, then you will use that same harness, but will also use # 37185 to connect to the vehicle's tow package wires found along the rear frame rail. If it does not have any wiring, then you will need # 18252 to add the 4-way and then use # ETBC7 to complete the wiring for your controller which...
    view full answer...
  • Pigtail With Inline Diode Needed for Brake Controller Installation on 2018 Toyota Highlander
    Yes it is. You'll need the # 7865 pigtail that has the diode in the brake stop lamp switch circuit to prevent the controller from feeding back into the vehicle wiring. To install the Tekonsha P3 # 90195 on your 2018 Highlander, you'll also need the # ETBC7 install kit. If your Highlander doesn't already have a 4-pole trailer wiring harness, you'll need to install one using part # 118449. I've linked to install videos for the brake controller and for the wiring harness.
    view full answer...
  • Where To Mount Tekonsha Prodigy P3 Trailer Brake Controller On 2021 Toyota Highlander
    In regards to installing the Tekonsha Prodigy P3 Trailer Brake Controller part # 90195 on a 2021 Toyota Highlander you will first need the Pigtail Wiring Harness with Diode for Tekonsha and Draw-Tite Brake Controllers part # 7865. Then you'll find a place to mount the controller. I have attached a video to show where I mounted the controller. It must be right-side up and not on its side.
    view full answer...
  • Parts Needed To Install A Brake Controller On A 2022 Toyota Highlander Without Factory Tow Package
    On most vehicles that did not include a factory towing package, they do need to start with a 4-Flat wiring harness. This gives a 7-Way plug something to piggyback off of. However, we have the Tekonsha OEM Replacement Vehicle Wiring Harness w Brake Controller Adapter # TK57VR that is specifically designed to get a 7-Way added to your 2022 Toyota Highlander without needing a 4-Flat to start with. It has everything you need to get the lights, power, and brake controller hooked up and running...
    view full answer...
  • Parts Needed To Install Tekonsha Prodigy P3 90195 In 2016 Toyota Highlander 7-way Connector
    I would be happy to help! It sounds like you have a 7-way connector installed on your 2016 Toyota Highlander that does not have all of the functions connected. If that is the case then you will need the # 10-2-1 and # 5506. One wire from the # 10-2-1 will run from the 7-way connector to the the positive terminal of the battery with 40 amp circuit breaker included with the # 5506, and the other wire of the # 10-2-1 will run from the 7-way connector to where the trailer brake controller...
    view full answer...

Do you have a question about this Trailer Brake Controller?


Info for this part was:

Employee Lindsey S
Edited by:
Lindsey S
Employee Alex H
Written by:
Alex H

At etrailer we provide the best information available about the products we sell. We take the quality of our information seriously so that you can get the right part the first time. Let us know if anything is missing or if you have any questions.


Product Experts Available Now!
Call 1-800-940-8924