Thank you! Your comment has been submitted successfully. You should be able to view your question/comment here within a few days.
Error submitting comment. Please try again momentarily.
Inner Diameter | Outer Diameter | Use with: |
---|---|---|
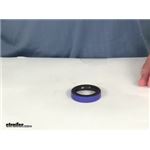
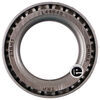
1.4" | 1.9" | Unique BT Hubs |
Seal Cross Reference | ||||
---|---|---|---|---|
Dexter # | Transcom # | National # | NOK # | Chicago Rawhide # |
- | 13194TB | - | AB1990EO | - |
Videos are provided as a guide only. Refer to manufacturer installation instructions and specs for complete information.
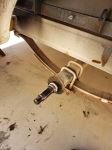
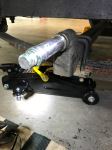
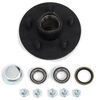
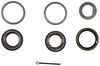
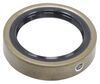
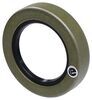
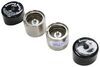
Speaker 1: Today we're going to take you through the rebuild process on a couple of hubs. We've got an idler hub, and here we've got a hub and drum assembly. Works with electric rigs, but this can also work for just standard discs, if you've got a disc brake style setup.Basically what we're going to show you is how to get all of the bearings out. How to remove the seal. How to remove the race's if they're damaged, then get them replaced in the proper manner. We'll show you how to use an easy loop hub, which we have here.The first thing we are going to need to do is, get the grease cap off the end.
It can have either a rubber plug in it like this one does, or it can be a solid metal cap.These are pressed fit in there, basically by tapping on them on the back side. To remove them, a deadbolt hammer is typically what we're going to use. We're just going to start tapping as we go around. You'll see a little separation start right here, and slowly it'll work it's way off.Now the next step's going to vary a little bit depending on your axle setup. Do you see this is going to have a keeper that goes around the nut.
And that prevents that from being backed off, or removed. A lot of times you'll have a castle nut, which will have just little tabs that stick off, and there will be a cotter pin that passes through it. Just depending on your application, you need to get the keeper for the nut off. This style we just kind of pry out. A cotter pin you would just remove of course.Once we have that off ...
We'll start to take off the nut here, and the washer that's in behind it. Now yours should look a whole lot more dirty than this. There should be a lot of grease packed in, and through the hub, this one's brand new. We thought it'd be nice to show you the components before the grease was on .. Of our washer that comes off.And then here we're going to have our outer bearing.
Continue to pull that. We're gonig to have our inner bearing here. That sits in the backside of the hub. And we didn't put it in yet, we will show you how to put it in. But a seal would typically be covering the backside here. We'll show you how to use a seal removal tool, or another tool. To get that pried up and out. To get an access to that inner bearing.Now for a drum style like this, that process for disassembly is going to be just the same. One thing to keep in mind if you're using a disc brake setup. You'll have to remove the caliper before the disc is going to come off.Now once we have the spindle exposed, as we said this is going to be really greasy. We want to get all the grease removed, and the first thing we'll do is inspect it. We want to make sure that it looks just like what we have here. Everything's nice and smooth. We don't see any kind of discoloration, or any marring on the metal. Indicating that our bearing's got hot.If you do have any of those symptoms, at this point it's time to replace those bearings. You don't want to repack them. Get new bearings, and put in there. You might have a bearing that's come apart in here. Another surface to ensure is in good condition, is where your seal is going to go. That helps seal all the grease inside of our hub. With a damaged or broken seal, that grease is going to seep out. Either out of the hub, or in this case into our brake assembly.Now if your axle has brakes, we're also going to check the disc. Make sure it doesn't have any issues, or your hub. And this is going to be a hub and drum assembly. The brakes are going to ride on this machine surface. You're going to check that for signs of excessive heat, discoloration, or cracking. And this is our magnet surface. We'll check that surface for the same issues.Now inside the hub regardless if it's a disc brake, it's a drum brake like this. Or just a standard idler style hub. You're going to have an outer race. Would be right here, it's a small tapered piece of metal your bearing sits in, and rotates on. That's basically the outer portion of the bearing.You have the same thing here on the backside. This is called the inner race. Now if those show any signs of wear, overheating, or cracking. Those are also something we'll need to replace, which we'll show you how to do in just a minute.Now, with your brake assembly exposed, if you do have electric brakes like we have here. It's a good idea to check all the components for wear, cracking, maybe missing pieces. Check your pad thickness to make sure those are in good shape. Basically if you have a non working brake assembly and you put everything back together, you're just going to have to take it apart and do it all over again to get back to the brake assembly. This gives you a really good option to be able to change them out.And most applications are going to use a four, or maybe a five bolt flange to hold them in place. And you'll just remove the lock nuts, or sometimes you'll have a hex nut with a lock washer. You want to remove those, and then simply slide your assembly off after you cut the wiring.The friction material itself should also be checked for any kinds of cracking, or overheating. If you have any grease inside the system at all, it's likely it's gotten on those pads. It's a good idea to get those changed. Now as far as the removal of the races go, it's going to be just the same whether we're using an idler style hub like we have here. A drum brake like we have here. You can basically see where the idler is, here in the middle of the hub. It's going to go all the way around there, and we just have this extra material here to provide our braking surface.Now if you're doing a disc brake style job again, it's going to be just the same here with the races living inside of the actual hub portion. You'll just have the discs there for the brakes to make contact. We're going to use this little bit smaller one, it's a little bit easier to manage to show you how to get these out. We've talked about where the races are. The outer here, the inner being closer to the inside, but on the backside of the race there's a little lip. That lip's meant to stick out just a little bit further than the hub, and provide us an area to put our tool on, and help to drive that out.If you look all the way through there on that inner race, you'll see that little lip that sticks out just from the hub slightly, and it gives us enough area to use our tool on. Now generally to remove these you're going to use a punch, similar to this. Some guys will use a screwdriver. Or a piece of pipe. If you have a piece of pipe that's small enough to fit inside of that diameter, you can take that down through and allow it to rest on that lip.Use our punch, and then just need a hammer. And we'll start working that out. We're going to tap all the way around. Kind of equally, and evenly apply the force to get it to come on out of the bottom for us.You can see now as it starts to come out there's going to be a little gap created between the hub and the race. And we can just keep going, bringing it on out. Then you can inspect the inside of the hub surface there. Make sure no damage or anything has occurred, and repeat that same process for the outer race if you plan on removing and replacing that one.Now in the outer flat edge, you can see we're going to have our tapered edge on this side. If we roll our race over to the flat side, typically there's going to be a manufacturers part number on there. That will help you identify which race it is, that you need to go back in your system. If those are rubbed off, worn off, if you can't read them. You can measure the outside, to outside diameter of the race here. It's a good idea to use a micrometer to get it exact.Now here's your basic micrometer. And again, the outside of the race is what we're going to need to measure. You want to go . I set the thickest point there. Looks like this one's going to be about 1.98. That's going to be the measurement you'll want to supply.Now while we've got this out, let's also look at the proper way to measure our bearing. Instead of the outside for the bearing, we need to measure the inside diameter. That's going to be pretty simple. Let's pull that out, find the largest measurement we can. Which here, looks like it's going to be 1.03. With that information, we'll be able to get the correct bearing, and the correct race, so they'll fit together properly and make a full bearing kit for us.Now here's the race, we're going to show you how to get this put back in. Basically just going to press fit inside of our hubs. We need to get it down on there. Kind of like that. And you'll have a couple options. A lot of times you're going to see do it yourself or at homer, just going to use a wooden block. Just place it on there. That's going to get you started, but at that point you'll struggle in getting it to go all the way down into it's seat.Now to take care of that problem, there are several seal drivers that are available. Seal and race drivers that are available out there on the market. It's designed to fit down inside of our race, inside of our hub and get it down there where it needs to go. This is part number ptw83020, has several different sizes, even if you have multiple trailers it's going to do the job.Now the side with the angle on it, is designed to fit down inside of our race. If we use the other side, that's going to be for driving your seal into place. Just want to hold it, and take it on in with your hammer. You'll see, you just want to insure that our race is all the way up against that line on the hub where it's supposed to mate to.Now when it comes time to pack your bearings you're going to have several different ways of doing this. You can just use your hand, is the traditional method. That's going to be the method probably reserved for the very occasional trailer work kind of situation. If you do it once or twice a year, probably get away with it that way.Next you would go to a, kind of a sandwich funnel style almost. If you look inside of there, you can see the bearing. It's located between the two pieces. Just use a grease gun. Start filling that with grease, and that's going to fill our bearing for us. And the third, with this one you're just going to place your bearing down and in. It should be pretty close to center. And then we've got our cone her that's going to go down and secure that.Now I think this style, wastes a little bit more grease than what this style will. This has a dust cap. You can see, you can keep your grease in there, put your dust cap on there and save it for later use. This will be if your going to do it every couple years. And this particular style would be if you're a more regular user.Let's start by showing you how to use a bearing packer. Similar to this. Again, we've just got our grease inaudible 00:11:07 here on the top. And then just slowly start to fill it. Now I like this style quite a bit. I think even regular users might enjoy it, because you can get a really quick visual look at that bearing. You're not going to have to overdo it, or have to much grease.You can kind of see in there now, we're starting to get grease to come out of it. Couple more pumps, we'll be good. You can see we've got grease coming out all the way around. Where all of our bearings are. Got a little bit of excess there. Just take that around the outside of it. And then we should be able to lift it off. And now you can see what we we're talking about. Just a little bit of excess there, that you're just going to wind up wasting.Now we'll take our bearing, we're going to place it right down in our race. And then we'll cap off the back with our seal. Right now our seal's going to fit in just like our race did. It's going to have a little bit of a pressure fit to it. Now very often in this situation, I see people using the four by four method. Kind of here, just placing that on and tapping it. As an option though, if you do have one of these. You can see that's designed to fit right on the top of the seal. And help drive it in.The biggest thing here is, just going to be getting it driven in squarely. You can see, this side's in a little bit further than this side. I'm going to start this side first. Now since we didn't have the opportunity to show you before, we're going to take a look at pulling a seal. Now this is a seal puller, we carry this on our website part number ptw1219. This is meant to hook underneath the seal. And then you kind of pull up on it, and just like our race you'll have to work all the way around that edge. Just bringing it out a little at a time.If you don't have that available. Another option would be a screwdriver. You just kind of get that under the seal, and turn it. And see, that'll allow you to also pop that out. We've taken care of our race. Our inner bearing. Our seal. The last component, before we put our hub back in place is going to be our outer bearing. Now with this bearing, I'll show you the hand packing method.This is definitely . Slightly dirtier method than the bearing packer. When we get grease on our hand we want to look at the larger side of the bearing. This is the smaller side. We have a larger side In between the inside and outside there's a gap. We can see our rollers in there. We want to grab that, and use that gap and shove grease inside of it. Now this is going to take a little bit, you want to work in the same spot until you get the grease pushed all the way through. We can see on the top there we've got a little bit starting to come through.And once we push it in the bottom, and you see it start coming out the of the top in those little drips, it's going to indicate that, that section's fully packed. Just need to work all the way around their outside edge now and do the same thing. Alright, once that's all the way around . The bearing will be ready for use.Now one more thing I like to do. We can see our inner bearing there, and our outer bearing. Well between the two, got a pretty big gap in there. If you'll take a . Pretty good amount of grease. We're just going to go all the way around. See how we can go all the way around the inside and just line that really well. The more grease we have in here, the less chance we have of any moisture getting in there, which can cause corrosion, rust, pitting. Pretty much things we do not like when it comes to bearings, races, and hubs.Put plenty of grease in there. And then this one does have the easy lube spindle, that'll even fill it in more. Now we can get our assembly slid on. I like to keep my thumbs on that outer bearing, just to prevent it from . inaudible 00:15:28 pushed off there. Now we can put on the original hardware that we removed, in taking off our hub the first time. In our case, we had our washer and our nut.Now most commonly you'll see pliers similar to this being used. We basically want to get that tightened down. Once it's fully tightened down you'll feel some resistance in the hub. We back it off just slightly. That'll give us a little bit more freedom of motion there. Something you don't want however . Is any movement in, or out on your hub. You want to be sure that everything is compressed, and you don't have what's called end play. Which would be the play in and out.Once we've got that set, then you'll put on whatever tight keeper yours came with. Get that put back in place. Now with an easy lube style hub, you're going to place your grease gun on the end, and then you can just fill the remainder of that hub up.Now for your typical applications, you're either going to have a solid cap, or a cap that'll have a rubber plug in it. A solid cap's going to be for an axle without the grease inaudible 00:16:51 here on the end. Goes on there. Just knock it on with your rubber mallet. Same with the one with the plug. Just gives you a removable area there, be able to cap that off.We'll show you how to put that on. Now as alternatives as well, a lot of times on boat trailers and marine kind of situations. You'll see a bearing buddy. This is going to apply a little bit of pressure on the grease, you'll fill it up. This kind of comes out just a little bit. That applies constant pressure on the grease to make sure we don't have any air, or anything like that. Then there is also an oil bath hub available. Now this is going to be for use with seals that are going to be designed specifically for oil bath use. You'll have to change that seal.We're using a double lip seal. There are also single lip seals available. Of course a double lip seal is going to give you just a little additional security. Keep that in mind when you order. But let's get this knocked on there now so you can see how that works. We just want to take the cap, we're going to center it. This is going to be very similar to what we did with the seal. And then just gently start tapping it around the outside. And it'll seep down on there for you.It's really going to be the same thing that you'll do with any of the end caps. Now with this side done, it's a good idea to take care of all the other hubs. Get them all on the same maintenance schedule. And as long as you'll periodically check the grease, take your trailer out for a trip occasionally. Just to keep everything lubricated. It should extend the life of these parts, and give us years of good service.
Average Customer Rating: 4.9 out of 5 stars (123 Customer Reviews)
Although the product was delayed due to shipping from the manufacturer the fact that we were updated throughout the process that made everything ok. We will definitely order from Etrailer again. Highly recommend to others. Excellent service. Thankyou.
Haven't installed it. Bought it for next time I grease the bearings. Had trouble finding the seal locally. This looks just like the one I removed.
Quality product, exactly the same as the original. It was hard to find this seal without buying directly from the trailer manufacturer (Magic tilt) but etrailer had them. Thanks
Kenneth
4/10/2023
One year later and still going strong. May I offer a little advice, don’t forget to install the inner bearing on the hub before you knock the seal on. Ask me how I know lol.
This was a difficult item to find except on etrailer. All bearing kits for my hubs come with 1-1/4" ID seals, etrailer was the only place that had them. Received my order within a matter of days. Great customer service.
Perfect fit on my trailer I bought different seal in my locals autopart and don’t it fit, thanks to etrailer.com because is the only one have this particular grease seal fit in my boat trailer ?? and shipping was very fast 5 stars.
Exactly the part I needed. Had the correct ID, OD and Width I needed to replace the seal on a 1990 Coleman Roanoke Royale Pop up camper. It would be helpful to note the following information on this website. Width: 0.432" which is different than many other seals I looked at which contained the 13194 seal number but contained a seal in a kit that was the width of 1.250. The seal I received has the Blue looking outside ring around it rather than bare metal shown in the stock photo on this site. The seal I received is the one shown in the video review on this site. In the photo you can see a side by side comparison between a different seal and the one sold by etrailer with a width of 0.432 which is what I needed. I hope this comparison helps determine if this is the seal you need. You may be able to see the number of the seal printed on the rubber of the seal in the photo.
Looks like the correct bearing hub seal, will insert it soon to be sure. E trailer was easy to use to get the correct size.
Paul
6/24/2022
Everything fit perfectly on my trailer.
Looked all over town for the correct grease seals for our old Skeeter (97) boat trailer and dang if I did not find them here at e-trailer, the "proper size" and at a fair price (much cheaper that the wrong one from the auto parts store). The shipped quickly and were exactly what we needed and solved our leaking seal problem. I bought spares and bookmarked this website incase I ever need and other parts for our many trailers on the farm here. I would definitely trade and do business with these folks again.
Note: double "lipped" seals are what one wants for a boat trailer and they keep water out far better than the single lipped seals sold at the auto parts........ - if you simply measure the OD and ID, these guys will fix you up, much obliged e-trailer!
Michael W.
6/8/2017
Seals installed are still tight and old Skeeter still rolling along....
a+Exactly what you need for axles that measure these dimensions. works great for my boat trailer
Bought a pair of seals for our old Coleman pop-up trailer here. Wasted a day driving around town looking for the correct ones, and then decided to go on the internet - found www.etrailer.com. Easily found the correct seals, ordered, and had them installed on the trailer several days later. I even ordered a backup pair from etrailer. Will use again!
Doug N.
8/10/2016
Still going strong!
This is just what i was looking for & shipped fast.
1992 Coleman popup camper axle seal.
Thanks again
Seals were great and fit like a glove I had removed the existing seals and repacked the bearings on a Majic Tilt boat trailer the seals I took out were single lip which I believe were not intended to be put on a boat trailer I was able to match the correct diameter by measuring the hub and the shoulder on the shaft and order the seal I had a problem finding the seals in the local area so went to the net and found your company . The seals had the number imprinted on the rubber seal material where as the OEM seal did not have any Identifying marks so that a novice could go to a seal distributor and ask for the proper seal and as a result they would have to go back to the trailer manufacturer and pay three times as much. I am going to order some additional seals so that next time I pack the bearings I do not have to wait 5 days to get them as I live in south AlL and they routed my seals from MO thru Atlanta to get to me seems like they would have gone thru Memphis and Jackson MS. very satisfied with purchase.
Hard to find this odd sized seal, etrailer had it in stock and shipped it promptly, actually arrived ahead of schedule.
After trying to guess what size seal I needed, with the awesome assistance from Katie D at etrailer, I was able to finish repacking the bearings and installing the new seals. Thanks for the assistance in helping me get my trailer ready for my upcoming camping trips!! The seal was a perfect fit!!!
I had to buy a bearing repair kit the last time i repacked my
bearings to get the right size seal, nobody in my location had
the seal or seemed interested in telling how to get the right sized
seal. I found it at etrailer.com and ordered it on saturday and had on the following tuesday [what service]. I haven't installed yet,but i checked it
with a seal i had and it looks like it is the right seal. Thanks
Received parts yesterday and everything arrived in excellent condition. Without etrailer's helpful guides it would have taken a lot longer to identify the correct Hub's and bearing's that I needed for my jet ski trailer. I always go to etrailer for my trailer needs!!!! I have a jet ski trailer, boat trailer, and 36.5 foot 5th wheel camper. So I'm always needing parts!!!
This was a hard seal to find.. Many other auto parts stores tried to sell me substitutes of the proper dimension but with only one lip.. etrailer.com was able to provide the proper DOUBLE lip seal at half the price to boot!! Thanks so much.. The shipping was very fast and fair priced as well.. This level of service is getting harder to find these days.. I am a returning customer..!! And will continue to come back to etrailer.com for all my trailer needs..
The 13194 grease seal is excellent and very nice to be able to find once again because of the difficulty in trying to locate a dealer with them. E-Trailer has them and it's no surprise. They have everything you will ever need for your trailering needs. They are excellent and very helpful in getting the products, especially for the do-it-yourself persons. Their videos of how to properly change and install their products are especially helpful. They are all around the best and clearly my choice for future purchases. Thanks!
Ordered 4 wheel bearings and 2 seals at a great price. They fit perfectly and had no problems. One of the old seals had come apart and dirt got into the bearing causing bearing noise. Nice and quiet now.
Was needing a hard to find wheel bearing seal for my 96 Coleman Camper.
Etrailer had what I needed and the ordering process was simple. Great service.
The seals arrived in time for my trip and fit perfectly. I was not able to purchase this size locally. Apparently a 1.25" or 1.50" nominal ID is common and my 1.38 nominal ID (1.372" ID x 1.983" OD) on my 1986 EZ- Loader is an odd size. Thanks etrailer.
I wanted these specific seals and couldn't find them locally. E trailer had what I needed and shipped it at a reasonable price. They fit the hub and spindle properly and installed easily.
2 of my local auto parts could not get the wheel seals I needed. Grabbed the mic, went to Etrailer and a couple days later I got my hubs back on my boat. Thanks Etrailer!
I had a hard time locating this seal even at the local trailer dealers and repair shops around. Went to etrailer.com and found it right away. Shipping was fast and I got my trailer back on the road in no time flat... Price was reasonable. I will use etrailer again without a doubt.
Not a lot you can say about grease seals, but these simply aren't available locally and we were lucky to find etrailer.com
Folks here are all great to deal with, ship faster than any other place I buy from and the parts we get are spot-on.
Do you have a question about this Trailer Bearings Races Seals Cap?
Info for this part was:
At etrailer.com we provide the best information available about the products we sell. We take the quality of our information seriously so that you can get the right part the first time. Let us know if anything is missing or if you have any questions.
Ronald
10/6/2023
Excellent. We should add this was a rare seal which was hard to locate, but they were able to supply it.