Hey David! That isn't the main purpose of the Softride Shuttle Pad Tailgate Pad #SR26457 but it will protect your tailgate while it is down. Keep in mind, you probably won't get 100% coverage, particularly on the sides. This is 61" wide…
Hello Michael, Sorry for the delay in getting an answer, but I am currently waiting for the information myself. As you can see this is a new item that is available for preorder, so we do not have much information about the unit. I will let you know…
Hey Richard. The EcoHitch Hidden Front Hitch item #EH79CR will definitely support a 542 lbs motorcycle. It has a 1,000 lbs total capacity no matter how you use it. Unless you have the lightest motorcycle carrier ever, it's not going to work with…
Hey Dale! For the black version you need the Westin Sure-Grip Running Boards w/ Custom Installation Kit #27-6135-1905. The correct part number for the brushed aluminum that fits your quad cab would be the #27-6130-1905. Both fit the existing holes on…
Great question Amie, RV A/C's like the Furrion Chill Cube RV A/C #FR77TQ are designed to fit in a standard 14" x 14" opening of an RV roof. As long as your existing opening is that standard size, no structural modification or enlarging…
Hey Nick, welcome back! There is a foam divider that is included with the Furrion Variable Speed Chill Cube RV Air Conditioner w/ Heat Pump item #FR77TQ. We've had customers trim this to accommodate a thinner roof. Furrion does not make a…
Yes, we do Tyler. For an air compressor that can be powered off of a 7-way connector, I recommend the Air Lift 7-Way Automatic Portable Air Compressor item #AL79FF. This air compressor can go as high as 120 psi to fill your air stream's tires.…
Hello Dennis, thanks for reaching out. The repeater, or lack thereof, would definitely explain why your monitor is not picking up the sensors. I took a screenshot of the installation instructions for the Signal Booster/Repeater #TST-507-R and…
Definitely, Mike. The 12-ton Tallboy #PM94FR has more than enough power for your dually’s front axle. The main thing to check is clearance - it needs about 11-1/4 inch minimum height to fit, so measure under your lower control arm or frame first.…
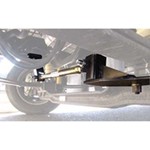
Hey Benny, that's pretty crazy! I'm glad you got your steering under control but yeah that had to have been quite the surprise when you got under there and realized you already had a stabilizer. Because the spring is on the inside of the…
Hi Mike! The B&W Companion OEM 5th Wheel Hitch w/ Slider for Chevy/GMC Towing Prep Package - Dual Jaw - 20K #BWRVK3775 is indeed the correct hitch for your 2026 GMC Sierra 3500HD AT4 with the short bed and puck system. It will lock right into…
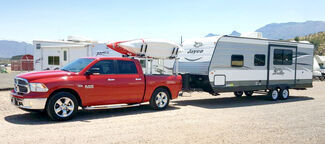
Hey Ron, congratulations on the new trailer! I have a Jay Feather myself and love it. You're definitely off to a great start with a weight distribution hitch, it will make a world of difference towing that trailer with your F-150. The Weigh Safe…
Hey David! That isn't the main purpose of the Softride Shuttle Pad Tailgate Pad #SR26457 but it will protect your tailgate while it is down. Keep in mind, you probably won't get 100% coverage, particularly on the sides. This is 61" wide…
Hello Michael, Sorry for the delay in getting an answer, but I am currently waiting for the information myself. As you can see this is a new item that is available for preorder, so we do not have much information about the unit. I will let you know…
Hey Richard. The EcoHitch Hidden Front Hitch item #EH79CR will definitely support a 542 lbs motorcycle. It has a 1,000 lbs total capacity no matter how you use it. Unless you have the lightest motorcycle carrier ever, it's not going to work with…
Hey Dale! For the black version you need the Westin Sure-Grip Running Boards w/ Custom Installation Kit #27-6135-1905. The correct part number for the brushed aluminum that fits your quad cab would be the #27-6130-1905. Both fit the existing holes on…
Great question Amie, RV A/C's like the Furrion Chill Cube RV A/C #FR77TQ are designed to fit in a standard 14" x 14" opening of an RV roof. As long as your existing opening is that standard size, no structural modification or enlarging…
Hey Nick, welcome back! There is a foam divider that is included with the Furrion Variable Speed Chill Cube RV Air Conditioner w/ Heat Pump item #FR77TQ. We've had customers trim this to accommodate a thinner roof. Furrion does not make a…
Yes, we do Tyler. For an air compressor that can be powered off of a 7-way connector, I recommend the Air Lift 7-Way Automatic Portable Air Compressor item #AL79FF. This air compressor can go as high as 120 psi to fill your air stream's tires.…
Hello Dennis, thanks for reaching out. The repeater, or lack thereof, would definitely explain why your monitor is not picking up the sensors. I took a screenshot of the installation instructions for the Signal Booster/Repeater #TST-507-R and…
Definitely, Mike. The 12-ton Tallboy #PM94FR has more than enough power for your dually’s front axle. The main thing to check is clearance - it needs about 11-1/4 inch minimum height to fit, so measure under your lower control arm or frame first.…
Hey Benny, that's pretty crazy! I'm glad you got your steering under control but yeah that had to have been quite the surprise when you got under there and realized you already had a stabilizer. Because the spring is on the inside of the…
Hi Mike! The B&W Companion OEM 5th Wheel Hitch w/ Slider for Chevy/GMC Towing Prep Package - Dual Jaw - 20K #BWRVK3775 is indeed the correct hitch for your 2026 GMC Sierra 3500HD AT4 with the short bed and puck system. It will lock right into…
Hey Ron, congratulations on the new trailer! I have a Jay Feather myself and love it. You're definitely off to a great start with a weight distribution hitch, it will make a world of difference towing that trailer with your F-150. The Weigh Safe…
Tire inflators are essential for maintaining optimal tire pressure, ensuring safety and efficiency on the road. Whether you're prepping for a road trip or managing RV tires, a reliable inflator is a must-have. Consider portability, ease of use, and pressure accuracy when choosing the right one for your needs.
Tire inflators are designed to be compact and user-friendly, making them perfect for on-the-go use. Many models come with a carry case and are battery-operated, allowing for easy access and use even in remote locations. Their intuitive design ensures that inflating tires is a hassle-free experience.
Pressure accuracy is crucial for tire safety. Most inflators are within 1 psi of a hand gauge, ensuring reliable readings. Some models feature LED displays for easy monitoring, though it's best to mount them at eye level for clear visibility. Consider adding a pressure regulator for enhanced control.
Yes, many inflators can manage high pressures, making them suitable for RVs and trailers. They may take a few minutes to reach higher psi levels, but they are effective. It's important to observe the duty cycle to prevent overheating, especially during extended use.
Absolutely! Besides inflating tires, some inflators can be used to blow out camper water lines, especially in cold weather. This versatility makes them a valuable tool for any outdoor enthusiast. Just ensure the model you choose has the necessary flow rate for your additional needs.
Regularly check hoses and connections for wear and tear to prevent leaks. Clean any paint or debris from threads to ensure smooth installation. Observing the duty cycle and allowing the inflator to cool down between uses will extend its lifespan and maintain performance.


 Filters