
To see if this custom-fit item will work for you please tell us what vehicle you'll use it with.


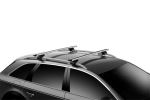
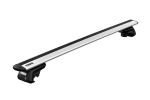
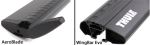
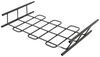
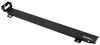
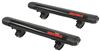
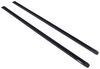
This Thule roof rack lets you carry cargo and gear on your vehicle. Aerodynamic crossbars with split rubber strips in top channels work with channel-mount and clamp-on accessories. Installs to flush rails on your vehicle's roof.
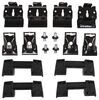
Features:
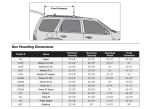
Specs:
 Alternate Instructions
California residents: click here
Videos are provided as a guide only. Refer to manufacturer installation instructions and specs for complete information.
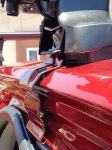
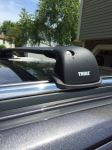
Hi, everyone, I'm Evangeline right here at etrailer. Today we're taking a look at this Thule roof rack right here on our 2023 Land Rover Discovery. If you are looking for a super sturdy base so that you can carry around all kinds of fun things like roof boxes or kayaks, this is definitely gonna be the one that I first recommend. But first, let's talk about the Discovery and its roof. So you'll see this flush and raised rail combination up here. and it might be a little confusing trying to figure out what is the best fit for your vehicle.
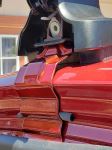
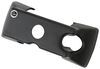
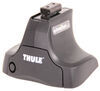
So here etrailer, when you put in your year, make, and model, we have a fit guy that shows you all the confirmed fits for your car. Some of them clamp around the rails, some of them secure in different ways. So with this Thule kit, what they do is they secure around the rails, and you can actually install it wherever you want depending on what you wanna carry. Of the roof racks that clamp around, this is one of my favorites. Look at that custom-fit design for the rubber that goes around to the top of your rail.
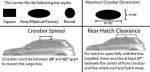
And then you also have metal clamps that secure around the front and the backs, making that very sturdy system where you can trust this carrying a lot of weight. And with the Discovery, you have two sunroofs that we get to take a look at for measurements. For the rear bar, if you put it over that rear roof, you'll have about 3/4 inches of space underneath. For the front bar, you'll have even more clearance at around four inches, maybe 4 1/4 depending where on your roof you measured. That's a lot of clearance.
Now, if you have super large clamps, you might get a little bit less clearance, but this will still fit for most things. You can still carry your accessory and open up your roof. Here you can see our clearance for our front sunroof, so you can see that come up. And then underneath the bar, you still have all of that space. In fact, this would be about a similar amount of space as you would have for the rear bar where everything lines up.
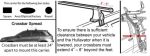
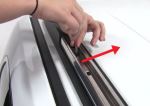
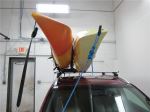
And based off of experience, 'cause I too have a sunroof and a roof rack, while the bars don't really affect the experience of that sunroof, my accessories definitely do. For example, if you have a large roof box, then you might lose out on that sunroof experience, or the wind will hit the roof box and shoot straight into the car. So that's just something to be mindful of when you have different accessories loaded up. You also wanna be mindful of your height of the bar. For example, what we have here, top of the roof to the top of the bar is 5 1/2 inches. If I was to carry skis with extra tall bindings, I would make sure I have clearance for those bindings and I'm not scratching up the roof. If that's the case, you can always get accessories with extra height. And where you set up your roof bars, well, that's totally up to you. You can get what we call a crossbar spread. So crossbar spread is from the center of one bar to the other. Where I have a set up is 32 inches apart, and that's a really versatile number for most types of things, roof boxes, bike racks, ski and snowboard carriers, you name it. If you find that what you wanna carry specifies a certain crossbar spread, then go ahead and slide those bars over to get that fit. The Evo system does have slightly longer bars, which gives you more bar space to clamp things around, but you also have the option of channel-mounting your items. When you flip over that end cap, you can then mount things in that track. Now that's gonna be helpful 'cause then you don't have to worry about clamp arounds clears, and then you can fully utilize all of the crossbar. The owner of this vehicle actually asked for my recommendation for a roof frack, and this is the one that I recommended because it's very similar to the roof frack I have on my own car. I love that flush rail design and how Thule does it, where they clamp around those rails and they have such a custom fit. It looks great, but it also works really well on the Discovery. We saw things like the clearances and how much space we had underneath the bars, so we we inchesre still able to use the sunroof. For the owner of this vehicle, where he's going on a long road trip, he's bringing his dogs with him, and he wants an extra cargo space on top of the vehicle, this is gonna be the perfect base for his setup. If you have a similar story, I'd love to hear all about it. If you send in a review and a picture, maybe can inspire some other people along the way who are looking for solutions similar to yours for their own adventures. And if you're curious about how this gets all installed, well, stick around. Now getting your roof rack put together might seem a little complicated at first because there's a lot of little parts, but it's actually very simple. Now what you do need to do the first time is set up your crossbar. So I already installed the rear crossbar, and then we get to install the front crossbar together. With your crossbar, you're going to have these rubber strips. So what you actually need to do is you need to split those rubber strips apart so that you get two separate pieces. The piece with the arrows pushes in where it aims or points towards the front of the bar, which is gonna be the thicker part of the bar, and then the flat rubber piece will go on the back of the bar where the Thule logo is. So just push those in with your thumb all the way to the end of the crossbar. When you're done with that, flip your crossbar over and then insert these measuring pieces. They're gonna have a little on the inside just to give them tension, and then this will be how you can mark your measurements for where your towers go, or just cover up that space to prevent wind from coming through. For the towers, you're gonna have A, B, and C parts that go on there. So A is going to look like this with the hooks that fits into the tower, and then you have your bolt going through. You're gonna secure that with pad B, which fits into place with those little tabs. And then, finally, C hooks onto that tab from A. And then you're gonna have these nuts that will secure all the pieces together. Just thread those on loosely for now. This then slides on through that bottom channel of the crossbar and then just pop that end cap on to secure it into place. Now we will have this rubber strip here as well to fill up that gap on the side of the tower. I do not install that part yet just because I want to confirm how much space we will have when we have this on our roof. So don't forget to put that rubber piece in there when you're done with everything. With both sides set up, you can now carefully lift this onto your roof. Now this is a lot easier with a second person, but it's totally doable on your own. You're just going to lift everything onto the rails. And then where you put it on the rails is totally up to you. Where I personally like it lined up is right where the pillar of the car is, so that's between the front and the rear door. I also like it where it's good a distance away from the other bar. In our case, 32 inches. And then you wanna make sure this is evenly distributed, meaning you want an equal amount of length on each side. So what I do or how I measure for that is just from the tower to the bar, let's say, about 2 1/2 inches. If that number's gonna be the same on the other side, then you're at a good length. With everything looking good, we're then going to start tightening down. Now just double check that everything is lined up. I love how the rubber pads fit around the grooves of the rail, the back clamp is flush against the back, and then our front hook here hooks around the lip of our base rail. I like to just tighten down by hand at first on both sides. And then once everything is touching with the hooks, I then go at it with our torque tool and continue securing this bolt. A good rule of thumb whenever I install roof racks is I like to evenly tighten them down. For example, I'll get one side to about halfway secured, and then I'll go to the other side and I'll go to maybe about 75%. Then I'll go back and forth. That way I'm not pulling the whole system one way. Now this isn't as big of a deal compared to some other roof racks that have hooks around the doors, but it's still nice just to make sure everything's properly down. This tool is a torque tool, and it's set to a specific tension, so that when you tighten down on those nuts and bolts, once you get to the proper tightness, you'll hear it click like that. Now I like to hear it click twice, like a gas cap, and I always double-check all four towers every now and then to make sure they're all clicking and they're all tightened down. There are kids going to have these plastic lock cores. You can always upgrade 'em to metal ones, if you want to. These are what I have on my roof rack. I use a flathead screwdriver to turn them around. To install 'em the first time, see how there's little tabs inside your end cap You want the part of your lock core that has this little button here. That's going to line up with those tabs. And from there, you simply push on through. You can then use that flathead screwdriver to turn it to the open position. The end cap then pops into your tower. (end cap popping) Hear it click like that. Then get your flathead screwdriver and then turn that lock core to the lock position. That way as you pull on the end cap, there's zero give and it doesn't come off. So do this for all four towers. And don't forget to put those rubber strips on the ends of your crossbars. If you notice any wind or any whistling, just double-check those pieces underneath. Another thing I like to do is hold onto this tool. I keep it in my glove box or my center console. That way if I needed to remove this roof rack or just double-check that it's tightened down, I'm always ready. That's gonna be it for the install. Hopefully this helped you out with seeing how this roof rack looks, works, and installs on your 2023 Land Rover Discovery.
Ratings & Reviews


Do you have a question about this Roof Rack?
Info for this part was:
At etrailer we provide the best information available about the products we sell. We take the quality of our information seriously so that you can get the right part the first time. Let us know if anything is missing or if you have any questions.


Thank you! Your comment has been submitted successfully. You should be able to view your question/comment here within a few days.
Error submitting comment. Please try again momentarily.