


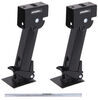
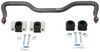
These compact, user-friendly scissor jacks are a must-have to keep your RV level and stable. They adjust from 5" to 29". Bow-tie bases steady the jacks on soft surfaces. Manual crank handle and drill bit included for flexible operation.
Features:
Specs:

California residents: click here
Videos are provided as a guide only. Refer to manufacturer installation instructions and specs for complete information.
Hi, Matt with etrailer. Today we're gonna talk about etrailer's stabilizing jacks. Now today this is gonna be the one that comes in a kit of two, but you can find different kits on our website. So let's check 'em out. If you've got any experience with these etrailer stabilizing jacks or if you plan to get these after watching this video, just let us know what that experience is like and what your camping adventures look like and how this is working for you overall. But really this is gonna be something great for anyone who is doing something of that outdoor camping and you just want something that's just gonna be a little bit easier to use than what comes standard with your RV.
Or in some cases you just need a replacement part because especially these ones that are sitting here in the back, if you're going over any release deep inclines, there's just some bumps in the road or going through some driveways. Sometimes if they're not lifted all the way up, maybe you forgot to do it or more so when there's more extreme situations, they can make contact with the ground and get damaged, and I think these are gonna be a great replacement set for you. So today we're gonna focus on just three things. We're gonna talk about a little bit about the specs of these jacks, then we'll move over to using it at the same time. And then finally we'll go over a quick installation of this since it doesn't take very long.
So with these, they are gonna be rated for 2,500 pounds per jack. So if you have these together, they're gonna have a total rating of 5,000. And for the total distance of travel they're gonna be able to have, it's gonna be five inches all the way up to 29 inches of stabilization. Now there are a few things that keep in mind with that. That's a wide range of travel and it's gonna be great for stabilizing things.
What it's not designed to do is lift your trailer. They're just meant to kind of make sure everything's level when you're on more of those outdoor camping situations. Now really those would be the most important specs when it comes to the style of jacks. If you need any more information like on the material or just overall measurements, then I just recommend checking out specs portion of our page. Now when we go to other things that this offers you, I wanna talk about this drill attachment right here.
This here I think is gonna save you a lot of time and it's gonna save you a lot of effort too. So super easy to use. Just make sure you have a drill. Come over here and this will work with other jacks too. But you see if I'm going down, it's gonna stop after a certain point. So just make sure you have a drill pile for enough to work with it. But to lift it up, that doesn't really take any time at all. But other than that, there's really not much to these jacks. Now when it comes to the installation, there's a couple ways you can do it, but we'll be doing it in an easier way today. So if you wanna stick around and see that process, just stay tuned, we'll walk you through it. To start off the installation, there's a couple ways we can do this. I'm actually gonna do it the easier way and that's just gonna be using our pre-existing hardware from our past jacks since this is most likely gonna be a replacement part for you. Now if you're not gonna be replacing it, or maybe the old jack you have just has a different pattern than the new etrailer one, then all you're gonna need is gonna be a eighth inch drill bit. You'll make that pilot hole underneath that beam there where those holes gonna line up with the plate of the jack, making sure everything looks good. Then you're gonna make a secondary hole in that same location with the 11/32 bit. And then you'll hold this jack into place with these self-tapping screws. And then you'll be good to go. Before we start bolting down this jack into place, something I recommend doing is setting these out prior, having them in the right orientation. And what I mean by that is the very end of it here where we're gonna have the head of that bolt, we wanna be able to access that. So if I try to install it in this orientation on your passenger side, you won't be able to access that and it might make things a little bit trickier. So save yourself some time, make sure you lay everything out, making sure that head of that bolt is facing out on your passenger side and on your driver's side too. So I left my bolt in place, one of 'em at least. And what I'm gonna do is just line this up. I'm actually gonna line it up with one of these two center holes. I think that's gonna give us the most stability from this. Lemme just push it on and I'm gonna hold it in place just like that. And we'll just make sure we put the other one in place too. But I'm just gonna start off installing one of these. I'm gonna put a flat washer on there and a split washer. A lot of times if you put 'em on at an angle, they'll hold themselves in place. Be careful though, 'cause if you just move a little bit, they'll typically just fall off. I will throw that net on there. Once that's about hand tight or it starts spinning on you, then we're gonna grab the socket and wrench. We're gonna put that wrench up top, socket underneath. And something else I recommend too is once you're getting it tightened down, don't tighten down all the way. Put that second bolt into place so it's not shifting around on you too much. You have everything lined up. And once they're both in place, then you can fully tighten everything down and try to make sure you get this really snug. Once you got both these bolts tightened up, they feel good. Then you can repeat that on the other side. And that'll do it for our look at some of the features and the installation of the etrailer scissor jacks. I'm Matt. Thanks for watching.

Do you have a question about this Camper Jack?
Info for this part was:
At etrailer.com we provide the best information available about the products we sell. We take the quality of our information seriously so that you can get the right part the first time. Let us know if anything is missing or if you have any questions.


Thank you! Your comment has been submitted successfully. You should be able to view your question/comment here within a few days.
Error submitting comment. Please try again momentarily.