
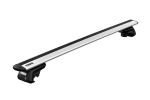
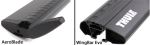
Thule WingBar Evo Roof Rack for Naked Roofs - Aluminum - Black - Qty 2


To see if this custom-fit item will work for you please tell us what vehicle you'll use it with.
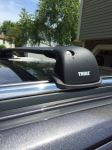
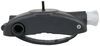
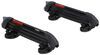
This Thule roof rack lets you carry cargo and gear on your vehicle. Aerodynamic crossbars with split rubber strips in top channels work with channel-mount and clamp-on accessories. Installs on your vehicle's naked roof.
Features:
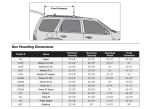
Specs:
 Alternate Instructions
California residents: click here
Videos are provided as a guide only. Refer to manufacturer installation instructions and specs for complete information.
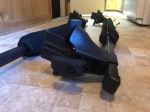
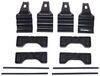
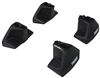
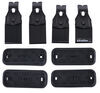
Hi, I am Danny with etrailer and today we're gonna take a look at and I'm gonna show you how to install the Thule WingBar Evo Crossbar on our 2023 Honda HR-V. Getting roof rack for your Honda is a great idea because it's going to allow you to use a ton of different accessories on the top of your vehicle, like maybe a cargo carrier for a long trip or a bike rack or kayak rack. Now if you decide to get these for your Honda, please let us know and review or comment how you we inchesre liking 'em and what you're using 'em for. So we have three main components here. So we're gonna have the crossbar followed by the tower and then we're gonna have this rubber pad and bracket and that's gonna be part of your fit kit. You will need all three of these components for this to work on your vehicle.
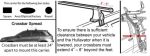
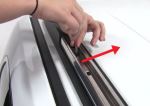
As far as getting your accessory in the crossbar here, it's very simple, you just rotate this end cap here and it reveals your T slot. Now this does have weather stripping built in and on some other roof racks we have, you have to actually cut your weather stripping. And this one allows you to put many different accessories on and still have your weather stripping. You have a lot of room between the top of the vehicle and the top of the crossbar. So clamp on accessories will work with this as well.
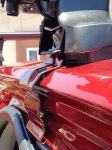
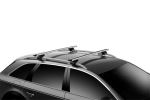
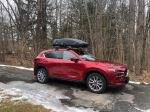
These crossbars are 53 inches long and they do stick out a little bit from the vehicle. Both of these are about three to three and a half inches outside of the tower. Now that is important for some accessories like kayak carriers and roof boxes 'cause you want those to be closer to your vehicle for easy access. As far as looks go, these do look pretty good for a naked style roof rack. They do have these brackets that go down on your door trim here, but that's pretty unavoidable with the naked style.
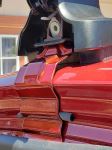
Now with the rubber padding, you can see that there is a little bit of a gapping, but it's mostly flush. And if I just shake this around, you can see it is not gonna go anywhere. Now these towers do come with a cover and you can lock them on this side and now they won't come off and you can use a coin or a screwdriver or anything that you can put in that slot. Now you can upgrade these to a metal core and those will come with a set of keys. I'll go ahead and give you a couple measurements you may need to know.
So from the top of your Honda here to the bottom of your rail is gonna be about three inches. So that's good enough space to put a clamping accessory on. Now the next measurement is from the top to the top of the crossbar here, which is roughly around four inches. So that's good to know if you put a cargo box up here or a different accessory, you can add that to this height and you should know if you're gonna be able to safely go in and out of a garage. All in all, I really like the look of this roof rack on this Honda and if I had these myself, I would keep them on just because it is a little tricky to take 'em on and off. If you're looking to install these yourself, then follow along and I'll show you how to do it. I went ahead and installed the front crossbar and towers on the vehicle and I'll go ahead and show you how to do the rear here. So you're gonna want to get the part that comes in your fit kit, your rubber pad and the bracket. And first we're gonna put this bracket in the tower and should hear a click and that's not gonna come out so we know that's good. And then your rubber pad's gonna have a tab on that back of it here. And so I'm gonna just line that up with the tab on the tower, kind of fold it back over and then press make sure the rubber's all around that. Now keep in mind that all these parts are side specific, so we'll tell you in the instructions they are all numbered as well as these brackets. So you're gonna wanna put these on the corresponding side. Next, I'm gonna take the end cap off our crossbar here. Just push down on that tab, wiggle it till it comes out, and it gives you a ruler in these crossbars and you can actually set this to the specs in the instructions. So this rear one is gonna be 40-1/2" and the front one we set to 43", but those are on the instructions, so that's nice. I put my tower on, it'll butt up against that. So for my tower, there's these two gray tabs that you can push in and that will actually push out on the top part of the tower, which will allow you to slide this in where you need to. So I'll push on those tabs, slide this in up to our ruler. Before we put the rear rail on, I'll go ahead and show you how we got the measurements to where to put the front one. So it will tell you in the instructions that you're gonna measure from the top of your windshield and it's very helpful to get a flexible tape measure to do this, you can do it with a normal tape, this is a little more accurate. And so on these I measured out 12-5/8" to the edge of our foot here. Now that we got our front one tightened down, we can go ahead and place the rear one and you wanna make sure that the thicker side is facing forward. That's gonna be the front. And I'm gonna go ahead and step up here. Place this roughly where we need it. Getting this snugged down might be a little tricky. You may have to loosen each side and work it down, but this is how it should look, once it's fitting snugly. The rubber should be completely seated on the top of the vehicle and there's a little notch you can see there that will be sitting on the lip here. So now with it loosely on, I'm gonna get up here and measure the correct distance. So from the top of our front rail to the front of our back rail is gonna be 27-5/8". So I'm gonna go ahead and move that to that measurement. Once I got the other side measured to the same measurement, I can go ahead and tighten this down. Now it gives you a tool in the kit and it will click once it's torqued completely. But this is very important to tighten this side a little bit. And now I'm gonna go around to the other side, tighten that a little bit and go back and forth just so it tightens down evenly. And this is why I recommend going back and forth tightening each side 'cause it will move on you and you will get these gaps here. So now I'm gonna loosen both sides and get this to see properly again and tighten 'em down again. Once you get 'em pretty tight, it will click and that now you know that they are torqued down. With both sides torqued down, we can go ahead and put our end cap on and our cover for our tower. Once you get all the covers back in place, you are good to go. And now was a look at the Thule Wingbar Evo Crossbars on our Honda CR-V.


Do you have a question about this Roof Rack?
Info for this part was:
At etrailer we provide the best information available about the products we sell. We take the quality of our information seriously so that you can get the right part the first time. Let us know if anything is missing or if you have any questions.


Thank you! Your comment has been submitted successfully. You should be able to view your question/comment here within a few days.
Error submitting comment. Please try again momentarily.