
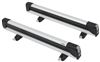
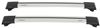
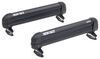
Thule WingBar Edge Roof Rack for Flush Rails - Aluminum - Black - Qty 2


To see if this custom-fit item will work for you please tell us what vehicle you'll use it with.


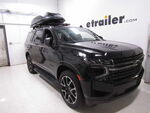
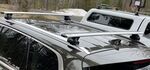
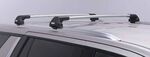
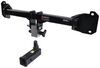
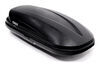
This aerodynamic Thule roof rack mounts flush on your roof for a sleek, factory look. Crossbars with split rubber strips in top channels work with channel-mount and clamp-on accessories. Installs to flush rails on your vehicle's roof.
Features:
Specs:
 Alternate Instructions
California residents: click here
Videos are provided as a guide only. Refer to manufacturer installation instructions and specs for complete information.
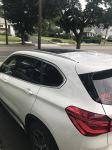
Hello, neighbor. This is Curt with etrailer. Today, we're gonna take a look at the Thule WingBar Edge roof rack and we're gonna see how it works with our 2021 BMW X1. So roof rack is a great way to carry that extra cargo that you either don't want riding with you in the vehicle or it simply won't fit. The X1 has a decent amount of cargo space back here, but not a whole lot. And if you've got like four passengers in the car on your trip, it's not gonna leave a lot of room in there for any of the extra luggage and things like that.
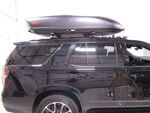
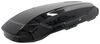
That's where something on your roof rack can come in really handy, like a cargo basket or a cargo box. But you also have the opportunity up here to carry things like a ski and snowboard carrier, a bike carrier, a kayak carrier, all manner of things that could go up on your roof. So the Thule Edge is a flush-mount roof rack, and what that means is that our crossbars are gonna dead-end into our towers. It's not gonna overhang at all. And while it does provide a much cleaner look overall, I think, it does force you to kind of put your accessories toward the middle of the vehicle and it doesn't really leave you any opportunity to put too many accessories side by side.
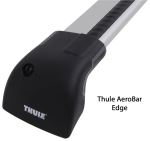
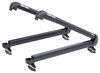
So with that in mind, it can accommodate your clamp-mounted accessories. And through this T-track up here at the top, it can accommodate your track mounted accessories as well. It is an arrow-shaped bar, which means it's wider in the front, narrow in the back, more of an oval shape. And what that's gonna end up providing for you is a much more aerodynamic crossbar. So this is gonna be a lot less noisy than a traditional square or round bar.
So the weight capacity on the Thule WingBar Edge is 165 pounds. However, you always want to double check your owner's manual to make sure of the vehicle's rooftop capacity. If it's less than 165 pounds, then that's gonna be your weight limit. Now we had talked a little bit about going into how it fits on our X1, so let's go up on the roof and take a few measurements and see how it fits. So with the crossbar dead-ending into the tower, let's first take a measurement of how much bar space we actually have to work with up here.
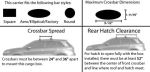
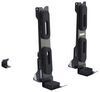
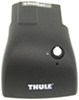
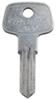
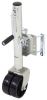
And this is gonna end up providing us with 34 and 1/4 inches here in the front, and 32 and 3/4 inches here in the back. So that's gonna be mainly what you're gonna be able to use, that 32 inches that we have back here. And the reason there's a difference in bar space in our front bar and in our back bar is that the rails up here actually kind of slope in toward each other as you get to the back of the vehicle. So you got a little over 32 inches of bar space that you can work with. The next thing we're gonna look into is our crossbar spread, and that is how far apart our crossbars are. So from the center of one of our T-tracks to the center of the next, we've got a crossbar spread of just a hair over 28 inches. And that for me is perfect. Every rooftop accessory has a minimum and a maximum crossbar spread that it can work with. And generally those numbers lie anywhere in between 25 and 32 inches. So at 28 inches, I'm pretty happy because that means that there are gonna be a lot of accessories that fit on my setup. One of the other things that we have to consider is this sunroof up here. We wanted to make sure that we had our crossbar placed in a good spot to interfere as little as possible with our sunroof and to make sure that it was going to clear it in the front and the back when we want to open and close it. And the way that we have it set up here is so that one, if you wanna ride with your sunroof open, you know, this is gonna like interfere as little as possible. It ought to be just directly above your head. This bar, we wanted to make sure that we placed with a little bit of clearance for when the sunroof is open back here. That way, we'd have the best chance of clearance with our clamp-mounted accessories that would go around the bar. So let's just take a few measurements and see how much clearance that ends up being. So underneath your bar, you're gonna have about two and a quarter inches of space underneath here to work with. And with the sunroof open, that drops to about three quarters of an inch. And we have this mounted about an inch back from the edge of our open sunroof. So just to give you an idea of the way that we have this set up, that's about what we're looking at. Now, we'll talk about it as we show you how to install it, but with these rails, you're really kind of free to move these bars around anywhere you want. However, keep in mind that it does taper toward the back of the vehicle. The further back you go, the less bar space you'll have to work with. And you don't wanna move it up too far apart either because there is a bit of a height difference in the rails here. You can see how it kind of starts high and then it goes low as it gets toward the back. You don't want to have them in a position to where one bar is that much higher than the other, especially because if you load it up that way, say you have a really long cargo box up here, it's gonna be kind of sitting like this and that's not gonna be all that great for wind resistance. So just bear those kind of things in mind. But we're gonna go over all of that when we look at the installation of it. So stick around, we'll show you exactly how we got these up on our X1. So as we begin our installation process, there's really only two tools that you're going to need. One is provided to you from Thule. It's this tool right here. And the other would be a measuring tape. And we're gonna go ahead and start with our tower assembly. Now, the tower assembly, we have our driver's side already assembled, and what we'll be doing is basically getting our clamps assembled along with our rubber foot pad and getting it all put together on the tower. So we're gonna go ahead and show you how to do that with the passenger side. So we're gonna start by removing our tower cover. Then we're gonna have these parts here that came in our fit kit. And Thule was nice enough to label 'em for us in order in which they go. You'll see this part stamped A, B, and C. So we're gonna start with part A. We're gonna thread that bolt through the hole there and make sure these tabs are outside going above just like so. And we're gonna go ahead and turn it over, and we're gonna get our foot pad on. You can see how these tabs are gonna line up here, and it'll go right in. What you wanna make sure of though is that this back clip is coming out and around the back of that pad. We're just gonna compress that down into place. Make sure it's good and flush on there. Finally, we're gonna take part C, which is our outer clamp. Thread it through here. And we'll get it lined up with that bolt. We're gonna take this piece here and thread that on as well. Now I'm just gonna thread it on loosely so that it catches. I don't want to tighten it down too much 'cause I want as much of this to be able to open as I can while we're getting it mounted up onto our rails. Now the next step is going to be to put our bar onto our tower. And to do that, we're gonna go ahead and line it up. Now when you're lining up your tower, you'll notice that this end of the casing is wider in the back than in the front. This is gonna go on the narrower end or the blade end of your crossbar. We're gonna go ahead and insert it in there just like that. And it's gonna stop us here with this tab. So what we're gonna do is to press that down and bring our bar in. It does take a little bit of muscle to do this. And once that tab clicks into the hole right here, it's gonna lock in place and we're gonna be able to maneuver our towers in and out. This is gonna be the same process of inserting our tower on the driver's side. All right, after our towers are attached to the bar, we're gonna go ahead and add our weather stripping. Now you're gonna have to separate this out of the box, just like so. And what you're gonna find is you're gonna find one of them has these arrows marked on them and the other one's just gonna be plain. The one with the arrows needs to be facing forward on the bar. So the wider end of the bar, that is where it's gonna go right into this slide here. It's gonna be cut slightly longer than the bar, but that's okay. Any excess is gonna be inside of the tower anyway. You're really not gonna see it, but we're just gonna press this in all the way down. And once you have that one in, go ahead and do the one on the backside of the bar. Same application. So now we're ready to get it up on our roof. If you got a friend to help line it up on the other side, that's great. If you don't, use a step ladder. Or if you're tall enough, just go ahead and kinda reach right across. But what I'm trying to do is just gently kind of lay it up there around that rail, get it kind of resting on there as much as I can. Over here on this side, I'm gonna go ahead and make sure it goes around it and that my foot pad is kind of sitting right on that rail just like that. I'm gonna go ahead and line up my other side. So let's talk a little bit about bar placement. Now on these flush rails, there really are no fixed mounting points, so you're really kind of free to be able to maneuver these really anywhere that you want. However, I think there is a pretty smart way to do this. When we installed our front bar, what I ended up doing was lining it up with this door seam right here. So you can see that bolt is centered right above this door seam. The reason that I wanted to put it in this section right here and not further up is if you we inchesre going to access your sunroof, I just wanted it to be as out of the way as it possibly could be. My second setup is gonna be pretty much right above the door seam in the back. I'm gonna go ahead and measure that bolt to bolt right now, and I'm gonna come up with right at 28 inches. Now one, that's a good crossbar spread for accessories to go up on, but two, I wanted it to be in an area where without use of a stool or a small ladder or anything like that, right here in the threshold of my second row, I can get up pretty much right in between the bars. So whatever accessory I have up here, I'm not gonna have any issue being able to get up here and load and unload it. This puts everything in a pretty convenient spot. But even though we have kind of a marking spot here on the vehicle as far as the placement goes, I'm gonna make sure on the driver's side that I have the exact same measurement of 28 inches bolt to bolt. That way I can ensure that my bars are gonna be perfectly parallel with each other and therefore be able to be loaded up safely. So once I've double checked my measurements and I am sure about where I'm putting my bar, I'm gonna go ahead and I'm just going to kind of pinch it snug up under that lip of the rail with my clamp here. And I'm gonna hand-tighten this bolt in just like so. Now I've already done this over on the driver's side. And the reason I wanna do this is I wanna make sure that I've got a good snug hold on it for when I really start tightening it because I don't want to accidentally overtighten one side and knock the other side out of place. So once I've got this good and snug, I'm gonna go ahead and grab the provided Thule tool and I'm gonna use that to kind of tighten it up even more. Now what I'm gonna do is kind of give it a couple of good turns here till I feel it start getting kind of tight. And then I'm gonna go over to the other side and I'm gonna do the same thing. For the reason that I previously stated, I don't want to completely overtighten one side and risk knocking the other side out of place. So I'm just getting it down to where, you know, I almost have to really kind of push to get it any tighter, and I'm just gonna alternate back and forth until they're tightened down completely. Now this is a torquing tool, so we're gonna get a good loud, audible click when it's tightened down completely. (tool clicks) Just like so. We're gonna make sure it does that over on the driver's side as well. Now the last step of our installation is going to be to replace our tower cover, but before we do that, I just wanted to talk to you a little bit about the lock core. You're gonna be provided with these plastic lock cores out of the box. These can be operated with like a small coin, like a dime, or more commonly like a flathead screwdriver. And they are gonna keep your tower covers on here. However, it's not the most secure way to do it. Thule has what they call their one-key system, and what that means is you could purchase keys and lock cores that are all gonna be keyed alike so you can get one for each tower. And if you have some Thule accessories, you even have the opportunity to get them keyed alike to that accessory. That way you won't have to have multiple Thule keys on your ring. You know that whatever your Thule key is gonna open is gonna open whatever you have up here, whether it's your roof box, your towers on your roof rack, any of those Thule accessories. One last thing you wanna do before putting your tower cover on: I always recommend that you give it a good shake test. So the vehicle is moving, but our towers are staying in place and our bar isn't sliding, so we got everything tightened down really, really well. And at this point, we're simply going to pop back on our cover. And we're ready to load up and hit the road. So there you go. Pretty simple installation. But that's a look at the Thule WingBar Edge roof rack on our 2021 BMW X1. And if after watching this video you decide this is the roof rack for you, go ahead and get it, install it, use it a little bit, and please share with us what you think about it in the comments below. Sharing your experience with us and with other neighbors just like you can help them make the best decision for themselves. Once again, this is Curt with etrailer. Thanks for stopping by.
Ratings & Reviews


Info for this part was:
At etrailer we provide the best information available about the products we sell. We take the quality of our information seriously so that you can get the right part the first time.


Thank you! Your comment has been submitted successfully. You should be able to view your question/comment here within a few days.
Error submitting comment. Please try again momentarily.