

 Arrives before Christmas


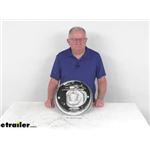
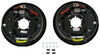
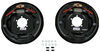
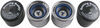
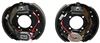
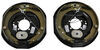
Replacement driver's-side hydraulic drum brake. Dacromet backing plate and e-coated shoes fights rust and corrosion. 12" x 2" Assembly is compatible with a hand brake (sold separately). Fits 14-1/2" and larger wheels.
Features:
Specs:
Backing up your trailer might be the only time you don't want the brakes to work. Normally, this would be a job for the reverse lockout on your hydraulic actuator. But if you don't have a lockout, you'll need brakes that will you allow you to back up freely instead.
How do they work, you ask?
During normal forward braking, a fall-away shoe expands to catch your brake drum with enough force to bring your rig to a stop. When driving in reverse, however, these brake assemblies prevent the shoes from fully catching on the drums. This takes away your braking control, allowing the wheels to continue to turn.
Note: Free backing brakes don't activate when you're in reverse. So, keep in mind that a trailer breakaway kit will not be effective if your trailer were to disconnect from your tow vehicle while you're backing up.
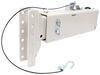
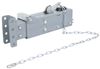
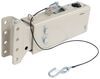
If you're looking to customize your boat trailer, opting to attach a parking brake cable to these brakes will make sure you get a little extra security when parking your trailer on steep inclines.
Installing these brakes is easy, and using them is even easier. Run the linkage cable from your tongue-mounted handbrake (T2385200 - sold separately) to the lever on the backing plate of the assembly. Then, just pull on the handbrake any time you need a little reassurance that your valuable cargo won't roll away from you.
If your trailer is routinely exposed to saltwater or heavily treated salt roads, these are the brakes for you. You'll get the best corrosion protection that drum brakes have to offer. The first layer of anti-corrosion coating is an e-coat primer applied to the shoe levers. Next, a Dacromet coating goes on. And finally, an acrylic topcoat that's nearly rustproof is put onto the backing plates. You'll also find stainless steel springs inside that are rustproof.
The more miles you put on your trailer, the more your brake pads will wear down. As they lose contact with the drum, stopping distances get longer and longer. To keep your brakes working great, it's important to adjust them pretty routinely. For this job, grab a floor jack and either a brake adjustment tool (sold separately) or just a standard flathead screwdriver.
Jack up your trailer enough to get the wheel(s) off the ground. Remove the adjuster plugs from the backing plate on the brake, and insert the flat end of the tool through the back of the assembly.
Push in on the star gear and lift it up. Keep doing this until the brake pads catch on your brake drum. When you can't spin your wheel by hand anymore, back the gear off by about 10 clicks (push down on the star gear). Does the wheel now spin freely (even if it sounds like the brake pads drag slightly on the drum)? Great! Then you're all done with that one and ready to adjust the rest.
Once you get these assemblies installed, and your lines flushed with fresh fluid, you'll need to break in these brakes. First, find a long stretch of road or a big, empty parking lot. Speed up to about 40 mph and brake to slow to about 20 mph. Repeat this 15-30 times. The goal is to get the brake shoes properly seated into your drum. You'll know you've done that when it feels less jerky (and more consistent) each time you apply the brakes.
Note: The brakes will be very hot after doing this, so after every 10 stops you'll want to wait about 10 minutes to let the brakes cool off before continuing. If you don't, you might cook and crack the pad material.
California residents: click here
Videos are provided as a guide only. Refer to manufacturer installation instructions and specs for complete information.
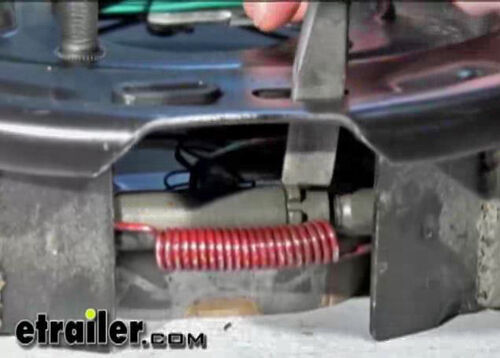
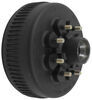
Hello, everybody. This is Jeff at etrailer.com. Today we're gonna take a look at this Dexter 12 inch by 2 inch corrosion-resistant left hand free backing hydraulic drum brake assembly with the parking brake for a 7,000-pound axle. Now this hydraulic drum break assembly is designed for use with a surge type trailer brake actuator. We mentioned this is a free backing design, and the free backing design will let you reverse without the trailer brakes being activated. And the way it does that is the hydraulic pressure is contained by the wheel cylinder, and the brake shoe turns and releases the pressure when it's reversing.
And the free backing design, you can always tell if the brakes are free backing, 'cause if you look at the primary shoe, which is a shoe over here, has a D-shaped design to it. So anytime you see that shoe with a D shape, that means it's a free backing design assembly. Now, the brake shoes themselves, they are lined with an automotive grade friction material. That friction material is fully bonded. It's not riveted to the shoes.
Gives you a lot longer life, more braking torque. The backing plate, if I flip this around you'll be able to see, the backing plate has a nice corrosion-resistant coating on it, and they do use stainless steel springs. So this is great for marine applications. Now, we mentioned this is a left hand driver's side brake assembly. And the way you can tell if it's a left hand or right hand, now when you get a new assembly, of course it'll have a sticker on it that'll tell you that, but if that sticker wasn't there, the easiest way to tell what side this goes on is you look at the length of the pad on the shoes.
So this pad goes from here to here. And if you look at this one, it goes all the way from here to here. So the shorter pad right here, that is the primary shoe, and that'll always face the front of the trailer. So when you see it like that, that shows you it's gonna be for the left hand driver's side of the trailer. Now this is a manual adjustment brake assembly.
Has the adjustment wheel down here. It does require periodic manual adjustment. We mentioned the parking lever. This is a built-in manual parking lever. This will work with a trailer that has a parking brake. If you do not have a parking brake, you can add a parking brake to your trailer. We sell the frame mounted brake lever and the cable separately on our website. It's part number T-2385200. And it's usually listed on this product page as a related product. Now, this does fit a five bolt. You can see the five holes here. It fits a five-bolt brake mounting flange bolt pattern. You notice the mounting hardware right here, these nuts are included. Now, this part is made in the USA. A few specs on this, again, it fits the axles rating of 7,000 pounds. Now we mentioned the size being a 12 inch by 2 inch, and what those measurements are, the 12 inch is the diameter. So if we're measured from here to here with our ruler, you'll be able to see there's your 12-inch measurement. And then the two inch is gonna be the width of the brake pad on the shoe. So there's your two inch. Now, this does require 12-inch brake drums, and the wheel size it'll use on this assembly is 16 inches and larger. But that should do it for the review on the Dexter 12 inch by 2 inch corrosion-resistant left hand free backing hydraulic drum brake assembly with the parking brake.
Info for this part was:
At etrailer.com we provide the best information available about the products we sell. We take the quality of our information seriously so that you can get the right part the first time. Let us know if anything is missing or if you have any questions.


Thank you! Your comment has been submitted successfully. You should be able to view your question/comment here within a few days.
Error submitting comment. Please try again momentarily.