
Thule WingBar Edge Roof Rack for Fixed Mounting Points - Aluminum - Black - Qty 2


To see if this custom-fit item will work for you please tell us what vehicle you'll use it with.

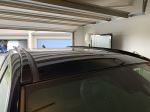
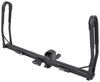
This aerodynamic Thule roof rack mounts flush on your roof for a sleek, factory look. Crossbars with split rubber strips in top channels work with channel-mount and clamp-on accessories. Installs to fixed mounting points on your vehicle's roof.
Features:
Specs:
 Alternate Instructions
California residents: click here
Videos are provided as a guide only. Refer to manufacturer installation instructions and specs for complete information.
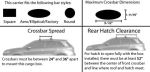
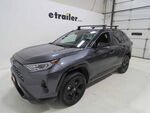
How's it going neighbors Today we're gonna take a look at the Thule WingBar Evo and see how well it fits on our 2025 Toyota RAV4. Now, being a RAV4 owner, you know, having a cargo space is at a premium and having a roof rack is gonna allow you to get those bigger, bulkier items out for your adventure. So let's see how it fits and see how easy it is to install. First thing that stands out to me is the fact that you don't have any hangover with the crossbars, gives it a nice clean OEM look. Another thing that stands out really is how tall it sits up. So that's gonna give you more than enough space to work with just about any type of rooftop accessory, cargo baskets, rooftop bike carriers, you're gonna be good to go.
Another thing that's really cool if you decide to go with other Thule products, you can actually have a single key for all of your Thule items to just reduce how much is on your key ring. Now another thing that's really smooth about this is the fact that you can switch out your lock core for the same key system. So you'll just have that and it makes it super easy. Another also, you're gonna have access to your T channel slot, so you can use eye loop rings or any T channel accessory that's gonna give you a lot of flexibility. Now you're rated right at 165 for the crossbars, however you want to definitely stick to whatever Toyota suggests as far as your rooftop capacity.
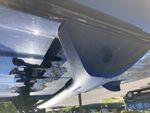
Now, as far as installation, everything you need is right in the box and it's a pretty quick setup. Having fixed mounted points makes it super easy and I'm gonna show you how to get it done. Now this setup is pretty straightforward based on the fact that you have fixed mounting points. I went ahead and threw on the rear bar just to get an idea of the rundown. You're gonna start with a trim panel removal tool or a screwdriver if you're careful to remove this panel.
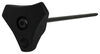
From here, you're gonna start adding your hardware. You're gonna have this two-sided bolt. One end is gonna be larger than the other, and that's gonna go into the threaded portion that's right here on top of your vehicle. I'm gonna start it with my fingers and I'm gonna use the included wrench to get this guy cinched down. And you can kind of see it's a little bit different as far as the style versus just like your regular wrench.
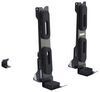
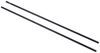
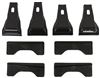
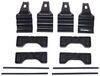
Now that I got it pretty hand tight, I'm gonna add our cover and each one of these guys are labeled on here. This one says FR for front right and it's gonna have the corresponding position for whichever base that you're putting on, and that just snaps right into place. So from here, we're gonna make sure that our external part with this little dip here is pointing to the outside. We're gonna just put that in position. And now we're gonna add on our bracket. Now our metal bracket is gonna point with the high point pointing towards you, and you want to observe which number for which part because that changes as well. And also keep in mind on the pad, that's gonna have its own independent number and it's in the guide so it'll tell you where to place it, but the process is the same on all of. This guy's gonna snap right into the rubber. We're gonna put this little plastic bracket in here and that's gonna snap into these holes. You can kind of see that right here. And now we're gonna add our screw here. And this is gonna use our Thule torque wrench. And the best thing about this torque wrench, it you don't have to worry about over tightening because it'll click to let you know when you have it in. You can already see we're getting stable. So now we're gonna put our edge end caps on along with our crossbar. And we're gonna continue with our super easy setup. We're gonna remove our end caps. These guys just pull right off and this is where you're gonna make your connection on your rooftop. But first, let's get it on our bar. This guy just slides right into position along this track by pushing down on this notch here. This plastic part slides right in here. And I'm gonna peel that back. And you can see this cutout right here where it comes into place that holds it in position. So now we're gonna go ahead, reinstall our little rubber here, and being aware of the position, we want the curve pointing towards the front. We're just gonna throw this guy up here and we're just gonna make a contact across and drop this guy right into position. And you may be a little long or short. The good thing is you can make that adjustment from here by pushing in and out. And this is actually locked down by the bolt that's on the top. So on this guy, we're gonna go ahead and hook this into position. And now we're gonna fasten it down, again using that same torque wrench to just make sure that we get listen for the click. And then it'll be locked in the position. So I'm gonna fasten this one down and I'll get this top bolt for our crossbar. Now, if we wanted to add metal lock cores to this, this would be the time to slide it in. But included are the plastic ones, and that works just fine depending on your situation. So we're just gonna slide this into position. And now you see we're good to go. We're ready for the road. Now again, this is Ed. Have a great day.

Do you have a question about this Roof Rack?
Info for this part was:
At etrailer we provide the best information available about the products we sell. We take the quality of our information seriously so that you can get the right part the first time. Let us know if anything is missing or if you have any questions.


Thank you! Your comment has been submitted successfully. You should be able to view your question/comment here within a few days.
Error submitting comment. Please try again momentarily.