


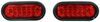
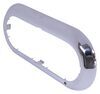
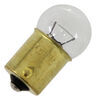
7-9/16" x 3-5/16" Oval lens. 3-Function, waterproof LED light acts as brake, tail, and turn signal. Surface mount with built-in flange. Accepts industry standard PL-3 plug.
Features:
Specs:
The waterproof construction of this light makes it ideal for use on trailers that may be submerged, like a boat trailer. The housing and lens are sonically sealed together to create a single unit, which means that water will not get into the light and damage the diodes or circuit board.
Surface-mount lights install flat against the surface of the trailer, so a hole does not need to be cut into the trailer for the light. This type of light is installed using a flange or bracket that has mounting holes. And mounting hardware is used to secure the light to the trailer.
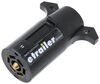
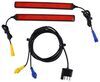
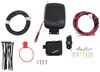
This light has an industry-standard PL-3 connection as pictured above. The light accepts a 3-prong plug (sold separately).
California residents: click here
Videos are provided as a guide only. Refer to manufacturer installation instructions and specs for complete information.
Hi, everyone. Aiden here with etrailer.com, and today we're gonna be taking a look and showing you how to install this Optronics LED taillight. Like with any other taillight replacement, you're gonna get your running light like you see here, our brake light, and turn signal. Everything's going to work really well, and those 10 diodes for your LEDs are going to be pretty darn bright, and they're gonna last a lot longer than a typical incandescent bulb and be much more power efficient too. You've got this durable polycarbonate construction all around from the lens to the outer flange here. So I don't think any sort of rocks or impacts are gonna have a big effect on this.
I think it's gonna hold up well over time. Everything on here is sonically sealed so water intrusion won't be an issue. It's even submersible so if you do plan on putting this on a boat trailer or something that's gonna be in and around water, you don't have to worry about any of that. Speaking of that outer flange here, you can see it's got four different mounting locations on the top and bottom and the two sides here. So you can use that to mount it in a pretty low profile setting.
Our trailer today had two existing holes that we just reused for our hardware. It doesn't come with hardware so you will need to pick that up, but you can see it is on there very solid. No shaking or anything on the trailer. And then speaking of that installation, everything's gonna be really straightforward. It's a whole plug and play system, and if you don't have that PL3 plug on your trailer you can pick that up separately, but let's check out how we did it.
We'll start our installation off by removing our old light. The one we have here is just attached with this grommet piece here. So we'll get a plastic trim panel tool and use that to pry up around the edges until we can get that out of the housing here on the trailer. Kind of working our way around like this. Once we have it removed, we can come around back to our PL3 plug and unplug it, and then go and grab our new light.
So our trailer already has the PL3 plug on it. If you don't have this piece, you can pick it up separately and hard wire it into your whole trailer wiring. But from here, all we need to do is plug it in like so, and we can put all the wiring back up into this compartment and we can mount the light using the four mounting holes on the light. So this trailer already has two holes on the top and bottom. So we're just gonna run our screws through there to attach the light. This doesn't come with any hardware so you will want to either reuse your old hardware depending on the light you're removing, or pick up some new hardware at the store to attach this however you see fit for your trailer. With everything plugged in, we can go ahead and test our lights starting with our taillights, our turn signal, and our brake lights. Then once we verify that everything is working, we're ready to hit the road. And that'll do it for our look at this Optronics LED taillight. Thanks for watching..
Ratings & Reviews

Great product should come with harness.
Info for this part was:
At etrailer we provide the best information available about the products we sell. We take the quality of our information seriously so that you can get the right part the first time.


Thank you! Your comment has been submitted successfully. You should be able to view your question/comment here within a few days.
Error submitting comment. Please try again momentarily.