
To see if this custom-fit item will work for you please tell us what vehicle you'll use it with.
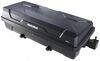
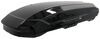
This Thule roof rack lets you carry cargo and gear on your vehicle. Aerodynamic crossbars with split rubber strips in top channels work with channel-mount and clamp-on accessories. Installs to flush rails on your vehicle's roof.
Features:
Specs:
 Alternate Instructions
California residents: click here
Videos are provided as a guide only. Refer to manufacturer installation instructions and specs for complete information.
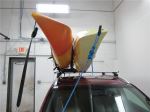
Hello, neighbor, this is Curt with etrailer. Today, we're gonna be taking a look at the Thule WingBar Evo Roof Rack, and see how it installs and see how it works with our 2024 Mazda CX-50. Now, if after watching this video, you decide that the WingBar Evo is the roof rack for you, you go ahead and you get it, you put it in, you install it, you use it a few times, please share with us what you think about it in the Comments below, and show us some pictures about how you're using it. We would love to share your experience with our other neighbors, so they can make the best decision for themselves. Now a roof rack is an excellent way to carry some of that extra cargo that you either can't fit or don't want riding in the vehicle with you and the other passengers. Sure, there are other ways to carry that extra cargo, there are hitch baskets and hitch cargo boxes.
There's also trailers, but those could be a bit cumbersome in that, you know, generally, they could make it difficult to park, difficult to maneuver, all kinds of reasons. Not only that, but being closer to ground-level, it might be a little bit more tempting for a thief or something to come along and try to get your stuff. A roof rack is an excellent way to keep everything up and out of the way. The one thing you might have to worry about with rooftop accessories is roof clearance if you're pulling into a garage or something somewhere, but, generally, it leaves a bit less of a footprint than carrying something off the back of the vehicle. Now the Thule Evo is an overhanging crossbar.
Now the overhang in some people's eyes isn't as, I guess, visually appealing, or factory looking as a flush roof rack, in which case, you know, there's nothing overhanging past the towers. And while those might look a lot cleaner in a lot of people's eyes, I personally don't find them as functional as an overhanging rack. An overhanging rack allows you to mount things closer to the side of the vehicle and therefore could allow you possibly to carry more than one accessory up here at a time. The flush roof racks have a tendency to not have that much bar space to work with, and it forces you to mount things in the middle of the vehicle, which would also force you to have to get up and reach in back and forth, it could be a lot more difficult to install, and just generally speaking, not as convenient. Plus, if you ever wanted to use a roof rack awning, or a roof kayak carrier, an overhang bar really is kind of necessary, because you want things like that to be as close to the edge of the vehicle as you could possibly get them.
The WingBar Evo is also what they call an aero bar, meaning it's got an elliptical shape, it's wider in the front, and it kind of has a blade in in the back. And what that's really gonna help you out with is going to be basically noise reduction. Because of the airflow, those other bars and the wind resistance of 'em, they can get quite noisy. This is really your least noisy option, plus, it also as a aero bar, will have a T-track slot at the top of it that'll allow you to use those T-track accessories. And they're accessible right here through this swivel cap, which I really like because most roof racks actually have you remove it completely in order to access your T-track.
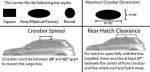
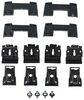
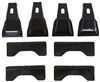
Now this roof rack is also gonna come with a 165-pound capacity. However, it is really important that you double-check your owner's manual, see what the factory roof capacity is for your vehicle. If it's lower than 165, then that number would be your capacity. But let's take a look at exactly how this fits on our CX-50. So one of the biggest concerns people have with an overhanging bar is, are they gonna be in danger of, you know, hitting their head on it when they get in and out of the vehicle The CX-50 isn't a very tall car, so I can understand that kind of concern. And while this particular kit comes with a 50-inch bar, you can possibly get longer bars that would stick out further. But, in the case of this, it really doesn't come out much further than the actual door threshold. And because the floor threshold down by your feet here is so much wider out, I really can't picture anybody getting out and just standing straight up. Generally, you're gonna get out and then up. So this doesn't really concern me as far as hitting my head at all. The other thing about this kit is the one thing that is going to be custom to your vehicle is the fit kit that's gonna come with particular clamps to grab onto your exact rails, as well as a rubber foot pad that contours to the top of the rails and keeps it seated nice and firm. So those are a couple of things about the fit kit that I really like. Now I'm gonna get up on the roof here, and we're gonna take a few measurements and see how this fits the roof of our CX-50. Now the rails on your CX-50 are not fixed rails, which means technically you can kind of mount these anywhere you want to, and we'll show you in a minute in the installation exactly why we chose to fit them where we fit them. But while we have them up here in the position they're in, I just wanna double-check our crossbar spread. So I'm gonna go from the middle of our back bar to the middle of our front, and I'm at 30 and a quarter inches, and that's a really good place to be. Most rooftop accessories require between 26 and 34-inches. So at 30-inches right in the middle of that, I'm not too worried about coming across many accessories that won't fit on this crossbar spread. The other thing that I wanna take a look at is how much height does this add to the vehicle And the WingBar Evo is gonna add about four and a half inches of height to the top of your vehicle empty. So if you want to calculate, you know, how much taller the vehicle's gonna be when you have an accessory or something on it, you can just take the height of your accessory and add four and a half inches, and that'll give you your roof clearance. I'm also gonna take a measurement underneath the bar, and we come up with about three-inches underneath. To me, that is more than enough room for any of those clamp-style accessories out there to be able to latch onto. But with all that being said, this was a really, really easy install. So follow along and I'll show you exactly how we got this on the roof of our CX-50. So, as we begin our installation, a couple of tools that you'll wanna have handy is, one, the included Thule tool. Now this is a pre-torque tool, and this is essentially gonna be the main tool that we're using to make sure everything gets tightened down on the roof of our CX-50. But we also wanna have a flathead screwdriver handy, as well as a tape measure. Now, as we begin, the first thing I wanna do is get my tower assembly done. So I'm gonna be putting the clamps on that are going to attach to our factory rails. And Thule does an excellent job of making this easy for you. They do label the parts, we have an A stamped here, a B stamped on our foot pad, and a C on our outer clamp. And essentially that's giving us the order that we're gonna actually install these. So we're gonna start with the inner-bracket that's gonna be marked with the A. And what we're going to do is, we're gonna make sure these two tabs go in these holes up here, and we're just gonna end up slipping the bolt through that hole in the middle, just like so. Once we do that, it's time to add our foot pad. Now the foot pad is gonna have tabs in it that are gonna line up right here at the bottom of our tower. So as we put that on, what we wanna make sure of is that that inner-clamp is on the outside of it, and we're just gonna press this down into place. And, finally, we're gonna do our outer-clamp, which is stamped in as C. We're going to use that open slot at the top to put that tab through, and leave our bolt exposed at which point we're finally gonna take this nut, it's got kind of a plastic washer on it as well, and we're just gonna lightly screw that into place. We're not gonna tighten this down, we're gonna leave it light, so that our clamps are open. Now we're gonna be putting it onto our bar itself. So, in order to do that, the first thing we'll do is remove the end cap from our crossbar. Eventually. There we go. And next, we're gonna use that slot right there to put these kind of T-fittings through. There are three of them here, and we're just gonna line them up and slide them all over into place. Once that's on, we're gonna re-place our end cap. (end cap clicking) And that's really it as far as getting the tower assembled and getting it attached up here on our bar. Next thing we need to do is simply put it up on our roof. All right, so as we get this seated on here, the rubber foot pad is contoured to go right over our rail pretty much perfectly. So I'm trying to make sure that both of my towers are set in the right spot. The next thing I'm gonna do is kind of get it figured out where I want these at. Now, because there aren't fixed mounting points on this, technically, we could put our bars wherever we really want to. However, I think there is a smart way to do it, and easy for you as well, but that would be to line up that center bolt with our door seams. We've already got our front bar installed and we did the same thing, we lined it up with our door seams. We're gonna do the same thing back here, and that's actually gonna end up giving us a really good crossbar spread. But at the same time, the taper of these rails on the CX-50 is really aggressive. They're much slimmer back here in the back, and they're much wider up here in the front, they're almost in a V shape. The other thing is that, as you get toward the front, they kind of contour down quite a bit, and they slope on the inside as well. So if I want these to lay flat up here, I do think this area is a really good area to be, same with back here, that gives them a pretty close to equal height as well. So if we're gonna line it up to our door seam, as we just did, the next thing that I wanna do is I wanna ensure that these are gonna be perpendicular to our rails and parallel with each other. So I'm gonna go ahead and grab my tape measure, and I'm gonna take a measurement from the end of this clamp right back here to the trunk or the lift gate opening there. I got 17 inches. I'm gonna go on the other side and make sure that says 17-inches, and that should guarantee that I've got parallel bars. So now that we've got our towers placed on our rails where we want them, it's even on both sides, the next thing I'm gonna double-check is the overhang on my crossbars. So I just wanna take a measurement and I wanna make sure that it's even on both sides, this is still gonna be able to be shifted back and forth a little bit until we get it tightened down. So once I get that done, we'll be able to tighten everything and get it clamped down onto our car. So now that they're placed correctly, we've got the correct overhang, it's time to tighten them down, and get these clamps clamped around our rails. I'm gonna take the provided Thule tool here, and what I'm going to do is kind of, you know, tighten it down slowly. I don't want to completely tighten down our passenger side and leave our driver's side loose, 'cause it could shift out of place over there. So what I'll do is, I'll do, you know, three or four turns on one side, tighten it down, and then go over the other side and do the same. And I'm basically gonna go back and forth until we get to the point where it's time to make sure they're torqued correctly. All right, once it's snuck down enough, the way that this is going to tell you that it's torqued down to its proper spec is you're gonna hear a loud kind of pop out of it. (clamp clicking) There you go. Once you hear that on both sides, that's gonna not only lock our clamps in place, it also locks our bar in place, so it doesn't slide back and forth. We've got a really good grip up here. So the last thing that we need to do then is put on our tower covers, and those are gonna go on just like this. They'll just kind of snap into place. And then, this is the only thing that your flathead is really for. When you purchase this initially, it's going to come with a plastic lock core that you could use just a simple flathead, or I've even seen people use like a nickel or something to get that locked and unlocked. You can, however, purchase separately, and it is available here at etrailer.com, there are matching keys and key cores, metal key cores, that you can get for all of your towers. And not only that, but through Thule's one-key system, you can get them keyed alike to all your other Thule accessories. So maybe you have a Thule roof box, a Thule kayak carrier, a Thule bike rack, you can get it keyed alike to all of those together, that way you only have one set of keys to really keep track of with all of your different Thule gear. But now that we've got that completely into place, we can get this loaded up and head out on our adventure. So that's the look at the features and the installation of the Thule WingBar Evo on our 2024 Mazda CX-50. I'm Curt with etrailer, thanks for stopping by.


Do you have a question about this Roof Rack?
Info for this part was:
At etrailer we provide the best information available about the products we sell. We take the quality of our information seriously so that you can get the right part the first time. Let us know if anything is missing or if you have any questions.


Thank you! Your comment has been submitted successfully. You should be able to view your question/comment here within a few days.
Error submitting comment. Please try again momentarily.