
To see if this custom-fit item will work for you please tell us what vehicle you'll use it with.


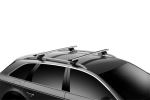
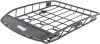
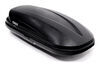
This Thule roof rack lets you carry cargo and gear on your vehicle. Aerodynamic crossbars with split rubber strips in top channels work with channel-mount and clamp-on accessories. Installs to raised rails on your vehicle's roof.
Features:
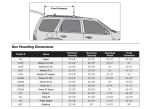
Specs:

California residents: click here
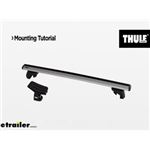
Videos are provided as a guide only. Refer to manufacturer installation instructions and specs for complete information.
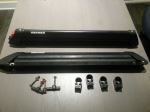
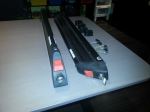
Hey everyone, I'm Evangeline right here at Etrailer. Today we'll be taking a look at and I'll also show you how to install this Thule Roof Rack System on your 2024 Subaru Forester. If you are planning on taking some roof boxes or kayaks or maybe you wanna get a rooftop tent on top of your Forester, you're first gonna need some crossbars like these. If you're looking at the different options for your Forester, what we have today is specifically the Thule WingBar Evo Kit with the 50 inch long bars and the Evo clamps that fit around the raised rails. You can get this kit in the black version, which is what we have here, or you can get these silver bars instead as a different option. Now with that, with the different options for your Forester, Subaru has traditionally worked with Thule for a more sleek but also sporty looking crossbar system.
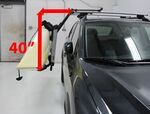
Thule has been around for a while, so this will look nice on the Forester, but also work well with your other Thule accessories if you have them. As for the length of the bar, Thule recommends the 50 inch bars and when you measure for overhang, which is from the tower to right before the end cap, I have it at around four inches of overhang and that's helpful 'cause then you can carry a lot of different things. You can clamp things around the overhang, making this easier to reach and you then also get to maximize your crossbar spread. But if you want to, you can also use the channel mount version or the channel mount option where you can get channel mounted accessories that slide through the tracks inside the bars and then you can use the whole crossbar and you don't have to dodge around the feet or the towers. So both are options available for you.
As for clearances with those clamps, let's take some measurements. So you wanna have enough space underneath the crossbar, so we'll start there. From the top of the roof to the bottom of the bar, I have around four inches, some areas, I measures like 3-3/4" and that's plenty of space. Even your old school U volts with wing nut style will be able to fit under there. As for the measurement on top of the crossbar, let's go from the roof to the top of the bar, maybe around 5-1/4".
Now those measurements will change a little bit because there is a curve to the roof, but this is a pretty good height. This means that even if you carry around skis with extra tall bindings as an example, you're less likely to scratch up the roof. And now that you know the measurement that sits at, you'll be able to see for yourself if you do need to get extra accessories that give you that extra height. Be mindful though, when you start venturing into the tall accessories like you have kayaks on there, a really tall roof box, you have to account for your garage door clearance then. Since your Subaru Forester has raised rails where the rails sit up above the roof and then you have a space inside to move your roof rack system, your crossbar spread, which is the distance from one bar to the other is adjustable.
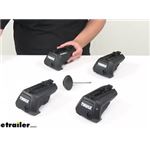
So I currently have it at 27 inches apart and I measure that from center of one bar to center of the other. And this is gonna be super helpful for most accessories. 27's a good one to shoot for, but if you need to go further out, let's say you're carrying a long canoe or a long ladder, you can go as far out as about 39 inches apart for crossbar spread. So many of my friends with a Subaru ask me for recommendations for a roof rack. I usually start looking at the Thule options simply because Thule roof rack are often seen on Subaru vehicles for several years. And even beyond that, it's there for a reason because Thule has always had solid roof racks with great weight capacity and they look really good. Now, sometimes I'm a little hesitant with clamps valve roof racks simply because I prefer straps that go all the way around the rails. But in the case of our Thule roof rack here, the clamps fits so nicely around the rails. There's a lot of touch points there. It gives me a lot of peace of mind knowing that we do truly have a good fit. So at this point, if you're really into a Thule roof rack because of its sturdiness, its strength and if you have a lot of other Thule accessories, well, hopefully this video helps you out with seeing how it's gonna work on your car. If you're curious about how to get it installed, stick around. Getting your rack set up the first time is a little bit more time consuming compared to after that where it's super easy and straightforward. The first thing you need to do is set up the wind strips and these will arrive as a single piece they have to split apart. And then the part where the arrows faces the front of the bar, which is gonna be the thicker end, and then the part with no arrows will be towards the back of the bar, which is the thinner end. Once that's set up, I then recommend keeping those end caps off. This way you can attach the feet or the towers. These will just slide into that channel there. And that's where I recommend putting the end cap back on so that that keeps those towers in place. So do this on both sides so that you have all four towers set up. Again, keeping in mind the front and the back of the crossbars, we're now ready to put this onto the roof. Make sure to try to put it on the same spot on both sides and to also have an equal amount of overhang on each side. So you're gonna need a tape measure for that one. Once you get to the spot that you like, then go ahead and take off that end cap and then that will reveal the bolt on the inside. So what I recommend doing is pushing your tower up against the rail, making sure that the flaps on the side are not folded in but they're folded out and I already started tightening this down. So you just go ahead and use your included torque tool to tighten this down too. Now this is a torque tool because once you get to a good amount of tension, it will click just like that. So once all four towers click, then you can then go and put the end caps back on. If you have the one key system lock cores, which is the pack that sold separately here at etrailer, you can switch out those plastic lock cores for those metal ones. The plastic ones still work fine, just use a flathead screwdriver to turn them into the lock position. But with all four towers secured, then you go ahead, give 'em a good shake, and that's it for your installation. Keep that torque tool handy. I like to put this in the glove box or with all of my adventure gear because if you do need to take off this roof rack, it's simply a matter of taking off those end caps and undoing those bolts. Very quick and easy process. Same thing for installation when you need your roof rack back on for all your gear, for all your adventures. Hopefully this video was helpful for you. What you saw was a look at the Thule Roof Rack system here on 2024 Subaru Forester. My name's Evangeline, and I hope you enjoyed this journey.

Do you have a question about this Roof Rack?
Info for this part was:
At etrailer.com we provide the best information available about the products we sell. We take the quality of our information seriously so that you can get the right part the first time. Let us know if anything is missing or if you have any questions.


Thank you! Your comment has been submitted successfully. You should be able to view your question/comment here within a few days.
Error submitting comment. Please try again momentarily.