
To see if this custom-fit item will work for you please tell us what vehicle you'll use it with.
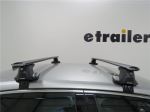
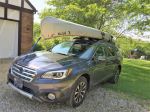
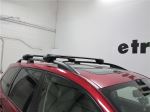
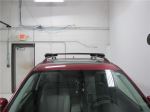
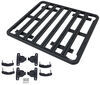
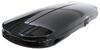
This aerodynamic roof rack mounts flush on your roof for a factory look. Crossbars with push-down rubber strips in top channels work with channel-mount and clamp-on accessories. Installs to raised rails on your vehicle's roof.
Features:
Specs:

Videos are provided as a guide only. Refer to manufacturer installation instructions and specs for complete information.
Hi, I'm Matt with etrailer. Today we're gonna be talking about inner roof rack with the flush rails on our 2024 Mercedes-Benz GLE. Now this can be a great option if you're looking for something that's just gonna have more of a clean look because we're not gonna have a lot of overhang that you get with your typical roof rack. Now roof racks, it would be my choice for that external storage area because you could go with a hitch and put a hitch carrier on it or even connect it to a trailer. The only downside to that is that's gonna take up a lot larger of a footprint. So if you're trying to get into those really tight areas, or just tire areas in general, it'll be really difficult to do that.
Now with the roof rack, we're gonna be using the same real estate that's already available to us, just making it a little bit taller. And that's why I like them a little bit more. And what's nice about these ones today is it has a lot of built-in features already on them so you don't have to worry about any tools on hands. And if you don't like any of those crossbars that have the overhang to them, this is gonna be a really good choice for you. But let's start off with talking about the components that come with this kit.
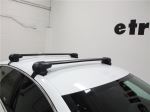
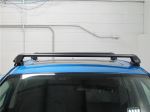
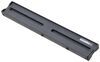
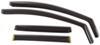
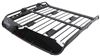
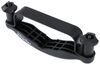
So this is gonna come in two pieces. We're gonna have our arrow crossbars and we're gonna have the tower itself. Now each one of these crossbars are gonna be different lengths. We're gonna have the longer ones up front and the shorter ones in the back. Now we are gonna have this built-in T channel with this built-in weather strip.
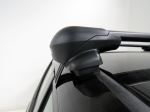
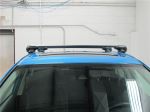
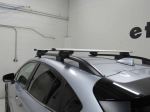
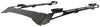
That's gonna keep out any wind and any debris to make sure it doesn't get obstructed and reduce wind noise. The shape of it is also gonna reduce wind noise. And this is gonna go right into our towers right here. If I remove this, typically you can have this locked into place, and if you unlocked it and you can see what's kind of happening underneath here. And what's really neat about this is we're gonna have this knob here.
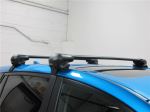
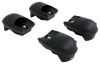
You can tighten this down just by pulling on this. So you don't need any external tools that do this, that's why I like it personally. And we are gonna have this indicator right here telling us which is gonna be your left and your right side. The left being your driver, right being the passenger. Underneath there we're gonna have this bar that is connected to this rubber strap. That's what you're tightening down when you tighten down this knob here. And that's what I like about it is that it's gonna give you full coverage of your rails, giving you really good hold. So let's talk about how it's gonna look up here. So you'll notice my crossbars are pretty far apart. I put them this far just to show you that we can get a pretty wide spread. And in the center you'll notice I already have my sunroof open and you can tell this gets pretty high. So if you do have a roof rack on here, a lot of times it will make contact with this, especially with this type of bar. So the biggest thing to note there is if it is kind of high, especially on the front side, since we still can open up our sunroof since it does kind of have this slight bow to it. Now here you just need to make sure if you have any clamps, just make sure they're not gonna make contact with your roof. Or in some cases just use this T channel at the very top of it so you can completely avoid that. Now the next measurement I want to talk about is gonna be the total distance it adds to your roof. This is gonna be a little bit under three inches. So that's still gonna be very compact. But I still recommend just taking the total measurement on your roof. So get your vehicle, your crossbars, and anything on top of that. So you know if you can make it under a spot anywhere like a garage. And this is gonna have a pretty decent weight capacity. But what I would recommend is finding out what your roof is rated for and then go from the lowest rated component so you don't damage anything. Now in my opinion, I think this is a solid choice because again, it's not gonna have that overhang so it looks a little bit more clean up here. And if you're looking for something that has everything already integrated into it, it's probably be my top choice because most roof racks out there don't have lock cores already installed. And since that tightening tool is integrated into it, we don't have to worry about losing it. And speaking of tightening it down and installing it, I can show you what that process looks like now. So the first thing we wanna do is make sure we have all our parts. You'll notice I'm missing a few because I already have my front crossbar installed. Now what we are gonna have is one crossbar first side and they are gonna be the same installation process. Now these are gonna be two different lengths, so we wanna make sure we have the right one to the right side. And we're gonna have our tower and the end cap that goes along with it. Now these will have a left and right side. I'll tell you which one is which once we get it over there. And then on top of that I recommend having a tape measure so we can make sure everything is even. So let's put these towers into place. Now the easiest way I find to do this is to put the crossbar in the orientation of your roof. So let's say I'm behind my vehicle right now, we wanna make sure the thicker side is facing forward, the thinner side behind us. And we wanna make sure we have the left tower on the driver's side. Once we do that, we wanna have the right tower on the passenger side. We can flip this over. And from here, I'm gonna have these tabs that'll go into this opening. If you don't see that opening, it's probably in an orientation like this. To put it in there, just press down that rubber square till it hides all of that. And then, put this little tabs here with that opening. Should kind of fall into place. Push on the side of it and it locks it like that. We wanna make sure that opening is facing on the outside. Once we're done with that, repeat that on the other side. And we can put it on our roof now. We wanna make sure this is gonna be the correct one for the correct location. So your shorter crossbar is gonna go in the backside, while your longer one goes on the front side. You are gonna have a little bit of play here, so I could put it at the very far end or I could put it a little bit forward. For now, I'm just gonna put it at the very far end to show you that we can reach all the way across here. Just get it to kind of line up with the raised rails. I guess I'll put mine at the very back of it, just like that. Once you make sure both sides are in the correct locations, we can grab this rubber strap and put that bar on these hooks. If that feels too tight, just loosen this up by turning this tab here and put it into place, then tighten it. And I'd recommend just to tighten it enough we have a little resistance. Once you have that little resistance, go to the other side and repeat the same process, then go back and forth until this is all the way tightened down. And you'll be able to tell if it's all the way tight if it feels just really snug, you can't really get it to tighten down anymore. I'll try to get it to push, point down the down position if I can. That makes putting the end cap a little bit easier on. And now again, you can kind of see this L right here. That's letting us know this is the left hand side to the left hand tower. We're gonna have the left end cap, it's also gonna have an L inside of it so you can match them up and not get them mixed up. Once you're ready, put that into place and then you can just give it a global shake test, make sure it's not gonna go anywhere, load it up, and then take it out for a ride. But that'll complete our installation. If you guys have any other questions, let us know here at etrailer. And again, I'm Matt, and thanks for watching.
Ratings & Reviews


Do you have a question about this Roof Rack?
Info for this part was:
At etrailer we provide the best information available about the products we sell. We take the quality of our information seriously so that you can get the right part the first time. Let us know if anything is missing or if you have any questions.


Thank you! Your comment has been submitted successfully. You should be able to view your question/comment here within a few days.
Error submitting comment. Please try again momentarily.