
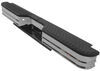
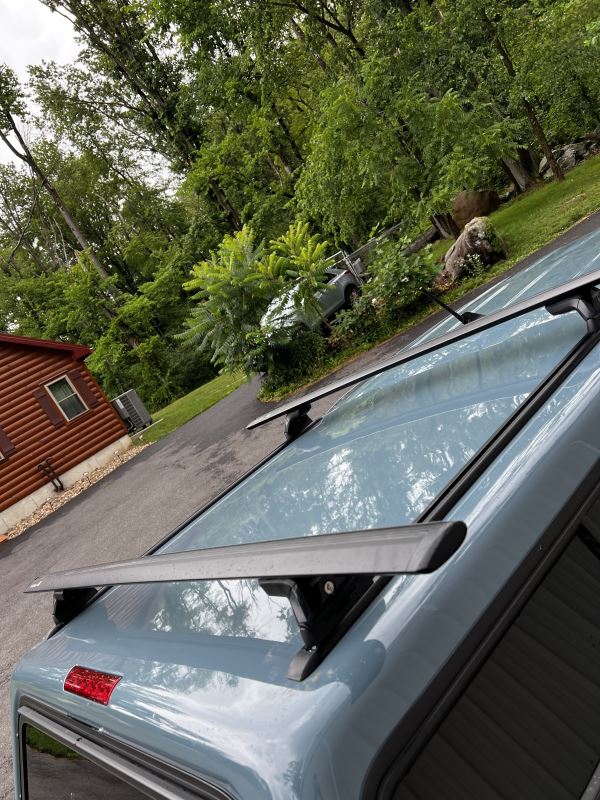
Yakima SkyLine Roof Rack for Fixed Mounting Points - HD Crossbars - Aluminum - Black - Qty 2
Item # Y78BB
Our Price: $767.75
Will this fit?
To see if this custom-fit item will work for you please tell us what vehicle you'll use it with.


- All Info
- Reviews (249)
- Q & A (0)
- Videos (8)
- Photos
Yakima Roof Rack - Y78BB
- Square Bars
- Crossbars
- 55 Inch Bar Space
- Yakima
- Black
- Overhang
- 2 Bars
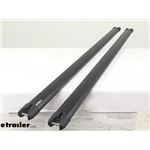
Heavy-duty crossbars mount to Yakima towers to create an aftermarket roof rack. Top and bottom channels let you add channel-mount accessories. Tie-down points in endcaps let you easily secure cargo.
Features:
Yakima HD Crossbars - 55" Long - Black - Qty 2:- Heavy-duty crossbars let you build an aftermarket roof rack for your vehicle
- Pair with Yakima truck bed towers or roof rack towers and a fit kit to create a complete system
- Full-length design maximizes space for carriers and accessories
- Versatile crossbars accommodate accessories that mount in the T-slots or clamp around the bars
- Accessories can be mounted in top and bottom channels
- Rubberized strips in top channels reduce wind noise and drag
- Keep dirt and grime out of crossbars
- Provide cushioning and slip resistance for your cargo
- Bottom channels allow for easy installation on Yakima truck bed rack towers
- SL adapter allows bars to work with BaseLine, TimberLine, SkyLine, and RidgeLine towers
- Etched measurements on bottom of bars help center rack on your vehicle
- Heavy-duty yet lightweight aluminum bars are durable and rustproof
- Plastic endcaps help to keep water and debris out of bars
- Integrated tie-down points make it easy to secure gear
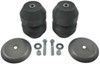
Yakima Landing Pad 1 Fit Kit:
- Provide mounting point for Yakima SkyLine and Control Towers
- Fit vehicles with C-shaped factory rack tracks
- Attach to factory tracks with anchor plates and screws
- Include snap-on covers for protection when Towers are not in place
Yakima HD Bar SL Adapter:
- Adapters let you mount your Yakima HD crossbars on BaseLine, SkyLine, TimberLine, or RidgeLine roof rack towers
- Can also be used as replacement adapters for JetStream crossbars
- Easy installation with included tool
- Simply slide adapter into bar's channel and secure it to the tower
- Kit includes 4 adapters
Yakima SkyLine Towers - Qty 4:
- 4 Heavy-duty towers mount Yakima crossbars to your vehicle with fixed mounting points, flush side rails, or tracks
- Pair with 2 Yakima crossbars and Landing Pads to create a complete roof rack
- Tower pitch can be adjusted 6 degrees forward and 6 degrees backward to level your crossbars
- Versatile BarBeds are curved to accommodate the elliptical shape of Yakima CoreBar and JetStream crossbars
- Also fit RoundBar crossbars with adapter
- Easy, tool-free installation - just drop tower onto Landing Pad and close the cover
- Included torque tool clicks 3 times when crossbar is tightened to tower - eliminates fear of under- or over-tightening
- Lockable with Yakima Same Key System (SKS) lock cores (Y07204 - sold separately)
- Weather-resistant die-cast aluminum, stainless steel, glass-reinforced plastic, and elastomer construction
8000221 Landing Pad 1 for Yakima Control or Sky Line Towers
8001156 Yakima HD Bar T-Slot Crossbars - Aluminum - Black - 55" Long - 500 lbs - Qty 2
8003541 HD Bar Adapter for Yakima StreamLine, BaseLine, TimberLine, Skyline, and RidgeLine Towers - Qty 4
8000163 Yakima Sky Line Roof Rack Towers for CoreBar, JetStream, and RoundBar Cross Bars - Raised Side Rails - Qty 2
Replaces 8000148


Video of Yakima SkyLine Roof Rack for Fixed Mounting Points - HD Crossbars - Aluminum - Black - Qty 2


Videos are provided as a guide only. Refer to manufacturer installation instructions and specs for complete information.


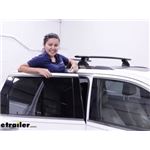
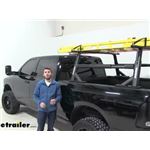
Video Transcript for Yakima HD Crossbars Roof Rack Kit Installation - 2021 Ford Explorer
Hi, Matt with etrailer. Today we're gonna talk about our Yakima roof rack system on top of our 2021 Ford Explorer. Now this gonna be a great option for you if you're looking for something that's gonna be really heavy duty and it's gonna be able to keep a lot of your accessories on top of your roof. Maybe you've run out of room in the back of your car, because we do have three rows of seating. So if this is packed full of people, you might run out of space faster. Or if you're already using that space for other accessories or items, then you might need somewhere else to store your extra stuff.
Or maybe you got kayaks, skis, or anything longer that you can't fit inside your car, this is gonna be a great solution for you. This is gonna be comprised of two parts. First, we're gonna have our 60-inch HD bars on top, and then beneath that we're gonna have our Yakima towers that grab onto your raised rails. Now let's take a closer look at these crossbars. The first thing I'd like to note is we do have this weather strip on top that's gonna protect that T-track channel at the very top of it.
And what that channel is used for is for any T-track accessories. And what's nice about this, this not only keeps debris out of that, but also reduces that wind noise from whistling through it. And then at the very edge, we're gonna have this anchor point. So if you need to tie anything off from anywhere, this is gonna make an excellent point of contact. This is also gonna be a pretty thick bar, so putting on any clamp-on accessories on here might be a little bit difficult if you don't have any HD bar adapters.
And then at the very bottom, there'll be an additional channel and that's what's gonna be what connects your tower to your crossbar. Then we're gonna have these towers and this end cap's gonna hide a lot of that hardware in here. And with that cap removing, take a closer look at how that strap wraps all the way around and it connects to these two hooks on the side. That's actually something I do kind of like about this one in particular, is that strap wrapping around this whole rail, giving you a nice secure fit. Though there is one downside to it, and that's gonna be on our rear crossbar.
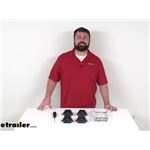
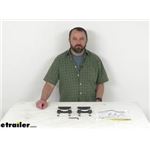
Take a closer look at it over here. If you notice, we do have this kind of plastic rubber material. The nice thing is you can push this down, but trying to get that strap to fit through this tiny crevice or hole here is a little bit of a struggle. For what we can put up here, we're gonna be able to put up to 220 pounds, but what I recommend doing is checking what your roof is able to handle. You can find that in your owner's manual so you don't exceed this weight capacity. Now for how far it's gonna stick up from the top, if I go from the top of our rails to the top of the crossbar, it's gonna be about three and a half inches. And that's another thing to note if you're going under any low clearance areas. So if you wanna make sure you can make those areas, you can take the total height of your car plus the rails, and then add your crossbars and any accessories you have on top of that so you know what areas you can make it under. And for the distance underneath from the top of our roof, that's gonna be about two and three quarters. So that's not a lot of room, but it's a decent amount of room to get a lot of different clamp-on accessories under here. Like I said earlier, you are gonna need some pretty large clamps that get around this though. So if you don't wanna use any clamp-on accessories, you can actually just use this T-channel at the top to put any stuff that you have. We're gonna have some overhang and actually, I think this is the perfect amount of overhang that you're gonna want, 'cause it's gonna stick out far enough where you're gonna be less likely to hit your head on, but you're gonna still have plenty of room to put on any accessories at the very end of it, so it's a lot easier to take off those items. Overall this is gonna be a great sturdy option, especially going for the build. If you want something that's gonna last you a long time, this is gonna be it. I would actually recommend the Yakima JetStream crossbars instead, because that's gonna be able to accommodate a lot of the same things. Now unless you're planning on getting a rooftop tent put on here, that's gonna be the only caveat off of that. But if you like this one for the sturdiness and you do plan on putting a rooftop tent on this, then I think it's gonna be the best option for you. But if you need to hand with the install, just stay tuned, we'll show you how to do that. Start off the installation, I'd just like to lay everything out to get an idea of what I'm working with. So we're gonna have our crossbars in front of me and over to the left, we're gonna have these towers. Along with the towers, the hardware to go with them. And then I'm gonna have my included Allen key with this built-in torque device. And what I recommend grabbing is a measuring tape to make things easier. First we'll get our tower ready just by taking off this end cap. And in your case you might have to loosen this up a bit just using your included Allen key. And once you've loosened it up some, you can push this through. Gonna adjust it because what we want to do is have access to this bolt that's within here. Once you can see that bolt, you're just gonna flip this around, you'll see it sticking out on the other side and you're just gonna match up this block with that bolt holding it in place. And then we're gonna just grab our Allen key and just tighten it down slightly. We just want it to be able to grab onto that block. We want it pretty loose because we're gonna be putting it on our crossbars. I've flipped over the crossbar now and you can tell, because we have this ruler on the backside and you can see this bolt in this channel. I'm just gonna unthread that bolt until it's all the way loose. And then at this point I just flip over the crossbar, let that bolt fall into my hands, and set it aside so I don't lose it. Remove that end cap. And when you're putting your towers on, you can actually put both of them on from this side. What I like to do is put the first one on backwards. Just matching that block up with that channel and pushing it all the way down to the other side. And then for the next one, I like to put that one in the right orientation, making sure that bolt is facing away from the center of the crossbar. And doing the same thing that we did on the first. And once you have it on, just make sure you put those end caps back on, and thread that bolt back through. Just move this over some so I have access to that bolt and just tighten it down just a little bit. I just wanna tighten it down enough where I can still adjust this if I need to, but it's not gonna be sliding all over the place with the slightest movement. Now I'm gonna find out where we're gonna place our crossbar. In your case, you can place the first one wherever you want to, but when you go on to that second one, you wanna find what crossbar spread that's gonna work best for you. In our case, I want a crossbar spread of about 30 inches. So that's gonna be able to accommodate a lot of the accessories we have. So if you know what accessory crossbar spread you need, then just adjust for that and then you can mark this location out. Place my crossbar up top, roughly where we marked it out to be. Matching up those towers to our raised rails, making any adjustments that we need to, and placing it right on there. And now we wanna make sure it is going to be even on both sides. So what I'm gonna do is get that crossbar spread again and I can see that's moved over just by a little bit. So I'm just gonna adjust it to make sure we're 30 inches from both sides until I'm good. I like to get my overhang distance. I like to make sure that's gonna be the same on both sides too. And when everything looks even, we can grab that strap, and pull on it and slide that metal bar into these hooks. And then once I've done that, I can just tighten this down slightly, just enough for it to make contact with the bar or the raised rails, with a little bit of tension, 'cause we don't wanna tie it in too much because it's gonna pull from the other side. Once it's been tightened just slightly, repeat the same process on the other side, going back and forth until this is completely tightened. You'll be able to tell when it's tight enough when it starts to click. Just like that. And then once you've tightened both of those all the way down, go into this small little channel up top or hole and do the same thing for this bolt here until that starts to click in place too. And repeat that on both sides. The final step is putting on this end cap until it clicks into place. Then after that, just check everything over, make sure everything feels secure, that's good to use. And then you can put on whatever accessories you need and then take it out for a ride. That's just a look at the installation and some of the features of our Yakima roof rack system on top of our 2021 Ford Explorer.
Customer Reviews
Yakima SkyLine Roof Rack for Fixed Mounting Points - HD Crossbars - Aluminum - Black - Qty 2 - Y78BB
Average Customer Rating: 4.8 out of 5 stars (249 Customer Reviews)
Heavy-duty crossbars mount to Yakima towers to create an aftermarket roof rack. Top and bottom channels let you add channel-mount accessories. Tie-down points in endcaps let you easily secure cargo.by: Pedro05/26/2024
Works perfect for our SUP with the tie down loops. Great for building materials as well. Looks great as well.


by: Eric 05/13/2024
Fit our Subaru Forester perfectly. Install was a breeze. For the money I wish they came with the core locks.
by: Bill K07/01/2023
Hyundai
I ordered the Yakima roof rack for a 2019 Hyundai Ioniq. I went with the heavy duty one for extra strength but it is quite a bit thicker, likely increasing wind noise. So I might have chosen the aerodynamic lighter weight one if I was to do it again. Also, I needed to get larger bolts for my kayak holder to get around the crossbar. The instructions and video on website were very helpful but they did not explain well how to adjust the toe and pitch. For the toe adjustment, you have to push the metal post with the tool before tightening. That was not obvious. For the pitch, it helped to do that once the towers are attached to crossbar. Then you can tilt tower while cross bar is laying flat (upside down). I ended up having to add tilt on both front and back crossbars for them to be flat when installed. Website said only front one would need to be pitched. I am very pleased with the look and sturdiness of the product. My Hyundai Dealer had zero options for this car.


by: Maureen02/12/2024
etrailer was a great place to order, quick and easy. Yakima products however are over priced and overly complicated.
by: John11/16/2023
Very nice quality towers. Very heavy duty! They have a cool "snap" on / off mechanism for quick removal and installation.


by: Bryan03/27/2024
Very nice and heavy duty. They don’t look too fragile on a lifted truck with oversized tires.
by: Frank P.03/06/2016
Fit good with the OE track on roof. I like the new covers they supplied with the mounts.


by: Mike06/04/2024
You sold me used equipment at new prices. What a rip off. Your company is a joke! No worries, you’ll not have to worry about screwing up another order for me in the future. I’ve learned my lesson not to deal with your customer service.
by: Nelson06/26/2023
Ford
It was what it was advertised and fit perfectly on my 2023 Ford Maverick


by: Rob04/19/2023
Honestly, I love etrailer. I love the expert help that you all provide. It's clear by the 1 year follow-ups that you care more about the relationships with your customers then just making a sale. Your service is friendly, informative and fast. I always come here first to look for my next purchase. Thanks again-Rob.


by: William02/28/2024
You guys provide great products and excellent customer service.
Thanks
by: Mike D07/16/2023
The customer service in ordering theses par tea was amazing!! I spoke with a wonderful specialist named Kate F, and she was super helpful and patient answering all my questions and helping me make sure I had the correct parts I needed for my type of car. The bars are very sturdy and have proven very worth the money!!
by: Layne 02/11/2024
These adapters were easy to install and made my system fit together nicely.
by: Jerry 07/29/2023
I have ordered several times from Etrailer and have always received efficient, timely and reasonable shipped items. Did not use customer service with this order but it has always been good.
by: Pat G08/29/2013
Great first experience dealing with you guys! Shipped fast, and was a faster install. You gave me the right parts and it went together in a flash.
Will definitely be doing business with you all again.


by: Aaron 02/10/2024
Perfect match
by: Donald03/26/2023
I had a difficult time identifying whether these were the correct adapters for the rack towers that I was purchasing to fit my tracks but that has more to do with yakima doing everything a-la-cart instead of having kits that include everything you need if I hadn't already had the HD bars on my other rack and wanted to be able to transfer them to this rack I probably wouldn't have went to this expense because I think they are overpriced.AS far as etrailer is concerned I always receive great service and products and they are always well packaged and never damaged by poor delivery care and always fast delivery speed.
by: Wade 03/09/2024
Your service is nothing short of excellent! Thank you
by: Ric 07/22/2023
Honestly went back to etrailer after buying something i couldnt find on the big A before because their support was so good and delivery speed was soo fast.
by: Hogan06/09/2023
I’ve placed 2 separate orders with etrailer in the last 6 weeks. Their service, response, pricing and follow-through have been terrific each time. I will use them every chance I get.
by: Michael01/22/2023
Yakima SkyLine Towers are well-designed and well-executed. They easily fit into the Yakima Landing Pads and form a tight fit when closed. And they also fit nicely into the Yakima JetStream Crossbars when following the Yakima instruction manual and various YouTube videos. I did run into a snag at first where I found the rubber seal on one SkyLine Tower getting caught on the JetStream Crossbar track, but after that I was careful not to let that happen with the other towers.
I find the appearance of the Yakima SkyLine Towers to match their level of quality in materials and design.
by: William 01/11/2024
Shipment received, as ordered! Thanks again to Bryce D., for assistance.
by: Blaine04/26/2021
Ford
Great product and even better was the service with etrailer! These guys make it happen and delivery was super fast. Thanks for a fantastic experience, will be a return customer.
Yakima HD bars 60”
2018 Ford Expedition


by: Brad G02/04/2023
I ordered a Yakima roof rack system here and it was easy to find what I needed for parts to install on my truck cap. Very solid product and this company ships quickly every time I've ordered from them
by: Paul 07/15/2023
Easily supports the RoofNest! The Customer Service with Roger was Excellent!
25
482
Show More Reviews
See what our Experts say about this Yakima Roof Rack
- What Roof Rack Do You Recommend that Will Work with a Thule Hullavator on My 2021 Toyota RAV4?To mount the Thule Hullavator Pro Kayak Carrier and Lift Assist with Tie-Downs - Side Loading Item # TH898 on your 2021 Toyota Rav4 with flush rails, you will need a crossbar system that gives you at least 4 inches past the feet of the system in order to function. For a great system that will give you that clearance on your 2021 Toyota RAV 4, I recommend the following parts: - Yakima HD Crossbars - Aluminum - Black - 55" # Y01156 - SkyLine Towers for Yakima Crossbars - Fixed Mounting Points,...
view full answer... - High Capacity Roof Rack Recommendation for 2017 Honda CR-V for Off-Road ApplicationFor an off-road application there's only one roof rack I can recommend for your 2017 Honda CR-V with flush rails and it's the Yakima HD roof rack part # Y01156, # Y53TR, # Y03541, and # Y00245. This rack has a 500 lb capacity and sits far enough off of the roof of the vehicle (see picture) that you'd never have to worry about flex in the bars. You should note that the capacity of this rack is not the capacity of your roof. You'd still be limited by the weight capacity of your roof but this...
view full answer...
- Are Two Different BaseClip's Needed for a Yakima Roof Rack on a 2023 Maxda CX-5 with Naked RoofYes, the two different BaseClip's are correct for your 2023 Mazda CX-5 with naked roof. The BaseClip Fit Kit for Yakima BaseLine Roof Rack Towers # Y06130 is for the front bar and the BaseClip Fit Kit for Yakima BaseLine Roof Rack Towers # Y06154 are for the rear bar. The rest of the roof rack kit is the: - Yakima HD Crossbars # Y01156 - BaseLine Towers for Yakima Crossbars # Y28TR - HD Bar SL Adapter for Yakima BaseLine # Y03541 This will allow you to use the Thule Hullavator Pro Kayak...
view full answer... - Recommended Roof Rack For Attaching A Thule Hullavator To A 2021 Toyota HighlanderTo attach the Thule Hullavator Pro Kayak Carrier and Lift Assist with Tie-Downs # TH898 to your 2021 Toyota Highlander you'll need a roof rack that has a T-Slot in the crossbars for the Hullavator to slide into. Currently the only brand of roof racks we carry for your vehicle that are compatible with your flush mounted rails is Yakima. I recommend the following parts to complete your roof rack: Yakima HD Crossbars - Aluminum - Black - 55" Long # Y01156 SkyLine Towers for Yakima Crossbars...
view full answer...
- Recommended Roof Rack For a 2013 Ford Transit ConnectI recommend the Yakima HD roof rack for your 2013 Ford Transit Connect. This will consist of the Crossbars # Y01156, Towers # Y53TR, Adapters # Y03541 and Fit Kit # Y00233. I prefer this option as the bars have a versatile design to accept either track or clamp on accessories plus the endcap has an integrated tie-down point to help secure your cargo.
view full answer... - How To Carry 1 Canoe And 1 Sea Kayak On A 2003 Dodge Caravan With Bare RoofIf you have the factory tracks running front to back and do not have raised rails, then the longest option is Yakima HD Crossbars - Aluminum - Black - 55" Long - Qty 2 # Y01156 which measure 55" long and have a weight capacity of 150lbs. To install these onto your roof you will also need Rhino-Rack Vortex Aero Crossbars - Aluminum - Black - 49" Long - Qty 2 and Rhino-Rack SX Series Legs for Vortex Aero Crossbars - Raised Factory Side Rails - Qty 4, parts # RRVA126B-2 and # RRSX100. When...
view full answer... - Rooftop Tent and Crossbars for a 2015 Subaru OutbackUnfortunately, those adapters are no longer available. Instead, I'd recommend going with the Thule WingBar Evo Crossbars # TH711100 with the Evo Flush Rail Feet for Thule Crossbars # TH710601 and the Fit Kit for Thule Evo Flush Rail and Edge Flush Rail Roof Rack Feet # TH37CE. These are going to attach to your OEM bars, so they're not going to replace them but this setup with work great with a rooftop tent like the Thule Tepui Explorer Kukenam 3 Rooftop Tent # TH8001KSK04.
view full answer... - Can I Install A Rooftop Tent On My 2021 Honda CR-V With Flush Rails?To make sure that you can get the spread you need to have to mount your rooftop tent you'll need to take some measurements. On your flush rails there will be fixed mounting points on the top of the rails. When you have flush rails you won't be able to adjust the spread at all. That is your maximum mounting width. If the fixed mounting points match up to your rooftop tent, you can get a roof rack for your 2021 Honda CR-V. I Recommend getting a hefty system like the Yakima HD Bars # Y01156...
view full answer... - What Crossbars Allow Me to Use the Hullavator # TH711420 on My 2022 RAV4 with Flush Rails?I recommend looking at the Yakima HD Crossbars - Aluminum - Black - 55" Long - Qty 2 # Y01156, which also requires Towers # Y53TR, Adapter # Y03541, and Landing Pads # Y98FR. This will fit your 2022 Rav4 with flush factory rails and should give you 4" of crossbar overhang on each side to use the Hullavator. One way you can tell for sure is by measuring from mounting point to mounting point on your roof. If that measurement does not exceed 47 inches, the Hullavator will have enough length.
view full answer... - Cross Bar Options And Kayak Carrier For A 2022 Hyundai SonataWe do have a couple of cross bar options for your 2022 Hyundai Sonata that will work great for you. -First we have the Yakima JetStream Crossbars # Y00425 with the BaseLine Towers for Yakima Crossbars # Y28TR, the fit kit # Y06180 & # Y06153. These are aerodynamic cross bars that measure 50" long, and have a maximum weight capacity of 165lbs. -Next, we have the Yakima CoreBar Crossbars # Y00421, with the same towers # Y00146, and fit kits # Y06153 & # Y06180. These cross bars share...
view full answer... - Roof Rack & Attachments For 2010 Toyota Tacoma TRD SR5I would get the Yakima HD Bar Roof Rack System. You'll need the HD bars # Y01156 Skyline Towers # Y53TR HD bar adapter # Y03541 and landing pad # Y74FR. You can then use the JayLow Kayak Carrier # Y04073, Off-Grid Cargo Basket # Y07139 or Skybox Cargo Box # Y95AV. These are just my suggestions for accessories but there is much much more on our website if you're wanting something different!
view full answer... - Replacement Yakima HD Adapter for Yakima HD CrossbarsIt sounds like you have the Yakima HD crossbars similar to the # Y01156. These are attached and held in place by the HD Bar SL Adapter # Y03541 on your roof rack towers and the # Y03541 would be the correct way to replace one of those. The HD Bar SL Adapter # Y03541 works with the BaseLine, SkyLine, TimberLine, or RidgeLine roof rack towers. If the adapter itself is not what you are needing, then it is likely the tower. If that is the case, I will need to know which style of tower you...
view full answer... - Recommended Roof Rack for Mounting a Thule Hullavator Pro on a 2021 Toyota RAV4The Thule Hullavator Pro, part # TH898, does in fact need crossbars that extend 4" - 8" beyond the feet. To use the flush rails on your 2021 Toyota RAV4, you will need a roof rack that has feet that are compatible with the rails. With those two stipulations in mind, the Thule WingBar Evos don't look like they will provide enough clearance with their 47" of crossbar length. Instead, I recommend the Yakima HD Crossbars, part # Y01156. They are 55" long, so they will have the extension you...
view full answer... - Recommended Roof Rack for Bikes and Surfboards on a 2019 Mini Cooper 2 doorI recommend Yakima aerodynamic bars part # Y01156 which are designed to cut down on wind noise with their design and wind strip on the top and bottom of the bar. You need RidgeLine towers part # Y00145, adapter part # Y03541 and fit kit part # Y06009. The Yakima HighRoad roof bike rack part # Y02114 allows you to carry 1 bike on the roof of the Mini Cooper. The carrier is a no frame contact carrier so it will not damage the frame of your bike. The pivoting wheel hoops hold the bike by...
view full answer... - Roof Rack Recommendation for 2006 Subaru Impreza with Higher Rated Weight CapacityThe highest weight rated roof rack we offer for your 2006 Subaru Impreza is the Yakima HD roof rack that consists of # Y01156, # Y03541, and # Y00147. This rack has crossbars that are rated for up to 500 lbs and feet that are rated for up to 220 lbs.
view full answer... - Recommended Roof Rack for a 2021 Mercedes-Benz GLC 300 SUVI would be happy to help you and yes we do have a roof rack for your 2021 Mercedes-Benz GLC suv. It is the 2021 Mercedes-Benz GLC Roof Rack by Thule and it includes the following parts: Thule WingBar Edge Crossbars - Aluminum - Black - Qty 2 item # TH96FE Edge Flush Rail Feet for Thule Edge Crossbars - Flush, Factory Side Rails - Qty 4 item # TH89SC Fit Kit for Thule Evo Flush Rail and Edge Flush Rail Roof Rack Feet - 6020 item # TH186020
view full answer... - Do Yakima Timberline Roof Rack Towers Fit 2022 Subaru Outback WildernessYes, we have confirmed with Yakima that their Timberline Towers part # Y00147 are a confirmed fit for the raised side rails on the roof of your 2022 Subaru Outback Wilderness. For an HD crossbar then Yakima has the part # Y01156 as a fit for these towers with the HD crossbar adapter part # Y03541.
view full answer... - 2016 Lexus GX 460 Flush Mounted Rails Fit KitFor your 2016 Lexus GX 460, you will need the Landing Pad 30 for Yakima SkyLine And Control Towers - Qty 6, part # Y25ZR, and not a RidgeClip. This kit works for Yakima HD Crossbars - Aluminum - Black - 55" Long - Qty 2 part # Y01156. You will also need the HD Bar SL Adapter for Yakima BaseLine, SkyLine, TimberLine, and RidgeLine Towers - Qty 4, part # Y03541. The last thing you will need is the Yakima RidgeLine Towers For Yakima Crossbars part # Y00145. This rack will have a weight limit...
view full answer... - Can Two 68 Pound Kayaks be Carried on the Roof of a 2016 Ford FusionThe strongest roof rack we carry for your 2016 Ford Fusion maxes out at 125 pounds so it will not be the best option for your 2016 Ford Fusion and two 68 pound kayaks. The components are limited by the capacity of your vehicle as the individual parts are rated higher. I do have a solution for you but none of the available roof racks for your Fusion are rated high enough. The only remaining option is to use what is called a roof rack on wheels. This is basically a trailer with a roof rack...
view full answer... - What is the Maximum Width Crossbar I Can Use on My 2019 Subaru Forester?As far as crossbar width, there is no set maximum that is set by manufacturers. It truly depends on the models of crossbars they offer for your 2019 Subaru Forester. Accessories that you mount on your crossbars will have different compatibilities based on the width of the crossbars you choose. If you have an accessory in mind, I would be happy to assist with crossbar compatibility. If you are curious about crossbar length, our fitguide provides compatible lengths of crossbars for your...
view full answer... - Does the Rhino-Rack HD Crossbars # RB1375 Fit a 2021 Nissan Sentra?I have a great alternative for you. Unfortunately, the Rhino-Rack Heavy Duty Crossbars # RB1375 will not fit your 2021 Nissan Sentra. For heavy-duty bars that are confirmed to fit your 2021 Nissan Sentra with a bare roof, I recommend the following parts: - Yakima HD Crossbars - Aluminum - Black - 55" Long - Qty 2 # Y01156 - BaseLine Towers for Yakima Crossbars - Naked Roofs - Qty 4 # Y28TR - HD Bar SL Adapter for Yakima BaseLine, SkyLine, TimberLine, and RidgeLine Towers - Qty 4 # Y03541 -...
view full answer... - Lowest Profile Roof Rack that Fits 2022 Outback WildernessThe lowest profile roof rack that fits your 2022 Subaru Outback Wagon is the Rhino Rack Stealthbar roof rack part # JA7970 which will only add right at 1-3/8 inches.
view full answer... - Heavy Duty Roof Rack Recommendation for 2021 Subaru Outback WagonFor your 2021 Subaru Outback Wagon the Yakima HD roof rack kit part # Y01156, # Y00148, # Y46VR, and Y03541 is a confirmed fit and would work great. This is a higher capacity roof rack that has crossbars that are rated for 220 lbs. This does not require removing the roof rails either. I attached install instructions link for this for you to check out as well.
view full answer... - Recommended Crossbars to Mount a Thule Hullavator to a 2024 Subaru Outback Touring XTBruce, to mount the Thule Hullavator # TH898 on your 2024 Subaru Outback Touring, you're just going to need to add a set of crossbars. I recommend going with an Aero style, personally, like the Thule WingBar Evo Crossbars # TH711120 with the feet # TH710601 and the fit kit # TH37CE. These aren't any more or less special than the others, but I think the shape of these bars are much nicer and it will work with about every accessory that requires bars to mount.
view full answer... - 2007 Jeep Commander with Flush Rails Roof Rack RecommendationFor an aero bar roof rack that fits the flush rails of your 2009 Jeep Commander I'd recommend the Yakima CoreBar kit part # Y00422, # Y53TR, and # Y00225. This fits directly to the flush rails on your vehicle roof, gives you aero shaped bars which minimize wind noise, and aren't nearly as expensive as some of the other kits.
view full answer... - Will the Yakima RocketBox Pro 14 Clear the Hatch on a 2019 Subaru Impreza HatchbackYes, the Yakima RocketBox Pro 14 Rooftop Cargo Box part # Y07192 will clear the rear hatch on your 2019 Subaru Impreza Hatchback with room to spare. For a roof rack to use with the Yakima RocketBox, I recommend the Yakima JetStream System. This system has aero shaped crossbars for reduced wind noise/drag and integrated channels for use with channel mounted accessories. If you have a bare roof then you will need part # Y00425, part # Y53TR, and part # Y00248 but if you have raised side...
view full answer... - Lear Camper Shell Compatibility With Yakima Roof RackI do have a solution for you. Your Yakima roof rack will consist of the following items: Yakima 42" Tracks for Roof Racks, part # Y01126 Yakima CoreBar Crossbars - Steel - Black - 60" Long - Qty 2, part # Y00422 SkyLine Towers for Yakima Crossbars - Fixed Mounting Points, Flush Rails, and Track Systems - Qty 4, part # Y53TR Landing Pad 1 for Yakima SkyLine and Control Towers - Qty 2, part # Y00221, Qty of 2 This is a roof rack with elliptical shaped bars. These bars help with with wind...
view full answer... - What Roof Rack Do You Recommend that Will Work with a Thule Hullavator on My 2021 Toyota RAV4?To mount the Thule Hullavator Pro Kayak Carrier and Lift Assist with Tie-Downs - Side Loading Item # TH898 on your 2021 Toyota Rav4 with flush rails, you will need a crossbar system that gives you at least 4 inches past the feet of the system in order to function. For a great system that will give you that clearance on your 2021 Toyota RAV 4, I recommend the following parts: - Yakima HD Crossbars - Aluminum - Black - 55" # Y01156 - SkyLine Towers for Yakima Crossbars - Fixed Mounting Points,...
view full answer... - How To Carry 2 Kayak And A SUP On A 2021 Toyota RAV4I can get that rack setup for you. I recommend a Yakima offering. It will consist of the following; Yakima JetStream Crossbars - Aluminum - Black - 50" Long - Qty 2, part # Y00425, SkyLine Towers for Yakima Crossbars - Fixed Mounting Points, Flush Rails, and Track Systems - Qty 4, part # Y53TR, Landing Pad 23 for Yakima SkyLine and Control Towers - Qty 4, part # Y98FR, Yakima Same Key System (SKS) Lock Cores (QTY 4), part # Y07204. This rack has t-channel, so it can work with all channel...
view full answer... - Recommended Roof Rack and Rooftop Tent for a 2013 Jeep Grand CherokeeIn order to install a rooftop tent on a 2013 Jeep Grand Cherokee you'll first need to start with a roof rack, the Yakima CoreBar Crossbar System part # Y00421, part # Y53TR, and part # Y00244 is a great option for models with black and chrome flush side rails. This can then be used to attach a rooftop tent such as the Yakima SkyRise HD Tent for Roof Rack Crossbars part # Y07436 which is what I recommend.
view full answer... - Is There A Trailer Hitch For 2023 Kia Soul GT Line With Center ExhaustIf you need to carry cargo with your Kia Soul, I do have a few potential solutions for you. I will tell you there is not a trailer hitch available anywhere that will fit the center exhaust model at this time (August 2023). The receiver would go exactly where the exhaust sits and there is no way to work around that. If your goal was to carry a few bikes we could set you up with a trunk mount bike rack like the Malone hanger # MPG2139. This can carry 3 bikes weighing up to 33 lbs apiece...
view full answer... - Yakima Roof Rack Recommendation for Cab and Camper Shell on 2022 Toyota TacomaFor a Yakima roof rack system on the cab and camper shell of your 2022 Toyota Tacoma I recommend going with the JetStream crossbars. I'll break down what parts you need for each section so it's easier to know what is paired together. Truck Cab 50" JetStream Bars - # Y00425 BaseLine Towers - # Y28TR BaseClip - # Y06145 BaseClip - # Y06128 Camper Shell 50" JetStream Bars - # Y00425 60" Tracks - Y01135 SkyLine Towers - # Y53TR Landing Pad 1 - # Y00221 (you'll need 2 of these) I also recommend...
view full answer...
- Parts Needed To Attach Yakima Crossbars To A Pace Edwards Ultra Groove Tonneau CoverTo connect some Yakima crossbars to the T-Tracks of your Pace Edwards UltraGroove Retractable Hard Tonneau Cover - Aluminum and Vinyl - Matte Black # 311-KRTA10A38 you purchased you'll need the follow items: First you'll need two of the Landing Pad 1 for Yakima SkyLine and Control Towers - Qty 2 # Y00221. These will fit the T-Tracks of the cover and will give an attachment point for the feet of the crossbars. For the feet you'll need the SkyLine Towers for Yakima Crossbars - Fixed Mounting...
view full answer... - Should a Hitch Rack or Roof Rack be Used to Carry Bikes and Skis with a 2022 Kia SoulIt does look like a Swagman bike rack like the Trailhead # S63380 will be compatible with the Class I hitch and the Yakima HitchSki # Y02418 since the cradles are adjustable along the arms of the bike rack. Yakima only rates their 4-bike racks for up to Class II hitches so you wouldn't be able to use a Yakima rack in your instance as there are only Class I hitches that fit your 2022 Kia Soul. If you'd like to go this route then I recommend using the Curt Hitch # C67FR (unless you have a...
view full answer... - Temporary Roof Rack Solution Using Tracks on Bed Rails of 2012 Honda Ridgeline with OEM TonneauThere isn't a roof rack option specifically designed to mount on top of your bed rails and work together with the OEM tonneau cover on your 2012 Honda Ridgeline, so the closest option I have for you is going to be a Yakima Custom Install Roof Rack. To accomplish this, you'll need a set of SkyLine Towers (qty 4) # Y53TR, a pair of CoreBar Crossbars # Y00422, four total landing pads # Y00221 (sold in pairs), and 54 inch Tracks # Y01127. The Yakima Tracks, # Y01127, are designed for sheet...
view full answer...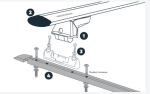
- Will the Thule Motion XT L # TH629706 Keep My Cargo Dry?While the Thule Motion XT L Rooftop Cargo Box - 16 cu ft # TH629706 provides a lot of coverage from rain and other elements, it is not rated as water-tight. Where the top and bottom halves meet, the edges are rolled a full 180 degrees. Water would have to come straight up from the bottom and turn 180 degrees to get inside. If you are concerned about water infiltration, we always recommend our neighbors in rainy areas throw their luggage or cargo in a plastic bag so if any moisture does...
view full answer... - Is Thule Hullavator Compatible With 24 Inch Crossbar Spread of 2017 Cadillac XT5The Thule # TH898 Hullavator is compatible with crossbar spreads of at least 24 inches, so the 27 inches you have to work with would work perfectly. For crossbars, I'd recommend the JetStream roof rack from Yakima, which would consist of the following parts: • 60 Inch JetStream Crossbars, # Y00426 • Yakima SkyLine Roof Rack Towers, part # Y53TR I've linked to a product demonstration video that you might find helpful.
view full answer...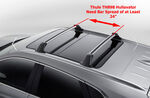
- Yakima Cargo Rack on my RetraxOne XR Tonneau CoverI have a solution for you that will get you exactly what you want. It will consist of 1 set of 4 SkyLine Towers for Yakima Crossbars part # Y53TR , two sets of the Landing Pad 1 for Yakima Control Towers - Qty 2 part # Y00221 , one of the RoundBar SL Adapter for Yakima SkyLine Towers - Qty 4 part # Y03536 , one of the Yakima Same Key System (SKS) Lock Cores 4 pack part # Y07204 and either the Round 66" CrossBars for Yakima Roof Rack System (QTY 2) part # Y00410 or the Round 78" CrossBars...
view full answer... - Roof Rack Bike Carrying Recommendation for 2019 Subaru ForesterFor a roof rack, what you'll need will depend on what's currently on your roof. If you have the rails along the edges or the roof running from front to back, your crossbars would attach directly to those. Rhino Rack offers a crossbar system that would have much higher quality than the entry level stuff, at a more reasonable cost than the more well-known names like Yakima or Thule. To construct this rack, you'd need the # RRVA126B-2 crossbars and the # RRSX100 feet. If your Forester doesn't...
view full answer... - Can Two Sets of Yakima Y04073 JayLow Kayak Carriers Fit on 2018 Toyota Highlander Factory Roof RackEach of the # Y04073 JayLow kayak carriers will take up approximately 10.3 inches of space on the crossbar. Factory crossbars won't extend past the roof side rails, so even though you should be able to fit two sets of the carriers on the roof, you might not be able to place them far enough apart on the crossbars to accommodate the two kayaks you'll want to place in the center. What I'd recommend you do is measure the length of your factory crossbars, and compare that to the combined width...
view full answer... - Recommended Roof Rack and Ski/Snowboard Carrier for 2015 Mazda CX-5 with Naked RoofI highly recommend using the Yakima JetStream roof rack for your 2015 Mazda CX-5 because it has a 165 lb weight capacity, mounts directly to fixed points on your roof, and allows you to use a variety of other roof mount accessories. This consists of the SkyLine Towers # Y53TR, Landing Pad 11 # Y00233, and then your choice of JetStream Bars: 50" Black # Y00425 60" Black # Y00426 70" Black # Y00427 You can then use the Yakima FreshTrack # Y03093 and the Lock Core Set # Y07206 to make...
view full answer... - Can Thule Hullavator Kayak Carrier Fit on Yakima Corebar Roof Rack of 2015 Subaru Outback WagonYes, the Yakima Corebar roof rack you have installed on your 2015 Subaru Outback Wagon part numbers # Y00421, # Y53TR, and # Y00241 is perfectly compatible with the Thule Hullavator part # TH898 you are interested in. The bar shape and length is compatible with the Hullavator so it would work great!
view full answer... - Recommended Roof Rack For Roof Top Tent On 2012 GMC Yukon SLEI was able to find in the owner's manual of your 2012 GMC Yukon SLE that the roof weight capacity is 200lbs, which leads me to believe that the roof capacity is not the cause for the amount of options for your vehicle. There are a few different roof styles available on the 2012 GMC Yukon SLE, so I will list my recommendation for each style. If you have the factory installed raised rails the run front to back I recommend the Rhino Rack Roof Rack System that uses 54" Rhino-Rack Vortex Aero...
view full answer... - Can 60 Inch Yakima CoreBar Roof Rack Be Used on 2021 Mazda 3You can indeed use the longer 60 inch Yakima CoreBar crossbars. To equip your 2021 Mazda 3 with a Yakima CoreBar roof rack, you'd need the following: • Yakima 60 Inch CoreBar, part # Y00422 • Yakima SkyLine towers, part # Y53TR • Yakima Landing Pad 22, part # Y00248 which attaches towers to existing mounting points on vehicle roof. I'll link to some product videos that you might find helpful.
view full answer... - Roof Rack Options for Adding a Yakima SkyRise Tent on a 2011 Subaru ForesterTo determine if the factory crossbars on your 2011 Subaru Forester are compatible with a rooftop tent you will first need to see if there are any specifications for the tent. For example, the Yakima SkyRise, part # Y07436 for 2 people, requires that your roof rack be supported and no higher than 98" off of the ground. Both the roof of your vehicle and the roof rack need to have a minimum load capacity of 165 lbs as well. I have attached a photo that you can use as a guideline for your...
view full answer...
- Parts Needed to Use Yakima RoundBar Crossbars from 1988 SST Rack on 2010 Jeep WranglerThe RoundBars like the # Y00410 from your 1988 SST rack can be used on your 2010 Jeep Wrangler. Since there are no adapters or clamps that will allow you to use your old SST towers, you will have to replace them with the Yakima 1A Raingutter Towers # Y00101. These will allow you to mount the existing crossbars on the gutters on your Wrangler. Keep in mind, the rain gutters are not structural so the maximum allowable load is skis or snowboards only. If you're looking to carry something...
view full answer... - Yakima Roof Rack Recommendation for 2004 Honda CR-V to Carry KayaksFor your 2004 Honda CR-V the correct parts needed to install a Yakima roof rack are # Y00408, # Y53TR, # Y03536, and # Y00228 which will give you a round bar roof rack. Once that's installed you'd be able to install a Yakima JayLow kayak carrier part # Y04073 which is a really solid option for a carrier. It is padded and can fold down when not in use plus is very easy to install and use.
view full answer... - Parts Needed to Add Yakima Rack to Diamondback SE Tonneau Cover on Ford Super DutyWe can get your Ford Super Duty set up with a Yakima rack for your Diamondback SE tonneau cover. The Q Towers are no longer made and aren't compatible with Yakima's latest racks, so you'll need a new set of towers for the system. Here is exactly what you'll need: - Yakima 72" HD Tracks for Diamondback Truck Covers # Y92AR - Yakima HD Crossbars - 78" Long # Y01159 - SkyLine Towers # Y53TR - HD Bar SL Adapter # Y03541 - Landing Pad 26 for Yakima SkyLine Towers # Y75ZR You'll need a...
view full answer... - Putting Stronger Crossbars on Sylvan Sport Go Easy TrailerThat is an interesting project you have there, and I called my friend in Yakima to discuss how it could fit. Since Sylvan Sport is not a brand we work with and can test on, we don't have the information to give confirmed fits. I can give my recommendation though based off my experience with kayak trailers. I am curious about how you can fit 4 bikes and two kayaks onto your bars. A close equivalent of the Go Easy Trailer is the Yakima EasyRider # Y08129. The EasyRider uses 78" HD Bars #...
view full answer... - Converting Yakima Timberline Towers To Work With Yakima Jetstream CrossbarsAll you need is this T-Bolt Adapter # Y03541. It will take the place of your RoundBar Adapter # Y03536 and will work with the Jetstream Crossbars # Y00426
view full answer... - What Roof Rack Do You Recommend that Will Work with a Thule Hullavator on My 2021 Toyota RAV4?To mount the Thule Hullavator Pro Kayak Carrier and Lift Assist with Tie-Downs - Side Loading Item # TH898 on your 2021 Toyota Rav4 with flush rails, you will need a crossbar system that gives you at least 4 inches past the feet of the system in order to function. For a great system that will give you that clearance on your 2021 Toyota RAV 4, I recommend the following parts: - Yakima HD Crossbars - Aluminum - Black - 55" # Y01156 - SkyLine Towers for Yakima Crossbars - Fixed Mounting Points,...
view full answer... - Parts Needed to Add Yakima Rack to Diamondback SE Tonneau Cover on Ford Super DutyWe can get your Ford Super Duty set up with a Yakima rack for your Diamondback SE tonneau cover. The Q Towers are no longer made and aren't compatible with Yakima's latest racks, so you'll need a new set of towers for the system. Here is exactly what you'll need: - Yakima 72" HD Tracks for Diamondback Truck Covers # Y92AR - Yakima HD Crossbars - 78" Long # Y01159 - SkyLine Towers # Y53TR - HD Bar SL Adapter # Y03541 - Landing Pad 26 for Yakima SkyLine Towers # Y75ZR You'll need a...
view full answer... - Yakima BaseLine Roof Rack for 2018 F150 Supercrew 4x4In addition to the # Y00426 JetStream crossbars and the # Y28TR BaseLine towers, you'll also need the # Y06122 BaseLine fit kit. If you wanted to go with the HD crossbars, the 78 inch long bars are part # Y01159 and you'd also need the SL adapter so the bars work with the BaseLine towers. The adapter is part # Y03541. According to Yakima, the fact that you have a sunroof won't prevent the rack from being installed, but I recommend taking care before operating it as it can interfere with...
view full answer...
- High Capacity Roof Rack Recommendation for 2017 Honda CR-V for Off-Road ApplicationFor an off-road application there's only one roof rack I can recommend for your 2017 Honda CR-V with flush rails and it's the Yakima HD roof rack part # Y01156, # Y53TR, # Y03541, and # Y00245. This rack has a 500 lb capacity and sits far enough off of the roof of the vehicle (see picture) that you'd never have to worry about flex in the bars. You should note that the capacity of this rack is not the capacity of your roof. You'd still be limited by the weight capacity of your roof but this...
view full answer... - Are Two Different BaseClip's Needed for a Yakima Roof Rack on a 2023 Maxda CX-5 with Naked RoofYes, the two different BaseClip's are correct for your 2023 Mazda CX-5 with naked roof. The BaseClip Fit Kit for Yakima BaseLine Roof Rack Towers # Y06130 is for the front bar and the BaseClip Fit Kit for Yakima BaseLine Roof Rack Towers # Y06154 are for the rear bar. The rest of the roof rack kit is the: - Yakima HD Crossbars # Y01156 - BaseLine Towers for Yakima Crossbars # Y28TR - HD Bar SL Adapter for Yakima BaseLine # Y03541 This will allow you to use the Thule Hullavator Pro Kayak...
view full answer... - Recommended Roof Rack For My 2021 Ram 1500 LimitedI do have roof rack options for your 2021 Ram 1500. Both of my recommendations will come with heavy duty crossbars instead of the standard crossbars. I have one for a Crew Cab and one for the Quad Cab. If you have the Ram 1500 Crew Cab, your roof rack will consist of the following items: Yakima HD Crossbars - Aluminum - Black - 68" Long - Qty 2, part # Y01158 BaseLine Towers for Yakima Crossbars - Naked Roofs - Qty 4, part # Y28TR HD Bar SL Adapter for Yakima BaseLine, SkyLine, TimberLine,...
view full answer... - Recommended Roof Rack for Roof Top Tent on a 2022 Kia TellurideI have a couple of options for roof racks depending on whether or not your 2022 Kia Telluride has the flush mounted rails that run front to back. If your Kia has the flush mounted rails that run front to back you will want the 2022 Kia Telluride Roof Rack by Rhino Rack. The Roof Rack Includes: Rhino-Rack Vortex Aero Crossbars - Aluminum - Black - 54" Long - Qty 2 item # RRVA137B-2 Rhino-Rack SX Series Legs for Vortex Aero Crossbars - Flush Factory Side Rails - Qty 4 item # RR94DY If...
view full answer... - Recommended Roof Rack For Attaching A Thule Hullavator To A 2021 Toyota HighlanderTo attach the Thule Hullavator Pro Kayak Carrier and Lift Assist with Tie-Downs # TH898 to your 2021 Toyota Highlander you'll need a roof rack that has a T-Slot in the crossbars for the Hullavator to slide into. Currently the only brand of roof racks we carry for your vehicle that are compatible with your flush mounted rails is Yakima. I recommend the following parts to complete your roof rack: Yakima HD Crossbars - Aluminum - Black - 55" Long # Y01156 SkyLine Towers for Yakima Crossbars...
view full answer... - Availability Of Screw To Connect Yakima CoreBar To SkyLine TowersThe screw that you are looking for comes with the SkyLine Towers. I am sorry to say that we do not offer the screw individually. So the only solution we can offer would be to buy a whole new tower. The SkyLine Towers are available individually with part # 8880614. I know this may be a bit costly just to get one screw. It may be worth contacting Yakima to see if they can provide them. All of their racks come with a lifetime warranty so the screws might be covered.
view full answer... - Recommended Roof Rack For a 2013 Ford Transit ConnectI recommend the Yakima HD roof rack for your 2013 Ford Transit Connect. This will consist of the Crossbars # Y01156, Towers # Y53TR, Adapters # Y03541 and Fit Kit # Y00233. I prefer this option as the bars have a versatile design to accept either track or clamp on accessories plus the endcap has an integrated tie-down point to help secure your cargo.
view full answer... - Roof Racks Available for 2020 Ram 1500 Crew CabI attached a link to this page that has all of the roof racks we offer that fit your 2020 Ram 1500 Crew Cab for you to check out but I really like the Yakima HD part # Y01158, # Y28TR, # Y03541, and # Y06135 as it's a heavier duty roof rack with a higher weight capacity but is also aero shaped for reduced wind noise.
view full answer... - Are Yakima HD and Corebar Roof Racks Overkill for 2018 Ford F-150I understand exactly what you are asking about. So with anything where there's a weight capacity involved (roof rack, towing, etc.) you are limited by the lowest rated component in the setup as the overall weight capacity. So if your roof capacity is 165 lbs the CoreBar rack part # Y00422, # Y28TR, and # Y06122 would give you the full capacity plus some and the HD Bar rack part numbers # Y01157, # Y28TR, # Y03541, and # Y06122 would be even more.
view full answer... - Can I Fit Four Pair Of J-Style Carriers On Top Of My 2013 GMC Yukon?You could possibly fit four of the # S65148 on your roof but it will be a pain to load majority of your kayaks up there. There is a better solution I found that will be more user friendly. You are going to need a large roof rack bar to accommodate your 4 kayaks. I suggest the Yakima 60" HD Bars # Y01157 and If you have factory side rails you will need the Yakima SkyLine Towers # Y53TR along with the Side Rail Adapter # Y03541 and Landing Pad # Y00221. If you have factory raised rails...
view full answer... - Roof Rack Recommendation for 2022 Mercedes Benz Sprinter 2500 High RoofYes we have the Yakima HD roof rack that fits your 2022 Mercedes-Benz Sprinter 2500 with part numbers # Y01158, # Y00148, # Y03541, and # Y00221. What's great about this rack is that it has a much higher weight capacity, is still aerodynamic shaped, and also has a lifetime warranty.
view full answer... - Can I Install A Rooftop Tent On My 2021 Honda CR-V With Flush Rails?To make sure that you can get the spread you need to have to mount your rooftop tent you'll need to take some measurements. On your flush rails there will be fixed mounting points on the top of the rails. When you have flush rails you won't be able to adjust the spread at all. That is your maximum mounting width. If the fixed mounting points match up to your rooftop tent, you can get a roof rack for your 2021 Honda CR-V. I Recommend getting a hefty system like the Yakima HD Bars # Y01156...
view full answer... - Yakima HD Bar Roof Rack For 2020 Ram 1500I like the look of the Yakima HD Crossbars # Y01158 on the roof of a 2020 Ram 1500 since trucks tend to be used more for utility than recreation. You'll need the bars, the BaseLine Towers # Y28TR, the HD Bar Adapters # Y03541 and the baseplate kit # Y06135. This is my favorite rack for your truck and I've installed it on a 2020 Ram 1500 before so I've included the installation video for you so you can see how it installs and how it looks!
view full answer... - What Crossbars Allow Me to Use the Hullavator # TH711420 on My 2022 RAV4 with Flush Rails?I recommend looking at the Yakima HD Crossbars - Aluminum - Black - 55" Long - Qty 2 # Y01156, which also requires Towers # Y53TR, Adapter # Y03541, and Landing Pads # Y98FR. This will fit your 2022 Rav4 with flush factory rails and should give you 4" of crossbar overhang on each side to use the Hullavator. One way you can tell for sure is by measuring from mounting point to mounting point on your roof. If that measurement does not exceed 47 inches, the Hullavator will have enough length.
view full answer... - Roof Rack Recommendation for a 2018 Ram 2500 with a Bare RoofOf course using the Yakima HD Crossbars part # Y01159 will give you the bars you're looking for then we can get the rest put together. This will be the towers, HD Bar Adapter and the Baseclips listed. BaseLine Towers for Yakima Crossbars part # Y28TR HD Bar SL Adapter part # Y03541 BaseClip Fit Kit for Yakima BaseLine Roof Rack Towers part # Y06135 For locks use the Yakims SKS Lock Cores part # Y07204. With this setup you will be able to use the Thule Hullavator Pro Kayak Carrier and...
view full answer... - Cross Bar Options And Kayak Carrier For A 2022 Hyundai SonataWe do have a couple of cross bar options for your 2022 Hyundai Sonata that will work great for you. -First we have the Yakima JetStream Crossbars # Y00425 with the BaseLine Towers for Yakima Crossbars # Y28TR, the fit kit # Y06180 & # Y06153. These are aerodynamic cross bars that measure 50" long, and have a maximum weight capacity of 165lbs. -Next, we have the Yakima CoreBar Crossbars # Y00421, with the same towers # Y00146, and fit kits # Y06153 & # Y06180. These cross bars share...
view full answer... - Roof Rack & Attachments For 2010 Toyota Tacoma TRD SR5I would get the Yakima HD Bar Roof Rack System. You'll need the HD bars # Y01156 Skyline Towers # Y53TR HD bar adapter # Y03541 and landing pad # Y74FR. You can then use the JayLow Kayak Carrier # Y04073, Off-Grid Cargo Basket # Y07139 or Skybox Cargo Box # Y95AV. These are just my suggestions for accessories but there is much much more on our website if you're wanting something different!
view full answer... - Replacement Yakima HD Adapter for Yakima HD CrossbarsIt sounds like you have the Yakima HD crossbars similar to the # Y01156. These are attached and held in place by the HD Bar SL Adapter # Y03541 on your roof rack towers and the # Y03541 would be the correct way to replace one of those. The HD Bar SL Adapter # Y03541 works with the BaseLine, SkyLine, TimberLine, or RidgeLine roof rack towers. If the adapter itself is not what you are needing, then it is likely the tower. If that is the case, I will need to know which style of tower you...
view full answer... - Recommended Roof Rack for Mounting a Thule Hullavator Pro on a 2021 Toyota RAV4The Thule Hullavator Pro, part # TH898, does in fact need crossbars that extend 4" - 8" beyond the feet. To use the flush rails on your 2021 Toyota RAV4, you will need a roof rack that has feet that are compatible with the rails. With those two stipulations in mind, the Thule WingBar Evos don't look like they will provide enough clearance with their 47" of crossbar length. Instead, I recommend the Yakima HD Crossbars, part # Y01156. They are 55" long, so they will have the extension you...
view full answer... - Lear Camper Shell Compatibility With Yakima Roof RackI do have a solution for you. Your Yakima roof rack will consist of the following items: Yakima 42" Tracks for Roof Racks, part # Y01126 Yakima CoreBar Crossbars - Steel - Black - 60" Long - Qty 2, part # Y00422 SkyLine Towers for Yakima Crossbars - Fixed Mounting Points, Flush Rails, and Track Systems - Qty 4, part # Y53TR Landing Pad 1 for Yakima SkyLine and Control Towers - Qty 2, part # Y00221, Qty of 2 This is a roof rack with elliptical shaped bars. These bars help with with wind...
view full answer... - Can I Use Yakima SkyLine Towers with Thule Tracks?Yes, the tracks themselves recreate the factory C-shaped rack tracks. Thule Tracks # THTP42 and Yakima Tracks # Y01126 have the same C-channel design, but differ in length and how they mount to the vehicle. To use your SkyLine Towers # Y53TR with these tracks, you need the Yakima Landing Pad 1 # Y00221. This is the mount that fits directly into track systems and can be used with SkyLine or Control Towers.
view full answer... - Yakima Roof Rack Recommendation for Cab and Camper Shell on 2022 Toyota TacomaFor a Yakima roof rack system on the cab and camper shell of your 2022 Toyota Tacoma I recommend going with the JetStream crossbars. I'll break down what parts you need for each section so it's easier to know what is paired together. Truck Cab 50" JetStream Bars - # Y00425 BaseLine Towers - # Y28TR BaseClip - # Y06145 BaseClip - # Y06128 Camper Shell 50" JetStream Bars - # Y00425 60" Tracks - Y01135 SkyLine Towers - # Y53TR Landing Pad 1 - # Y00221 (you'll need 2 of these) I also recommend...
view full answer... - Parts Needed To Attach Yakima Crossbars To A Pace Edwards Ultra Groove Tonneau CoverTo connect some Yakima crossbars to the T-Tracks of your Pace Edwards UltraGroove Retractable Hard Tonneau Cover - Aluminum and Vinyl - Matte Black # 311-KRTA10A38 you purchased you'll need the follow items: First you'll need two of the Landing Pad 1 for Yakima SkyLine and Control Towers - Qty 2 # Y00221. These will fit the T-Tracks of the cover and will give an attachment point for the feet of the crossbars. For the feet you'll need the SkyLine Towers for Yakima Crossbars - Fixed Mounting...
view full answer... - Temporary Roof Rack Solution Using Tracks on Bed Rails of 2012 Honda Ridgeline with OEM TonneauThere isn't a roof rack option specifically designed to mount on top of your bed rails and work together with the OEM tonneau cover on your 2012 Honda Ridgeline, so the closest option I have for you is going to be a Yakima Custom Install Roof Rack. To accomplish this, you'll need a set of SkyLine Towers (qty 4) # Y53TR, a pair of CoreBar Crossbars # Y00422, four total landing pads # Y00221 (sold in pairs), and 54 inch Tracks # Y01127. The Yakima Tracks, # Y01127, are designed for sheet...
view full answer... - Yakima Cargo Rack on my RetraxOne XR Tonneau CoverI have a solution for you that will get you exactly what you want. It will consist of 1 set of 4 SkyLine Towers for Yakima Crossbars part # Y53TR , two sets of the Landing Pad 1 for Yakima Control Towers - Qty 2 part # Y00221 , one of the RoundBar SL Adapter for Yakima SkyLine Towers - Qty 4 part # Y03536 , one of the Yakima Same Key System (SKS) Lock Cores 4 pack part # Y07204 and either the Round 66" CrossBars for Yakima Roof Rack System (QTY 2) part # Y00410 or the Round 78" CrossBars...
view full answer... - Yakima Roof Rack that Fits Leer Truck Topper TracksWe have the Yakima roof rack components needed to install in the tracks on top of your Leer 100XR camper shell. To complete your roof rack setup you will need: quantity 2 of the Landing Pad 1 # Y00221 quantity 4 of the Control Towers # Y8890027 and depending on the length of your cap quantity 2 Crossbars like: 48 inch # Y00408 58 inch # Y00409 66 inch # Y00410 78 inch # Y00411 To lock your roof rack to your tracks, I recommend the set of 4 lock cores with keys # Y07204.
view full answer... - Dimension of Mounting Hole Spacing of Yakima Landing Pad 1 #Y00221I was able to go out to the warehouse and measure the Yakima Landing Pad 1 for you and found that the mounting hole spacing is 3-15/16 inches from center to center. I have linked a picture and the part to this page for your convenience.
view full answer...
- Recommended Roof Rack For Roof Top Tent On 2012 GMC Yukon SLEI was able to find in the owner's manual of your 2012 GMC Yukon SLE that the roof weight capacity is 200lbs, which leads me to believe that the roof capacity is not the cause for the amount of options for your vehicle. There are a few different roof styles available on the 2012 GMC Yukon SLE, so I will list my recommendation for each style. If you have the factory installed raised rails the run front to back I recommend the Rhino Rack Roof Rack System that uses 54" Rhino-Rack Vortex Aero...
view full answer... - Landing Pad Recommendation for Yakima Roof Tracks Y01127 for Installing 48 inch Round CrossbarsThe correct landing pad to go with the Tracks part # Y01127 is the Landing Pad 1 part # Y00221. Then for control towers you would need part # Y8890027 for individual towers, and then for 48 inch crossbars part # Y8810021.
view full answer... - Parts Needed to Use Yakima RoundBar Crossbars from 1988 SST Rack on 2010 Jeep WranglerThe RoundBars like the # Y00410 from your 1988 SST rack can be used on your 2010 Jeep Wrangler. Since there are no adapters or clamps that will allow you to use your old SST towers, you will have to replace them with the Yakima 1A Raingutter Towers # Y00101. These will allow you to mount the existing crossbars on the gutters on your Wrangler. Keep in mind, the rain gutters are not structural so the maximum allowable load is skis or snowboards only. If you're looking to carry something...
view full answer... - Yakima Round Bar Complete Roof Rack System With TracksYou can piece together a round bar system that is going to be similar to a Yakima roof rack with round bars and a track system. What you will need are the following parts: - Yakima 54" Tracks for Roof Racks # Y01127 - Yakima Control Tower # Y8890027 (Quantity of 4) - Landing Pad 1 for Yakima Control Towers # Y00221 (Quantity of 2) - Round 58" CrossBars for Yakima Roof Rack System # Y00409 OR Round 66" CrossBars for Yakima Roof Rack System # Y00410 This will give you a track-based roof...
view full answer... - Recommendation for Roof Rack 2014 Honda Odyssey with Naked RoofA 2014 Honda Odyssey with a naked roof is a rarity. The vast majority of those vans came with factory installed rails. Although there isn't a custom fit rack available, we can still get a roof rack on your Odyssey. I recommend going with the Yakima 54 Inch Tracks, # Y01127, or the 60 Inch Tracks, # Y01135 for your Odyssey. You will want to measure the roof of your Odyssey to see which size will work best for you. This track permanently mounts to your vehicle with PlusNut hardware. There...
view full answer... - Parts Needed to Add Yakima Rack to Thule Tracks on Leer CamperYep, you can put a Yakima roof rack in the Thule tracks on your Leep truck cap. I'll go ahead and list out the parts you need: - (Order a quantity of 2 of these) Landing Pad 1 for Yakima SkyLine and Control Towers # Y00221 - SkyLine Towers for Yakima Crossbars # Y53TR - 50" Long Yakima JetStream Crossbars # Y00425 OR - 60" Long Yakima JetStream Crossbars # Y00426 OR - 70" Long Yakima JetStream Crossbars # Y00427 You'll want to measure the width of your tracks and get ones that extend...
view full answer... - Is a Dutchmen Coleman Rubicon Setup for Crossbars from the FactoryI do have options for you but I don't have any information that the Dutchmen Coleman Rubicon comes equipped with a factory rack. That said, it would be pretty easy to add one using a kit like the Yakima Aero Bar Roof Rack for Camper Shells part # Y67CV. This kit installs via tracks which get bolted to the roof and then provides you with adjustable crossbars to secure your gear.
view full answer... - Can I Put a Tent on Top of My 1995 Jeep YJ with a Hardtop?While we do have roof rack systems that will fit your jeep, the issue is that your roof has a maximum weight capacity of 100 lbs. Even if you got the roof rack system with parts # Y00426, # Y01126, # Y53TR, # Y00221, you wouldn't have enough weight capacity for a tent. For example, the Yakima Sky Rise Tent # Y07436 weighs 101 lbs on its own and requires a roof weight capacity of at least 165 lbs. Your options from here is to either try to find an exo-style system to increase your roof...
view full answer... - Best Roof Rack System for 2001 Ford E350 VanThe gutter mounts we have are actually really sturdy if you get the right ones and install them right. Technically, you should have more weight capacity off the gutter mounts since the weight is distributed vertically through the gutters vs racks bolted onto your fiberglass roof. A good system for your 2001 Ford E350 Van is the Rhino Rack system with Square Crossbars # RB1800B-2 and Gutter Feet # RL150S10. You can switch the square crossbars for aero ones with 71" Vortex Aero Crossbars...
view full answer... - Parts Needed to Mount Yakima SkyBox Cargo Box to Top of Artic Fox Truck CamperThe Yakima SkyBox 18 Cargo Box, # Y07336, is designed to be mounted on a roof rack system. In order to mount the cargo box on the top of your Artic Fox camper, you will need to install a roof track system like the Yakima which would consist of the following: Yakima 42 Inch Tracks, # Y01126, Control Towers, # Y8890027, and Landing Pad, # Y00221, Qty 2 and Round 58" CrossBars, # Y00409. I have included a video of the track system being installed on a Ford F-250 just to give you an idea of...
view full answer...
- Roof Rack for Leer Cap With Factory Tracks on 2015 Ram 1500You can absolutely get a roof rack for the factory tracks of the Leer cap on your 2015 Ram 1500. I have spoken about this exact issue with Yakima and they have told me the exact parts you need for a roof rack on your truck cap, which is the following: - Landing Pad 1 for Yakima Control Towers # Y00221 (Quantity of 2) - SkyLine Towers for Yakima Crossbars # Y53TR Crossbars (the correct length will depend on how wide the tracks are on your Leer cap, so just be sure to measure and then choose...
view full answer... - What Size Yakima Jetstream Crossbars Are Needed For RetraxPRO XR Tonneau On 2019 Toyota Tacoma? Retrax recommends using the 60" Yakima JetStream Crossbars # Y00426 with their RetraxPRO XR Hard Tonneau Cover # RTT-80852. You will need the Skyline Towers # Y53TR and 2 of the Landing Pad 1 Kits # Y00221. Since the Yakima Jetstream crossbars do have a full length bottom channel you could mount the 70" Bars # Y00427 but do know the bars will stick out past your cab.
view full answer... - Replacement Base for Yakima Skyline Towers on Camper ShellIt sounds like you already have the crossbars and feet and just need the bases. If that is the case, then you just need two of the Landing Pad 1 for Yakima Control Towers - Qty 2 # Y00221 which is a fit for the rails. If that isn't the case, then the Yakima JetStream Truck Bed Rack for Tonneau Covers - Aluminum - 70" Long # Y00427-482104 will work to give you the complete kit for your rails.
view full answer... - How To Use Yakima Round Crossbars With Tracks On Bed RailsIn order to use round crossbars on top of the bed rails you'll have to start with the tracks; then you can add the feet, landing pads, and crossbars. The feet are only offered in one height unfortunately but nonetheless I will attach a list of all the parts you'll need below. There isn't an all inclusive kit. Yakima Roof Track part # Y01127 Landing Pads part # Y00221 (2) Mounting Foot part # Y8890027 (4) Round Crossbars part # Y00411 (Cut To Fit)
view full answer... - Roof Rack for Camper Shell and Roof of 2020 Chevy Silverado 1500You can then use the Yakima roof rack with landing pad 1 part # Y00221, two of the control towers # Y8890027, and the single crossbar # Y8810025. Then for a single bar rack for the roof of your 2020 Chevy Silverado 1500 you'd want the part # RRVA150B, # RRRLKVAH, and # DK427H and you'd be set.
view full answer... - Roof Rack Recommendation for 2022 Mercedes Benz Sprinter 2500 High RoofYes we have the Yakima HD roof rack that fits your 2022 Mercedes-Benz Sprinter 2500 with part numbers # Y01158, # Y00148, # Y03541, and # Y00221. What's great about this rack is that it has a much higher weight capacity, is still aerodynamic shaped, and also has a lifetime warranty.
view full answer... - Lear Camper Shell Compatibility With Yakima Roof RackI do have a solution for you. Your Yakima roof rack will consist of the following items: Yakima 42" Tracks for Roof Racks, part # Y01126 Yakima CoreBar Crossbars - Steel - Black - 60" Long - Qty 2, part # Y00422 SkyLine Towers for Yakima Crossbars - Fixed Mounting Points, Flush Rails, and Track Systems - Qty 4, part # Y53TR Landing Pad 1 for Yakima SkyLine and Control Towers - Qty 2, part # Y00221, Qty of 2 This is a roof rack with elliptical shaped bars. These bars help with with wind...
view full answer... - Can I Use Yakima SkyLine Towers with Thule Tracks?Yes, the tracks themselves recreate the factory C-shaped rack tracks. Thule Tracks # THTP42 and Yakima Tracks # Y01126 have the same C-channel design, but differ in length and how they mount to the vehicle. To use your SkyLine Towers # Y53TR with these tracks, you need the Yakima Landing Pad 1 # Y00221. This is the mount that fits directly into track systems and can be used with SkyLine or Control Towers.
view full answer... - Yakima Roof Rack Recommendation for Cab and Camper Shell on 2022 Toyota TacomaFor a Yakima roof rack system on the cab and camper shell of your 2022 Toyota Tacoma I recommend going with the JetStream crossbars. I'll break down what parts you need for each section so it's easier to know what is paired together. Truck Cab 50" JetStream Bars - # Y00425 BaseLine Towers - # Y28TR BaseClip - # Y06145 BaseClip - # Y06128 Camper Shell 50" JetStream Bars - # Y00425 60" Tracks - Y01135 SkyLine Towers - # Y53TR Landing Pad 1 - # Y00221 (you'll need 2 of these) I also recommend...
view full answer... - Parts Needed To Attach Yakima Crossbars To A Pace Edwards Ultra Groove Tonneau CoverTo connect some Yakima crossbars to the T-Tracks of your Pace Edwards UltraGroove Retractable Hard Tonneau Cover - Aluminum and Vinyl - Matte Black # 311-KRTA10A38 you purchased you'll need the follow items: First you'll need two of the Landing Pad 1 for Yakima SkyLine and Control Towers - Qty 2 # Y00221. These will fit the T-Tracks of the cover and will give an attachment point for the feet of the crossbars. For the feet you'll need the SkyLine Towers for Yakima Crossbars - Fixed Mounting...
view full answer... - Temporary Roof Rack Solution Using Tracks on Bed Rails of 2012 Honda Ridgeline with OEM TonneauThere isn't a roof rack option specifically designed to mount on top of your bed rails and work together with the OEM tonneau cover on your 2012 Honda Ridgeline, so the closest option I have for you is going to be a Yakima Custom Install Roof Rack. To accomplish this, you'll need a set of SkyLine Towers (qty 4) # Y53TR, a pair of CoreBar Crossbars # Y00422, four total landing pads # Y00221 (sold in pairs), and 54 inch Tracks # Y01127. The Yakima Tracks, # Y01127, are designed for sheet...
view full answer... - Yakima Cargo Rack on my RetraxOne XR Tonneau CoverI have a solution for you that will get you exactly what you want. It will consist of 1 set of 4 SkyLine Towers for Yakima Crossbars part # Y53TR , two sets of the Landing Pad 1 for Yakima Control Towers - Qty 2 part # Y00221 , one of the RoundBar SL Adapter for Yakima SkyLine Towers - Qty 4 part # Y03536 , one of the Yakima Same Key System (SKS) Lock Cores 4 pack part # Y07204 and either the Round 66" CrossBars for Yakima Roof Rack System (QTY 2) part # Y00410 or the Round 78" CrossBars...
view full answer... - Yakima Roof Rack that Fits Leer Truck Topper TracksWe have the Yakima roof rack components needed to install in the tracks on top of your Leer 100XR camper shell. To complete your roof rack setup you will need: quantity 2 of the Landing Pad 1 # Y00221 quantity 4 of the Control Towers # Y8890027 and depending on the length of your cap quantity 2 Crossbars like: 48 inch # Y00408 58 inch # Y00409 66 inch # Y00410 78 inch # Y00411 To lock your roof rack to your tracks, I recommend the set of 4 lock cores with keys # Y07204.
view full answer... - Dimension of Mounting Hole Spacing of Yakima Landing Pad 1 #Y00221I was able to go out to the warehouse and measure the Yakima Landing Pad 1 for you and found that the mounting hole spacing is 3-15/16 inches from center to center. I have linked a picture and the part to this page for your convenience.
view full answer... - Recommended Roof Rack For Roof Top Tent On 2012 GMC Yukon SLEI was able to find in the owner's manual of your 2012 GMC Yukon SLE that the roof weight capacity is 200lbs, which leads me to believe that the roof capacity is not the cause for the amount of options for your vehicle. There are a few different roof styles available on the 2012 GMC Yukon SLE, so I will list my recommendation for each style. If you have the factory installed raised rails the run front to back I recommend the Rhino Rack Roof Rack System that uses 54" Rhino-Rack Vortex Aero...
view full answer... - Landing Pad Recommendation for Yakima Roof Tracks Y01127 for Installing 48 inch Round CrossbarsThe correct landing pad to go with the Tracks part # Y01127 is the Landing Pad 1 part # Y00221. Then for control towers you would need part # Y8890027 for individual towers, and then for 48 inch crossbars part # Y8810021.
view full answer... - Parts Needed to Use Yakima RoundBar Crossbars from 1988 SST Rack on 2010 Jeep WranglerThe RoundBars like the # Y00410 from your 1988 SST rack can be used on your 2010 Jeep Wrangler. Since there are no adapters or clamps that will allow you to use your old SST towers, you will have to replace them with the Yakima 1A Raingutter Towers # Y00101. These will allow you to mount the existing crossbars on the gutters on your Wrangler. Keep in mind, the rain gutters are not structural so the maximum allowable load is skis or snowboards only. If you're looking to carry something...
view full answer... - Yakima Round Bar Complete Roof Rack System With TracksYou can piece together a round bar system that is going to be similar to a Yakima roof rack with round bars and a track system. What you will need are the following parts: - Yakima 54" Tracks for Roof Racks # Y01127 - Yakima Control Tower # Y8890027 (Quantity of 4) - Landing Pad 1 for Yakima Control Towers # Y00221 (Quantity of 2) - Round 58" CrossBars for Yakima Roof Rack System # Y00409 OR Round 66" CrossBars for Yakima Roof Rack System # Y00410 This will give you a track-based roof...
view full answer... - Recommendation for Roof Rack 2014 Honda Odyssey with Naked RoofA 2014 Honda Odyssey with a naked roof is a rarity. The vast majority of those vans came with factory installed rails. Although there isn't a custom fit rack available, we can still get a roof rack on your Odyssey. I recommend going with the Yakima 54 Inch Tracks, # Y01127, or the 60 Inch Tracks, # Y01135 for your Odyssey. You will want to measure the roof of your Odyssey to see which size will work best for you. This track permanently mounts to your vehicle with PlusNut hardware. There...
view full answer... - Parts Needed to Add Yakima Rack to Thule Tracks on Leer CamperYep, you can put a Yakima roof rack in the Thule tracks on your Leep truck cap. I'll go ahead and list out the parts you need: - (Order a quantity of 2 of these) Landing Pad 1 for Yakima SkyLine and Control Towers # Y00221 - SkyLine Towers for Yakima Crossbars # Y53TR - 50" Long Yakima JetStream Crossbars # Y00425 OR - 60" Long Yakima JetStream Crossbars # Y00426 OR - 70" Long Yakima JetStream Crossbars # Y00427 You'll want to measure the width of your tracks and get ones that extend...
view full answer... - Is a Dutchmen Coleman Rubicon Setup for Crossbars from the FactoryI do have options for you but I don't have any information that the Dutchmen Coleman Rubicon comes equipped with a factory rack. That said, it would be pretty easy to add one using a kit like the Yakima Aero Bar Roof Rack for Camper Shells part # Y67CV. This kit installs via tracks which get bolted to the roof and then provides you with adjustable crossbars to secure your gear.
view full answer... - Can I Put a Tent on Top of My 1995 Jeep YJ with a Hardtop?While we do have roof rack systems that will fit your jeep, the issue is that your roof has a maximum weight capacity of 100 lbs. Even if you got the roof rack system with parts # Y00426, # Y01126, # Y53TR, # Y00221, you wouldn't have enough weight capacity for a tent. For example, the Yakima Sky Rise Tent # Y07436 weighs 101 lbs on its own and requires a roof weight capacity of at least 165 lbs. Your options from here is to either try to find an exo-style system to increase your roof...
view full answer... - Best Roof Rack System for 2001 Ford E350 VanThe gutter mounts we have are actually really sturdy if you get the right ones and install them right. Technically, you should have more weight capacity off the gutter mounts since the weight is distributed vertically through the gutters vs racks bolted onto your fiberglass roof. A good system for your 2001 Ford E350 Van is the Rhino Rack system with Square Crossbars # RB1800B-2 and Gutter Feet # RL150S10. You can switch the square crossbars for aero ones with 71" Vortex Aero Crossbars...
view full answer... - Parts Needed to Mount Yakima SkyBox Cargo Box to Top of Artic Fox Truck CamperThe Yakima SkyBox 18 Cargo Box, # Y07336, is designed to be mounted on a roof rack system. In order to mount the cargo box on the top of your Artic Fox camper, you will need to install a roof track system like the Yakima which would consist of the following: Yakima 42 Inch Tracks, # Y01126, Control Towers, # Y8890027, and Landing Pad, # Y00221, Qty 2 and Round 58" CrossBars, # Y00409. I have included a video of the track system being installed on a Ford F-250 just to give you an idea of...
view full answer... - Roof Rack for Leer Cap With Factory Tracks on 2015 Ram 1500You can absolutely get a roof rack for the factory tracks of the Leer cap on your 2015 Ram 1500. I have spoken about this exact issue with Yakima and they have told me the exact parts you need for a roof rack on your truck cap, which is the following: - Landing Pad 1 for Yakima Control Towers # Y00221 (Quantity of 2) - SkyLine Towers for Yakima Crossbars # Y53TR Crossbars (the correct length will depend on how wide the tracks are on your Leer cap, so just be sure to measure and then choose...
view full answer... - What Size Yakima Jetstream Crossbars Are Needed For RetraxPRO XR Tonneau On 2019 Toyota Tacoma? Retrax recommends using the 60" Yakima JetStream Crossbars # Y00426 with their RetraxPRO XR Hard Tonneau Cover # RTT-80852. You will need the Skyline Towers # Y53TR and 2 of the Landing Pad 1 Kits # Y00221. Since the Yakima Jetstream crossbars do have a full length bottom channel you could mount the 70" Bars # Y00427 but do know the bars will stick out past your cab.
view full answer... - Replacement Base for Yakima Skyline Towers on Camper ShellIt sounds like you already have the crossbars and feet and just need the bases. If that is the case, then you just need two of the Landing Pad 1 for Yakima Control Towers - Qty 2 # Y00221 which is a fit for the rails. If that isn't the case, then the Yakima JetStream Truck Bed Rack for Tonneau Covers - Aluminum - 70" Long # Y00427-482104 will work to give you the complete kit for your rails.
view full answer... - How To Use Yakima Round Crossbars With Tracks On Bed RailsIn order to use round crossbars on top of the bed rails you'll have to start with the tracks; then you can add the feet, landing pads, and crossbars. The feet are only offered in one height unfortunately but nonetheless I will attach a list of all the parts you'll need below. There isn't an all inclusive kit. Yakima Roof Track part # Y01127 Landing Pads part # Y00221 (2) Mounting Foot part # Y8890027 (4) Round Crossbars part # Y00411 (Cut To Fit)
view full answer... - Roof Rack for Camper Shell and Roof of 2020 Chevy Silverado 1500You can then use the Yakima roof rack with landing pad 1 part # Y00221, two of the control towers # Y8890027, and the single crossbar # Y8810025. Then for a single bar rack for the roof of your 2020 Chevy Silverado 1500 you'd want the part # RRVA150B, # RRRLKVAH, and # DK427H and you'd be set.
view full answer... - Roof Rack Recommendation for 2022 Mercedes Benz Sprinter 2500 High RoofYes we have the Yakima HD roof rack that fits your 2022 Mercedes-Benz Sprinter 2500 with part numbers # Y01158, # Y00148, # Y03541, and # Y00221. What's great about this rack is that it has a much higher weight capacity, is still aerodynamic shaped, and also has a lifetime warranty.
view full answer...
Do you have a question about this Roof Rack?
Info for this part was:

Edited by:
Daron K

Written by:
Alex H
At etrailer.com we provide the best information available about the products we sell. We take the quality of our information seriously so that you can get the right part the first time. Let us know if anything is missing or if you have any questions.
Product Experts Available Now!
Call 1-800-940-8924
Thank you! Your comment has been submitted successfully. You should be able to view your question/comment here within a few days.
Error submitting comment. Please try again momentarily.