


 Arrives before Christmas
 To see if this custom-fit item will work for you please tell us what vehicle you'll use it with.

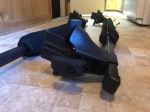
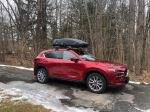
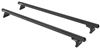
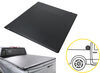
This Thule roof rack lets you carry cargo and gear on your vehicle. Aerodynamic crossbars with split rubber strips in top channels work with channel-mount and clamp-on accessories. Installs on your vehicle's naked roof.
Features:
Specs:
 Alternate Instructions
California residents: click here
Videos are provided as a guide only. Refer to manufacturer installation instructions and specs for complete information.
Hello neighbor, this is Curt with Etrailer. Today we're gonna be taking a look at the Thule Wingbar Evo roof rack and we're gonna see how it fits and how it installs on our 2024 Chevy Colorado. So it may be strange to some to have a roof rack on your truck when you've got all this storage space to carry things in. Well, the Chevy Colorado only has about a five foot bed, so there are gonna be a few things that probably aren't gonna fit in here all that well, such as a kayak or, you know, even some bikes or things like that. A roof rack could be a great place to store those longer items or those bulkier items. So things like roof baskets, roof boxes, bike carriers, kayak carriers, snowboard and ski carriers, all are things that could go on the roof rack on the cab of your Colorado.
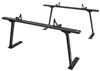
And you might be in a situation where your truck bed is just constantly full of stuff. You know, maybe you do a lot of landscape work, things like that. There might be some things that you keep in your truck bed that you really don't want mixing with the stuff that you intend to put on the roof. Maybe it's just a mess back here, you've got a lot of gravel, a lot of mulch, a lot of dirty things, and things like that, you just don't want mixing kind of back and forth. The other reason why you may want to put a roof rack on your truck would be that you have a ladder rack as well and you just want that extra support for those longer items that may extend out over your cab.
So the Thule Wingbar Evo is an overhanging roof rack. And this is something that I actually personally like on trucks myself. I like to have as much usable bars space as I can. This offers 50 inch bars that you can use with your clamp mounted accessories or if you open up your end cap here, you'll have a split T track that you could put your T mounted accessories in as well. So it is over hanging just a little bit.
If your clamp is small enough, you could put a clamp around here and a clamp around here. Also, one of the concerns some people have about overhanging roof racks are that, you know, head clearance, you're worried about hitting your head getting in and out. Truth is, the end of this bar actually doesn't even really come out past the door threshold, so you shouldn't have any issues there. Now the Thule Wingbar Evo has a weight capacity of 165 pounds. However, you always wanna double check your owner's manual and see what the vehicle's rooftop capacity is.
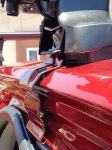
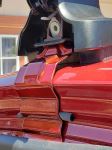
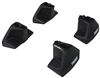
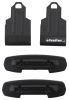
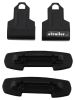
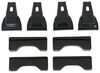
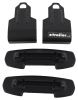
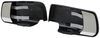
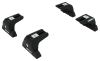
Whatever number is lower, that's gonna be your weight capacity. So let's talk a little bit about how it fits on the roof of our Colorado. Now it already mentioned that we've got a total of 50 inches of bar space at our disposal. We also wanna double check our crossbar spread. Now the crossbar spread is important because all rooftop accessories have a minimum and a maximum crossbar spread that they're going to be able to work with. So you really wanna make sure that you know that. And I'm gonna do that measurement from the middle of one of our T tracks to the middle of the next one. And what we're looking at is about 27 and a half inches. And I'm pretty happy with that. The minimum/maximum of a lot of rooftop accessories end up between 25 and 35 inches. So 27 and a half tells me that there's gonna be a lot of rooftop accessories that are gonna be compatible with this setup. The other thing I'm gonna take a look at is how much height does this add to the vehicle And as we look here, it's gonna give us about, I would say, four and three eighths more inches added to the top of the vehicle. So if you're worried about roof clearance, if you know your vehicle height and you know your accessory height, add that four and three eighths to it and you'll have your general overall height. We'll also take a look at how much room we have underneath the bar and that's gonna give us right at three inches, which is more than enough room for those clamp mount accessories to be fit around and adjusted. Now as far as where the bars are placed up here on our roof, this is a clamp mounted system, there are no rails on the roof to put it on, but if you follow your installation instructions, these have to be placed very specifically in order for them to fit correctly and be even up here and carry your load safely. So follow along, we'll show you exactly how we got these on the roof of our Colorado. So to start our installation, first and foremost, we already have our front bar installed so we will be walking through the second bar. They're gonna install exactly the same, however, there is one thing that you definitely want to pay attention to and that is going to be these rubber foot pads that you got in your fit kit. Each of these pads are stamped with a number. This one says 547. And according to the instructions, this is going to be on the second bar on the passenger side. And that's the tower that I'll be showing us how to assemble. 546 is the back bar on the driver's side and that's indicated right here. Other than that, assembly of the towers, and you know how they go on the roof, is really essentially the same. So we're gonna start by putting that rubber foot pad onto our tower and that is, you can see, is gonna fit right onto this space here. You do want to compress it and make sure that it's on there snugly. And the reason that you want to get these numbers correct is because where they're placed on the roof, there is a curve and basically it kind of contours to that area of the roof. So you can end up with a really kinda wonky looking roof rack if you don't pay attention to where those pads go. Once I do that, the other thing I'm gonna do to prep my tower is use the included tool from Thule. I'm gonna go through this bolt right here and I'm gonna go ahead and loosen this all the way. And it looks like we've got it all the way loosen now. The reason for that is I want this area here to have as much reach as I can for when I put my clamp on because it has to reach all the way down around the door. So you want this to have as much outward angle as you could possibly get. So the next thing we're gonna do is turn our crossbar over on the back. And what you're gonna find back here is the sliding scale and the tab for your end cap. We're gonna depress that and remove our end cap. Then we're gonna take our tower. And with the bolt end facing outward, what I'm gonna do is I'm gonna compress in like this. And what that does is it lifts this here on this T slot that's gonna slide right in here. So I'm gonna compress that and slide it on over. Now when I don't have it compressed, it grabs on, it doesn't really move. So as I'm moving it, I'm gonna have to depress that in to do so. Now in your instructions, you're also gonna find a measurement for how far apart your towers need to be. And you can measure that using this sliding scale. So what it indicates is that we want to go for 40. So the line that is above the number is the one that I'm looking for, and I'm gonna line up 40. There it is right there. So I'm gonna just compress this, I'm gonna slide it over until it stops at the end of my scale, let it go, and it's in place. That was the passenger side, I'm gonna do the same thing out here on the driver's side. Now before we get our second crossbar, let's talk a little bit about bar placement up on the roof. In your instructions, you're gonna see these measurements. So what they ask for is from the top of our windshield glass to the front of this first tower to be 11 and a quarter inches. We measured that on both the driver and the passenger side to make sure that our bar is perpendicular with the vehicle roof. And the second crossbar location is determined by our first crossbar, which is why we had to install this first. And for that measurement we're gonna measure from the front of this crossbar, 27 and a half inches, to where the front of the next crossbar would be. So I'm looking to place my second crossbar right around this area right here. So as I place this up here, you'll notice that there's kind of a ridge or a lip right here on the inside of that rubber pad. And I want that to be fitting right along the inside of this rail up here. So I'm gonna put it in its kind of general area. We could always remeasure before clamping it down and kind of alter the placement a little bit and adjust it as needed. But we should be right in this neighborhood right here. Alright, so at this point we wanna double check our measurement, 27 and a half inches. And we got really, really close. We're just gonna bump this up a little bit. And again, we're gonna double check that measurement on the driver's side. That way we can make sure our crossbars are perpendicular with the roof and parallel to each other. All right, so for the next step, since we've got it in place, we're gonna go ahead and take this seal going around our door. We're just gonna gently pull down on it a little bit until we expose this piece of frame. And that's because our clamps have this little J hook on it that needs to go up and under that in order to grab onto the roof. But before we put that on, you're going to get four of these little, kind of, rubber tube strips here. This is gonna go on this area here. That's that first ridge that's above our seal. It's basically just gonna, kind of, create a little buffer there so that when we put our clamp on, it doesn't pinch in that area or scratch it up or anything like that. So it's there to protect the vehicle. Now it has an adhesive backing. We're not doing a permanent install today, we're just doing a test fit, so we used a little bit of painter's tape just to put it up and keep it in place. But if you're installing this permanently, just remove the adhesive backing and stick it on right here. And once that's in place, we're gonna go ahead and grab our clamp. And remember we loosen our tower up all the way so we can get more of this angle here. And I'm just gonna go ahead and get that all the way up into place. What you'll hear is this kind of pop and that's gonna indicate that the clamp is in place. So with that in place, we're just gonna pull down here and we're gonna get it to where it's up and under that lip. Now at this point, what I'm gonna do is I'm gonna push up on it to where it's grabbing. I'm gonna take the included Thule tool and through this bolt here, I'm just going to get it tightened up enough to where it's snug. I don't wanna make it super tight 'cause I don't want my driver's side placement to come out of where it's at. I just want to get this to the point where it grabs. Because we left it so loose, if we don't, it could pop outta place really easy. So I just want to get it to where it's set in here and isn't loose enough for it to kind of fall out on its own. So when your hook is set and snug on both sides, both the passenger and the driver's side, go ahead and take that Thule tool again and now it's time to get things really tightened down. And as you're doing this, I like to go kind of back and forth a little bit, tighten down a bit on each side. One of the things you may notice is that as you tighten down your side to side, you might have a gap here between the rooftop and your rubber foot pad there. But as you notice, as I tighten it, that actually gets more drawn together. And I'm gonna keep doing this until I hear a loud click out of the tool. Just like that. That's because this is a torquing tool. Three Newton meters matches up with that. This is the included tool with it. So I've got this tightened down to exactly where it needs to be. I'm gonna go ahead and give it a good shake. The vehicle is moving but the crossbar is not, and my tower is not. And I like the way it's seated right here on my roof. So with everything in place now I'm gonna go ahead and put that weather stripping back up. Now because of this being in here, you'll notice there is a little bit of a bulge to it now. Can't really be helped. But again, I'm really, really happy with how secure this is on my roof. And our final step is going to be to place on our tower covers. Now one of the things about the covers, that outta the box, is that they're gonna come with these plastic lock cores. Now these can be open really easy with like a small coin or with a flathead screwdriver like I've got today. But my recommendation would be that you buy separate lock cores and keys from Thule. They're available right here at etrailer.com. You can get a set that are keyed alike for all four of your towers. And if you have other Thule accessories at home, using Thule's one key system, you can get 'em keyed alike to those as well. That way you don't have four or five different Thule keys on your ring trying to figure out what goes to what, everything could be keyed alike. But we're gonna go ahead and just slip these two tabs in up here. It'll go right into place. And I'm gonna lock it on using our flathead screwdriver. And that does it. So that's a look at the Thule Wingbar Evo on our 2024 Chevy Colorado. And if after watching this video you decide that this is the roof rack for you and you get it, install it, have the opportunity to use it a little bit, please share with us what you think about it in the comments below. Sharing your experience with us and other neighbors just like you can help them make the best decision for themselves. Once again, this is Curt with Etrailer. Thanks for stopping by.


Do you have a question about this Roof Rack?
Info for this part was:
At etrailer.com we provide the best information available about the products we sell. We take the quality of our information seriously so that you can get the right part the first time. Let us know if anything is missing or if you have any questions.


Thank you! Your comment has been submitted successfully. You should be able to view your question/comment here within a few days.
Error submitting comment. Please try again momentarily.