
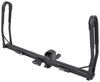
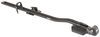
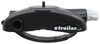
Thule WingBar Edge Roof Rack for Flush Rails - Aluminum - Black - Qty 2


To see if this custom-fit item will work for you please tell us what vehicle you'll use it with.


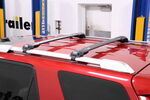
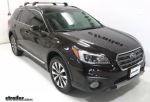
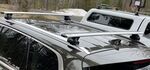
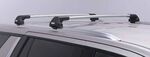
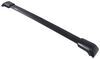
This aerodynamic Thule roof rack mounts flush on your roof for a sleek, factory look. Crossbars with split rubber strips in top channels work with channel-mount and clamp-on accessories. Installs to flush rails on your vehicle's roof.
Features:
Specs:
 Alternate Instructions
California residents: click here
Videos are provided as a guide only. Refer to manufacturer installation instructions and specs for complete information.
Hello neighbor, this is Curt with etrailer, and today we're gonna be taking a look at the Thule WingBar Edge roof rack system for our 2023 Jeep Grand Cherokee L. Now, if you have any experience with this roof rack system, please leave a comment below and share it with us. We do like to use your experiences to help other neighbors find the perfect item for them, so we would appreciate it if you left a comment below. Now, before we get into too many details about this rack, let's go ahead and take a look at exactly how much space this is gonna take up. It is a fixed mount system, so we're not gonna be able to adjust our crossbar spread, but the way we have it right here, if we're going from the center of one T-track to the center of the other, we're right at 27 and a half inches, and that's a good spread. Generally speaking, most rooftop accessories require 24 to 30 inches, so being within that range is gonna allow for most accessories to go up here with this particular crossbar spread.
We also want to take a look at how much height this is adding to the vehicle for any kind of clearance issues, and we're gonna take a look at how much space we have between the roof and the bottom of the bar just in case you have a working sunroof or moonroof, and you want to see if that's something you could still use while these are up here. So as we take that measurement, these bars are going to add about five inches of height to the vehicle if you're worried about clearance issues and underneath the bar, we're looking at probably three and a half, maybe three and three quarter inches of space that you have for that working sunroof or moonroof. Now this Jeep Grand Cherokee L has a flush mounted rail here, and this is also flush crossbars, which means that they're not gonna overhang beyond the towers themselves. Now while that does create a lot more aesthetically pleasing of a look, a little bit cleaner, more factory look, it can provide issues with accessibility because everything is gonna have to be mounted more to the center of the vehicle. The other thing I wanted to point out too is that these rubber pieces that fit over the rails, they're intended to fit several different rails on several different makes and models of vehicles, so they're not always gonna be a perfect fit.
The fit that we got out of these on the Jeep Grand Cherokee L, they're not quite flush. There is some spacing, however, they really can't be fitted any more than that. We've got everything up here about as tight as it could be. Now I'm gonna go ahead and get up here and kind of show you what I meant by some of those accessibility issues that you may run into with a flush system. As I come up here, this actually has a pretty low step in the door, and while I am able to get up here and get to most things, I cannot reach all the way across.
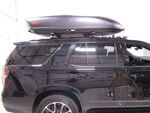
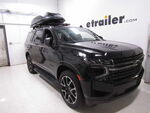
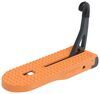
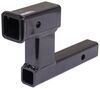
So if I do have a roof box or anything like that, it's gonna be really hard for me to reach back here, up here all the way across. In the case of that, I have another item I'd like to recommend for you. This is called a Moki doorstep. Very, very simple tool, and what it's going to do is open up, we're gonna latch it inside of this door hook right here, and that's gonna create a 400 pound capacity platform for us to get a little higher up. So as I step up on this, now all of a sudden the rooftop is about waist high.
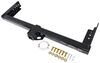
I'm able to get to anything I need to. This is also gonna help out too when we're mounting our rooftop accessories. It could be a little difficult to reach some of the clamps all the way on this other side if you have a rooftop box that only opens from one side to secure it to the rails. So the Thule WingBar Edge system that we have up here has a 165 pound capacity. Now, despite that capacity, we still want to check our owner's manual and make sure that our roof capacity at least meets or exceeds that. If it doesn't, say the roof has, for example, 140 pounds, then 140 pounds would be our capacity despite what the bar capacity would be. With that being said, if you're somebody that really likes the factory look, a cleaner look up on the roof, maybe you're someone that doesn't use rooftop accessories all that often. I do think that a system like this where the bars come flush is a good system for you to have. However, if utility more than aesthetics is where your heart is, I would probably on this vehicle recommend a set with some overhang or a rooftop basket that's just gonna make accessibility to this taller vehicle that much easier for you. Now before we install our second bar, let's take a look at the components involved. The first set of components here is going to be our custom mounting kit. There are some pieces that come with this kit that are gonna be installed in our towers, and this is our 34 inch WingBar. So bar, towers, mounting kit are really the three main things that we're gonna be taking a look at as we put it up there. We've already got one of the bars installed. This is gonna install the exact same way. So let's take a look at how we get that done. Thule makes that pretty easy for us by labeling their parts kind of in order of how they go in. So you'll see part A, part B and part C stamped right there. So we're gonna start by taking part A and putting that through right just like that. Once that's done, we're taking part B. You'll see how these notches are lining up under here, and we're gonna go ahead and get that attached as well. We will get it down there nice and flush. Then we're going to take part C. That is gonna go over this little lip right here. We're gonna put the bolt through the hole there, and then we're gonna take this little piece here. Now, one end of this piece is threaded for a bolt. The other end is marked for your special Thule tool that's gonna come with your towers. This is a torquing tool, so it'll let you know that you have everything tightened down the way we need it. So we'll take the bolt threaded end and we're gonna go ahead and loosely just get that caught. We want this to have some room because this is how we're going to be attaching and wrapping around our tower. So now that we've got that all done, we're gonna go ahead up there and get our custom mounting plate mounted. We've got three different sets of bolt holes up here on top of the Grand Cherokee L. Since we're doing crossbars today, we're gonna want to use the front two sets of holes. You really only want to use these back ones when you're mounting a large roof basket or platform rack. That's where these would come into play. We don't want to have that much of a crossbar spread. There really won't be any accessories that'll take a spread like that if you use the front and the back hole. So now that we've got that all established, let's go ahead and line our plate up and get these bolts threaded. Now that we got the bolts started, I've got 'em tightened down most of the way. I did leave them a little bit loose because on these mounting plates, the bolt holes are slotted, which does make it really easy to find the the bolt hole and get it to catch and going in, but it couldn't run into some problems if it's inconsistent with what we did on the other side. Being the front bars, I'm gonna go ahead and get this to where it slides all the way forward. I've done the same thing on the driver's side and I'm gonna tighten 'em down at this point really because I want to kind of help maximize the crossbar spread a little bit. On the back bar we went ahead and mounted them so they we inchesre slid all the way back. While it probably doesn't really add much more than a half inch of bar space, it's still a little bit more and it could make it a little more compatible with some of the rooftop accessories that you come across. So now that we've got it slid forward, we're gonna go ahead and completely tighten it down. So now we're gonna take a look at getting our WingBar mounted to our edge towers. Let's talk a little bit about the bar itself while we have it here. It is an aero shaped bar, meaning it's got kind of this aerodynamic, almost ovular shape to it that's really gonna cut down on wind resistance and give a lot less road noise than a circular or a square bar would. Now this is a track mount, so while you can use clamp on accessories, this also gives you the ability to use a T slotted track mount system. You could see right in here where that would work. We can peel this back some so you can get a better view, and that right there is the T slot for your track mount. Now that we've got all that kind of established about the bars, let's take a look at getting these towers attached. Now this can be a little bit tricky. You'll see on the tower there's this tab right here, and what we're gonna need to do is get that pushed down as we slide in, and we're looking for that to end up in this notch right here. So let's go ahead and get that in there and we'll repeat that same process on the other side. So now that we've got both the driver and the passenger side in with the tab in place, we can go ahead and depress our rubber track right back down into its spot. It is important to make sure that we have this fully put in and mounted and flush. This rubber strip not only kind of protects your T slot from any debris or anything getting into it, it also helps a lot with vibration and road noise. So just one more feature on it that's really gonna give you a quieter ride than the round bar or square bar systems would. Now that we have all that in place, let's go ahead and get it on the roof and get it measured for width. Now just before we go up there, I do wanna show this feature here. Thule makes it pretty easy to make sure that we measure our bars on either side to make them even. So you can use these gauges here with these letters to measure out what line you're at and do the same on the other side when you get, say both of 'em, just for example to say G or H or I, we'll be able to even it out and clamp it down so that you have a perfect crossbar spread. So now that we've got it up here and we've got the bar even, we're gonna go ahead and clamp it onto our custom mounting kit here. So we left this loose on purpose if you'll remember when we assembled our towers, that's because this is the piece here that's gonna end up clamping to it. Now, underneath the rubber part that we added on, this cavity right here is really gonna fit very snugly and perfectly around here. So we're gonna go ahead and drop that down, push it all the way down into place so it's a good snug fit. Then we're gonna take our Thule torquing tool and we're gonna completely tighten this whole assembly up until we hear that loud click, audible click. That'll let us know that we've got it torqued to spec. So you can see as I'm tightening this, this part here is getting more and more snug around the mounting kit. It's gonna take quite a few turns here because we left it as loose as possible and we're gonna hear a nice loud pop when we've got it torqued enough. There it goes, the side's end solid. Now we can get our face plates to cover the towers and we will go from there. Now, nobody wants to go down the road with everything looking like this, so we're gonna go ahead and mount the face plate back onto our towers, and we'll do that very simply by getting it right here and sliding it into place. Now, once we have that done, we'll be able to take our flathead and turn this lock core here to lock that down. Now, honestly, from a security measure, only needing a flathead to get these removed, that leaves a lot to be desired. However, Thule has a one key system where you can purchase lock cores with keys to match not just for all four of your towers, but you could also get keys to match any Thule accessories you get up there. So it really makes everything easy for you and difficult for those thieves. But now that we've got that in place, we're gonna go ahead and lock it down. Now that we've got everything up here and secure, we're ready to put on our rooftop accessory and hit the road. Now, one more thing I want to add about this crossbar system is that when you need to remove the bars for any reason, perhaps you're going somewhere with clearance issues, perhaps you wanna run it through an automatic car wash. One thing that I didn't like as much about it is that when you do take off the bars and towers, those custom mounting brackets remain on top of the vehicle. They're really not all that pleasing to the eye, and they can of course be removed and put back on. That just creates more work for you. But overall, I think this would be a great, great roof rack system for a 2023 Jeep Grand Cherokee L owner for all of those great aesthetic reasons that you can use it for, and I think you could have some great adventures with this in your Jeep Grand Cherokee L. So once again, this is Curt at etrailer. Thanks for stopping by.
Ratings & Reviews


Info for this part was:
At etrailer we provide the best information available about the products we sell. We take the quality of our information seriously so that you can get the right part the first time.


Thank you! Your comment has been submitted successfully. You should be able to view your question/comment here within a few days.
Error submitting comment. Please try again momentarily.