
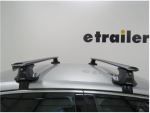
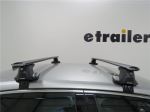
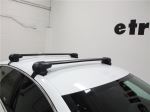
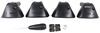
Inno Aero Roof Rack for Naked Roofs - Aluminum - Black - Qty 2


To see if this custom-fit item will work for you please tell us what vehicle you'll use it with.


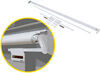
This sleek, aerodynamic roof rack provides space to carry gear on your vehicle. Crossbars with push-down rubber strips in top channels work with channel-mount and clamp-on accessories. Installs on your vehicle's naked roof.
Features:
Specs:
 Alternate Instructions
Videos are provided as a guide only. Refer to manufacturer installation instructions and specs for complete information.
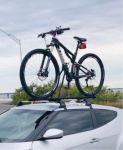
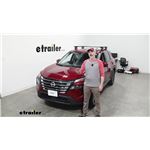
Hello neighbor, this is Curt with etrailer and today we're gonna take a look at the Inno Aero Roof Rack on our 2025 Nissan Rogue. Now, if you've had any experience with this roof rack or if you have questions about it, go ahead and leave those in the comments below. We love to take those and share them with our other neighbors in order to help them make the best decisions for themselves. Now, if you're in a situation where you have to travel somewhere and maybe you've got a full car, all four or five passengers in there, you're probably gonna need some extra space for cargo and that's where a roof rack is gonna come in very handy for you. A roof rack can hold things such as bike racks, cargo boxes, kayak carriers, you know, really anything that you need that won't fit in the vehicle or maybe it's something that you just don't want to ride with in the vehicle. I think roof racks are a good option compared to, say, a hitch accessory, like a basket or cargo box, only because it's still, it's more up and outta the way than having an extra few feet hanging off the bumper.
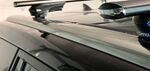
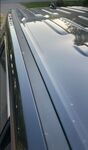
So Inno's Aero Roof Rack is an aero-style bar, which means it's got an ovular shape with a blade in the back. That's really gonna cut down on wind resistance. It's gonna reduce noise and improve gas mileage for you. It can be mounted by clamp accessories or using the rubber weatherstrip up top. It can be depressed to accept T-slot accessories.
But while we're up here, I just wanna take a few measurements and see how this kind of interacts with the Rogue. One of the things that I do want to note is that your crossbar placement is going to be predetermined. So it's not gonna be a situation where you can move these bars kinda wherever you want. So this should be consistent with your setup, as well. But as it's set up, we're gonna have a center-to-center crossbar spread of 27 and 3/4 inches.
Now, that's a really good spread. 26 inches to 32 inches is really where most rooftop accessories require you to be in. So this should be able to accommodate almost anything that you'd wanna put up here. Another important thing to take a look at is to see just how much height this is gonna add to the vehicle. And to the top of the bar, we're looking at 4 and 3/4 inches.
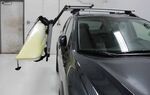
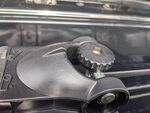
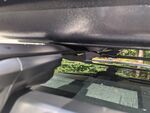
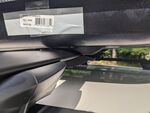
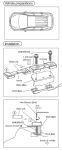
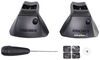
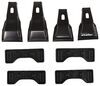
So just bear that in mind. This isn't a very tall vehicle, but if you do happen to go somewhere that has, you know, kind of a lower hanging area to it, you just wanna be conscious that you got almost five extra inches coming up. Another one is we're gonna check the clearance underneath the bar to the vehicle roof, which is going to be at about 3 and 1/4 to 3 and 1/2 inches, basically, that's plenty of room under here for really almost any clamp accessory to fit around and grab onto. Now, Inno does make a fantastic set of crossbars and they're really, really good value. And one of the things that I think makes them stand out more than other crossbar manufacturers is the fact that you do get lockable covers. So you are gonna get a set of keys, all four of your towers will be keyed alike and that's really nice 'cause most crossbars, you actually have to purchase lockable cores from the company to supplement a plastic one that would come with. So the fact that this comes with lockable towers is a huge bonus for the Inno crossbars. But now let's take the clock back just a little bit. We're gonna show you exactly how we got these mounted on our roof. Now, as we begin our installation, we've kinda laid out everything that we need here. As you can see, we've already got our rear bar installed. We're gonna go ahead and get our front bar installed. We have put together one of the towers, however, installation of that is the exact same on all four of them. So I'll show you how we did that right here. So the first thing that we're gonna need to do is remove our end cap, then we're gonna take this tray, we're gonna slide it all the way out, just like that. This piece here is what we're gonna be putting in that's gonna allow us to bolt down our towers onto the bar. So we're gonna put that in just like so. We'll pop in just from the underneath, kind of just like this. And then we're gonna slide that all the way back, depress this tab and get it all in this more open square area. Now, as we grab our tower, we'll see that these slots are all gonna line up. Our T-slot is gonna line up here, this little tab right there, and the bolt is gonna go right in there. So what we're gonna do right now is just kind of get that in there in place and we're going to just work it and slide it on back. Now, because it's a naked roof that we're working with today, we are going to have to predetermine how far apart the towers are on our crossbar. Luckily, they are gonna provide us with a measurement for that. There is a mark right here at the center of the bar and the measurement that it gives us, we're gonna be measuring to this line right here. So the measurement that Inno gave us for the front bar is 20 and 3/4. So we're gonna go ahead and get that measured out. Quite a bit more to go here. And we're just gonna work on it until we get to that 20 and 3/4 inches. So now we've got ourselves measured out 20 and 3/4 to the mark on each tower. At this point, we can go ahead and tighten our towers down so that they're not gonna slide back and forth on us. We're gonna use the provided Allen key for that. Right through this hole here, there is a bolthead and we're just going to tighten that down until it's good and snug. The next thing we're gonna put on is our rubber foot pad. Now, this should be pretty easy to determine how it goes on. It does leave indentations for all the different screw heads on here, along with these, so it's pretty easy to orientate, but from underneath, you wanna make sure that the thinner part of this kinda ledge right here is facing the outside. And once you get in that position, you're just gonna depress it on until it pops on everywhere and is on there nice and snug. All right, now we're ready to go ahead and put this up on our roof and see how it looks. Now, as we've got it up on the roof here, I do wanna mention that you'll probably notice in your kit, you have two different length bars, one at 49 inches one at 52 inches. The 52-inch bar will be the one going toward the front. And as far as placement goes, there are specific areas that we need to place these here. Now, the way that Inno measures it is from the door seam. So they want the front bolt, or the front, the bolt of the front bar to be in the center of two inches from the door seam here. So we've got that measured out. For the back bar, from the door seam, that center bolt should be at 25 and 1/4 inches. So once you have those in the right areas, you'll be good to go. You should see that it is seated nicely. That little ledge that we have in the rubber foot pad should seat really nicely up against the vehicle here. And Inno also provides a a padded sticker kind of tape that you could put on here to really protect your door from scratches with the clamps, however, because this is not a permanent install that we're doing today, we're supplementing painter tape for that. So in order to get our clamps on, what we're first going to do is just remove this bolt. We can do this by hand. And we are gonna take our clamp, there are two different lengths of clamp, as well, because there's more of the vehicle body to cover, the longer clamps will go on your rear bar, the shorter on the front. We're just gonna slide that right up in there, hook it around our inside of our door frame there, and then we're just going to rethread that bolt in by hand and get it tightened down. And what we're going to do next is kind of tighten these down incrementally, both here on the driver and on the passenger side. I don't want to torque this all the way down on one side 'cause I don't want to risk, you know, the clamp tightening and then kind of popping everything out of place. So we're just gonna go a little bit on each side until we get to the point where we can completely torque it down. And the final step is gonna be to make sure these all torque down. The provided Inno tool is a torquing tool. So you're gonna hear a loud pop like that when you know you've got it tight enough. So once that's complete on all four towers, we'll be ready to put on our tower covers. Putting on our tower covers is really easy. There's gonna be these hooks right here that we're just gonna simply latch in, move it up into place, and then lock it on with the provided keys. Once we get this done here, we're on, everything's tightened down. We're ready to load up and hit the road. So there you have it. I think the Inno Aero Roof Rack is an excellent choice for you and your 2025 Nissan Rogue. Once again, I'm Curt with etrailer, thanks for stopping by.


Do you have a question about this Roof Rack?
Info for this part was:
At etrailer we provide the best information available about the products we sell. We take the quality of our information seriously so that you can get the right part the first time. Let us know if anything is missing or if you have any questions.


Thank you! Your comment has been submitted successfully. You should be able to view your question/comment here within a few days.
Error submitting comment. Please try again momentarily.