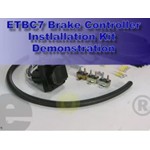
Brake Controller Install on Class C Motorhome on a 2014 Ford E450 Van Cutaway Chassis
Updated 07/14/2014 | Published 07/11/2014
Products Featured in This Question
Question:
We have a 2012 Fourwinds 28Z class C motor home on a Ford E-450 Chassis. I need to install a brake controller. I understand there is a connector at the top center of the console where the connector is located in the cab. I have a 4 pin connector on the hitch. I am confused about what wiring I need to do to add a Tekonsha controller. I thought there was a video of a fairly simple install but when I went to look I could not find a new motor home install. What do I need to make this happen? Are there any additional instructions available? Thanks
asked by: Mark
Expert Reply:
The brake controller connector should be located behind the dash as shown in the accompanying photos. The Tekonsha Prodigy P2, part # 90885 would be an excellent choice of brake controller. The P2 is extremely easy to set up and to use, which is why it's one of our most popular brake controllers. You'll also need the # 3034-P brake controller adapter.
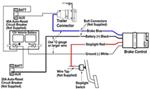
Usually, a Ford Van that's equipped with the 4-pole trailer connector won't have the brake controller output circuit ran to the rear of the vehicle, but the cutaway chassis models are sometimes equipped differently. Follow the wiring harness for the trailer connector from the rear bumper up to the driver's side frame rail, where it plugs into the wiring harness leading to the front of the vehicle. On the side of this junction closest to the front of the vehicle, look for a blue and an orange or red wire (you might need to peel back a bit of the wire loom). If the blue wire is present, it'll be the output circuit for the brake controller. The orange or red wire, if present is the 12 volt accessory circuit.
You'll need an adapter like part # 37185 to convert your existing 4-pole into a 7-way. The adapter would plug into your existing 4-pole, leaving four remaining wires. The blue wire would attach to the blue wire you found on the frame rail. The black wire could connect to the orange or red wire on the frame rail and the white wire would ground to the vehicle frame. The purple wire usually carries the reverse light circuit, but if not needed, the wire can be bundled up out of the way. Once this is installed, you can plug in the controller, and you should be good to go at that point.
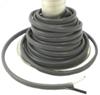
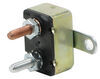
If you don't find the blue and red or orange wire on the frame rail, you'll need to run your own output and 12-volt accessory circuit. You'll need a length of # 10-2-1 cable long enough to reach the vehicle battery from the rear of the vehicle. Connect the black wire from the cable to black wire on the adapter, and the white cable wire to the blue wire on the adapter. Route the cable under the vehicle to the engine compartment, being sure to avoid anything that's sharp, moving or hot. The white wire in the cable would go through the firewall to the brake controller. On the # 3034-P wiring adapter, you'll sever the blue wire, and connect it to the white wire from the cable. The black cable wire connects to the positive battery terminal via a # 9510 40 amp breaker.
I'll link you to an FAQ article that explains the process.


Featured Help Information
Miscellaneous Media


Continue Researching
- Search Results: rubber rv window parts
- Q&A: Recommended Replacement Slide Out Seals For A 2017 Flagstaff Classic Super Lite 8529RLWS
- Shop: DeeMaxx Disc Brake Kit w/ Actuator for Tandem Axle Trailers - 12" Hub/Rotor - 6 on 5-1/2 - 6K
- Q&A: Replacement 18 Foot Power Awning Needed for 2019 Forest River Travel Trailer
- Video: Rubber Outer Window Weather Strip for RVs Review
- Video: Complete Breakdown of the Rubber Window Edge Weather Strip for RVs
- Video: Rubber Wiper Seal with Bulb for RV Slide Out Review
- Shop: DeeMaxx Hydraulic/Mechanical Disc Brake Kit - 12" Hub/Rotor - 6 on 5-1/2 - 6,000 lbs
- Shop: DeeMaxx Hydraulic/Mechanical Disc Brake Caliper - Maxx Coating - 3,500 lbs to 6,000 lbs
- Video: Tips on RV Awning Care: Opening, Cleaning, and Replacing Your Awning
- Shop: Brake Controller
- Shop: Towing Mirrors
- Shop: Rubber Window Edge Weather Strip for RVs - Press In - 12' Long x 1/2" Tall
- Shop: Rubber Wiper Seal for RV Slide Out - Stick On - 30' Long x 3" Wide
- Shop: Repair Kit for Schwintek In-Wall RV Slide-Out Systems
- Shop: Rubber Wiper Seal for RV Slide Outs - Channel Mounted Press-In - 15' Long
- Q&A: How To Install A Brake Controller On A 2008 Ford E-450
- Video: Review of the Hydraulic Trailer Brake Kit
- Q&A: Brake Controller that Fits 2024 Motorhome on E350 Cutaway Chassis
- Video: DIY Install: Roadmaster Front Anti-Sway Bar on your 2006 Ford F-350, 450, and 550 Cab and Chassis
- Video: Feature Review Dexter Electric Trailer Brake Assembly
- Article: Brake Controller Installation on a Ford Full-Size Van
- Search Results: coupon code
- Search Results: promo code
- Q&A: Recommended Brake Controller for 2024 Ford E-450
- Shop: Trailer Hitch
- Shop: Trailer Wiring
- Search Results: trailer brake controller
- Q&A: Wiring Diagram and Instructions for a Tekonsha Prodigy P3 Brake Controller
- Shop: Windshield Covers

on Accessories and Parts